DROPS Merino Extra Fine
100% Wool
from 4.55 $ /50g
Get the yarn to make this pattern from 40.95$.

The yarn cost is calculated from the pattern’s smallest size and the yarn’s cheapest product type. Looking for an even better price? You might find it on the DROPS Deals!

DROPS SS24

Snuggly Bunny

Knitted bunting bag in seed st with textured pattern and cables in DROPS Merino Extra Fine

DROPS Baby 19-10
DROPS design: Pattern no ME-042-by
--------------------------------------------------------
Size: 1/3 - 6/9 - 12/18 months (2 - 3/4) years
Finished measurements:
Bust: 62-68-76 (80-88) cm / 24⅜"-26¾"-30" (31½"-34⅝")
Full length: 56-66-76 (86-98 ) cm / 22"-26"-30" (33⅞"-38½")

Materials: DROPS MERINO EXTRA FINE from Garnstudio
450-500-550 (650-700) g color no 01, off-white

DROPS CIRCULAR NEEDLE (60 or 80 cm / 24" or 32") size 4 mm/US 6 – or size needed to get 21 sts x 28 rows in stockinette st = 10 x 10 cm / 4" x 4".

DROPS WOODEN BUTTON BURNT, no 511: 10-10-10 (12-12) pcs.

-------------------------------------------------------

Alternative Yarn – See how to change yarns here
Yarn Groups A to F – Use the same pattern and change the yarn here
Yarn usage using an alternative yarn – Use our yarn converter here

-------------------------------------------------------

DROPS Merino Extra Fine
100% Wool
from 4.55 $ /50g
Get the yarn to make this pattern from 40.95$.

The yarn cost is calculated from the pattern’s smallest size and the yarn’s cheapest product type. Looking for an even better price? You might find it on the DROPS Deals!

Pattern instructions

NOTE: This pattern is written in American English. All measurements in charts are in cm. For conversion from inches to cm - click here. There are different terms for crocheting in American and British English. If this pattern includes crochet, click for "crochet terms" here. For this pattern in British English, please click here.
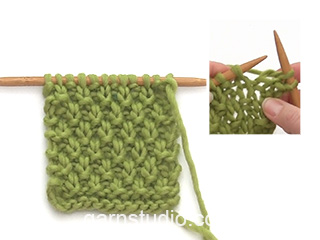
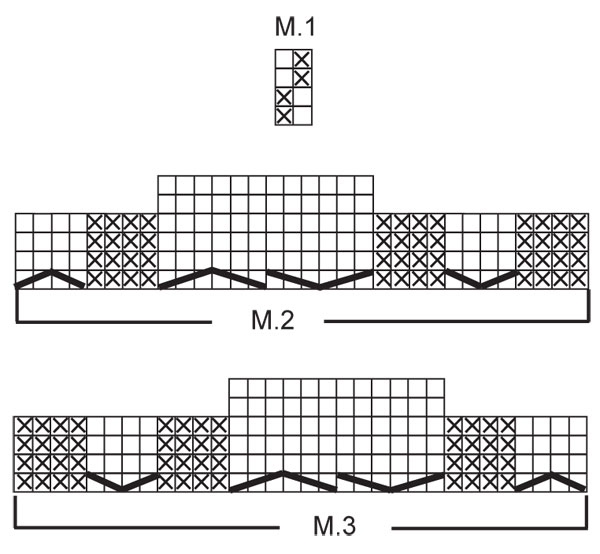
BUNTING BAG:


GARTER ST (back and forth on needle): K all rows.

PATTERN:
See diagram M.1 to M.3. Diagrams show the pattern from RS. First row in M.2 and M.3 = RS.

HOLE FOR SEAT BELT IN CAR SEAT:
You can make a hole on front and back piece for car seat belt. Make the hole when piece measures approx 16-20-23 (28-33) cm / 6¼"-8"-9" (11"-13") (or required measurements) by casting/binding off the middle 10 sts on needle. On next row cast on 10 new sts over bind off sts and continue as before.

BUTTONHOLES:
Make buttonholes on right front band. 1 buttonhole = K tog 2nd and 3rd st from mid front and make 1 YO.
Make buttonholes when piece measures:
Size 1/3 months: 25, 30, 35, 40, 45 and 50 cm / 9¾",11¾",13¾",15¾",17¾" and 19¾".
Size 6/9 months: 28, 34, 41, 47, 54 and 60 cm / 11",13⅜",16⅛", 18½",21¼" and 23⅝".
Size 12/18 months: 30, 38, 46, 54, 62 and 70 cm / 11¾",15",18",21¼",24⅜" and 27½".
Size 2 years: 37, 44, 51, 58, 65, 72 and 79 cm / 14½",17¼",20",22¾",25½",28⅜" and 31".
Size 3/4 years: 40, 48, 57, 65, 74, 82 and 91 cm / 15¾",19",22½",25½",29⅛",32¼" and 35¾".
--------------------------------------------------------
--------------------------------------------------------

BUNTING BAG:
The bag is worked in 2 parts from bottom edge and up and sewn tog afterwards. Work each part back and forth on circular needle in order to fit in all sts.
NOTE: If hole for seat belt is required – see above.

BACK PIECE:
Cast on 68-74-82 (86-94) sts (includes 1 edge st each side) on circular needle size 4 mm / US 6 with Merino Extra Fine. Work GARTER ST - see above – for 4-4-4 (5-5) cm / 1½"-1½"-1½" (2"-2") – adjust to a row from WS. P 1 row from WS and continue in M.1 with 1 edge st in garter st each side (beg with K1 after edge st).
When piece measures 44-53-62 (71-82) cm / 17¼"-21"-24⅜" (28"-32¼") cast on new sts for sleeves each side. Cast on at the end of every row as follows: 4 sts 2-2-3 (3-3) times, 8 sts 1-1-1 (1-3) times, 10 sts 1-1-1 (2-1) times and 12-14-15 (15-16) sts 1 time = 144-154-172 (196-218) sts on needle – NOTE: incorporate inc sts in M.1 as you go along - when all sts have been cast on continue M.1, but with 10 sts each side in garter st (= bottom edge of sleeves).
When piece measures 54-64-74 (84-96) cm / 21¼"-25¼"-29⅛" (33"-37¾") bind off the middle 16-18-22 (24-24) sts for neck and complete each shoulder/sleeve separately. Bind off 1 st on neckline on next row = 63-67-74 (85-96) sts left on needle (= shoulder + sleeve). Bind off when piece measures 56-66-76 (86-98) cm / 22"-26"-30" (33⅞"-38½"). Repeat on the other side.

FRONT PIECE:
Cast on 68-74-82 (86-94) sts and work garter st for 2-2-2 (2.5-2.5) cm / ¾"-¾"-¾" (7/8"-⅞"), then work next row as follows from RS: K 12-13-14 (14-16) sts, * K2 tog, 1 YO, K 12-13-15 (12-13) sts *, repeat from *-* a total of 3-3-3 (4-4) times, K2 tog, 1 YO and finish with K 12-14-15 (14-16) sts (= 4-4-4 (5-5) buttonholes). Continue in garter st until edge measures 4-4-4 (5-5) cm / 1½"-1½"-1½" (2"-2") - adjust to a row from WS. P 1 row from WS, AT THE SAME TIME inc 22 sts evenly = 90-96-104 (108-116) sts. Work next rows as follows from RS: 1 edge st, M.1 on the first 5-8-12 (14-18) sts (beg with K1 at the side to match pattern at the side to back piece), M.2 (= 32 sts), P 14 sts, M.3 (= 32 sts), M.1 on the next 5-8-12 (14-18) sts (adjust so M.1 finishes with P1 at the side before edge st to match pattern to back piece) and finish with 1 edge st. Continue in pattern like this with M.1, M.2 and M.3 and 14 sts in reverse stockinette st mid front. When piece measures 23-25-28 (33-37) cm / 9"-9¾"-11" (13"-14½") slip the first 42-45-49 (51-55) sts on a stitch holder = 48-51-55 (57-61) sts left on needle.

RIGHT FRONT PIECE:
= 48-51-55 (57-61) sts. Continue in pattern as before, but work the 6 sts towards mid front in garter st for front band - REMEMBER BUTTONHOLES - see above! When piece measures 44-53-62 (71-82) cm / 17¼"-21"-24⅜" (28"-32¼") cast on new sts for sleeve at the end of every row towards the side as described for back piece = 86-91-100 (112-123) sts. When all sts have been cast on continue in pattern as before, but work the 10 sts on sleeve edge in garter st. When 1 row remain before piece measures 51-61-71 (80-92) cm / 20"-24"-28" (31½"-36¼") – adjust so this row is from WS - dec 4 sts on the cable towards mid front (i.e. dec 2 sts over cable and 1 st each side of cable). On next row from RS slip 6-7-8 (9-9) sts towards mid front on a stitch holder for neck. Bind off to shape the neckline at the beg of every row from mid front: 2 sts 2 times and 1 st 2-2-3 (3-3) times = 70-74-81 (92-103) sts left on needle (= shoulder + sleeve). Continue in pattern as before. When 1 row remain before piece measures 56-66-76 (86-98) cm / 22"-26"-30" (33⅞"-38½") dec 7 sts evenly over sts in cables in M.3 = 63-67-74 (85-96) sts. On next row bind off all sts.

LEFT FRONT PIECE:
Slip sts from stitch holder back on needle and pick up 6 sts behind the 6 garter sts on right front band = 48-51-55 (57-61) sts. Continue as described for right front piece but mirrored – NOTE: do not make buttonholes on front band.

ASSEMBLY:
Sew shoulder/over arm seams. Sew seam under sleeves and down along the side inside 1 edge st. Fold 5 cm / 2" on each sleeve edge towards RS and fasten with a couple of sts. Sew 4-4-4 (5-5) buttons at bottom of bunting bag and sew remaining buttons on left front band.

HOOD:
Pick up from RS approx 58 to 78 sts round neck (includes sts from stitch holders at front) on circular needle size 4 mm / US 6 with Merino Extra Fine. K 1 row from WS, then K 1 row from RS, AT THE SAME TIME inc evenly to 85-89-93 (97-101) sts. Continue in M.1 with 6 garter sts each side - AT THE SAME TIME cast on 6 new sts at the end of the next 2 rows for folding edge = 97-101-105 (109-113) sts – work these sts in garter st. Continue in M.1 with 12 garter sts each side until hood measures 21-23-25 (27-28) cm / 8¼"-9"-9¾" (10⅝"-11") and bind off. Fold hood double and sew tog at the top. Fold 6 garter sts round opening of hood towards RS and fasten to neckline with neat sts.

Diagram

All measurements in charts are in cm.

symbols = K from RS, P from WS
symbols = P from RS, K from WS
symbols = slip 3 sts on cable needle behind piece, K3, K3 from cable needle
symbols = slip 3 sts on cable needle in front of piece, K3, K3 from cable needle
symbols = slip 2 sts on cable needle behind piece, K2, K2 from cable needle
symbols = slip 2 sts on cable needle in front of piece, K2, K2 from cable needle
diagram
diagram
Do you have a question? See a list of frequently asked questions (FAQ)

Knitting tension is what determines the final measurements of your work, and is usually measured per 10 x 10 cm. It is provided like so: number of stitches in width x number of rows in height - eg: 19 stitches x 26 rows = 10 x 10 cm.

The knitting tension is very individual; some people knit/crochet loosely while others work tightly. You adjust the knitting tension with the needle size, which is why the suggested needle size only serve as a guide! You need to adjust this (up or down) to ensure that YOUR knitting tension matches the knitting tension provided in the pattern. If you work with a different knitting tension than provided you will have a different yarn consumption, and your work will have different measurements than what the pattern suggests.

The knitting tension also determines which yarns can replace each other. As long as you achieve the same knitting tension you can replace one yarn with another.

See DROPS lesson: How to measure your tension/gauge

See DROPS video: How to make a gauge tension swatch

The required amount of yarn is provided in grams, eg: 450 g. To calculate how many balls you’ll need you first need to know how many grams are in 1 ball (25g, 50g or 100g). This information is available if you click on the individual yarn quality on our pages. Divide the amount required with the amount of each ball. For example, if each ball is 50g (the most common amount), the calculation will be as follows: 450 / 50 = 9 balls.

The important thing when changing from one yarn to another is that the knitting/crochet tension remains the same. This is so that the measurements of the finished piece will be the same as on the sketch provided. It is easier to achieve the same knitting tension using yarns from the same yarn group. It is also possible to work with multiple strands of a thinner yarn to achieve the knitting tension of a thicker one. Please try our yarn converter. We recommend you to always work a test swatch.

Please NOTE: when changing yarn the garment might have a different look and feel to the garment in the photo, due to individual properties and qualities of each yarn.

See DROPS lesson: Can I use a different yarn than the one mentioned in the pattern?

All our yarns are categorised into yarn groups (from A to F) according to thickness and knitting tension – group A contains the thinnest yarns and group F the thickest. This makes it easier for you to find alternative yarns to our patterns, should you wish to switch yarn. All yarns within the same group have a similar knitting tension and can easily replace each other. However, different yarn qualities have different structures and properties which will give the finished work a unique look and feel.

Click here for an overview of the yarns in each yarn group

At the top of all our patterns you’ll find a link to our yarn converter, which is a helpful tool should you wish to use a different yarn than suggested. By filling in the yarn quality you wish to replace, the amount (in your size) and number of strands, the converter will present good alternative yarns with the same knitting tension. Additionally it will tell you how much you’ll require in the new qualities and whether you’ll need to work with multiple strands. Most skeins are 50g (some are 25g or 100g).

If the pattern is worked with multiple colours, every colour will have to be converted separately. Similarly, if the pattern is worked with several strands of different yarns (for example 1 strand Alpaca and 1 strand Kid-Silk) you will have to find alternatives for each, individually.

Click here to see our yarn converter

Since different yarns have different qualities and textures we have chosen to keep the original yarn in our patterns. However, you can easily find options among our available qualities by using our yarn converter, or simply pick a yarn from the same yarn group.

It is possible that some retailers still have discontinued yarns in stock, or that someone has a few skeins at home that they would like to find patterns for.

The yarn converter will provide both alternative yarn as well as required amount in the new quality.

If you think it's hard to decide what size to make, it can be a good idea to measure a garment you own already and like the size of. Then you can pick the size by comparing those measures with the ones available in the pattern's size chart.

You'll find the size chart at the bottom of the pattern.

See DROPS lesson: How to read size chart

The needle size provided in the pattern serves only as a guide, the important thing is to follow the knitting tension. And since knitting tension is very individual, you will have to adjust the needle size to ensure that YOUR tension is the same as in the pattern – maybe you’ll have to adjust 1, or even 2 needle sizes, up or down to achieve the correct tension. For this, we recommend that you work test swatches.

Should you work with a different knitting tension than the one provided, the measurements of the finished garment might deviate from the measurement sketch.

See DROPS lesson: How to measure your tension/gauge

See DROPS video: How to make a gauge tension swatch

Working a garment top-down provides more flexibility and room for personal adjustment. For example it is easier to try the garment on while working, as well as making adjustments to length of yoke and shoulder caps.

The instructions are carefully explaining every step, in the correct order. Diagrams are adjusted to the knitting direction and are worked as usual.

The diagram depicts all rows/rounds, and every stitch seen from the right side. It is read from bottom to top, from right to left. 1 square = 1 stitch.

When working back and forth, every other row is worked from the right side and every other row is worked from the wrong side. When working from the wrong side, the diagram will have to be worked reversed: from left to right, knit stitches are purled, purl stitches are knit etc.

When working in the round every round is worked from the right side and the diagram are worked from right to left on all rounds.

See DROPS lesson: How to read knitting diagrams

The diagram depicts all rows/rounds, and every stitch seen from the right side. It is worked from bottom to top, from right to left.

When working back and forth every other row is worked from the right side: from right to left and every other row is worked from the wrong side: from left to right.

When working in the round, every row in the diagram are worked from the right side, from right to left.

When working a circular diagram you start in the middle and work your way outwards, counter clockwise, row by row.

The rows usually start with a given number of chain stitches (equivalent to the height of the following stitch), this will either be depicted in the diagram or explained in the pattern.

See DROPS lesson: How to read crochet diagrams

Instructions for working several diagrams after each other on the same row/round, will often be written like so: “work A.1, A.2, A.3 a total of 0-0-2-3-4 times". This means you work A.1 once, then A.2 is worked once, and A.3 is repeated (in width) the number of times provided for your size – in this case like so: S = 0 times, M = 0 times, L=2 times, XL= 3 times and XXL = 4 times.

The diagrams are worked as usual: begin with the first row in A.1, then work the first row in A.2 etc.

See DROPS lesson: How to read knitting diagrams

See DROPS lesson: How to read crochet diagrams

The total width of the garment (from wrist-to-wrist) will be larger in the larger sizes, despite the actual sleeves being shorter. The larger sizes have longer sleeve caps and wider shoulders, so there will be a good fit in all sizes.

The measurement sketch/schematic drawing provides information regarding the full length of the garment. If it’s a jumper or a jacket the length is measured from the highest point on the shoulder (usually closest to the neckline), and straight down to the bottom of the garment. It is NOT measured from the tip of shoulder. Similarly, the length of yoke is measured from the highest point on the shoulder and down to where yoke is split into body and sleeves.

See DROPS lesson: How to read a schematic drawing

Diagrams are often repeated on the round or in height. 1 repeat is the diagram the way it appears in the pattern. If it says to work 5 repeats of A.1 in the round, then you work A.1 a total of 5 times after/next to each other in the round. If it says to work 2 repeats of A.1 vertically/in height you work the entire diagram once, then begin again at the start and work the entire diagram one more time.

Chain stitches are slightly narrower than other stitches and to avoid working the cast-on edge too tight, we simply chain more stitches to begin with. The stitch count will be adjusted on the following row to fit the pattern and measurement sketch.

The rib edge is more elastic and will contract slightly compared to, for example, stocking stitch. By increasing before the rib edge, you avoid a visible difference in width between the rib edge and the rest of the body.

It’s very easy to cast off too tightly, and by making yarn overs while casting off (and simultaneously casting these off) you avoid a too tight cast off edge.

See DROPS video: How to bind off with yarn overs (yo)

To achieve an even increase (or decrease) you can increase on, for example: every 3rd and 4th row alternately, like so: work 2 rows and increase on the 3rd row, work 3 rows and increase on the 4th. Repeat this until the increase is complete.

See DROPS lesson: Increase or decrease 1 st on every 3rd and 4th row alternately

Should you prefer to work in the round instead of back and forth, you may of course adjust the pattern. You’ll need to add steeks mid-front (usually 5 stitches), and follow the instructions. When you would normally turn and work from the wrong side, simply work across the steek and continue in the round. At the end you’ll cut the piece open, pick up stitches to work bands, and cover the cut edges.

See DROPS video: How to knit steeks and cut open

Should you prefer to work back and forth instead of in the round, you may of course adjust the pattern so you work the pieces separately and then assemble them at the end. Divide the stitches for the body in 2, add 1 edge stitch in each side (for sewing) and work the front and back pieces separately.

See DROPS lesson: Can I adapt a pattern for circular needles into straight needles?

Pattern repeats can vary slightly in the different sizes, in order to get the correct proportions. If you’re not working the exact same size as the garment in the photo, yours might deviate slightly. This has been carefully developed and adjusted so that the complete impression of the garment is the same in all sizes.

Make sure to follow instructions and diagrams for your size!

If you have found a pattern you like which is available in women’s size it’s not very difficult to convert it to men’s size. The biggest difference will be the length of sleeves and body. Start working on the women size that you think would fit across the chest. The additional length will be worked right before you cast off for the armhole/sleeve cap. If the pattern is worked top-down you can add the length right after the armhole or before the first decrease on sleeve.

Regarding additional yarn amount, this will depend on how much length you add, but it is better with a skein too many than too few.

All yarns will have excess fibres (from production) that might come off as lint or shedding. Brushed yarns (ie hairier yarns) have more of these loose, excess fibres, causing more shedding.

Shedding also depends on what is worn under or over the garment, and whether this pulls at the yarn fibres. It’s therefore not possible to guarantee that there will be no shedding

Below are some tips on how to get the best result when working with hairier yarns:

1. When the garment is finished (before you wash it) shake it vigorously so the looser hairs come off. NOTE: do NOT use a lint roller, brush or any method that pulls at the yarn.

2. Place the garment in a plastic bag and put it in your freezer - the temperature will cause the fibres to become less attached to each other, and excess fibres will come off easier.

3. Leave in the freezer for a few hours before taking it out and shaking it again.

4. Wash the garment according to the instructions on the yarn label.

Pilling is a natural process that happens to even the most exclusive of fibers. It's a natural sign of wear and tear that is hard to avoid, and that is most visible in high friction areas of your garment like a sweater's arms and cuffs.

You can make your garment look as new by removing the pilling, using a fabric comb or a pill/lint remover.

Still can't find the answer you need? Then scroll down and leave your question so one of our experts can try to help you. This will be done normally within 5 to 10 working days.
In the meantime, you can read the questions and answers that others have left to this pattern or join the DROPS Workshop on Facebook to get help from fellow knitters/crocheters!

You might also like...

Snuggly Bunny

MissTawnyOwl, Finland

Bunt the Baby

Linda, Canada

Post a comment to pattern DROPS Baby 19-10

We would love to hear what you have to say about this pattern!

If you want to leave a question, please make sure you select the correct category in the form below, to speed up the answering process. Required fields are marked *.

Comments / Questions (294)

Illi wrote:

Ho notato che nel mio lavoro le due doppie trecce sono convergenti mentre nella foto del modello sono divergenti, eppure ho seguito il diagramma: la doppia treccia si forma mettendo prima le tre maglie DAVANTI il lavoro e dopo tre maglie DIETRO il lavoro... oppure ho sbagliato qualcosa? Grazie per il vostro aiuto.

21.07.2015 - 12:12

DROPS Design answered:

Buongiorno Illi. I diagrammi si leggono dal basso verso l'alto e da destra verso sinistra. In questo modo mette le tre maglie prima sul dietro del lavoro e poi sul davanti, così la treccia risulta come nella fotografia. Ci riscriva se non è chiaro. Buon lavoro!

21.07.2015 - 19:29

Illi wrote:

Ho cominciato la parte davanti del lavoro interpretando il diagramma M2 e M3 in questo modo: il 5º e 6º ferro della parte centrale li ho lavorati prima di proseguire con il 4º ferro, cioè le dodici maglie centrali ripetute indietro e poi di nuovo avanti per tornare al punto dove poter proseguire con il 4º ferro. Ottengo in questo modo un risultato diverso da quello da voi proposto?

21.07.2015 - 12:07

DROPS Design answered:

Buongiorno Illi. I diag.M.2 e M.3 vengono lavorati come segue: le trecce laterali si lavorano su quattro righe; quella centrale su 6. Quindi, dopo le prime 4 righe, per le trecce laterali riprende dalla prima riga, per quella centrale continua con la quinta e la sesta riga. I diagrammi si leggono dal basso verso l'alto e da destra verso sinistra. Ci riscriva se non è chiaro. Buon lavoro!

21.07.2015 - 19:28

country flag Henriette Blik wrote:

Nogen, der har strikket denne kørepose med hul til barnevognssele? Vil gerne strikke en i str 6/9mdr men kan ikke helt regne ud, hvor langt oppe hullet skal være for at passe til barnevognsselen.

20.05.2015 - 13:25

DROPS Design answered:

Hej Henriette, jo men det har vi regnet ud: HUL TIL SIKKERHEDSSELE I BILSTOL: Hvis man ønsker kan der strikkes et hul på for- og rygstk til at putte sikkerhedsselen på en bilstol igennem. Luk af til hul når arb måler ca 16-20-23 (28-33) cm, evt ved ønsket mål ved at lukke de midterste 10 m af på p. På næste p slåes der 10 nye m op over de aflukkede og mønsteret fortsættes som før.

20.05.2015 - 15:03

Joanne Gibson wrote:

The penny has just dropped! Thanks for the info.... Feel silly now lol. 😄

12.05.2015 - 18:36

Joanne Gibson wrote:

When knitting m2 and 3. Why is there 6 rows? How do I knit the top two middle rows? Confused ..... Please help x

12.05.2015 - 08:44

DROPS Design answered:

Dear Mrs Gibson, all cables in M.2 and M.3 are not worked over the same number of rows, ie where there are only 4 rows, repeat these cables over 4 rows - where there are 6 rows, repeat these cables over 6 rows. Happy knitting!

12.05.2015 - 10:10

country flag Kathrine wrote:

"Luk derefter af til hals på hver p fra halsen: 2 m 2 gange og 1 m 2-2-3 (3-3) gange" betyder det at jeg skal starte på vrang siden? hvordan lukker man dem af? ved at strikke 2 masker sammen? skal der melem rum imellem aflukningerne eller tager man dem bare ud i en?

06.05.2015 - 08:25

DROPS Design answered:

Ja i den ene side lukker du af mod halsen fra retsiden og i den anden side lukker du af mod halsen fra vrangen. De første 2 m lukker du af en ad gangen, det gør du i starten af pinden fra halsen. Bagefter lukker du 1 m af som der står i opskriften. God fornøjelse!

13.05.2015 - 10:26

country flag Susi wrote:

Meine Frage hat sich erledigt. Nach vielem googlen und versuchen habe ich das Diagramm verstanden.

11.04.2015 - 00:11

DROPS Design answered:

Ok, ich habe Ihren Kommentar erst gelesen, nachdem ich geantwortet hatte. Ich hoffe, Sie haben das Gleiche ergoogelt. :-) Leider ist es uns nicht möglich, immer sofort auf die Fragen zu antworten, aber wir bemühen uns stets um Antwort. Weiterhin gutes Gelingen!

11.04.2015 - 08:54

country flag Susi wrote:

Ich bin jetzt beim Vorderteil und verstehe M2 und M3 nicht. Was bedeuten die zwei Reihen über den grossen Zöpfen? Arbeite ich zwei Reihen glatt rechts komplett von links nach rechts oder was genau muss ich machen? Über eine ausführliche Erklärung würde ich mich freuen. Ansonsten klappt alles super bisher :)

10.04.2015 - 02:51

DROPS Design answered:

Es bedeutet, dass die mittleren 12 M von M.2 aus 6 R bestehen, die äußeren je 8 M jedoch nur aus 4 R. Sie stricken also die ersten 4 R des Musters, wie Sie sie sehen, dann beginnen Sie mit den ersten 8 M wieder unten bei der 1. Muster-R, stricken bei den nächsten 12 M jedoch die 5. Muster-R und bei den letzten 8 M wieder die 1. R. Sie stricken also immer bei den ersten und letzten 8 M 3 R zwischen den Verzopfungen und bei den mittleren 12 M 5 R zwischen den Verzopfungen. Die Verzopfungen sind damit nicht immer in derselben R.

11.04.2015 - 08:14

country flag Christina Svensson wrote:

Höger framst, start avmaskning för halsen: Borde det inte stå "minska" istället för avm, eftersom det blir fel om man avmaskar, så här: "minska 4 m över den yttersta flätan mot mitt fram (dvs. minska 2 m över flätan och 1 m på varje sida om flätan)". Då stickar man ju två maskor tillsammans fyra gånger istället för att avmaska, har jag fattat rätt?

09.03.2015 - 18:11

DROPS Design answered:

Hej Christina, jo det är rätt som du säger, över flätan minskar du och i kanten avm du. Lycka till!

22.05.2015 - 15:41

country flag Kaia Solheim Hansen wrote:

I mønsteret står at det skal legges ut til ermet v/44 ...cm. På diagrammet ser det ut som emet legges opp v/56 cm

29.01.2015 - 19:09

DROPS Design answered:

Hei Kaia. 56 cm er den totale höjde. Du skal legge ud ved 44 cm som der staar i mönstret.

30.01.2015 - 13:58