DROPS Merino Extra Fine
100% Wool
from 4.55 $ /50g
Get the yarn to make this pattern from 40.95$.

The yarn cost is calculated from the pattern’s smallest size and the yarn’s cheapest product type. Looking for an even better price? You might find it on the DROPS Deals!

DROPS SS24

Snuggly Bunny

Knitted bunting bag in seed st with textured pattern and cables in DROPS Merino Extra Fine

DROPS Baby 19-10
DROPS design: Pattern no ME-042-by
--------------------------------------------------------
Size: 1/3 - 6/9 - 12/18 months (2 - 3/4) years
Finished measurements:
Bust: 62-68-76 (80-88) cm / 24⅜"-26¾"-30" (31½"-34⅝")
Full length: 56-66-76 (86-98 ) cm / 22"-26"-30" (33⅞"-38½")

Materials: DROPS MERINO EXTRA FINE from Garnstudio
450-500-550 (650-700) g color no 01, off-white

DROPS CIRCULAR NEEDLE (60 or 80 cm / 24" or 32") size 4 mm/US 6 – or size needed to get 21 sts x 28 rows in stockinette st = 10 x 10 cm / 4" x 4".

DROPS WOODEN BUTTON BURNT, no 511: 10-10-10 (12-12) pcs.

-------------------------------------------------------

Alternative Yarn – See how to change yarns here
Yarn Groups A to F – Use the same pattern and change the yarn here
Yarn usage using an alternative yarn – Use our yarn converter here

-------------------------------------------------------

DROPS Merino Extra Fine
100% Wool
from 4.55 $ /50g
Get the yarn to make this pattern from 40.95$.

The yarn cost is calculated from the pattern’s smallest size and the yarn’s cheapest product type. Looking for an even better price? You might find it on the DROPS Deals!

Pattern instructions

NOTE: This pattern is written in American English. All measurements in charts are in cm. For conversion from inches to cm - click here. There are different terms for crocheting in American and British English. If this pattern includes crochet, click for "crochet terms" here. For this pattern in British English, please click here.
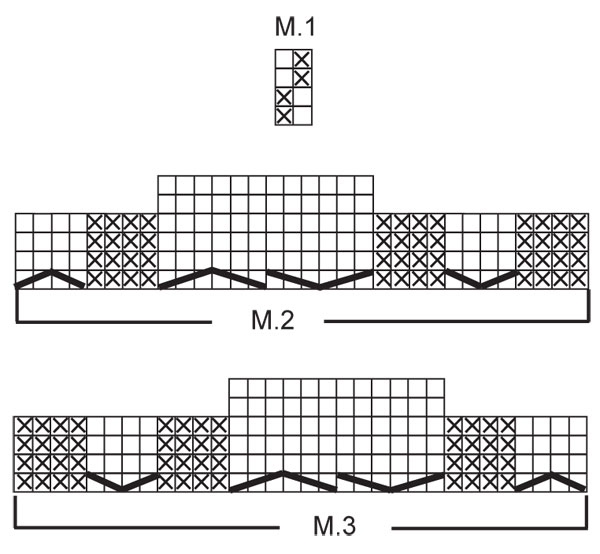
BUNTING BAG:


GARTER ST (back and forth on needle): K all rows.

PATTERN:
See diagram M.1 to M.3. Diagrams show the pattern from RS. First row in M.2 and M.3 = RS.

HOLE FOR SEAT BELT IN CAR SEAT:
You can make a hole on front and back piece for car seat belt. Make the hole when piece measures approx 16-20-23 (28-33) cm / 6¼"-8"-9" (11"-13") (or required measurements) by casting/binding off the middle 10 sts on needle. On next row cast on 10 new sts over bind off sts and continue as before.

BUTTONHOLES:
Make buttonholes on right front band. 1 buttonhole = K tog 2nd and 3rd st from mid front and make 1 YO.
Make buttonholes when piece measures:
Size 1/3 months: 25, 30, 35, 40, 45 and 50 cm / 9¾",11¾",13¾",15¾",17¾" and 19¾".
Size 6/9 months: 28, 34, 41, 47, 54 and 60 cm / 11",13⅜",16⅛", 18½",21¼" and 23⅝".
Size 12/18 months: 30, 38, 46, 54, 62 and 70 cm / 11¾",15",18",21¼",24⅜" and 27½".
Size 2 years: 37, 44, 51, 58, 65, 72 and 79 cm / 14½",17¼",20",22¾",25½",28⅜" and 31".
Size 3/4 years: 40, 48, 57, 65, 74, 82 and 91 cm / 15¾",19",22½",25½",29⅛",32¼" and 35¾".
--------------------------------------------------------
--------------------------------------------------------

BUNTING BAG:
The bag is worked in 2 parts from bottom edge and up and sewn tog afterwards. Work each part back and forth on circular needle in order to fit in all sts.
NOTE: If hole for seat belt is required – see above.

BACK PIECE:
Cast on 68-74-82 (86-94) sts (includes 1 edge st each side) on circular needle size 4 mm / US 6 with Merino Extra Fine. Work GARTER ST - see above – for 4-4-4 (5-5) cm / 1½"-1½"-1½" (2"-2") – adjust to a row from WS. P 1 row from WS and continue in M.1 with 1 edge st in garter st each side (beg with K1 after edge st).
When piece measures 44-53-62 (71-82) cm / 17¼"-21"-24⅜" (28"-32¼") cast on new sts for sleeves each side. Cast on at the end of every row as follows: 4 sts 2-2-3 (3-3) times, 8 sts 1-1-1 (1-3) times, 10 sts 1-1-1 (2-1) times and 12-14-15 (15-16) sts 1 time = 144-154-172 (196-218) sts on needle – NOTE: incorporate inc sts in M.1 as you go along - when all sts have been cast on continue M.1, but with 10 sts each side in garter st (= bottom edge of sleeves).
When piece measures 54-64-74 (84-96) cm / 21¼"-25¼"-29⅛" (33"-37¾") bind off the middle 16-18-22 (24-24) sts for neck and complete each shoulder/sleeve separately. Bind off 1 st on neckline on next row = 63-67-74 (85-96) sts left on needle (= shoulder + sleeve). Bind off when piece measures 56-66-76 (86-98) cm / 22"-26"-30" (33⅞"-38½"). Repeat on the other side.

FRONT PIECE:
Cast on 68-74-82 (86-94) sts and work garter st for 2-2-2 (2.5-2.5) cm / ¾"-¾"-¾" (7/8"-⅞"), then work next row as follows from RS: K 12-13-14 (14-16) sts, * K2 tog, 1 YO, K 12-13-15 (12-13) sts *, repeat from *-* a total of 3-3-3 (4-4) times, K2 tog, 1 YO and finish with K 12-14-15 (14-16) sts (= 4-4-4 (5-5) buttonholes). Continue in garter st until edge measures 4-4-4 (5-5) cm / 1½"-1½"-1½" (2"-2") - adjust to a row from WS. P 1 row from WS, AT THE SAME TIME inc 22 sts evenly = 90-96-104 (108-116) sts. Work next rows as follows from RS: 1 edge st, M.1 on the first 5-8-12 (14-18) sts (beg with K1 at the side to match pattern at the side to back piece), M.2 (= 32 sts), P 14 sts, M.3 (= 32 sts), M.1 on the next 5-8-12 (14-18) sts (adjust so M.1 finishes with P1 at the side before edge st to match pattern to back piece) and finish with 1 edge st. Continue in pattern like this with M.1, M.2 and M.3 and 14 sts in reverse stockinette st mid front. When piece measures 23-25-28 (33-37) cm / 9"-9¾"-11" (13"-14½") slip the first 42-45-49 (51-55) sts on a stitch holder = 48-51-55 (57-61) sts left on needle.

RIGHT FRONT PIECE:
= 48-51-55 (57-61) sts. Continue in pattern as before, but work the 6 sts towards mid front in garter st for front band - REMEMBER BUTTONHOLES - see above! When piece measures 44-53-62 (71-82) cm / 17¼"-21"-24⅜" (28"-32¼") cast on new sts for sleeve at the end of every row towards the side as described for back piece = 86-91-100 (112-123) sts. When all sts have been cast on continue in pattern as before, but work the 10 sts on sleeve edge in garter st. When 1 row remain before piece measures 51-61-71 (80-92) cm / 20"-24"-28" (31½"-36¼") – adjust so this row is from WS - dec 4 sts on the cable towards mid front (i.e. dec 2 sts over cable and 1 st each side of cable). On next row from RS slip 6-7-8 (9-9) sts towards mid front on a stitch holder for neck. Bind off to shape the neckline at the beg of every row from mid front: 2 sts 2 times and 1 st 2-2-3 (3-3) times = 70-74-81 (92-103) sts left on needle (= shoulder + sleeve). Continue in pattern as before. When 1 row remain before piece measures 56-66-76 (86-98) cm / 22"-26"-30" (33⅞"-38½") dec 7 sts evenly over sts in cables in M.3 = 63-67-74 (85-96) sts. On next row bind off all sts.

LEFT FRONT PIECE:
Slip sts from stitch holder back on needle and pick up 6 sts behind the 6 garter sts on right front band = 48-51-55 (57-61) sts. Continue as described for right front piece but mirrored – NOTE: do not make buttonholes on front band.

ASSEMBLY:
Sew shoulder/over arm seams. Sew seam under sleeves and down along the side inside 1 edge st. Fold 5 cm / 2" on each sleeve edge towards RS and fasten with a couple of sts. Sew 4-4-4 (5-5) buttons at bottom of bunting bag and sew remaining buttons on left front band.

HOOD:
Pick up from RS approx 58 to 78 sts round neck (includes sts from stitch holders at front) on circular needle size 4 mm / US 6 with Merino Extra Fine. K 1 row from WS, then K 1 row from RS, AT THE SAME TIME inc evenly to 85-89-93 (97-101) sts. Continue in M.1 with 6 garter sts each side - AT THE SAME TIME cast on 6 new sts at the end of the next 2 rows for folding edge = 97-101-105 (109-113) sts – work these sts in garter st. Continue in M.1 with 12 garter sts each side until hood measures 21-23-25 (27-28) cm / 8¼"-9"-9¾" (10⅝"-11") and bind off. Fold hood double and sew tog at the top. Fold 6 garter sts round opening of hood towards RS and fasten to neckline with neat sts.

Diagram

All measurements in charts are in cm.

symbols = K from RS, P from WS
symbols = P from RS, K from WS
symbols = slip 3 sts on cable needle behind piece, K3, K3 from cable needle
symbols = slip 3 sts on cable needle in front of piece, K3, K3 from cable needle
symbols = slip 2 sts on cable needle behind piece, K2, K2 from cable needle
symbols = slip 2 sts on cable needle in front of piece, K2, K2 from cable needle
diagram
diagram
Do you have a question? See a list of frequently asked questions (FAQ)

Knitting tension is what determines the final measurements of your work, and is usually measured per 10 x 10 cm. It is provided like so: number of stitches in width x number of rows in height - eg: 19 stitches x 26 rows = 10 x 10 cm.

The knitting tension is very individual; some people knit/crochet loosely while others work tightly. You adjust the knitting tension with the needle size, which is why the suggested needle size only serve as a guide! You need to adjust this (up or down) to ensure that YOUR knitting tension matches the knitting tension provided in the pattern. If you work with a different knitting tension than provided you will have a different yarn consumption, and your work will have different measurements than what the pattern suggests.

The knitting tension also determines which yarns can replace each other. As long as you achieve the same knitting tension you can replace one yarn with another.

See DROPS lesson: How to measure your tension/gauge

See DROPS video: How to make a gauge tension swatch

The required amount of yarn is provided in grams, eg: 450 g. To calculate how many balls you’ll need you first need to know how many grams are in 1 ball (25g, 50g or 100g). This information is available if you click on the individual yarn quality on our pages. Divide the amount required with the amount of each ball. For example, if each ball is 50g (the most common amount), the calculation will be as follows: 450 / 50 = 9 balls.

The important thing when changing from one yarn to another is that the knitting/crochet tension remains the same. This is so that the measurements of the finished piece will be the same as on the sketch provided. It is easier to achieve the same knitting tension using yarns from the same yarn group. It is also possible to work with multiple strands of a thinner yarn to achieve the knitting tension of a thicker one. Please try our yarn converter. We recommend you to always work a test swatch.

Please NOTE: when changing yarn the garment might have a different look and feel to the garment in the photo, due to individual properties and qualities of each yarn.

See DROPS lesson: Can I use a different yarn than the one mentioned in the pattern?

All our yarns are categorised into yarn groups (from A to F) according to thickness and knitting tension – group A contains the thinnest yarns and group F the thickest. This makes it easier for you to find alternative yarns to our patterns, should you wish to switch yarn. All yarns within the same group have a similar knitting tension and can easily replace each other. However, different yarn qualities have different structures and properties which will give the finished work a unique look and feel.

Click here for an overview of the yarns in each yarn group

At the top of all our patterns you’ll find a link to our yarn converter, which is a helpful tool should you wish to use a different yarn than suggested. By filling in the yarn quality you wish to replace, the amount (in your size) and number of strands, the converter will present good alternative yarns with the same knitting tension. Additionally it will tell you how much you’ll require in the new qualities and whether you’ll need to work with multiple strands. Most skeins are 50g (some are 25g or 100g).

If the pattern is worked with multiple colours, every colour will have to be converted separately. Similarly, if the pattern is worked with several strands of different yarns (for example 1 strand Alpaca and 1 strand Kid-Silk) you will have to find alternatives for each, individually.

Click here to see our yarn converter

Since different yarns have different qualities and textures we have chosen to keep the original yarn in our patterns. However, you can easily find options among our available qualities by using our yarn converter, or simply pick a yarn from the same yarn group.

It is possible that some retailers still have discontinued yarns in stock, or that someone has a few skeins at home that they would like to find patterns for.

The yarn converter will provide both alternative yarn as well as required amount in the new quality.

If you think it's hard to decide what size to make, it can be a good idea to measure a garment you own already and like the size of. Then you can pick the size by comparing those measures with the ones available in the pattern's size chart.

You'll find the size chart at the bottom of the pattern.

See DROPS lesson: How to read size chart

The needle size provided in the pattern serves only as a guide, the important thing is to follow the knitting tension. And since knitting tension is very individual, you will have to adjust the needle size to ensure that YOUR tension is the same as in the pattern – maybe you’ll have to adjust 1, or even 2 needle sizes, up or down to achieve the correct tension. For this, we recommend that you work test swatches.

Should you work with a different knitting tension than the one provided, the measurements of the finished garment might deviate from the measurement sketch.

See DROPS lesson: How to measure your tension/gauge

See DROPS video: How to make a gauge tension swatch

Working a garment top-down provides more flexibility and room for personal adjustment. For example it is easier to try the garment on while working, as well as making adjustments to length of yoke and shoulder caps.

The instructions are carefully explaining every step, in the correct order. Diagrams are adjusted to the knitting direction and are worked as usual.

The diagram depicts all rows/rounds, and every stitch seen from the right side. It is read from bottom to top, from right to left. 1 square = 1 stitch.

When working back and forth, every other row is worked from the right side and every other row is worked from the wrong side. When working from the wrong side, the diagram will have to be worked reversed: from left to right, knit stitches are purled, purl stitches are knit etc.

When working in the round every round is worked from the right side and the diagram are worked from right to left on all rounds.

See DROPS lesson: How to read knitting diagrams

The diagram depicts all rows/rounds, and every stitch seen from the right side. It is worked from bottom to top, from right to left.

When working back and forth every other row is worked from the right side: from right to left and every other row is worked from the wrong side: from left to right.

When working in the round, every row in the diagram are worked from the right side, from right to left.

When working a circular diagram you start in the middle and work your way outwards, counter clockwise, row by row.

The rows usually start with a given number of chain stitches (equivalent to the height of the following stitch), this will either be depicted in the diagram or explained in the pattern.

See DROPS lesson: How to read crochet diagrams

Instructions for working several diagrams after each other on the same row/round, will often be written like so: “work A.1, A.2, A.3 a total of 0-0-2-3-4 times". This means you work A.1 once, then A.2 is worked once, and A.3 is repeated (in width) the number of times provided for your size – in this case like so: S = 0 times, M = 0 times, L=2 times, XL= 3 times and XXL = 4 times.

The diagrams are worked as usual: begin with the first row in A.1, then work the first row in A.2 etc.

See DROPS lesson: How to read knitting diagrams

See DROPS lesson: How to read crochet diagrams

The total width of the garment (from wrist-to-wrist) will be larger in the larger sizes, despite the actual sleeves being shorter. The larger sizes have longer sleeve caps and wider shoulders, so there will be a good fit in all sizes.

The measurement sketch/schematic drawing provides information regarding the full length of the garment. If it’s a jumper or a jacket the length is measured from the highest point on the shoulder (usually closest to the neckline), and straight down to the bottom of the garment. It is NOT measured from the tip of shoulder. Similarly, the length of yoke is measured from the highest point on the shoulder and down to where yoke is split into body and sleeves.

See DROPS lesson: How to read a schematic drawing

Diagrams are often repeated on the round or in height. 1 repeat is the diagram the way it appears in the pattern. If it says to work 5 repeats of A.1 in the round, then you work A.1 a total of 5 times after/next to each other in the round. If it says to work 2 repeats of A.1 vertically/in height you work the entire diagram once, then begin again at the start and work the entire diagram one more time.

Chain stitches are slightly narrower than other stitches and to avoid working the cast-on edge too tight, we simply chain more stitches to begin with. The stitch count will be adjusted on the following row to fit the pattern and measurement sketch.

The rib edge is more elastic and will contract slightly compared to, for example, stocking stitch. By increasing before the rib edge, you avoid a visible difference in width between the rib edge and the rest of the body.

It’s very easy to cast off too tightly, and by making yarn overs while casting off (and simultaneously casting these off) you avoid a too tight cast off edge.

See DROPS video: How to bind off with yarn overs (yo)

To achieve an even increase (or decrease) you can increase on, for example: every 3rd and 4th row alternately, like so: work 2 rows and increase on the 3rd row, work 3 rows and increase on the 4th. Repeat this until the increase is complete.

See DROPS lesson: Increase or decrease 1 st on every 3rd and 4th row alternately

Should you prefer to work in the round instead of back and forth, you may of course adjust the pattern. You’ll need to add steeks mid-front (usually 5 stitches), and follow the instructions. When you would normally turn and work from the wrong side, simply work across the steek and continue in the round. At the end you’ll cut the piece open, pick up stitches to work bands, and cover the cut edges.

See DROPS video: How to knit steeks and cut open

Should you prefer to work back and forth instead of in the round, you may of course adjust the pattern so you work the pieces separately and then assemble them at the end. Divide the stitches for the body in 2, add 1 edge stitch in each side (for sewing) and work the front and back pieces separately.

See DROPS lesson: Can I adapt a pattern for circular needles into straight needles?

Pattern repeats can vary slightly in the different sizes, in order to get the correct proportions. If you’re not working the exact same size as the garment in the photo, yours might deviate slightly. This has been carefully developed and adjusted so that the complete impression of the garment is the same in all sizes.

Make sure to follow instructions and diagrams for your size!

If you have found a pattern you like which is available in women’s size it’s not very difficult to convert it to men’s size. The biggest difference will be the length of sleeves and body. Start working on the women size that you think would fit across the chest. The additional length will be worked right before you cast off for the armhole/sleeve cap. If the pattern is worked top-down you can add the length right after the armhole or before the first decrease on sleeve.

Regarding additional yarn amount, this will depend on how much length you add, but it is better with a skein too many than too few.

All yarns will have excess fibres (from production) that might come off as lint or shedding. Brushed yarns (ie hairier yarns) have more of these loose, excess fibres, causing more shedding.

Shedding also depends on what is worn under or over the garment, and whether this pulls at the yarn fibres. It’s therefore not possible to guarantee that there will be no shedding

Below are some tips on how to get the best result when working with hairier yarns:

1. When the garment is finished (before you wash it) shake it vigorously so the looser hairs come off. NOTE: do NOT use a lint roller, brush or any method that pulls at the yarn.

2. Place the garment in a plastic bag and put it in your freezer - the temperature will cause the fibres to become less attached to each other, and excess fibres will come off easier.

3. Leave in the freezer for a few hours before taking it out and shaking it again.

4. Wash the garment according to the instructions on the yarn label.

Pilling is a natural process that happens to even the most exclusive of fibers. It's a natural sign of wear and tear that is hard to avoid, and that is most visible in high friction areas of your garment like a sweater's arms and cuffs.

You can make your garment look as new by removing the pilling, using a fabric comb or a pill/lint remover.

Still can't find the answer you need? Then scroll down and leave your question so one of our experts can try to help you. This will be done normally within 5 to 10 working days.
In the meantime, you can read the questions and answers that others have left to this pattern or join the DROPS Workshop on Facebook to get help from fellow knitters/crocheters!

You might also like...

Snuggly Bunny

MissTawnyOwl, Finland

Bunt the Baby

Linda, Canada

Post a comment to pattern DROPS Baby 19-10

We would love to hear what you have to say about this pattern!

If you want to leave a question, please make sure you select the correct category in the form below, to speed up the answering process. Required fields are marked *.

Comments / Questions (294)

country flag Rebuttato wrote:

Je veut tricoter avec des aiguilles droites et non circulaire comment faire ?

06.10.2019 - 01:54

DROPS Design answered:

Bonjour Mme Rebuttato, le nid d'ange se tricote en deux parties, en allers et retours sur aiguille circulaire pour avoir suffisamment de place pour toutes les mailles, vous pouvez donc tricoter ici avec des aiguilles droites. Vous trouverez ici plus d'infos sur les aiguilles circulaires. Bon tricot!

07.10.2019 - 09:18

country flag Daisy wrote:

The question has been accidentally repeated. Thanks for the reply, will look into the pattern and sort out. Thank you

03.09.2019 - 19:11

country flag Daisy wrote:

Hi, I didn't knit the hood separately. I picked up the stitches for the hood from the neckline as per the pattern instructions and is a one piece hood. As you replied to my question dated 23-5-19 I folded the 6 garter stitches backwards and stitched, however the hood is not coming up properly, it is almost flat. I tried with a dummy doll's head, and the hood is not coming up as a hood as shown in the picture. Please help . Thank you

03.09.2019 - 19:03

DROPS Design answered:

Dear Daisy, it's somewhat tricky to give you the right answer, please show your store your project (even per mail), they should be able to assist you more easily. Happy knitting!

04.09.2019 - 08:54

country flag Daisy wrote:

Hi, I didn't knit the hood separately. I picked up the stitches for the hood from the neckline as per the pattern and is a one piece hood. As you replied to my question dated 23-5-19 I folded the 6 garter stitches backwards and stitched, however the hood is not coming up properly, it is almost flat. I tried with a dummy doll's head, and the hood is not coming up as a hood as shown in the picture. Please help . Thank you

03.09.2019 - 13:05

DROPS Design answered:

Dear Daisy, to get the folded edge around the hood as on the picture, you have to cast on 6 extra stitches on each side of the stitches picked up along neck, then work in pattern M.1 with 12 stitches in garter stitch in each side. When hood is done and sewn together, the edge is folded on the RS (half of the edge in garter stitch) ; If you worked like this, you might rather show your piece to your store (even sending them a picture per mail) so that they can check together with you. Happy knitting!

03.09.2019 - 14:53

country flag Zezette wrote:

Merci pour vos explications j en suis au dos vos explications sont très nettes merci encore

25.08.2019 - 08:13

country flag Mona wrote:

Skal det være 5 omg med glattstrikk mellom flettene (som går over 12 m) i midten ? .Og bare 3omg. på di andre flettene.

20.08.2019 - 20:05

DROPS Design answered:

Hei Mona. Kan ikke se at det skal være 5. omganger glattstrikk mellom flettene. Når du begynner med flettene / diagrammene, strikker du M.1 over de første 5-8-12 (14-18) maskene, deretter strikker du M.2 (= 32 masker), 14 m vrang, M.3 (= 32 masker), M.1 over de neste 5-8-12 (14-18) maskene (avpass slik at M.1 slutter med 1 vrang i siden før kantmasken slik at mønsteret stemmer mot bakstk) og avslutt med 1 kantmaske. Mellom alle flettene er det 4 vrangmasker, både mellom de enkle flettene og de doble, men mellom diagram M.2 og M.3 strikkes det 14 vrangmasker. God Fornøyelse!

09.09.2019 - 10:13

country flag Mairien Jacqueline wrote:

Je ne vois pas ou situés dans le nid d'ange le passage des sangles merci j'attends votre réponse Jacqueline

19.08.2019 - 09:59

DROPS Design answered:

Bonjour Mme Mairien, pour les sangles, il vous faudra rabattre les 10 mailles centrales à 16-33 cm (cf taille et OUVERTURES POUR LE PASSAGE DE LA SANGLE DE SÉCURITÉ DU SIÈGE AUTO) du dos et du devant, au rang suivant, montez 10 mailles au-dessus des mailles rabattues (ajustez le devant pour que les 10 m soient rabattues au même rang que pour le dos) et continuez comme avant. Bon tricot!

19.08.2019 - 11:50

country flag Zezette wrote:

Je voudrai realiser ce nid d ange mais comment tricoter les mailles de tous les rangs pairs ? Merck

18.08.2019 - 07:08

DROPS Design answered:

Bonjour Zezette, les diagrammes montrent tous les rangs, ceux tricotés sur l'endroit ainsi que ceux sur l'envers - cf légende = les croix sont des mailles en jersey envers et les cases blanches en jersey endroit. Bon tricot!

19.08.2019 - 09:58

country flag Céline wrote:

Bonjour, je ne comprends pas bien les diagrammes M2 et M3 au niveau des deux lignes du haut car il n'y a que les 12 mailles du milieu de représenter. Que tricote-t-on au-dessus des autres mailles ? Merci pour votre réponse car je suis bloquée.

17.08.2019 - 10:12

DROPS Design answered:

Bonjour Céline, les torsades de M.2 et M.3 se tricotent sur un nombre de rangs différent en hauteur, quand les 4 premiers rangs sont tricotés sur la torsade au début et à la fin de M.2/M.3, reprenez cette partie du diagramme au 1er rang; et tricotez encore 2 rangs sur la torsade du milieu = les torsades de 4 m se tricotent sur 4 rangs et celles de 6 m (= 12 m au total) se tricotent sur 6 rangs. Bon tricot!

19.08.2019 - 09:23

country flag Rita Ashar wrote:

Love this pattern and am about to start with the increase for sleeves. I am confused whether the increase needs to be done only at the end of each row or at both ends of each row. As in 4 sets 2 times means 4 sets at the end of first row and 4 sets at the end of next 2 rows?

13.08.2019 - 02:51

DROPS Design answered:

Dear Mrs Ashar, on back piece you will cast on the new stitches for sleeves on each side, ie at the end of each row, so that there are the same number of stitches cast on for each sleeve. On front piece, you will increase the stitches for sleeve only one one side since you work both front piece separately at this point. Happy knitting!

13.08.2019 - 08:22