
Popular categories
Looking for a yarn?


|
||||||||||
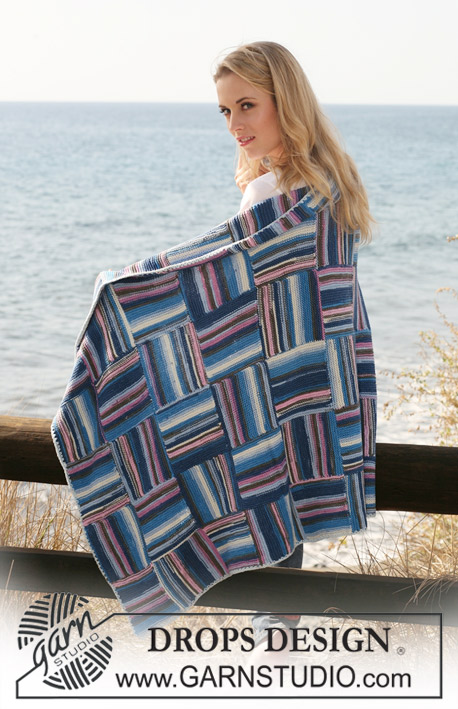
Seaside Blues |
||||||||||
|
|
||||||||||
DROPS blanket crochet in squares in ”Karisma”.
DROPS 120-3 |
||||||||||
|
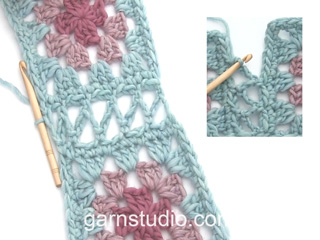
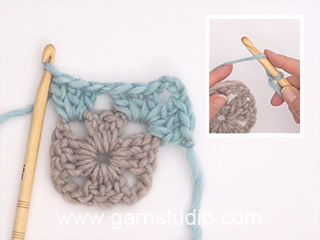
COLOUR COMBINATION: Square 1: Round 1-2: denim blue Round 3: off-white Round 4-5: ice blue Round 6-8: off-white Square 2: Round 1-2: dark grey/blue Round 3: ice blue Round 4-5: denim blue Round 6-8: off-white Square 3: Round 1-2: denim blue Round 3: off-white Round 4-5: dark grey/blue Round 6-8: off-white Square 4: Round 1-2: ice blue Round 3: denim blue Round 4-5: dark grey/blue Round 6-8: off-white Square 5: Round 1-2: dark grey/blue Round 3: denim blue Round 4-5: ice blue Round 6-8: off-white Square 6: Round 1-2: ice blue Round 3: dark grey/blue Round 4-5: denim blue Round 6-8: off-white ASSEMBLY OF SQUARES: See diagram M.1 and M.2. -------------------------------------------------------- BLANKET: Crochet a total of 30 squares, 5 of each colour combination – see above. SQUARE: Crochet 4 ch with 1 thread Karisma and crochet hook size 5 mm and form a ring with 1 sl st in first ch. ROUND 1: 4 ch (= 1 tr+1 ch), * 1 tr in ring, 1 ch *, repeat from *-* a total of 7 times, finish with 1 sl st in 3rd ch from beg of round = 8 tr. REMEMBER THE CROCHET TENSION! ROUND 2: 3 ch (= 1 tr), 1 tr in the first of the 3 ch, but wait with last pull-through (= 2 sts on hook), 1 tr in the same ch, but wait with last pull-through (= 3 sts on hook), 1 YO round hook, pull hook through all 3 sts = 1 st on hook (= 1 tr-group). Crochet * 1 ch, 1 tr in next ch, but wait with last pull-through (= 2 sts on hook), 1 tr in the same ch, but wait with last pull-through (= 3 sts on hook), 1 YO round hook, pull hook through all 3 sts = 1 st on hook (= 1 tr-group), 1 ch, 1 tr in next tr, but wait with last pull-through (= 2 sts on hook), 1 tr in the same tr, but wait with last pull-through (= 3 sts on hook), 1 YO round hook, pull hook through all 3 sts = 1 st on hook (= 1 tr-group) *. Repeat from *-* around, and finish with 1 tr-group in last ch, 1 ch and 1 sl st in 3rd ch from beg of round = 16 tr-groups. Cut the thread. ROUND 3: Change colour. Crochet 4 ch, * 3 tr in next ch, 1 ch *, repeat from *-*, and finish with 2 tr in last ch and 1 sl st in 3rd ch from beg of round. Cut the thread. ROUND 4: Change colour. Crochet 1 ch, 1 dc in first ch, * 3 ch, 1 dc in next ch, 3 ch, 1 dc in the same ch, 3 ch, 1 dc in next ch, 3 ch, 1 dc in next ch, 7 ch, 1 dc in the same ch, 3 ch, 1 dc in next ch, *, repeat from *-*, and finish with 1 sl st in first dc from beg of round (= 4 ch-loops with 7 ch = corners). ROUND 5: 1 ch, 1 dc in first dc from last round, * skip the 3-ch-loop, in the next 3-ch-loop crochet as follows: 4 tr, 1 ch, 4 tr. Skip the next 3-ch-loop, 1 dc in next dc, skip the next 3-ch-loop, in 7-ch-loop crochet as follows: 6 tr, 2 ch, 6 tr. Skip the next 3 ch-loop, 1 dc in next dc *, repeat from *-* ending with 1 sl st in first dc from beg of round. Cut the thread. ROUND 6: Change colour. * 1 tr(= replace first time with 3 ch) in first dc, 3 ch, 1 dc in ch in the 8-tr-group, 3 ch, 1 tr in next dc, 5 ch, in corner (2 ch-loop) crochet as follows: 1 dc, 3 ch, 1 dc, 5 ch *, repeat from *-*, and finish with 1 sl st in 3rd ch from beg of round. ROUND 7: Crochet, * 4 tr(= replace first tr with 3 ch first time) in 3-ch-loop, 4 tr in next 3-ch-loop, 5 tr in 5-ch-loop, in corner (3-ch-loop) crochet as follows: 3 tr, 2 ch, 3 tr, 5 tr in next 5-ch-loop *, repeat from *-*, and finish with 1 sl st in 3rd ch from beg of round. ROUND 8: 1 ch, 1 dc in each of the next 16 tr, * in corner (2-ch-loop) crochet as follows: 1 dc, 1 ch, 1 dc. Then 1 dc in the next 24 tr * repeat from *-*, and finish with 1 dc in each of the last 8 dc, 1 sl st in first ch from beg of round. Cut the thread. Fasten all thread ends. ASSEMBLY: Place the squares as shown in M.1 with 5 squares horizontally and 6 squares vertically – see above! Crochet squares tog with off-white and crochet hook size 5 mm as shown in M.2 – crochet them tog vertically first and then horizontally. |
||||||||||
Diagram explanations |
||||||||||
|
||||||||||

|
||||||||||
|
Have you made this or any other of our designs? Tag your pictures in social media with #dropsdesign so we can see them! Do you need help with this pattern?You'll find tutorial videos, a Comments/Questions area and more by visiting the pattern on garnstudio.com. © 1982-2024 DROPS Design A/S. We reserve all rights. This document, including all its sub-sections, has copyrights. Read more about what you can do with our patterns at the bottom of each pattern on our site. |
||||||||||


With over 40 years in knitting and crochet design, DROPS Design offers one of the most extensive collections of free patterns on the internet - translated to 17 languages. As of today we count 304 catalogues and 11422 patterns - 11422 of which are translated into English (UK/cm).
We work hard to bring you the best knitting and crochet have to offer, inspiration and advice as well as great quality yarns at incredible prices! Would you like to use our patterns for other than personal use? You can read what you are allowed to do in the Copyright text at the bottom of all our patterns. Happy crafting!
Comments / Questions (143)
Hi, Is there a video of this pattern being made up? I am having a great deal of difficulty understanding the written pattern!
05.01.2021 - 01:01DROPS Design answered:
Dear Kathy, we do not have any video for this square yet, follow the pattern stitch after stitch, round after round to get how to work it. Happy crocheting!
05.01.2021 - 11:25Omg 2: 3 lm, 1 st i den første af af de 3 lm osv frem til *. Jeg synes den første st gruppe bliver meget anderledes end de andre st grupper. Er der en fejl i opskriften så det kun er en st der laves i den første lm og ikke en hel st gruppe, da de 3 lm = 1 st?
31.10.2020 - 20:02DROPS Design answered:
Hej, Den første stangmaske gruppe ser lidt anderledes i og med først stangmaske består af 3 luftmasker, men det kommer du ikke til at se i de færdige ruder. God fornøjelse!
05.11.2020 - 13:19I am trying to make the Seaside Blues blanket. I can't seem to find the details for the assembly. I only have the chart M 2. I am not an expert crocheted by any means. I do understand the other instructions as I have made other blankets. I like the way these squares are joined, I just don't know how to do it. Thank you so much and I appreciate your patience.
01.07.2020 - 14:28DROPS Design answered:
Dear Mrs Hasian, you will find here a video showing how to crochet the squares together in both height and width, ie as shown in M.2 - see diagram key for the number of chains to crochet between sc/squares. Happy crocheting!
01.07.2020 - 15:41I omg 6: Efter de 3 lm, der erstatter en st, står der, at man skal lave en fm - i hvilken maske fra forrige omgang skal denne laves? Synes ikke, at jeg kan fornemme det ud fra billederne af tæppet.
09.04.2020 - 23:30DROPS Design answered:
Hei Ida. Du avsluttet 5. omgang med 1 kjedemaske i 1. fastmaske på omgangen. Når du begynner på 6. omgang hekler du 3 luftmasker (erstatter 1.stav), deretter hekler du 3 luftmasker, 1 fastmaske om luftmasken i 8-stavgruppen osv... Bokstaven i mangler foran 1 fm. Slik skal det stå: 6.OMG: Skift farve. * 1 st (erstattes af 3 lm første gang) i 1 fm, 3 lm, 1 fm om lm i 8-st-gruppen..... mvh DROPS design
15.04.2020 - 15:33Good morning I would like to have photos of the patterns if is possible because I need to do it for me is better to follow the patterns an to see the images thank you in advance. Amelie
27.10.2019 - 09:48DROPS Design answered:
Dear Amelie. I'm sorry but this pattern has no charts, only written instructions. There are no more photos available. Happy crocheting.
27.10.2019 - 22:38Szeretném a mintát rajzban látni, mert még nem vagyok egy nagy horgolóbajnok. Köszönöm
09.09.2019 - 15:55DROPS Design answered:
Kedves Irén, sajnos nem áll módunkban külön rajzot készíteni a mintáról. Próbálja meg követni a leírást, ha elakad, javaslom a Facebookon a Magyar DROPS csoportot, ahol közvetlenül is kaphat segítséget kéziunkás társaitól. Siikeres kézimunkázást!
30.09.2019 - 22:33Welke is de afwerking vanaf dat alle vierkantjes aan elkaar gehaakt zijn? Hoe moet je de rand errond haken??
13.08.2019 - 00:10DROPS Design answered:
Dag De Clerck Ann,
In teltekening M.2 staat aangegeven hoe je de vierkanten in elkaar haakt.
Er wordt verder geen rand rondom de deken gehaakt.
01.09.2019 - 14:19Round 5 doesn't work, even your corrected one. I doesn't work out as written.. The picture is showing 4dc in 1 chain 3, sc, 4dc in the next chain 3. Is this correct?
15.04.2019 - 04:21DROPS Design answered:
Dear Kim, in the middle of each side, you will have 4 dc, 1 ch, 4 dc, and in each of the 4 corner 6 dc, 2 ch, 6 dc, and there will be 1 sc between each dc-groups. Happy crocheting!
23.04.2019 - 10:04Goeie dag, Ek sukkel om die patroon af te laai of om na my epos adres te stuur. Kan u my asseblief help en verduidelik die regte prosedure. Baie dankie.
18.03.2019 - 15:44DROPS Design answered:
Dag Charline,
Als je op de knop 'Patroon' (de knop met het print-pictogram) klikt, krijg je een nieuw venster en dan klik je helmaal rechts bovenin op de link om het patroon te printen. Als je het patroon niet wilt printen, maar bewaren als pdf, dan kun de bestemming wijzigen, zodat hij niet naar de printer gestuurd word maar als pdf opgeslagen wordt. Verder kun je ook een link van het naar je e-mail sturen, zodat je het later kunt afdrukken. Hopelijk is het zo duidelijk.
21.03.2019 - 17:17Ich habe keinen Laden wo ich nachfragen kann da ich den Garn online beziehe. Außerdem hätte ich erwartet, dass Sie als Hersteller eine solche Frage am besten beantworten können
13.03.2019 - 13:13DROPS Design answered:
Liebe Veronique, Ihr DROPS Laden kann Ihnen persönnliche Hilfe anbringen, deshalb ist es immer besser, daß Sie sich direkt an Ihren DROPS Laden anwenden, Telefon und Email finden Sie unter die Liste. Viel Spaß beim stricken!
13.03.2019 - 15:07