DROPS Muskat
DROPS Muskat
100% Cotton
from 2.80 $ /50g
Get the yarn to make this pattern from 28.00$.

The yarn cost is calculated from the pattern’s smallest size and the yarn’s cheapest product type. Looking for an even better price? You might find it on the DROPS Deals!

DROPS SS24

Seaside Victoria

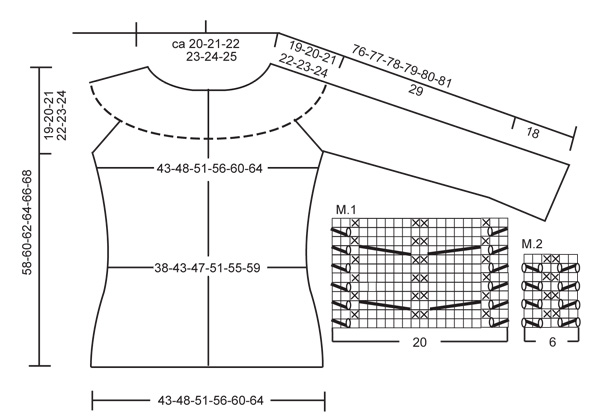
DROPS jacket in ”Muskat” with yoke knitted from side to side with cables and shortened rows. Size S to XXXL.

DROPS 119-25
DROPS design: Pattern no R-556
--------------------------------------------------------
Size: S - M - L - XL - XXL - XXXL
Finished measurements:
Bust: 86-96-102-112-120-128 cm /33 7/8"-37 3/4"-40"-44"-47 1/4"-50 3/8"
Full length: 58-60-62-64-66-68 cm / 22¾''-23 5/8''-24 3/8''-25¼''-26''-26¾''

Materials: DROPS MUSKAT from Garnstudio
color no 06, light pink 500-550-600-650-750-800 g

DROPS DOUBLE POINTED NEEDLES and CIRCULAR NEEDLE (80 cm / 32'') size 4 mm/US 6 – or size needed to get 21 sts x 28 rows in stockinette st = 10 x 10 cm / 4'' x 4''.

DROPS DOUBLE POINTED NEEDLES and CIRCULAR NEEDLE (80 cm / 32'') size 3.5 mm/US 4 - for edges.

DROPS MOTHER OF PEARL BUTTONS, no 521: 6-6-7-7-7-7 pcs.

-------------------------------------------------------

Alternative Yarn – See how to change yarns here
Yarn Groups A to F – Use the same pattern and change the yarn here
Yarn usage using an alternative yarn – Use our yarn converter here

-------------------------------------------------------

DROPS Muskat
DROPS Muskat
100% Cotton
from 2.80 $ /50g
Get the yarn to make this pattern from 28.00$.

The yarn cost is calculated from the pattern’s smallest size and the yarn’s cheapest product type. Looking for an even better price? You might find it on the DROPS Deals!

Pattern instructions

NOTE: This pattern is written in American English. All measurements in charts are in cm. For conversion from inches to cm - click here. There are different terms for crocheting in American and British English. If this pattern includes crochet, click for "crochet terms" here. For this pattern in British English, please click here.
GARTER ST (back and forth on needle): K all rows.

GARTER ST (in the round): K 1 round, P 1 round.

SHORTENED ROWS:
To make yoke wider along bottom edge work shortened rows as follows:
* Work 2 rows on all sts, work row to marker-2, turn, tighten thread and work return row, work 2 rows on all sts, work row to marker-1, turn, tighten thread and work return row *, repeat from *-*, i.e. 1 repeat = 4 rows at the top and 8 rows at the bottom.

PATTERN:
See diagram M.1 and M.2 - diagram is seen from RS and shows 1 pattern repeat.

DECREASING TIP (applies to body piece and sleeves):
Make all dec from RS!
Dec as follows BEFORE marker at the side: K2 tog.
Dec as follows AFTER marker at the side: slip 1 st as if to K, K1, psso.

BUTTONHOLES:
Make buttonholes on right front band from WS. 1 BUTTONHOLE = K tog 3rd and 4th st
from mid front and make 1 YO.
Make buttonholes when piece measures:
SIZE S and M: 6, 14, 22 and 30 cm / 2 3/8", 5½", 8 3/4" and 11 3/4".
SIZE L, XL, XXL, XXXL: 6, 13, 20, 27 and 34 cm / 2 3/8", 5 1/8", 8", 10 5/8" and 13 3/8".
--------------------------------------------------------
--------------------------------------------------------

YOKE (part 1):
Worked back and forth on 2 double pointed needles, from side to side from mid front.
LOOSELY cast on 22 sts (for all sizes) on needle size 4 mm / US 6 with Muskat. K 2 rows on all sts (first row = RS from bottom edge).
Work next row as follows: K4, K2 tog, 1 YO, K1, K2 in each of the next 3 sts (= K6), K2, K2 in each of the next 3 sts (= K6), K1, 1 YO, slip 1 st as if to K, K1, psso, K4 = 28 sts. Work next row as follows from WS: K4, P2, K1, P6, K2, P6, K1, P2 and K4, turn. Insert 2 markers in piece as follows (from RS): marker-1 after 7 sts and marker-2 after a total of 21 sts, i.e. there are 7 sts after marker-2 at the top. Now work SHORTENED ROWS – see above - and PATTERN as follows: 4 GARTER STS – see above, M.1 on the next 20 sts and 4 garter sts. REMEMBER THE GAUGE!
Continue until piece measures approx 96-100-104-108-112-116 cm / 37 3/4"-39 3/8"-41"-42½"-44"-45 3/4"- along bottom edge (piece measures approx 48-50-52-54-56-58 cm / 19''-19¾''-20½''-21¼''-22''-22¾'' at the top) - adjust to after 1 full repeat. Work next row as follows: K7, * K2 tog, K2 tog, K2 tog *, K2, repeat from *-* 1 more time, K7 = 22 sts. K 1 row on all sts, and bind off in K sts from RS. Remove markers.

YOKE (part 2):
Worked back and forth on circular needle. Cast on 5 sts (= left front band) on circular needle size 4 mm / US 6, then pick up 1 st in outer loop of each garter st along bottom edge of yoke part-1, cast on 5 new sts at the end of row (= right front band) = approx 200 to 260 sts. K 1 row from WS on all sts, AT THE SAME TIME adjust no of sts to 210-218-230-238-250-258 (if you have less sts make a YO at evenly intervals across the row to make up the no of sts – work YO into back of loop on return row to avoid a hole – if you have to many sts K2 tog evenly across the row).
Insert 4 markers in piece as follows from RS: MARKER-1 after 36-38-40-42-44-46 sts, MARKER-2: 38-38-40-40-42-42 sts from marker-1, MARKER-3: 62-66-70-74-78-82 sts from marker-2 and MARKER-4: 38-38-40-40-42-42 sts from marker-3 (= 36-38-40-42-44-46 sts left after the last marker).
Work next row as follows (from RS): 5 front band sts in garter st, 28-30-32-34-36-38 stockinette sts, M.2 (= 6 sts – marker-1 sits in the middle of these sts), 32-32-34-34-36-36 stockinette sts, M.2 (marker-2 sits in the middle of these sts), 56-60-64-68-72-76 stockinette sts, M.2 (marker-3 sits in the middle of these sts), 32-32-34-34-36-36 stockinette sts, M.2 (marker-4 sits in the middle of these sts), 28-30-32-34-36-38 stockinette sts and 5 front band sts in garter st.
In M.2 you inc 2 sts on every other row (incorporate inc sts in stockinette st as you go along). Continue like this until there are 298-322-342-366-386-402 sts on needle. Work 1 row from WS after the last inc, yoke now measures a total of approx 19-20-21-22-23-24 cm / 7½''-8''-8¼''-8¾''-9''-9½'' in the height.

BODY PIECE:
Continue as follows: Work row to marker-1 (= 47-51-54-58-61-64 sts), slip sts from here to marker-2 on a stitch holder for sleeve (= 60-64-68-72-76-78 sts), cast on 6-8-10-12-14-16 new sts under sleeve, work sts to marker-3 (= 84-92-98-106-112-118 sts), slip sts from here to marker-4 on a stitch holder for sleeve (= 60-64-68-72-76-78 sts), cast on 6-8-10-12-14-16 new sts under sleeve, work remaining sts (= 47-51-54-58-61-64 sts). There is now a total of 190-210-226-246-262-278 sts on needle. Remove all markers. Insert 1 new marker each side 50-55-59-64-68-72 sts in from each side (= 90-100-108-118-126-134 sts between markers on back piece). NOW MEASURE PIECE FROM HERE!
Continue in stockinette st back and forth on needle with 5 front band sts in garter st each side towards mid front. When piece measures 3-3-4-4-5-5 cm / 1 1/8''-1 1/8''-1½''-1½''-2''-2'' dec 1 st each side of both markers – SEE DECREASING TIP! Repeat the dec on every 4 cm / 1½'' a total of 5 times = 170-190-206-226-242-258 sts.
AT THE SAME TIME when piece measures 6 cm / 2 3/8'' make BUTTONHOLES – see above!
When piece measures 23-24-25-26-27-28 cm / 9''-9½''-9¾''-10¼''-10 5/8''-11'' inc 1 st each side of both markers (inc from RS by K2 in st each side of marker), repeat the inc on every 3 cm / 1 1/8'' a total of 5 times = 190-210-226-246-262-278 sts. When piece measures 38-39-40-41-42-43 cm / 15-15¼''-15¾''-16 1/8''-16½''-17'' change to circular needle size 3.5 mm / US 4, work 6 rows garter st and bind off loosely.

SLEEVE:
Worked in the round on double pointed needles. Slip the 60-64-68-72-76-78 sts from one stitch holder on double pointed needles size 4 mm / US 6 and pick up 1 st in each of the 6-8-10-12-14-16 sts cast on under sleeve = 66-72-78-84-90-94 sts.
NOW MEASURE PIECE FROM HERE!
Insert a marker mid under sleeve and work stockinette st in the round. When sleeve measures 2 cm / 3/4'' dec 1 st each side of marker – SEE DECREASING TIP! Repeat the dec on every 4-3-2.5-2-2-2 cm / 1½''-1 1/8''-7/8''-3/4''-3/4''-3/4'' a total of 7-9-11-13-14-14 times = 52-54-56-58-62-66 sts. When piece measures 29 cm / 11 3/8'' work next round as follows: K 21-22-23-24-26-28, P1, K2 in each of the next 3 sts (= K6), P2, K2 in each of the next 3 sts (= K6), P1 and K 21-22-23-24-26-28 = 58-60-62-64-68-72 sts. Continue as follows: 18-19-20-21-23-25 stockinette sts, 1 garter st, M.1 (= 20 sts), 1 garter st and 18-19-20-21-23-25 stockinette sts. When sleeve measures approx 45 cm / 17 3/4'' (adjust after 1 full repeat) K2 tog on the 6 sts on cable (i.e. 6 sts become 3 sts) – work remaining sts as before = 52-54-56-58-62-66 sts. Change to double pointed needles size 3.5 mm / US 4, work 6 rows garter st on all sts and bind off loosely.
Knit the other sleeve in the same way on sts on the other stitch holder.

LEFT FRONT BAND:
Pick up 1 st in each of the 5 sts cast on for front band when working yoke, part-2. Work garter st back and forth on 2 double pointed needles size 3.5 mm / US 4 until front band measures approx 2 cm / 3/4'' less than the width of yoke, part 1 - slip sts on a stitch holder. Sew front band to yoke, edge to edge – pull it slightly when sewing it on.

RIGHT FRONT BAND:
Like left front band, but after 1 cm / 3/8'' make 1 buttonhole in line with the others on front band, repeat when 2 rows remain.

NECKLINE:
Work the 5 sts from right front band in on circular needle size 3.5 mm / US 4, pick up 1 st in the outer loop in each garter st along neckline (= approx 100 to 120 sts) and work the 5 sts from left front band in on needle = approx 110 to 130 sts in total. K 3 rows back and forth on needle and bind off.

ASSEMBLY:
Sew on buttons.

Diagram

All measurements in charts are in cm.

symbols = K from RS, P from WS.
symbols = P from RS, K from WS.
symbols = slip 3 sts on cable needle behind piece, K3, K3 from cable needle.
symbols = slip 3 sts on cable needle in front of piece, K3, K3 from cable needle.
symbols = K2 tog, 1 YO.
symbols = 1 YO, slip 1 st as if to K, K1, psso.
symbols = 1 YO, K2 tog, 1 YO.
symbols = 1 YO, slip 1 st as if to K, K1, psso, 1 YO.
diagram

Each of our patterns has specific tutorial videos to help you.

Do you have a question? See a list of frequently asked questions (FAQ)

Knitting tension is what determines the final measurements of your work, and is usually measured per 10 x 10 cm. It is provided like so: number of stitches in width x number of rows in height - eg: 19 stitches x 26 rows = 10 x 10 cm.

The knitting tension is very individual; some people knit/crochet loosely while others work tightly. You adjust the knitting tension with the needle size, which is why the suggested needle size only serve as a guide! You need to adjust this (up or down) to ensure that YOUR knitting tension matches the knitting tension provided in the pattern. If you work with a different knitting tension than provided you will have a different yarn consumption, and your work will have different measurements than what the pattern suggests.

The knitting tension also determines which yarns can replace each other. As long as you achieve the same knitting tension you can replace one yarn with another.

See DROPS lesson: How to measure your tension/gauge

See DROPS video: How to make a gauge tension swatch

The required amount of yarn is provided in grams, eg: 450 g. To calculate how many balls you’ll need you first need to know how many grams are in 1 ball (25g, 50g or 100g). This information is available if you click on the individual yarn quality on our pages. Divide the amount required with the amount of each ball. For example, if each ball is 50g (the most common amount), the calculation will be as follows: 450 / 50 = 9 balls.

The important thing when changing from one yarn to another is that the knitting/crochet tension remains the same. This is so that the measurements of the finished piece will be the same as on the sketch provided. It is easier to achieve the same knitting tension using yarns from the same yarn group. It is also possible to work with multiple strands of a thinner yarn to achieve the knitting tension of a thicker one. Please try our yarn converter. We recommend you to always work a test swatch.

Please NOTE: when changing yarn the garment might have a different look and feel to the garment in the photo, due to individual properties and qualities of each yarn.

See DROPS lesson: Can I use a different yarn than the one mentioned in the pattern?

All our yarns are categorised into yarn groups (from A to F) according to thickness and knitting tension – group A contains the thinnest yarns and group F the thickest. This makes it easier for you to find alternative yarns to our patterns, should you wish to switch yarn. All yarns within the same group have a similar knitting tension and can easily replace each other. However, different yarn qualities have different structures and properties which will give the finished work a unique look and feel.

Click here for an overview of the yarns in each yarn group

At the top of all our patterns you’ll find a link to our yarn converter, which is a helpful tool should you wish to use a different yarn than suggested. By filling in the yarn quality you wish to replace, the amount (in your size) and number of strands, the converter will present good alternative yarns with the same knitting tension. Additionally it will tell you how much you’ll require in the new qualities and whether you’ll need to work with multiple strands. Most skeins are 50g (some are 25g or 100g).

If the pattern is worked with multiple colours, every colour will have to be converted separately. Similarly, if the pattern is worked with several strands of different yarns (for example 1 strand Alpaca and 1 strand Kid-Silk) you will have to find alternatives for each, individually.

Click here to see our yarn converter

Since different yarns have different qualities and textures we have chosen to keep the original yarn in our patterns. However, you can easily find options among our available qualities by using our yarn converter, or simply pick a yarn from the same yarn group.

It is possible that some retailers still have discontinued yarns in stock, or that someone has a few skeins at home that they would like to find patterns for.

The yarn converter will provide both alternative yarn as well as required amount in the new quality.

If you think it's hard to decide what size to make, it can be a good idea to measure a garment you own already and like the size of. Then you can pick the size by comparing those measures with the ones available in the pattern's size chart.

You'll find the size chart at the bottom of the pattern.

See DROPS lesson: How to read size chart

The needle size provided in the pattern serves only as a guide, the important thing is to follow the knitting tension. And since knitting tension is very individual, you will have to adjust the needle size to ensure that YOUR tension is the same as in the pattern – maybe you’ll have to adjust 1, or even 2 needle sizes, up or down to achieve the correct tension. For this, we recommend that you work test swatches.

Should you work with a different knitting tension than the one provided, the measurements of the finished garment might deviate from the measurement sketch.

See DROPS lesson: How to measure your tension/gauge

See DROPS video: How to make a gauge tension swatch

Working a garment top-down provides more flexibility and room for personal adjustment. For example it is easier to try the garment on while working, as well as making adjustments to length of yoke and shoulder caps.

The instructions are carefully explaining every step, in the correct order. Diagrams are adjusted to the knitting direction and are worked as usual.

The diagram depicts all rows/rounds, and every stitch seen from the right side. It is read from bottom to top, from right to left. 1 square = 1 stitch.

When working back and forth, every other row is worked from the right side and every other row is worked from the wrong side. When working from the wrong side, the diagram will have to be worked reversed: from left to right, knit stitches are purled, purl stitches are knit etc.

When working in the round every round is worked from the right side and the diagram are worked from right to left on all rounds.

See DROPS lesson: How to read knitting diagrams

The diagram depicts all rows/rounds, and every stitch seen from the right side. It is worked from bottom to top, from right to left.

When working back and forth every other row is worked from the right side: from right to left and every other row is worked from the wrong side: from left to right.

When working in the round, every row in the diagram are worked from the right side, from right to left.

When working a circular diagram you start in the middle and work your way outwards, counter clockwise, row by row.

The rows usually start with a given number of chain stitches (equivalent to the height of the following stitch), this will either be depicted in the diagram or explained in the pattern.

See DROPS lesson: How to read crochet diagrams

Instructions for working several diagrams after each other on the same row/round, will often be written like so: “work A.1, A.2, A.3 a total of 0-0-2-3-4 times". This means you work A.1 once, then A.2 is worked once, and A.3 is repeated (in width) the number of times provided for your size – in this case like so: S = 0 times, M = 0 times, L=2 times, XL= 3 times and XXL = 4 times.

The diagrams are worked as usual: begin with the first row in A.1, then work the first row in A.2 etc.

See DROPS lesson: How to read knitting diagrams

See DROPS lesson: How to read crochet diagrams

The total width of the garment (from wrist-to-wrist) will be larger in the larger sizes, despite the actual sleeves being shorter. The larger sizes have longer sleeve caps and wider shoulders, so there will be a good fit in all sizes.

The measurement sketch/schematic drawing provides information regarding the full length of the garment. If it’s a jumper or a jacket the length is measured from the highest point on the shoulder (usually closest to the neckline), and straight down to the bottom of the garment. It is NOT measured from the tip of shoulder. Similarly, the length of yoke is measured from the highest point on the shoulder and down to where yoke is split into body and sleeves.

See DROPS lesson: How to read a schematic drawing

Diagrams are often repeated on the round or in height. 1 repeat is the diagram the way it appears in the pattern. If it says to work 5 repeats of A.1 in the round, then you work A.1 a total of 5 times after/next to each other in the round. If it says to work 2 repeats of A.1 vertically/in height you work the entire diagram once, then begin again at the start and work the entire diagram one more time.

Chain stitches are slightly narrower than other stitches and to avoid working the cast-on edge too tight, we simply chain more stitches to begin with. The stitch count will be adjusted on the following row to fit the pattern and measurement sketch.

The rib edge is more elastic and will contract slightly compared to, for example, stocking stitch. By increasing before the rib edge, you avoid a visible difference in width between the rib edge and the rest of the body.

It’s very easy to cast off too tightly, and by making yarn overs while casting off (and simultaneously casting these off) you avoid a too tight cast off edge.

See DROPS video: How to bind off with yarn overs (yo)

To achieve an even increase (or decrease) you can increase on, for example: every 3rd and 4th row alternately, like so: work 2 rows and increase on the 3rd row, work 3 rows and increase on the 4th. Repeat this until the increase is complete.

See DROPS lesson: Increase or decrease 1 st on every 3rd and 4th row alternately

Should you prefer to work in the round instead of back and forth, you may of course adjust the pattern. You’ll need to add steeks mid-front (usually 5 stitches), and follow the instructions. When you would normally turn and work from the wrong side, simply work across the steek and continue in the round. At the end you’ll cut the piece open, pick up stitches to work bands, and cover the cut edges.

See DROPS video: How to knit steeks and cut open

Should you prefer to work back and forth instead of in the round, you may of course adjust the pattern so you work the pieces separately and then assemble them at the end. Divide the stitches for the body in 2, add 1 edge stitch in each side (for sewing) and work the front and back pieces separately.

See DROPS lesson: Can I adapt a pattern for circular needles into straight needles?

Pattern repeats can vary slightly in the different sizes, in order to get the correct proportions. If you’re not working the exact same size as the garment in the photo, yours might deviate slightly. This has been carefully developed and adjusted so that the complete impression of the garment is the same in all sizes.

Make sure to follow instructions and diagrams for your size!

If you have found a pattern you like which is available in women’s size it’s not very difficult to convert it to men’s size. The biggest difference will be the length of sleeves and body. Start working on the women size that you think would fit across the chest. The additional length will be worked right before you cast off for the armhole/sleeve cap. If the pattern is worked top-down you can add the length right after the armhole or before the first decrease on sleeve.

Regarding additional yarn amount, this will depend on how much length you add, but it is better with a skein too many than too few.

All yarns will have excess fibres (from production) that might come off as lint or shedding. Brushed yarns (ie hairier yarns) have more of these loose, excess fibres, causing more shedding.

Shedding also depends on what is worn under or over the garment, and whether this pulls at the yarn fibres. It’s therefore not possible to guarantee that there will be no shedding

Below are some tips on how to get the best result when working with hairier yarns:

1. When the garment is finished (before you wash it) shake it vigorously so the looser hairs come off. NOTE: do NOT use a lint roller, brush or any method that pulls at the yarn.

2. Place the garment in a plastic bag and put it in your freezer - the temperature will cause the fibres to become less attached to each other, and excess fibres will come off easier.

3. Leave in the freezer for a few hours before taking it out and shaking it again.

4. Wash the garment according to the instructions on the yarn label.

Pilling is a natural process that happens to even the most exclusive of fibers. It's a natural sign of wear and tear that is hard to avoid, and that is most visible in high friction areas of your garment like a sweater's arms and cuffs.

You can make your garment look as new by removing the pilling, using a fabric comb or a pill/lint remover.

Still can't find the answer you need? Then scroll down and leave your question so one of our experts can try to help you. This will be done normally within 5 to 10 working days.
In the meantime, you can read the questions and answers that others have left to this pattern or join the DROPS Workshop on Facebook to get help from fellow knitters/crocheters!

You might also like...

Post a comment to pattern DROPS 119-25

We would love to hear what you have to say about this pattern!

If you want to leave a question, please make sure you select the correct category in the form below, to speed up the answering process. Required fields are marked *.

Comments / Questions (50)

country flag Ina wrote:

Bei mir reicht die angegebene Wollmenge für Größe S nicht, Vorder- und Rückenteil (400g)und ein Ärmel(100g) sind fertig. Es fehlen jetzt noch ein ganzer Ärmel und die Blenden. Meine Maschenprobe ist M18 x R26. Es fehlen jetzt noch 150 g. Wie kann das sein?

26.10.2019 - 19:30

DROPS Design answered:

Liebe Ina, stricken Sie DROPS Muskat? Diese Jacke wird hier mit Muskat und eine Maschenprobe von 21 R x 28 R gestrickt - wenn Sie eine andere Wolle benutzt haben, war vielleicht die Umrechnung falsch (hier kalkuliert man die gesamte Länge). Wenden Sie sich bitte an Ihrem Laden, wo Sie die Wolle gekauft haben. Viel Spaß beim stricken!

04.11.2019 - 12:16

country flag Deborah wrote:

Buongiorno. Le indicazioni delle asole sono sbagliate perché se si misura da sotto la manica la prima asola si fa a circa 16cm dall’inizio del secondo sprone e quindi risulta che manca un’asola. Guardando la foto mancherebbe la terza asola dall’alto.

16.07.2018 - 09:31

DROPS Design answered:

Buongiorno Deborah, la 1° asola sulla parte del corpo si lavora dopo 6 cm e le altre asole alle distanze indicate: se sta lavorando ad esempio la taglia S le altre asole saranno a 14, 22 e 30 cm dall'inizio del corpo. Le prime 2 asole verranno lavorate alla fine quando si riprendono le maglie dello sprone. Buon lavoro!

16.07.2018 - 09:56

country flag Deborah wrote:

Quindi ogni volta che faccio il ferro accorciato al segnapunto 1 e ritorno, non lo considero come ferro sullo schema M1 o solo quando coincide con l’intreccio?

23.06.2018 - 17:27

DROPS Design answered:

Buonasera Deborah. Non consideri il ferro accorciato fino al segnapunti 1 come ferro dello schema. Buon lavoro!

23.06.2018 - 21:05

country flag Deborah wrote:

Scusate ma non ho capito. Se unisco tutte le info, guardando il motivo M1 le righe 1 e 2 sono complete, la 3 dove si fanno gli intrecci ha il ferro accorciato al segnapunti 2, riga 4 è il ferro di ritorno, 5 e 6 ferro completo, 7 ferro accorciato fino al segnapunto 1, 8 ritorno. Seguendo questa ripetizione mi trovo alla riga 15 dove dovrei fare l’intreccio e anche il ferro accorciato al segnapunto 1. Sbaglio la partenza iniziale?

23.06.2018 - 08:41

DROPS Design answered:

Buongiorno Deborah. Quando arriva al ferro 15, lavora fino al segnapunti 1: quindi le 4 m a legaccio + le prime 3 del motivo M1. Non viene lavorata nessuna maglia di quelle che vengono intrecciate. Ferro 16: lavora su queste 7 m. Ferro 17: lavora come se fosse il 15, su tutte le m e intrecciando. Ci riscriva se è ancora in difficoltà. Buon lavoro!

23.06.2018 - 10:01

country flag Deborah wrote:

Buonasera. Ho un problema a far coincidere il motivo M1 con i ferri accorciati. Mi trovo che sul ferro della treccia dovrei fare il ferro accorciato fino al segnapunto 1: quindi salto la treccia o la faccio al ferro successivo benché non coincidano poi il numero di ferri?

23.06.2018 - 00:41

DROPS Design answered:

Buongiorno Deborah. Il segnapunti 1 si trova dopo la terza maglia del motivo M1. Lavora fino al segnapunti, lavora il ferro di ritorno e al ferro successivo intreccia. Verifichi sempre che gli intrecci siano a distanza di 6 ferri (lavorati sulle maglie della treccia) l'uno dall'altro. Buon lavoro!

23.06.2018 - 08:06

country flag Catie wrote:

Je n'ai pas compris comment compter les rangs raccourcis. Qu'entendez-vous par 1 rapport = 4 rangs en haut et 8 rangs en bas ?

29.12.2015 - 20:39

DROPS Design answered:

Bonjour Catie, 1 série des rangs raccourcis = 8 rangs tricotés en début de rang (= bas de la bordure) et 4 rangs seulement en fin de rang (= haut de la bordure) - vu sur l'endroit. Bon tricot!

02.01.2016 - 15:21

Anna Stummer wrote:

1. Sind bei M.1und M2 jeweils nur die Reihen auf der Vorderseite gezeichnet und die Rückreihe links bzw. Maschen, wie sie erscheinen? 2. Bei Anleitung für Ärmel steht "nach einem ganzen Rapport M1" - was ist unter "ganzer Rapport" zu verstehen - wieviele Reihen, denn im Diagramm sind es nur 2 Verzopfungen?? Vielen Dank für Ihre Antwort! Anna Stummer

21.08.2015 - 18:01

DROPS Design answered:

Antwort siehe unten! :-)

01.09.2015 - 23:26

country flag Anna Stummer wrote:

1. Sind bei M.1und M2 jeweils nur die Reihen auf der Vorderseite gezeichnet und die Rückreihe links bzw. Maschen, wie sie erscheinen? 2. Bei Anleitung für Ärmel steht "nach einem ganzen Rapport M1" - was ist unter "ganzer Rapport" zu verstehen - wieviele Reihen, denn im Diagramm sind es nur 2 Verzopfungen?? Vielen Dank für Ihre Antwort! Anna Stummer

18.08.2015 - 16:30

DROPS Design answered:

Es sind alle Reihen gezeichnet, also Hin- und Rück-R. 1 Rapport von M.1 besteht aus 12 R. Es soll aber nicht heißen, dass Sie nur 12 R stricken, sondern Sie stricken in etwa bis zur angegebenen Höhe, achten dabei aber darauf, dass 1 Rapport, also die 12 R, abgeschlossen sind.

01.09.2015 - 10:44

country flag Ana wrote:

Não consigo compreender como se fazem os aumentos em M2. São feitos de cada lado de M2 ao longo de toda a carreira ou têm de ser incorporados dentro do esquema de M2? Obrigada.

03.03.2015 - 15:05

DROPS Design answered:

Os aumentos estão já incluídos em cada repetição do diagrama M2. Basts seguir o diagrama. Bom tricô!

05.03.2015 - 11:22

country flag Ana wrote:

Não consigo compreender como se fazem os aumentos em M2. São feitos de cada lado de M2 ao longo de toda a carreira ou têm de ser incorporados dentro do esquema de M2? Obrigada.

28.02.2015 - 21:10