DROPS Fabel
DROPS Fabel
75% Wool, 25% Polyamide
from 3.00 $ /50g
Get the yarn to make this pattern from 12.00$.

The yarn cost is calculated from the pattern’s smallest size and the yarn’s cheapest product type. Looking for an even better price? You might find it on the DROPS Deals!

DROPS SS24

Aquarius

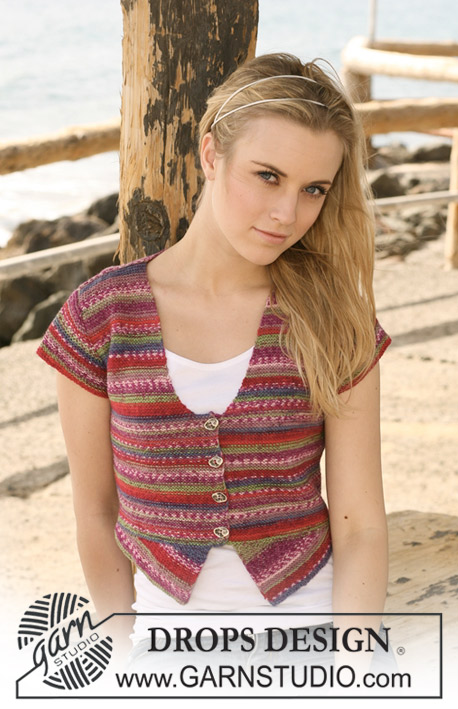
DROPS waistcoat in hexagons knitted in garter st in “Fabel”. Size S - XXXL

DROPS 120-29
DROPS design: Pattern no FA-117
--------------------------------------------------------
Size: S/M - L/XL - XXL/XXXL
Finished measurements:
Bust: 84-104-124 cm / 33"-41"-48¾"
Full length: 40-48-56 cm / 15¾"-19"-22"

Materials: DROPS FABEL from Garnstudio
150-200-250 g color no 910, sea mist
50-100-100 g color no 100, off-white

10 pcs DOUBLE POINTED NEEDLES and DROPS POINTED NEEDLES size 3 mm / US 2or3 – or size needed to get 24 sts x 48 rows in garter st = 10 x 10 cm / 4" x 4".
The side of a hexagon should measure approx 4-5-6 cm / 1½"-2"-2⅜".

-------------------------------------------------------

Alternative Yarn – See how to change yarns here
Yarn Groups A to F – Use the same pattern and change the yarn here
Yarn usage using an alternative yarn – Use our yarn converter here

-------------------------------------------------------

DROPS Fabel
DROPS Fabel
75% Wool, 25% Polyamide
from 3.00 $ /50g
Get the yarn to make this pattern from 12.00$.

The yarn cost is calculated from the pattern’s smallest size and the yarn’s cheapest product type. Looking for an even better price? You might find it on the DROPS Deals!

Pattern instructions

NOTE: This pattern is written in American English. All measurements in charts are in cm. For conversion from inches to cm - click here. There are different terms for crocheting in American and British English. If this pattern includes crochet, click for "crochet terms" here. For this pattern in British English, please click here.
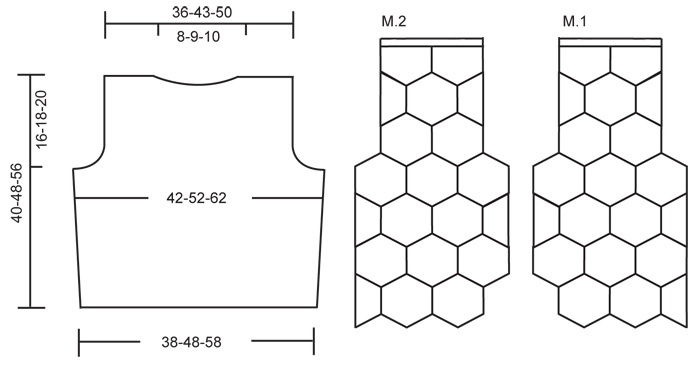
WHOLE HEXAGON (worked in the round on double pointed needles):
Cast on 6 sts distributed on 3 double pointed needles size 3 mm / US 2or3 (= 2 sts per needle) with sea mist.
ROUND 1: P all sts
ROUND 2: K all sts
ROUND 3: * P1, 1 YO *, repeat from *-* = 12 sts
ROUND 4: K all sts – K YO into back of loop to avoid a hole
ROUND 5: P all sts
ROUND 6: K all sts
Now continue with 7 double pointed needles. Distribute sts on 6 needles with 2 sts per needle
ROUND 7: * P1, 1 YO, P1, 1 YO *, repeat from *-* = 24 sts.
ROUND 8: Like round 4
ROUND 9: P all sts
ROUND 10: K all sts
ROUND 11: * P1, 1 YO, P3, 1 YO *, repeat from *-* = 36 sts
ROUND 12: Like round 4
ROUND 13: P all sts
ROUND 14: K all sts
ROUND 15: * P1, 1 YO, P5, 1 YO *, repeat from *-* = 48 sts.
ROUND 16: Like round 4
SIZE S/M:
ROUND 17: Change to off-white. * P1, 1 YO, P7, 1 YO *, repeat from *-* = 60 sts
ROUND 18: bind off with K sts.
SIZE L/XL:
ROUND 17: P all sts
ROUND 18: K all sts
ROUND 19: * P1, 1 YO, P7, 1 YO *, repeat from *-* = 60 sts
ROUND 20: Like round 4
ROUND 21: Change to off-white. * P1, 1 YO, P9, 1 YO *, repeat from *-* = 72 sts.
ROUND 22: bind off with K sts.
SIZE XXL/XXXL:
ROUND 17: P all sts
ROUND 18: K all sts
ROUND 19: * P1, 1 YO, P7, 1 YO *, repeat from *-* = 60 sts
ROUND 20: Like round 4
ROUND 21: P all sts
ROUND 22: K all sts
ROUND 23: * P1, 1 YO, P9, 1 YO *, repeat from *-* = 72 sts
ROUND 24: Like round 4
ROUND 25: Change to off-white. * P1, 1 YO, P11, 1 YO *, repeat from *-* = 84 sts.
ROUND 26: bind off with K sts.
Turn the hexagon so the thread from cast on row sits on what becomes the WS.

HALF HEXAGON (worked back and forth on double pointed needles):
Cast on 4 sts distributed on 2 double pointed needles size 3 mm / US 2or3 (= 2 sts per needle) with sea mist.
ROW 1 and 2: K all sts
ROW 3: * K1, 1 YO *, repeat from *-* and finish with K1 = 7 sts.
ROW 4: K all sts – K YO into back of loop to avoid a hole.
ROW 5 and 6: K all sts
Now continue with 4 double pointed needles. Distribute sts on 3 double pointed needles with 2 sts on first needle, 2 sts on second needle and 3 sts on third needle.
ROW 7: * K1, 1 YO, K1, 1 YO *, repeat from *-* and finish with K1 = 13 sts.
ROW 8: Like row 4
ROW 9 and 10: K all sts
ROW 11: * K1, 1 YO, K3, 1 YO *, repeat from *-* and finish with K1 = 19 sts.
ROW 12: Like row 4
ROW 13 and 14: K all sts
ROW 15: * K1, 1 YO, K5, 1 YO *, repeat from *-* and finish with K1 = 25 sts
ROW 16: Like row 4
SIZE S/M:
ROW 17: Change to off-white. * K1, 1 YO, K7, 1 YO *, repeat from *-* and finish with K1 = 31 sts. Now make 1 YO, then pick up 17 sts along the edge, make 1 YO = 50 sts. Now bind off in the round with P sts.
SIZE L/XL:
ROW 17 and 18: K all sts
ROW 19: * K1, 1 YO, K7, 1 YO *, repeat from *-* and finish with K1 = 31 sts.
ROW 20: Like row 4
ROW 21: Change to off-white. * K1, 1 YO, K9, 1 YO *, repeat from *-* and finish with K1 = 37 sts. Now make 1 YO, then pick up 22 sts along the edge, make 1 YO = 61 sts. Now bind off in the round with P sts.
SIZE XXL/XXXL:
ROW 17 and 18: K all sts
ROW 19: * K1, 1 YO, K7, 1 YO *, repeat from *-* and finish with K1 = 31 sts.
ROW 20: Like row 4
ROW 21 and 22: K all sts
ROW 23: * K1, 1 YO, K9, 1 YO *, repeat from *-* and finish with K1 = 37 sts
ROW 24: Like row 4
ROW 25: Change to off-white. * K1, 1 YO, K11, 1 YO *, repeat from *-* and finish with K1 = 43 sts. Now make 1 YO, then pick up 26 sts along the edge, make 1 YO = 71 sts. Now bind off in the round with P sts.

PENTAGON ON SHOULDER (worked in the round at first on double pointed needles, then back and forth on needle):
Cast on 6 sts on 3 double pointed needles size 3 mm / US 2or3 (= 2 sts per needle) with sea mist.
ALL SIZES:
ROUND 1 to 8 inclusive: Like whole hexagon = 24 sts.
SIZE S/M:
ROUND 9: bind off 2 sts, P remaining 22 sts. Turn piece and continue back and forth on double pointed needles.
ROW 10: bind off 2 sts, P remaining sts = 20 sts.
ROW 11: bind off 1 st, there is now 1 st left on first needle (P this when casting/binding off the first st). Make 1 YO at the end of first needle, then * P1, 1 YO, P3, 1 YO *, repeat from *-* (4 times) and finish with P2 = 28 sts.
ROW 12: bind off 1 st, P remaining sts on row (P YO into back of loop) = 27 sts.
ROW 13: bind off 1 st, P remaining sts = 26 sts.
ROW 14: bind off 1 st, P remaining sts = 25 sts.
ROW 15: bind off 1 st, there is now no sts left on first and last needle. Make 1 YO, P5 and make 1 YO, then * P1, 1 YO, P5, 1 YO *, repeat from *-* (3 times) = 32 sts.
ROW 16: P all sts (P YO into back of loop).
ROW 17: Change to off-white. P8 and make 1 YO, then * P1, 1 YO, P7, 1 YO *, repeat from *-* (2 times) and finish with P1, 1 YO and P7 = 38 sts.
ROUND 18: bind off with P sts.
SIZE L/XL:
ROUND 9: P all sts
ROUND 10: K all sts
ROUND 11: * P1, 1 YO, P3, 1 YO *, repeat from *-* = 36 sts
ROUND 12: K all sts (K YO into back of loop)
ROUND 13: bind off 2 sts, P remaining sts = 34 sts. Turn piece.
Now continue back and forth on double pointed needles.
ROW 14: bind off 2 sts, P remaining sts = 32 sts.
ROW 15: bind off 2 sts, there are now 2 sts left on first needle, P these and make 1 YO at the end of first needle, then * P1, 1 YO, P5, 1 YO *, repeat from *-* (4 times) and finish with P4 = 39 sts
ROW 16: bind off 2 sts, P remaining sts (P YO into back of loop) = 37 sts
ROW 17: bind off 1 st, P remaining sts = 36 sts.
ROW 18: bind off 1 st, P remaining sts = 35 sts.
ROW 19: bind off 1 st, there is now 1 st left on first needle (P this when casting/binding off first st), then * P1, 1 YO, P7, 1 YO *, repeat from *-* (4 times) and finish with P1 = 42 sts.
ROW 20: bind off 1 st, P remaining sts (P YO into back of loop) = 41 sts.
ROW 21: Change to off-white. Bind off 1 st, there are now no sts left on first and last needle, P9 and make 1 YO, then * P1, 1 YO, P9, 1 YO *, repeat from *-* (2 times) and finish with P1, 1 YO and P9 = 46 sts.
ROW 22: bind off with P sts.
SIZE XL/XXL:
ROUND 9: P all sts
ROUND 10: K all sts
ROUND 11: * P1, 1 YO, P3, 1 YO *, repeat from *-* = 36 sts.
ROUND 12: K all sts, (K YO into back of loop)
ROUND 13: P all sts
ROUND 14: K all sts
ROUND 15: * P1, 1 YO, P5, 1 YO *, repeat from *-* = 48 sts.
ROUND 16: Like round 12
ROUND 17: bind off 3 sts, P remaining sts = 45 sts. Turn piece.
Now continue back and forth on double pointed needles.
ROW 18: bind off 3 sts, P remaining sts = 42 sts
ROW 19: bind off 2 sts, there are now 3 sts left on first needle, P these and make 1 YO, then * P1, 1 YO, P7, 1 YO *, repeat from *-* (4 times) and finish with P5 = 49 sts
ROW 20: bind off 2 sts, P remaining sts (P YO into back of loop) = 47 sts
ROW 21: bind off 2 sts, P remaining sts = 45 sts
ROW 22: bind off 2 sts, P remaining sts = 43 sts.
ROW 23: bind off 1 st, there are now 1 st left on first needle, (P this when casting/binding off the first st), then * P1, 1 YO, P9, 1 YO *, repeat from *-* (4 times) and finish with P1 = 50 sts.
ROW 24: bind off 1 st, P remaining sts (P YO into back of loop) = 49 sts.
ROW 25: Change to off-white. Bind off 1 st, there are now no sts left on first and last needle, P11 and make 1 YO, then * P1, 1 YO, P11, 1 YO *, repeat from *-* (2 times) and finish with P1, 1 YO and P11 = 54 sts.
ROW 26: bind off with P sts.
--------------------------------------------------------
--------------------------------------------------------

LEFT FRONT PIECE:
Work 13 WHOLE HEXAGONS, 5 HALF HEXAGONS and 2 PENTAGONS FOR SHOULDER - see above.
Sew the shapes tog as shown in diagram M.1. Sew a couple of sts in the corners only, i.e. the sides are left open. Cut and fasten thread. Pick up 33-40-48 sts on shoulder on needle size 3 mm / US 2or3 with off-white. K 5 rows and bind off loosely.

RIGHT FRONT PIECE:
Like left front piece. Sew the shapes tog as shown in diagram M.2. Pick up sts and bind off on shoulder as described for left front piece

BACK PIECE:
Cast on 92-116-140 sts with off-white (includes 1 edge st each side) on needle size 3 mm / US 2or3. K 1 row from RS and K 1 row from WS. Change to sea mist and continue back and forth on needle in garter st (i.e. K all rows). REMEMBER THE GAUGE!
Insert 1 marker after 34-42-50 sts and 1 marker after 58-74-90 sts (= 24-32-40 sts between markers).
When piece measures 2-4-4 cm / ¾"-1½"-1½" inc 1 st each side of the 24-32-40 sts between markers (= 2 inc) by making 1 YO. On next row K YO into back of loop to avoid a hole. Repeat the inc on every 4.5-5.5-7 cm / 1¾"-2¼"-2¾" a total of 5 times = 102-126-150 sts. Continue until piece measures 24-30-36 cm / 9½"-11¾"-14¼". Now bind off 3 sts at beg of the next 2 rows for armhole. Dec to shape the armhole each side at the beg of every row by K2 tog inside 3 sts: 5-9-12 times = 86-102-120 sts. Continue until piece measures 38-46-54 cm / 15"-18"-21¼". Change to off-white. K 1 row from RS and K 1 row from WS. On next row bind off the middle 18-20-22 sts for neck and complete each shoulder separately. Bind off 1 st on neckline on next row = 33-40-48 sts left on shoulder. bind off loosely when piece measures approx 40-48-56 cm / 15¾"-19"-22".

ASSEMBLY:
Sew shoulder seams.
Sew side seams in outer loops of sts so that the white edges of the hexagons are visible.

TIE STRING:
Beg towards bottom edge on right front piece and pick up from RS with off-white: 1 st in the outer loop of each st on the three hexagons towards mid front, then cast on approx 70 to 90 sts at the top. Turn piece. K 1 row from WS on all sts and bind off with K sts from RS. Repeat on left front piece, but cast on the 70 to 90 sts before picking up sts from RS on front piece.

Diagram

All measurements in charts are in cm.

diagram measurements
Do you have a question? See a list of frequently asked questions (FAQ)

Knitting tension is what determines the final measurements of your work, and is usually measured per 10 x 10 cm. It is provided like so: number of stitches in width x number of rows in height - eg: 19 stitches x 26 rows = 10 x 10 cm.

The knitting tension is very individual; some people knit/crochet loosely while others work tightly. You adjust the knitting tension with the needle size, which is why the suggested needle size only serve as a guide! You need to adjust this (up or down) to ensure that YOUR knitting tension matches the knitting tension provided in the pattern. If you work with a different knitting tension than provided you will have a different yarn consumption, and your work will have different measurements than what the pattern suggests.

The knitting tension also determines which yarns can replace each other. As long as you achieve the same knitting tension you can replace one yarn with another.

See DROPS lesson: How to measure your tension/gauge

See DROPS video: How to make a gauge tension swatch

The required amount of yarn is provided in grams, eg: 450 g. To calculate how many balls you’ll need you first need to know how many grams are in 1 ball (25g, 50g or 100g). This information is available if you click on the individual yarn quality on our pages. Divide the amount required with the amount of each ball. For example, if each ball is 50g (the most common amount), the calculation will be as follows: 450 / 50 = 9 balls.

The important thing when changing from one yarn to another is that the knitting/crochet tension remains the same. This is so that the measurements of the finished piece will be the same as on the sketch provided. It is easier to achieve the same knitting tension using yarns from the same yarn group. It is also possible to work with multiple strands of a thinner yarn to achieve the knitting tension of a thicker one. Please try our yarn converter. We recommend you to always work a test swatch.

Please NOTE: when changing yarn the garment might have a different look and feel to the garment in the photo, due to individual properties and qualities of each yarn.

See DROPS lesson: Can I use a different yarn than the one mentioned in the pattern?

All our yarns are categorised into yarn groups (from A to F) according to thickness and knitting tension – group A contains the thinnest yarns and group F the thickest. This makes it easier for you to find alternative yarns to our patterns, should you wish to switch yarn. All yarns within the same group have a similar knitting tension and can easily replace each other. However, different yarn qualities have different structures and properties which will give the finished work a unique look and feel.

Click here for an overview of the yarns in each yarn group

At the top of all our patterns you’ll find a link to our yarn converter, which is a helpful tool should you wish to use a different yarn than suggested. By filling in the yarn quality you wish to replace, the amount (in your size) and number of strands, the converter will present good alternative yarns with the same knitting tension. Additionally it will tell you how much you’ll require in the new qualities and whether you’ll need to work with multiple strands. Most skeins are 50g (some are 25g or 100g).

If the pattern is worked with multiple colours, every colour will have to be converted separately. Similarly, if the pattern is worked with several strands of different yarns (for example 1 strand Alpaca and 1 strand Kid-Silk) you will have to find alternatives for each, individually.

Click here to see our yarn converter

Since different yarns have different qualities and textures we have chosen to keep the original yarn in our patterns. However, you can easily find options among our available qualities by using our yarn converter, or simply pick a yarn from the same yarn group.

It is possible that some retailers still have discontinued yarns in stock, or that someone has a few skeins at home that they would like to find patterns for.

The yarn converter will provide both alternative yarn as well as required amount in the new quality.

If you think it's hard to decide what size to make, it can be a good idea to measure a garment you own already and like the size of. Then you can pick the size by comparing those measures with the ones available in the pattern's size chart.

You'll find the size chart at the bottom of the pattern.

See DROPS lesson: How to read size chart

The needle size provided in the pattern serves only as a guide, the important thing is to follow the knitting tension. And since knitting tension is very individual, you will have to adjust the needle size to ensure that YOUR tension is the same as in the pattern – maybe you’ll have to adjust 1, or even 2 needle sizes, up or down to achieve the correct tension. For this, we recommend that you work test swatches.

Should you work with a different knitting tension than the one provided, the measurements of the finished garment might deviate from the measurement sketch.

See DROPS lesson: How to measure your tension/gauge

See DROPS video: How to make a gauge tension swatch

Working a garment top-down provides more flexibility and room for personal adjustment. For example it is easier to try the garment on while working, as well as making adjustments to length of yoke and shoulder caps.

The instructions are carefully explaining every step, in the correct order. Diagrams are adjusted to the knitting direction and are worked as usual.

The diagram depicts all rows/rounds, and every stitch seen from the right side. It is read from bottom to top, from right to left. 1 square = 1 stitch.

When working back and forth, every other row is worked from the right side and every other row is worked from the wrong side. When working from the wrong side, the diagram will have to be worked reversed: from left to right, knit stitches are purled, purl stitches are knit etc.

When working in the round every round is worked from the right side and the diagram are worked from right to left on all rounds.

See DROPS lesson: How to read knitting diagrams

The diagram depicts all rows/rounds, and every stitch seen from the right side. It is worked from bottom to top, from right to left.

When working back and forth every other row is worked from the right side: from right to left and every other row is worked from the wrong side: from left to right.

When working in the round, every row in the diagram are worked from the right side, from right to left.

When working a circular diagram you start in the middle and work your way outwards, counter clockwise, row by row.

The rows usually start with a given number of chain stitches (equivalent to the height of the following stitch), this will either be depicted in the diagram or explained in the pattern.

See DROPS lesson: How to read crochet diagrams

Instructions for working several diagrams after each other on the same row/round, will often be written like so: “work A.1, A.2, A.3 a total of 0-0-2-3-4 times". This means you work A.1 once, then A.2 is worked once, and A.3 is repeated (in width) the number of times provided for your size – in this case like so: S = 0 times, M = 0 times, L=2 times, XL= 3 times and XXL = 4 times.

The diagrams are worked as usual: begin with the first row in A.1, then work the first row in A.2 etc.

See DROPS lesson: How to read knitting diagrams

See DROPS lesson: How to read crochet diagrams

The total width of the garment (from wrist-to-wrist) will be larger in the larger sizes, despite the actual sleeves being shorter. The larger sizes have longer sleeve caps and wider shoulders, so there will be a good fit in all sizes.

The measurement sketch/schematic drawing provides information regarding the full length of the garment. If it’s a jumper or a jacket the length is measured from the highest point on the shoulder (usually closest to the neckline), and straight down to the bottom of the garment. It is NOT measured from the tip of shoulder. Similarly, the length of yoke is measured from the highest point on the shoulder and down to where yoke is split into body and sleeves.

See DROPS lesson: How to read a schematic drawing

Diagrams are often repeated on the round or in height. 1 repeat is the diagram the way it appears in the pattern. If it says to work 5 repeats of A.1 in the round, then you work A.1 a total of 5 times after/next to each other in the round. If it says to work 2 repeats of A.1 vertically/in height you work the entire diagram once, then begin again at the start and work the entire diagram one more time.

Chain stitches are slightly narrower than other stitches and to avoid working the cast-on edge too tight, we simply chain more stitches to begin with. The stitch count will be adjusted on the following row to fit the pattern and measurement sketch.

The rib edge is more elastic and will contract slightly compared to, for example, stocking stitch. By increasing before the rib edge, you avoid a visible difference in width between the rib edge and the rest of the body.

It’s very easy to cast off too tightly, and by making yarn overs while casting off (and simultaneously casting these off) you avoid a too tight cast off edge.

See DROPS video: How to bind off with yarn overs (yo)

To achieve an even increase (or decrease) you can increase on, for example: every 3rd and 4th row alternately, like so: work 2 rows and increase on the 3rd row, work 3 rows and increase on the 4th. Repeat this until the increase is complete.

See DROPS lesson: Increase or decrease 1 st on every 3rd and 4th row alternately

Should you prefer to work in the round instead of back and forth, you may of course adjust the pattern. You’ll need to add steeks mid-front (usually 5 stitches), and follow the instructions. When you would normally turn and work from the wrong side, simply work across the steek and continue in the round. At the end you’ll cut the piece open, pick up stitches to work bands, and cover the cut edges.

See DROPS video: How to knit steeks and cut open

Should you prefer to work back and forth instead of in the round, you may of course adjust the pattern so you work the pieces separately and then assemble them at the end. Divide the stitches for the body in 2, add 1 edge stitch in each side (for sewing) and work the front and back pieces separately.

See DROPS lesson: Can I adapt a pattern for circular needles into straight needles?

Pattern repeats can vary slightly in the different sizes, in order to get the correct proportions. If you’re not working the exact same size as the garment in the photo, yours might deviate slightly. This has been carefully developed and adjusted so that the complete impression of the garment is the same in all sizes.

Make sure to follow instructions and diagrams for your size!

If you have found a pattern you like which is available in women’s size it’s not very difficult to convert it to men’s size. The biggest difference will be the length of sleeves and body. Start working on the women size that you think would fit across the chest. The additional length will be worked right before you cast off for the armhole/sleeve cap. If the pattern is worked top-down you can add the length right after the armhole or before the first decrease on sleeve.

Regarding additional yarn amount, this will depend on how much length you add, but it is better with a skein too many than too few.

All yarns will have excess fibres (from production) that might come off as lint or shedding. Brushed yarns (ie hairier yarns) have more of these loose, excess fibres, causing more shedding.

Shedding also depends on what is worn under or over the garment, and whether this pulls at the yarn fibres. It’s therefore not possible to guarantee that there will be no shedding

Below are some tips on how to get the best result when working with hairier yarns:

1. When the garment is finished (before you wash it) shake it vigorously so the looser hairs come off. NOTE: do NOT use a lint roller, brush or any method that pulls at the yarn.

2. Place the garment in a plastic bag and put it in your freezer - the temperature will cause the fibres to become less attached to each other, and excess fibres will come off easier.

3. Leave in the freezer for a few hours before taking it out and shaking it again.

4. Wash the garment according to the instructions on the yarn label.

Pilling is a natural process that happens to even the most exclusive of fibers. It's a natural sign of wear and tear that is hard to avoid, and that is most visible in high friction areas of your garment like a sweater's arms and cuffs.

You can make your garment look as new by removing the pilling, using a fabric comb or a pill/lint remover.

Still can't find the answer you need? Then scroll down and leave your question so one of our experts can try to help you. This will be done normally within 5 to 10 working days.
In the meantime, you can read the questions and answers that others have left to this pattern or join the DROPS Workshop on Facebook to get help from fellow knitters/crocheters!

You might also like...

Post a comment to pattern DROPS 120-29

We would love to hear what you have to say about this pattern!

If you want to leave a question, please make sure you select the correct category in the form below, to speed up the answering process. Required fields are marked *.

Comments / Questions (19)

country flag Monica wrote:

Buonasera, se volessi realizzare questo modello facendolo con le maniche lunghe a righe come il dietro e una fila in più di esagoni per allungarlo un po', quanta lana in più mi occorrerebbe? Grazie per l'aiuto.

19.02.2018 - 19:01

DROPS Design answered:

Buongiorno Monica. Purtroppo in questa sede non riusciamo a dare una risposta alla sua domanda. Può rivolgersi al suo rivenditore Drops di fiducia che è a sua disposizione con la competenza necessaria. Buon lavoro!

20.02.2018 - 06:46

country flag Mitz wrote:

I discovered that the error was in my interpretation, when I read the pattern correctly, it all worked out...

04.09.2012 - 13:09

country flag Mitz wrote:

I found an error/errors in pattern DROPS 120-29. the errors are on all increase rows from row 11 and forwards. If knitted as described you will increase 6 stitches but the pattern summary (your calculation that is) adds 12 stitches. is it the calculation that is incorrect or is it the amount of stitches between the increases that is incorrect?

04.09.2012 - 12:41

country flag Ingela wrote:

Denna var riktigt ful. Skulle aldrig sätta på mig något sådant.

18.02.2010 - 11:02

Lily wrote:

Great

14.02.2010 - 15:59

country flag Soile wrote:

Suuret kiitokset!!! Tätä on odotettut! Nyt ei tarvitse enää käydä kurkkimassa joko ohje on suomennettu...

29.01.2010 - 19:32

country flag Mitz wrote:

This is the pattern I unknowingly have been waiting for! finally a vest for me!

21.01.2010 - 03:55

country flag Lise wrote:

Sjov vest, håber snart der kommer en opskrift.

19.01.2010 - 09:16

country flag Jane Engdahl wrote:

Supersnygg! Snabba er Att Lägga ut mönstret ..

18.01.2010 - 19:52

country flag Irene Andersen wrote:

Sej og smart vest

15.01.2010 - 10:04