DROPS Cotton Viscose
54% Cotton, 46% Viscose
Discontinued
find alternatives
DROPS SS24

Vested lnterest

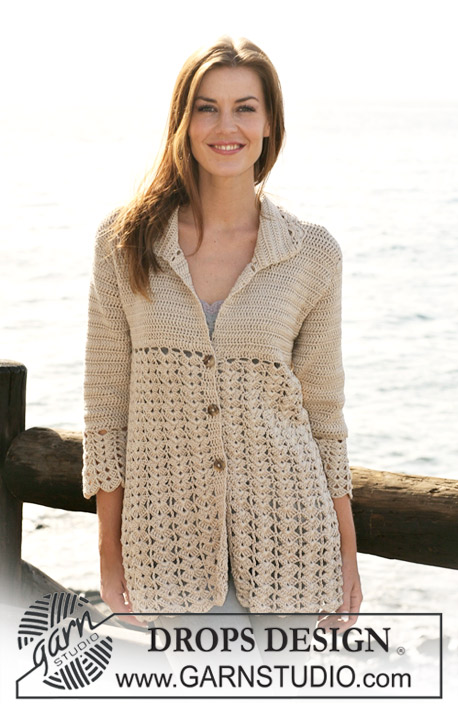
Crochet DROPS waistcoat with fan pattern in ”Cotton Viscose”. Size XS - XXL.

DROPS 118-26
DROPS design: Pattern no N-108

Size: XS - S - M - L - XL - XXL
Materials: DROPS COTTON VISCOSE from Garnstudio
300-300-350-400-450-450 g colour no 29, light grey/green

DROPS CROCHET HOOK size 3.5 mm – or size needed to get 22 tr x 10 rows = 10 x 10 cm.

DROPS MOTHER OF PEARL BUTTON w/hole, no 522: 2 pcs.

-------------------------------------------------------

Alternative Yarn – See how to change yarns here
Yarn Groups A to F – Use the same pattern and change the yarn here
Yarn usage using an alternative yarn – Use our yarn converter here

-------------------------------------------------------

DROPS Cotton Viscose
54% Cotton, 46% Viscose
Discontinued
find alternatives

Pattern instructions

NOTE: This pattern is written in British English. All measurements in charts are in cm. For conversion from cm to inches - click here. There are different terms for crocheting in British and American English. If this pattern includes crochet, click for "crochet terms" here. For this pattern in American English, please click here.
CROCHET TIP: Replace first tr on row with 3 ch, and finish row with 1 tr in 3rd ch from previous row.
Replace first dtr on row with 4 ch, and finish row with 1 dtr in 4th ch from previous row.
--------------------------------------------------------
--------------------------------------------------------

WAISTCOAT:
Back piece and both front pieces crochet from shoulder and down. Then the pieces are sewn tog and the body piece of waistcoat is crochet in fan pattern from the yoke towards bottom edge.

LEFT SHOULDER BACK PIECE (when placed flat):
Crochet 23 LOOSE ch with crochet hook size 3.5 mm and Cotton Viscose.
ROW 1: Crochet 1 tr in 4th ch from hook, * skip 1 ch, 1 tr in each of the next 4 ch *, repeat from *-* and finish with skip 1 ch and 1 tr in each of the last 3 ch = 17 tr.
ROW 2: See CROCHET TIP! Crochet 1 tr in each tr.
ROW 3: Crochet 1 tr in each tr. Put piece aside and crochet RIGHT SHOULDER on back piece in the same way, turn piece.
ROW 4: 1 tr in each tr as before, at the end of row on right back piece crochet 30-33-35-38-40-43 ch (= neckline mid back), then 1 tr in each tr on left back piece, turn piece.
ROW 5: 1 tr in each tr on left back piece, 1 tr in each of the first 2-1-2-1-2-1 ch, * skip 1 ch, 1 tr in each of the next 4 ch *, repeat from *-* a total of 5-6-6-7-7-8 times, skip 1 ch, 1 tr in each of the last 2-1-2-1-2-1 ch, crochet 1 tr in each tr from right back piece. There are now 58-60-62-64-66-68 tr on row.
Continue with 1 tr in each tr.
AT THE SAME TIME when piece measures 13-12-12-11-9-6 cm inc for armhole each side. Inc 1 tr at the beg and end of every row, and repeat the inc a total of 5-7-8-10-13-17 times each side by working 2 tr in the outermost tr.
On next row crochet 7-8-10-11-15-18 ch at the end of row, turn and crochet 1 tr in 4th ch from hook and 1 tr in each of the next 3-4-6-7-11-14 ch. Repeat the other side = 78-86-94-102-118-134 tr. Continue with 1 tr in each tr until back measures 25-27-29-31-33-35 cm. Put piece aside.

RIGHT FRONT PIECE:
Crochet 23 LOOSE ch on crochet hook size 3.5 mm with Cotton Viscose.
ROW 1: Crochet 1 tr in 4th ch from hook, * skip 1 ch, 1 tr in each of the next 4 ch *, repeat from *-* and finish with skip 1 ch and crochet 1 tr in each of the last 3 ch = 17 tr.
ROW 2: See CROCHET TIP! Crochet 1 tr in each tr.
Continue with 1 tr in each tr, AT THE SAME TIME when piece measures 5 cm inc for neckline towards mid front. Inc 1 tr at the end and the beg of every row towards mid front by working 2 tr in outermost tr a total of 16-17-18-19-20-21 times. AT THE SAME TIME when piece measures 13-12-12-11-9-6 cm inc for armhole at the side as described for back piece. When all inc are complete there are 43-47-51-55-63-71 tr on row. Continue with 1 tr in each tr until piece measures 25-27-29-31-33-35 cm – adjust to back piece. Put piece aside and crochet left front piece.

LEFT FRONT PIECE: Like right front piece, but mirrored.

ASSEMBLY:
Sew shoulder seams edge to edge. Sew side seams edge to edge. There are now 164-180-196-212-244-276 tr along bottom edge.

FAN PATTERN:
Continue back and forth from mid front as follows – see CROCHET TIP!
ROW 1: 1 tr in each tr = 164-180-196-212-244-276 tr, turn piece.
ROW 2: 1 tr in each tr, AT THE SAME TIME inc 32 tr evenly = 196-212-228-244-276-308 tr.
ROW 3: * 4 ch, skip 3 sts, 1 dc in next tr *, repeat from *-* on all sts = 49-53-57-61-69-77 ch-loops, turn piece.
ROW 4: 4 tr in first ch-loop, 1 tr in next ch-loop, * 4 tr + 2 ch + 4 tr in next ch-loop, 1 tr in next ch-loop *, repeat from *-* until 1 ch-loop remain, and finish with 4 tr in this ch-loop = 23-25-27-29-33-37 fans with 4 tr (= front band) each side towards mid front, turn piece.
ROW 5: 1 tr in each of the first 4 tr (= front band), 1 tr in next tr, * 4 tr + 2 ch + 4 tr in the middle of next tr-group (i.e. in 2 ch in tr-group), 1 tr in next tr *, repeat from *-* until 4 tr remain, and finish with 1 tr in each tr (= front band).
Repeat row 5 until piece measures approx 40-42-44-46-48-50 cm from shoulder.
NEXT ROW: 1 dtr in each of the first 4 tr, 1 dtr in next tr, * 4 dtr + 2 ch + 4 dtr in the middle of next tr-group, 1 dtr in next tr *, repeat from *-* until 4 tr remain, and finish with 1 dtr in each tr.
Repeat this row until piece measures approx 52-54-56-58-60-62 cm from shoulder. Cut and fasten thread.

Sew buttons on left front band over fan pattern. Use gaps between tr on right front band as buttonholes.

CROCHET BORDER:
Crochet a border with crochet hook size 3.5 mm and Cotton Viscose round opening as follows, beg at bottom of right front piece: 1 dc in first st, * skip approx 2 cm, 3 tr + 2 ch + 3 tr in next st, skip approx 2 cm, 1 dc in next st *, repeat from *-* up along right front piece, along neckline and down along left front piece.
Crochet a similar border round armholes.

This pattern has been corrected.

Updated online: 16.02.2010
Size XS-XXL .... FAN PATTERN: .....Row 3: * 4 ch, skip 3 sts, 1 dc in next tr *, repeat from *-* on all sts = 49-53-57-61-69-77 ch-loops, turn piece.
Updated online: 02.03.2010
LEFT SHOULDER BACK PIECE:.....Inc 1 tr at the beg and end of every row, and repeat the inc a total of 5-7-8-10-13-17 times each side by working 2 tr in the outermost tr.

Diagram

diagram measurements
Do you have a question? See a list of frequently asked questions (FAQ)

Knitting tension is what determines the final measurements of your work, and is usually measured per 10 x 10 cm. It is provided like so: number of stitches in width x number of rows in height - eg: 19 stitches x 26 rows = 10 x 10 cm.

The knitting tension is very individual; some people knit/crochet loosely while others work tightly. You adjust the knitting tension with the needle size, which is why the suggested needle size is only meant as a guide! You need to adjust this (up or down) to ensure that YOUR knitting tension matches the knitting tension provided in the pattern. If you work with a different knitting tension than provided you will have a different yarn consumption, and your work will have different measurements than what the pattern suggests.

The knitting tension also determines which yarns can replace each other. As long as you achieve the same knitting tension you can replace one yarn with another.

See DROPS lesson: How to measure your tension/gauge

See DROPS video: How to make a gauge tension swatch

The required amount of yarn is provided in grams, eg: 450 g. To calculate how many balls you’ll need you first need to know how many grams are in 1 ball (25g, 50g or 100g). This information is available if you click on the individual yarn quality on our pages. Divide the amount required with the amount of each ball. For example, if each ball is 50g (the most common amount), the calculation will be as follows: 450 / 50 = 9 balls.

The important thing when changing from one yarn to another is that the knitting/crochet tension remains the same. This is so that the measurements of the finished piece will be the same as on the sketch provided. It is easier to achieve the same knitting tension using yarns from the same yarn group. It is also possible to work with multiple strands of a thinner yarn to achieve the knitting tension of a thicker one. Please try our yarn converter. We recommend you to always work a test swatch.

Please NOTE: when changing yarn the garment might have a different look and feel to the garment in the photo, due to individual properties and qualities of each yarn.

See DROPS lesson: Can I use a different yarn than the one mentioned in the pattern?

All our yarns are categorised into yarn groups (from A to F) according to thickness and knitting tension – group A contains the thinnest yarns and group F the thickest. This makes it easier for you to find alternative yarns to our patterns, should you wish to switch yarn. All yarns within the same group have a similar knitting tension and can easily replace each other. However, different yarn qualities have different structures and properties which will give the finished work a unique look and feel.

Click here for an overview of the yarns in each yarn group

At the top of all our patterns you’ll find a link to our yarn calculator, which is a helpful tool should you wish to use a different yarn than suggested. By filling in the yarn quality you wish to replace, the amount (in your size) and number of strands, the calculator will present good alternative yarns with the same knitting tension. Additionally it will tell you how much you’ll require in the new qualities and whether you’ll need to work with multiple strands. Most skeins are 50g (some are 25g or 100g).

If the pattern is worked with multiple colours, every colour will have to be calculated separately. Similarly, if the pattern is worked with several strands of different yarns (for example 1 strand Alpaca and 1 strand Kid-Silk) you will have to find alternatives for each, individually.

Click here to see our yarn calculator

Since different yarns have different qualities and textures we have chosen to keep the original yarn in our patterns. However, you can easily find options among our available qualities by using our yarn calculator, or simply pick a yarn from the same yarn group.

It is possible that some retailers still have discontinued yarns in stock, or that someone has a few skeins at home that they would like to find patterns for.

The yarn calculator will provide both alternative yarn as well as required amount in the new quality.

If you think it's hard to decide what size to make, it can be a good idea to measure a garment you own already and like the size of. Then you can pick the size by comparing those measures with the ones available in the pattern's size chart.

You'll find the size chart at the bottom of the pattern.

See DROPS lesson: How to read size chart

The needle size provided in the pattern serves only as a guide, the important thing is to follow the knitting tension. And since knitting tension is very individual, you will have to adjust the needle size to ensure that YOUR tension is the same as in the pattern – maybe you’ll have to adjust 1, or even 2 needle sizes, up or down to achieve the correct tension. For this, we recommend that you work test swatches.

Should you work with a different knitting tension than the one provided, the measurements of the finished garment might deviate from the measurement sketch.

See DROPS lesson: How to measure your tension/gauge

See DROPS video: How to make a tension/gauge swatch

Working a garment top-down provides more flexibility and room for personal adjustment. For example it is easier to try the garment on while working, as well as making adjustments to length of yoke and shoulder caps.

The instructions are carefully explaining every step, in the correct order. Diagrams are adjusted to the knitting direction and are worked as usual.

The diagram depicts all rows/rounds, and every stitch seen from the right side. It is read from bottom to top, from right to left. 1 square = 1 stitch.

When working back and forth, every other row is worked from the right side and every other row is worked from the wrong side. When working from the wrong side, the diagram will have to be worked reversed: from left to right, knit stitches are purled, purl stitches are knit etc.

When working in the round every round is worked from the right side and the diagram are worked from right to left on all rounds.

See DROPS lesson: How to read knitting diagrams

The diagram depicts all rows/rounds, and every stitch seen from the right side. It is worked from bottom to top, from right to left.

When working back and forth every other row is worked from the right side: from right to left and every other row is worked from the wrong side: from left to right.

When working in the round, every row in the diagram are worked from the right side, from right to left.

When working a circular diagram you start in the middle and work your way outwards, counter clockwise, row by row.

The rows usually start with a given number of chain stitches (equivalent to the height of the following stitch), this will either be depicted in the diagram or explained in the pattern.

See DROPS lesson: How to read crochet diagrams

Instructions for working several diagrams after each other on the same row/round, will often be written like so: “work A.1, A.2, A.3 a total of 0-0-2-3-4 times". This means you work A.1 once, then A.2 is worked once, and A.3 is repeated (in width) the number of times provided for your size – in this case like so: S = 0 times, M = 0 times, L=2 times, XL= 3 times and XXL = 4 times.

The diagrams are worked as usual: begin with the first row in A.1, then work the first row in A.2 etc.

See DROPS lesson: How to read knitting diagrams

See DROPS lesson: How to read crochet diagrams

The total width of the garment (from wrist-to-wrist) will be larger in the larger sizes, despite the actual sleeves being shorter. The larger sizes have longer sleeve caps and wider shoulders, so there will be a good fit in all sizes.

The measurement sketch/schematic drawing provides information regarding the full length of the garment. If it’s a jumper or a jacket the length is measured from the highest point on the shoulder closest to the neckline, and straight down to the bottom of the garment. It is NOT measured from the tip of shoulder. Similarly, the length of yoke is measured from the highest point on the shoulder and down to where yoke is split into body and sleeves.

On a jacket measures are never taken along bands, unless specifically stated. Always measure inside band stitches when measuring the length.

See DROPS lesson: How to read a schematic drawing

Diagrams are often repeated on the round or in height. 1 repeat is the diagram the way it appears in the pattern. If it says to work 5 repeats of A.1 in the round, then you work A.1 a total of 5 times after/next to each other in the round. If it says to work 2 repeats of A.1 vertically/in height you work the entire diagram once, then begin again at the start and work the entire diagram one more time.

Chain stitches are slightly narrower than other stitches and to avoid working the cast-on edge too tight, we simply chain more stitches to begin with. The stitch count will be adjusted on the following row to fit the pattern and measurement sketch.

The rib edge is more elastic and will contract slightly compared to, for example, stocking stitch. By increasing before the rib edge, you avoid a visible difference in width between the rib edge and the rest of the body.

It’s very easy to cast off too tightly, and by making yarn overs while casting off (and simultaneously casting these off) you avoid a too tight cast off edge.

See DROPS video: How to bind off with yarn overs (yo)

To achieve an even increase (or decrease) you can increase on, for example: every 3rd and 4th row alternately, like so: work 2 rows and increase on the 3rd row, work 3 rows and increase on the 4th. Repeat this until the increase is complete.

See DROPS lesson: Increase or decrease 1 st on every 3rd and 4th row alternately

Should you prefer to work in the round instead of back and forth, you may of course adjust the pattern. You’ll need to add steeks mid-front (usually 5 stitches), and follow the instructions. When you would normally turn and work from the wrong side, simply work across the steek and continue in the round. At the end you’ll cut the piece open, pick up stitches to work bands, and cover the cut edges.

See DROPS video: How to knit steeks and cut open

Should you prefer to work back and forth instead of in the round, you may of course adjust the pattern so you work the pieces separately and then assemble them at the end. Divide the stitches for the body in 2, add 1 edge stitch in each side (for sewing) and work the front and back pieces separately.

See DROPS lesson: Can I adapt a pattern for circular needles into straight needles?

Pattern repeats can vary slightly in the different sizes, in order to get the correct proportions. If you’re not working the exact same size as the garment in the photo, yours might deviate slightly. This has been carefully developed and adjusted so that the complete impression of the garment is the same in all sizes.

Make sure to follow instructions and diagrams for your size!

If you have found a pattern you like which is available in women’s size it’s not very difficult to convert it to men’s size. The biggest difference will be the length of sleeves and body. Start working on the women size that you think would fit across the chest. The additional length will be worked right before you cast off for the armhole/sleeve cap. If the pattern is worked top-down you can add the length right after the armhole or before the first decrease on sleeve.

Regarding additional yarn amount, this will depend on how much length you add, but it is better with a skein too many than too few.

All yarns will have excess fibres (from production) that might come off as lint or shedding. Brushed yarns (ie hairier yarns) have more of these loose, excess fibres, causing more shedding.

Shedding also depends on what is worn under or over the garment, and whether this pulls at the yarn fibres. It’s therefore not possible to guarantee that there will be no shedding

Below are some tips on how to get the best result when working with hairier yarns:

1. When the garment is finished (before you wash it) shake it vigorously so the looser hairs come off. NOTE: do NOT use a lint roller, brush or any method that pulls at the yarn.

2. Place the garment in a plastic bag and put it in your freezer - the temperature will cause the fibres to become less attached to each other, and excess fibres will come off easier.

3. Leave in the freezer for a few hours before taking it out and shaking it again.

4. Wash the garment according to the instructions on the yarn label.

Pilling is a natural process that happens to even the most exclusive of fibers. It's a natural sign of wear and tear that is hard to avoid, and that is most visible in high friction areas of your garment like a sweater's arms and cuffs.

You can make your garment look as new by removing the pilling, using a fabric comb or a pill/lint remover.

Still can't find the answer you need? Then scroll down and leave your question so one of our experts can try to help you. This will be done normally within 5 to 10 working days.
In the meantime, you can read the questions and answers that others have left to this pattern or join the DROPS Workshop on Facebook to get help from fellow knitters/crocheters!

You might also like...

Post a comment to pattern DROPS 118-26

We would love to hear what you have to say about this pattern!

If you want to leave a question, please make sure you select the correct category in the form below, to speed up the answering process. Required fields are marked *.

Comments / Questions (116)

Martine wrote:

Bonjour! J'ai commencé le gilet Drops Design 108. Je suis arrivée au point d'éventail auquel je ne comprends pas grand'chose malgré recherche sur le net.Auriez-vous une vidéo ou une explication plus facile? Au 4ème rang , *4B+2ml+4B dans l'arceau suivant , 1B dans l'arceau suivant* , la 2ème série de 4B se fait-elle dans les mailles de l'arceau?Merci

06.05.2012 - 15:53

DROPS Design answered:

Bonjour Martine, au 3ème rang, vous avez fait : *4 ml, sauter 3 m, 1 ms dans la B suiv* et vous avez 49-53-57-61-69-77 arceaux de 4 ml. Au 4ème rang, vous faites 4 B dans le 1er arceau, 1 B dans l'arceau de 4 ml suiv, puis * dans l'arceau suivant : 4 brides, 2 ml, 4 B, puis 1 B dans l'arceau suiv*, répétez de *-* comme indiqué. Bon crochet !

07.05.2012 - 09:15

Neha wrote:

In left shoulder back piece you have mentioned total 17tr in 1st row. bus its coming total 16 tr. please let me know the how much tr should be there.

27.04.2012 - 12:34

DROPS Design answered:

It will be 17 sts on first row, you also count the first 3 ch that you turn with as 1 st.

30.04.2012 - 23:43

country flag Rita wrote:

Having a misunderstanding about back piece..."on next row chain 7-8-10-11-15-18 at the end of row...". Is this done to both sides and if not, would this not be uneven looking?

23.04.2012 - 16:41

DROPS Design answered:

You do it first in one side, then right after in the other side, it will be 1 row difference, but that will not be visible.

23.04.2012 - 19:30

country flag Rita wrote:

Beautiful pattern but having a problem with Row 5 and the 212121 ch. so for size large, it is 1 dc in 1st chain?

06.04.2012 - 00:47

country flag Rhonda wrote:

Question: In row 5 what does 2-1-2-1-2-1 mean?

29.02.2012 - 23:50

DROPS Design answered:

You follow the number for the size you are making.

01.03.2012 - 17:51

country flag Gun-Britt Fredriksson wrote:

Modellen verkar trevlig att virka, men Cotton viscose är svår att virka i, tråden delar sig hela tiden, har gett upp och ska fixa annat garn. Bättre att sticka i ? /GB

17.05.2010 - 13:51

country flag DROPS Design wrote:

The pattern is available in US English. Click the US flag to get to it.

28.04.2010 - 22:53

country flag Tmesia Gurley wrote:

Please may I have the pattern printed in American english and also the diagram, thank you.

28.04.2010 - 21:46

country flag Carol Binns wrote:

This is a lovely pattern. I have just completed it for a friend.

21.04.2010 - 15:05

country flag DROPS Design NL wrote:

Na het haken van de 13 stk voor het armsgat haak je: "Haak in de volgende toer 7-8-10-11-15-18 l aan het einde van de toer, keer en haak 1 stk in de 4e l van de haak en 1 stk in iedere van de volgende 3-4-6-7-11-14 l. Dan zou het aantal stk komen te kloppen. Succes verder. Gr, Tine

23.03.2010 - 12:18