DROPS Karisma
DROPS Karisma
100% Wool
from 3.00 $ /50g
Get the yarn to make this pattern from 27.00$.

The yarn cost is calculated from the pattern’s smallest size and the yarn’s cheapest product type. Looking for an even better price? You might find it on the DROPS Deals!

DROPS SS24

Hardanger

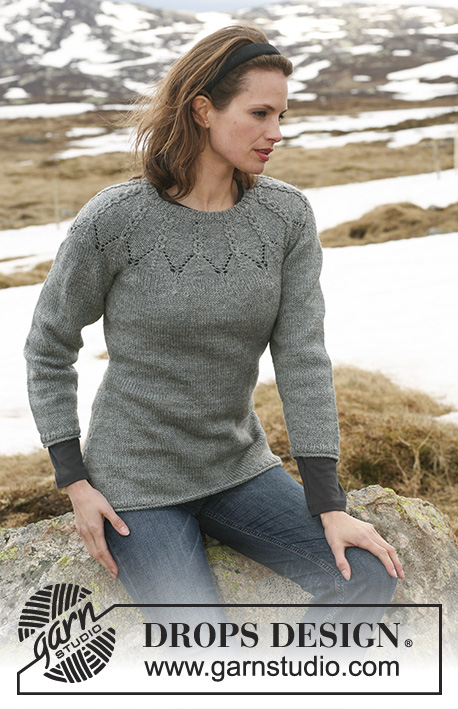
DROPS jumper with cables and round yoke sleeves in ”Karisma”. Size S - XXXL

DROPS 114-2
DROPS design: Pattern no U-559.
--------------------------------------------------------
Size: S - M - L - XL - XXL - XXXL

Finished measurements:
Bust: 80-88-96-106-118-130 cm /
31½"-34⅝"-37¾"-41¾"-46½"-51" /
Full length: 64-66-68-70-72-74 cm /
25¼"-26"-26¾"-27½"-28⅜"-29⅛"

Materials: DROPS KARISMA SUPERWAS from Garnstudio
450-500-550-600-650-700 g color no 21, medium gray

DROPS DOUBLE POINTED NEEDLES and CIRCULAR NEEDLE (80 cm / 32") size 4 mm/ US 6 - or size needed to get 21 sts x 28 rows in stockinette st = 10 x 10 cm / 4" x 4".
DROPS DOUBLE POINTED NEEDLES and CIRCULAR NEEDLE (80 cm / 32") size 3.5 mm/ US 4 – for rib.

-------------------------------------------------------

Alternative Yarn – See how to change yarns here
Yarn Groups A to F – Use the same pattern and change the yarn here
Yarn usage using an alternative yarn – Use our yarn converter here

-------------------------------------------------------

DROPS Karisma
DROPS Karisma
100% Wool
from 3.00 $ /50g
Get the yarn to make this pattern from 27.00$.

The yarn cost is calculated from the pattern’s smallest size and the yarn’s cheapest product type. Looking for an even better price? You might find it on the DROPS Deals!

Pattern instructions

NOTE: This pattern is written in American English. All measurements in charts are in cm. For conversion from inches to cm - click here. There are different terms for crocheting in American and British English. If this pattern includes crochet, click for "crochet terms" here. For this pattern in British English, please click here.
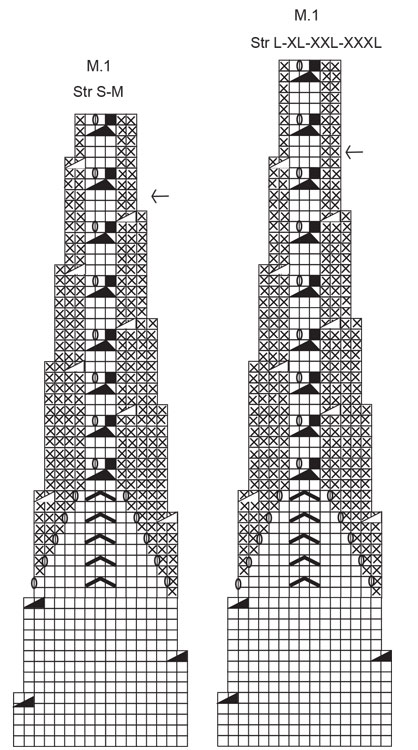
PATTERN:
See diagram M.1. Diagram shows the pattern from RS.
When later working M.1 back and forth on needle (from WS): slip 1 st, P2, psso.
--------------------------------------------------------
--------------------------------------------------------

JUMPER:
Worked in the round on circular needle. Cast on 192-210-225-249-273-297 sts on circular needle size 3.5 mm / US 4 with Karisma.
K 2 rounds and work 4 rounds rib K1/ P2. Change to circular needle size 4 mm / US 6 and K 1 round, AT THE SAME TIME dec 0-2-1-1-1-1 sts evenly = 192-208-224-248-272-296 sts. Insert 1 marker at beg of round and 1 marker after 96-104-112-124-136-148 sts (= the sides). Now continue in stockinette st.. REMEMBER THE KNITTING TENSION /GAUGE! When piece measures 6 cm / 2⅜" dec 1 st each side of both markers (= 4 dec), and repeat the dec on every 2 cm / ¾" a total of 10 times = 152-168-184-208-232-256 sts. When piece measures 30 cm / 11¾" inc 1 st each side of both markers, and repeat the inc on every 3-3-3-4-4-4 cm / 1⅛"-1⅛"-1⅛"-1½"-1½"-1½" a total of 4 times = 168-184-200-224-248-272 sts. Continue until piece measures 43-44-45-46-47-48 cm / 17"-17¼"-17¾"-18"-18½"-19". Now bind off 8 sts each side for armhole (= 4 sts each side of marker) = 152-168-184-208-232-256 sts. Put piece aside and knit the sleeves.

SLEEVE:
Worked in the round on double pointed needles. Cast on 51-54-54-57-60-60 sts on double pointed needles size 3.5 mm / US 4 with Karisma. K 2 rounds and work 4 rounds rib K1/ P2. Change to double pointed needles size 4 mm / US 6 and K 1 round, AT THE SAME TIME dec 1-2-0-1-2-0 sts evenly = 50-52-54-56-58-60 sts. Insert a marker at beg of round = mid under sleeve. Continue in stockinette st. When piece measures 7 cm / 2¾" inc 1 st each side of marker, repeat the inc on every 1.5-1.5-1.5-1-1-1 cm / ⅝"-⅝"-⅝"-⅜"-⅜"-⅜" a total of 14-15-16-17-18-19 times = 78-82-86-90-94-98 sts. When sleeve measures 33-33-32-32-31-31 cm / 13"-13"-12½"-12½"-12¼"-12¼" (less for the larger sizes because of longer sleeve cap and wider shoulder) bind off 4 sts on each side of marker = 70-74-78-82-86-90 sts. Put piece aside and knit the other sleeve.

YOKE:
Slip sleeves on same circular needle as body piece where bind off for armholes = 292-316-340-372-404-436 sts. K 1 round, AT THE SAME TIME adjust no of sts to 289-323-340-374-408-442 sts. Insert a marker mid front (38-42-46-52-58-64 sts in from each sleeve) and work round to this marker – this is now beg of round. Work 0-1-0-1-2-3 cm / 0"-⅜"-0-⅜"-¾"-1⅛" stockinette st, and then work M.1 (= 17-19-20-22-24-26 repeats across the round), see diagram for your size = 119-133-140-154-168-182 sts on needle. Continue up to arrow in diagram. Now slip 1 repeat (= 7 sts) each side of marker mid front on a stitch holder for neck (= 14 sts on stitch holder). Continue back and forth on needle in M.1 as before. AT THE SAME TIME, slip sts on stitch holder each side towards mid front on every other row as follows: 2 sts 3-3-4-4-4-4 times = 26-26-30-30-30-30 sts on stitch holder. M.1 has now been completed = 76-88-90-102-114-126 sts on needle.
Slip all sts from stitch holder back on needle = a total of 104-116-122-134-146-158 sts on needle. Change to circular needle size 3.5 mm / US 4. K 1 round, AT THE SAME TIME dec 2-11-14-23-32-41 sts evenly = 102-105-108-111-114-117 sts. P 1 round, K 1 round and P 1 round, and work 4 rounds rib K1/ P2. Bind off loosely with K over K and P over P.

ASSEMBLY:
Sew openings under sleeves.

This pattern has been corrected.

Updated online: 24.01.2018
New chart M.1 (arrow in size S-M is moved 1 row down).
Updated online: 18.04.2023
New diagram M.1 (the arrow in size L-XL-XXL-XXXL has been moved 1 row upwards).

Diagram

All measurements in charts are in cm.

symbols = K from RS, P from WS
symbols = K2 tog
symbols = 1 YO between 2 sts
symbols = P from RS, K from WS
symbols = slip 1 st as if to K, K2 tog,
psso
symbols = P2 tog
symbols = slip 1 st as if to K, K2, psso
symbols = st not incl in this round
diagram
diagram

Each of our patterns has specific tutorial videos to help you.

Do you have a question? See a list of frequently asked questions (FAQ)

Knitting tension is what determines the final measurements of your work, and is usually measured per 10 x 10 cm. It is provided like so: number of stitches in width x number of rows in height - eg: 19 stitches x 26 rows = 10 x 10 cm.

The knitting tension is very individual; some people knit/crochet loosely while others work tightly. You adjust the knitting tension with the needle size, which is why the suggested needle size only serve as a guide! You need to adjust this (up or down) to ensure that YOUR knitting tension matches the knitting tension provided in the pattern. If you work with a different knitting tension than provided you will have a different yarn consumption, and your work will have different measurements than what the pattern suggests.

The knitting tension also determines which yarns can replace each other. As long as you achieve the same knitting tension you can replace one yarn with another.

See DROPS lesson: How to measure your tension/gauge

See DROPS video: How to make a gauge tension swatch

The required amount of yarn is provided in grams, eg: 450 g. To calculate how many balls you’ll need you first need to know how many grams are in 1 ball (25g, 50g or 100g). This information is available if you click on the individual yarn quality on our pages. Divide the amount required with the amount of each ball. For example, if each ball is 50g (the most common amount), the calculation will be as follows: 450 / 50 = 9 balls.

The important thing when changing from one yarn to another is that the knitting/crochet tension remains the same. This is so that the measurements of the finished piece will be the same as on the sketch provided. It is easier to achieve the same knitting tension using yarns from the same yarn group. It is also possible to work with multiple strands of a thinner yarn to achieve the knitting tension of a thicker one. Please try our yarn converter. We recommend you to always work a test swatch.

Please NOTE: when changing yarn the garment might have a different look and feel to the garment in the photo, due to individual properties and qualities of each yarn.

See DROPS lesson: Can I use a different yarn than the one mentioned in the pattern?

All our yarns are categorised into yarn groups (from A to F) according to thickness and knitting tension – group A contains the thinnest yarns and group F the thickest. This makes it easier for you to find alternative yarns to our patterns, should you wish to switch yarn. All yarns within the same group have a similar knitting tension and can easily replace each other. However, different yarn qualities have different structures and properties which will give the finished work a unique look and feel.

Click here for an overview of the yarns in each yarn group

At the top of all our patterns you’ll find a link to our yarn converter, which is a helpful tool should you wish to use a different yarn than suggested. By filling in the yarn quality you wish to replace, the amount (in your size) and number of strands, the converter will present good alternative yarns with the same knitting tension. Additionally it will tell you how much you’ll require in the new qualities and whether you’ll need to work with multiple strands. Most skeins are 50g (some are 25g or 100g).

If the pattern is worked with multiple colours, every colour will have to be converted separately. Similarly, if the pattern is worked with several strands of different yarns (for example 1 strand Alpaca and 1 strand Kid-Silk) you will have to find alternatives for each, individually.

Click here to see our yarn converter

Since different yarns have different qualities and textures we have chosen to keep the original yarn in our patterns. However, you can easily find options among our available qualities by using our yarn converter, or simply pick a yarn from the same yarn group.

It is possible that some retailers still have discontinued yarns in stock, or that someone has a few skeins at home that they would like to find patterns for.

The yarn converter will provide both alternative yarn as well as required amount in the new quality.

If you think it's hard to decide what size to make, it can be a good idea to measure a garment you own already and like the size of. Then you can pick the size by comparing those measures with the ones available in the pattern's size chart.

You'll find the size chart at the bottom of the pattern.

See DROPS lesson: How to read size chart

The needle size provided in the pattern serves only as a guide, the important thing is to follow the knitting tension. And since knitting tension is very individual, you will have to adjust the needle size to ensure that YOUR tension is the same as in the pattern – maybe you’ll have to adjust 1, or even 2 needle sizes, up or down to achieve the correct tension. For this, we recommend that you work test swatches.

Should you work with a different knitting tension than the one provided, the measurements of the finished garment might deviate from the measurement sketch.

See DROPS lesson: How to measure your tension/gauge

See DROPS video: How to make a gauge tension swatch

Working a garment top-down provides more flexibility and room for personal adjustment. For example it is easier to try the garment on while working, as well as making adjustments to length of yoke and shoulder caps.

The instructions are carefully explaining every step, in the correct order. Diagrams are adjusted to the knitting direction and are worked as usual.

The diagram depicts all rows/rounds, and every stitch seen from the right side. It is read from bottom to top, from right to left. 1 square = 1 stitch.

When working back and forth, every other row is worked from the right side and every other row is worked from the wrong side. When working from the wrong side, the diagram will have to be worked reversed: from left to right, knit stitches are purled, purl stitches are knit etc.

When working in the round every round is worked from the right side and the diagram are worked from right to left on all rounds.

See DROPS lesson: How to read knitting diagrams

The diagram depicts all rows/rounds, and every stitch seen from the right side. It is worked from bottom to top, from right to left.

When working back and forth every other row is worked from the right side: from right to left and every other row is worked from the wrong side: from left to right.

When working in the round, every row in the diagram are worked from the right side, from right to left.

When working a circular diagram you start in the middle and work your way outwards, counter clockwise, row by row.

The rows usually start with a given number of chain stitches (equivalent to the height of the following stitch), this will either be depicted in the diagram or explained in the pattern.

See DROPS lesson: How to read crochet diagrams

Instructions for working several diagrams after each other on the same row/round, will often be written like so: “work A.1, A.2, A.3 a total of 0-0-2-3-4 times". This means you work A.1 once, then A.2 is worked once, and A.3 is repeated (in width) the number of times provided for your size – in this case like so: S = 0 times, M = 0 times, L=2 times, XL= 3 times and XXL = 4 times.

The diagrams are worked as usual: begin with the first row in A.1, then work the first row in A.2 etc.

See DROPS lesson: How to read knitting diagrams

See DROPS lesson: How to read crochet diagrams

The total width of the garment (from wrist-to-wrist) will be larger in the larger sizes, despite the actual sleeves being shorter. The larger sizes have longer sleeve caps and wider shoulders, so there will be a good fit in all sizes.

The measurement sketch/schematic drawing provides information regarding the full length of the garment. If it’s a jumper or a jacket the length is measured from the highest point on the shoulder (usually closest to the neckline), and straight down to the bottom of the garment. It is NOT measured from the tip of shoulder. Similarly, the length of yoke is measured from the highest point on the shoulder and down to where yoke is split into body and sleeves.

See DROPS lesson: How to read a schematic drawing

Diagrams are often repeated on the round or in height. 1 repeat is the diagram the way it appears in the pattern. If it says to work 5 repeats of A.1 in the round, then you work A.1 a total of 5 times after/next to each other in the round. If it says to work 2 repeats of A.1 vertically/in height you work the entire diagram once, then begin again at the start and work the entire diagram one more time.

Chain stitches are slightly narrower than other stitches and to avoid working the cast-on edge too tight, we simply chain more stitches to begin with. The stitch count will be adjusted on the following row to fit the pattern and measurement sketch.

The rib edge is more elastic and will contract slightly compared to, for example, stocking stitch. By increasing before the rib edge, you avoid a visible difference in width between the rib edge and the rest of the body.

It’s very easy to cast off too tightly, and by making yarn overs while casting off (and simultaneously casting these off) you avoid a too tight cast off edge.

See DROPS video: How to bind off with yarn overs (yo)

To achieve an even increase (or decrease) you can increase on, for example: every 3rd and 4th row alternately, like so: work 2 rows and increase on the 3rd row, work 3 rows and increase on the 4th. Repeat this until the increase is complete.

See DROPS lesson: Increase or decrease 1 st on every 3rd and 4th row alternately

Should you prefer to work in the round instead of back and forth, you may of course adjust the pattern. You’ll need to add steeks mid-front (usually 5 stitches), and follow the instructions. When you would normally turn and work from the wrong side, simply work across the steek and continue in the round. At the end you’ll cut the piece open, pick up stitches to work bands, and cover the cut edges.

See DROPS video: How to knit steeks and cut open

Should you prefer to work back and forth instead of in the round, you may of course adjust the pattern so you work the pieces separately and then assemble them at the end. Divide the stitches for the body in 2, add 1 edge stitch in each side (for sewing) and work the front and back pieces separately.

See DROPS lesson: Can I adapt a pattern for circular needles into straight needles?

Pattern repeats can vary slightly in the different sizes, in order to get the correct proportions. If you’re not working the exact same size as the garment in the photo, yours might deviate slightly. This has been carefully developed and adjusted so that the complete impression of the garment is the same in all sizes.

Make sure to follow instructions and diagrams for your size!

If you have found a pattern you like which is available in women’s size it’s not very difficult to convert it to men’s size. The biggest difference will be the length of sleeves and body. Start working on the women size that you think would fit across the chest. The additional length will be worked right before you cast off for the armhole/sleeve cap. If the pattern is worked top-down you can add the length right after the armhole or before the first decrease on sleeve.

Regarding additional yarn amount, this will depend on how much length you add, but it is better with a skein too many than too few.

All yarns will have excess fibres (from production) that might come off as lint or shedding. Brushed yarns (ie hairier yarns) have more of these loose, excess fibres, causing more shedding.

Shedding also depends on what is worn under or over the garment, and whether this pulls at the yarn fibres. It’s therefore not possible to guarantee that there will be no shedding

Below are some tips on how to get the best result when working with hairier yarns:

1. When the garment is finished (before you wash it) shake it vigorously so the looser hairs come off. NOTE: do NOT use a lint roller, brush or any method that pulls at the yarn.

2. Place the garment in a plastic bag and put it in your freezer - the temperature will cause the fibres to become less attached to each other, and excess fibres will come off easier.

3. Leave in the freezer for a few hours before taking it out and shaking it again.

4. Wash the garment according to the instructions on the yarn label.

Pilling is a natural process that happens to even the most exclusive of fibers. It's a natural sign of wear and tear that is hard to avoid, and that is most visible in high friction areas of your garment like a sweater's arms and cuffs.

You can make your garment look as new by removing the pilling, using a fabric comb or a pill/lint remover.

Still can't find the answer you need? Then scroll down and leave your question so one of our experts can try to help you. This will be done normally within 5 to 10 working days.
In the meantime, you can read the questions and answers that others have left to this pattern or join the DROPS Workshop on Facebook to get help from fellow knitters/crocheters!

Post a comment to pattern DROPS 114-2

We would love to hear what you have to say about this pattern!

If you want to leave a question, please make sure you select the correct category in the form below, to speed up the answering process. Required fields are marked *.

Comments / Questions (80)

country flag Nina Ziv wrote:

Another question is do I alternate knitting on right side forvone row and then knit on wrong side for the next row?

05.05.2021 - 00:53

DROPS Design answered:

Dear Mrs Ziv, the yoke is here worked in the the round, this means you will read every row in diagram from the right towards the left - see link in previous answer. Happy knitting!

05.05.2021 - 08:38

country flag Nina Ziv wrote:

I am doing the M1 diagram and am unsure where to start - do I start at the bottom of the diagram -the wider part or the top?

05.05.2021 - 00:49

DROPS Design answered:

Dear Mrs Ziv, work diagram bottom up starting on the corner on the right side and read every round from the right towards the left. You will decrease as shown in diagram and getting that way always less stitches. read more about diagrams here. Happy knitting!

05.05.2021 - 08:37

country flag Nina Ziv wrote:

Hello I am following a diagram for the Hardanger drops dedign and there is one box that is black and the code says this stitch is not included in the round. What does that mean in relation to the rest of the pattern?Do I just slip the stitch?

04.05.2021 - 17:50

DROPS Design answered:

Dear Nina, the stitch that was on the place of the square marked with black is being decreased. We keep the square so the diagram shows the full ro, but you do not have to do anything, just knit the next diagram. Happy Knitting!

04.05.2021 - 18:39

country flag Ida Corneliussen wrote:

I rapport M1 forstår jeg ikke den sorte firkant - en maske, der ikke tæller Jeg kan ikke få maskeantallet til at stemme med antallet på den forudgående pind, som er 5 vrang+2 masker under 1, + 4 vrang=11 m.. Næste pind begynder med 5 vrang, så den svære maske. det en af de 2 m. som springes over, mens den anden strikkes, hvorefter der slås om tråden og endnu en strikkes ret, derefter 4 vr. (9 m i alt, giver problem - forskydning eller hvad! næste p 12 m.

22.01.2021 - 21:29

country flag Carmen Desruisseaux wrote:

Je suis rendue à placer 7 mailles de chaque côté, et je ne sais pas quoi faire avec ces mailles avant de terminé mon école en côte 2/2.merci

16.11.2020 - 23:04

DROPS Design answered:

Bonjour Mme Desruisseaux, une fois que vous avez placé ces 14 mailles au milieu devant en attente sur un fil, continuez en allers et retours (= en rangs, alternativement sur l'endroit et sur l'envers), en suivant toujours le diagramme, en même temps, mettez en attente de chaque côté au début de chaque rang (tricotez ces mailles puis mettez-les en attente): 3 à 4 fois 2 m de chaque côté, il doit vous rester 76 à 126 m selon la taille et vous avez 26 ou 30 mailles en attente pour l'encolure devant. Bon tricot!

17.11.2020 - 11:06

country flag HUANG wrote:

Bonjour, je suis tombée sur ce modèle et le trouve intéressant. Pouvez-vous me dire si le diagramme M.1 a été mis à jour suite à la correction mise à jour le 24.01.2018 : Correction en ligne le: 24.01.2018 : Nouveau diagramme M.1 (la flèche en taille S-M a été déplacée 1 rang plus bas)? Ou il faut tout de même déplacer la flèche 1 rang plus bas par rapport au diagramme? Bien cordialement

09.10.2020 - 16:31

DROPS Design answered:

Bonjour Mme Huang, si vous avez imprimé les explications après la date de la correction, alors le diagramme en ligne est correct. En revanche, si vous aviez déjà imprimé les explications, il vaudrait mieux les imprimer à nouveau. Bon tricot!

12.10.2020 - 07:07

country flag María Dolores Sánchez Cruz wrote:

Se puede realizar el jersey con agujas que no sean circulares? Gracias

05.12.2019 - 21:33

DROPS Design answered:

Hola María Dolores. Puedes leer nuestra lección sobre cómo adaptar un modelo trabajado con agujas circulares a agujas rectas: https://www.garnstudio.com/lesson.php?id=13&cid=23

09.12.2019 - 21:18

country flag Assa wrote:

Ich bin gerade bei der Passe angekommen, das Muster M1 verwirrt mich doch etwas. Gibt es ein Video, wo diese Technik mit dem Hilfsfaden und dem Hin-und Her-Stricken erklärt wird? Bei den mit x gekennzeichneten Maschen handelt es sich doch um linke Maschen? Wieso wird denn erst ab dem Pfeil auf einen Hilfsfaden gelegt und dann hin-und her gestrickt? Strickt man jetzt jeden Rapport einzeln? Vielen Dank für die Hilfestellung !

04.12.2019 - 12:11

DROPS Design answered:

Liebe Assa, bei M.1 sind die x linke Maschen (= die stricken Sie links bei Hinreihen - und später rechts bei Rückreihen). Beim Pfeil legen Sie die mittleren Maschen für den Halsausschnitt still, dann stricken Sie M.1 weiter, aber jetzt die restlichen Maschen in Hin und Rückreihen von einer Seite vom Halsausschnitt bis andere Seite (gleichzeitig am Anfang jeder Reihe für den Halsausschnitt weitere Maschen stilllegen) - Diagramme lesen Sie dann Hinreihen rechts nach links und Rückreihen links nach rechts. Viel Spaß beim stricken!

04.12.2019 - 13:32

country flag Cinzia wrote:

È possibile avere lo schema in italiano?

17.06.2019 - 21:08

DROPS Design answered:

Buongiorno Cinzia. A questo link trova il modello in italiano. Buon lavoro!

17.06.2019 - 21:14

country flag Elke wrote:

Hallo, als ik het goed begrijp zet ik vanaf de pijl alleen vooraan 14 steken op een hulpnaald en niet achteraan op de rug. Deze steken laat ik staan en brei de rest verder tot einde M1. Daarna 4 x 2 st op hulpnaald breien = 30 st. Moeten die steken voor en achter komen op de hulpnaald met de 14 steken? Graag je hulp. Dan u wel.

02.06.2019 - 17:18

DROPS Design answered:

Dag Elke,

Er worden inderdaad alleen aan de voorkant steken op een hulpdraad gezet. Dit is om de ronding voor de hals te maken. Vanaf dat je steken op een hulpdraad hebt gezet, brei je heen en weer. De 4 x 2 steken komen bovenop de eerste middelste steken van de hulpdraad. Deze schuif je dus bij de hulpdraad.

06.06.2019 - 21:50