DROPS Vivaldi
DROPS Vivaldi
56% Mohair, 30% Polyamide, 14% Wool
Discontinued
find alternatives
DROPS Super Sale
DROPS 117-34
DROPS design: Pattern no OO-071

Length mid back: approx 75 cm
Width at top: approx 145 cm
Materials: DROPS VIVALDI
100 g colour no 03, red
50 g colour no 02, dark brown
50 g colour no 08, grey pink
50 g colour no 15, cerise
50 g colour no 16, orange
50 g colour no 32, heather

If you wish to crochet the shawl in 1 single colour you’ll need 150 g in total.

DROPS CROCHET HOOK size 4 mm – or size needed to get 1 square = 15 x 15 cm.

-------------------------------------------------------

Alternative Yarn – See how to change yarns here
Yarn Groups A to F – Use the same pattern and change the yarn here
Yarn usage using an alternative yarn – Use our yarn converter here

-------------------------------------------------------

DROPS Vivaldi
DROPS Vivaldi
56% Mohair, 30% Polyamide, 14% Wool
Discontinued
find alternatives

DROPS Super Sale

SAVE 30% on 6 cotton favourites!
Valid until 12.04.2024

Pattern instructions

NOTE: This pattern is written in British English. All measurements in charts are in cm. For conversion from cm to inches - click here. There are different terms for crocheting in British and American English. If this pattern includes crochet, click for "crochet terms" here. For this pattern in American English, please click here.
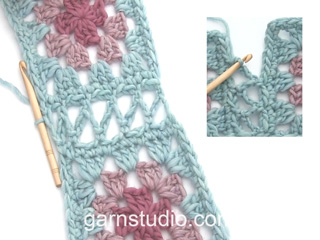
CROCHET TIP: Replace first tr on round with 3 ch and finish each round with 1 sl st in first st from beg of round.
--------------------------------------------------------

SHAWL: Crochet 21 whole and 7 half squares.

COLOURS OF SQUARES:
All squares are crochet in different colour combinations. Round 7 and 8 round are red on all squares.
SQUARE-1: round 1 and 2 = orange, round 3 and 4 = dark brown, round 5 and 6 = heather.
SQUARE-2: round 1 and 2 = heather, round 3 to 6 = cerise.
SQUARE-3: round 1 to 4 = grey pink, round 5 and 6 = red.
SQUARE-4: round 1 and 2 = dark brown, round 3 to 6 = cerise.
SQUARE-5: round 1 and 2 = red, round 3 and 4 = orange, round 5 and 6 = dark brown.
SQUARE-6: round 1 and 2 = red, round 3 and 4 = grey pink, round 5 and 6 = heather.
SQUARE-7: round 1 to 6 = cerise.
SQUARE-8: round 1 and 2 = grey pink, round 3 to 6 = dark brown.
SQUARE-9: round 1 and 2 = red, round 3 and 4 = heather, round 5 and 6 = orange.
SQUARE-10: round 1 = orange, round 2 to 4 = dark brown, round 5 and 6 = red.
SQUARE-11: round 1 = heather, round 2 to 4 = cerise, round 5 and 6 = red.
SQUARE-12: round 1 = grey pink, round 2 to 4 = heather, round 5 and 6 = red.
SQUARE-13: round 1 and 2 = cerise, round 3 to 6 = orange.
SQUARE-14: round 1 and 2 = cerise, round 3 to 6 = grey pink.
SQUARE-15: round 1 to 6 = heather.
SQUARE-16: round 1 and 2 = orange, round 3 and 4 = cerise, round 5 and 6 = grey pink.
SQUARE-17: round 1 to 6 = dark brown.
SQUARE-18: round 1 and 2 = red, round 3 and 4 = grey pink, round 5 and 6 = cerise.
SQUARE-19: round 1 and 2 = red, round 3 to 6 = heather.
SQUARE-20: round 1 and 2 = dark brown, round 3 and 4 = heather, round 5 and 6 = grey pink.
SQUARE-21: round 1 to 4 = orange, round 5 and 6 = red.
SQUARE-22: round 1 to 4 = heather, round 5 and 6 = red.
SQUARE-23: round 1 and 2 = orange, round 3 to 6 = cerise.
SQUARE-24: round 1 to 6 = orange.
SQUARE-25: round 1 to 4 = dark brown, round 5 and 6 = red.
SQUARE-26: round 1 to 6 = grey pink.
SQUARE-27: round 1 = grey pink, round 2 to 4 = orange, round 5 and 6 = red.
SQUARE-28: round 1 to 4 = cerise, round 5 and 6 = red.

WHOLE SQUARE:
Crochet 6 ch with colour of round 1 on crochet hook size 4 mm and form a ring with 1 sl st in first ch.
ROUND 1: 12 tr in ring - SEE CROCHET TIP!
ROUND 2: 2 tr in each tr = 24 tr.
ROUND 3: 1 dc in first tr, * 5 ch, skip 2 tr, 1 dc in next tr *, repeat from *-* = 8 ch-loops.
ROUND 4: Crochet as follows in all ch-loops: 1 dc, 1 htr, 1 tr, 2 dtr, 1 tr, 1 htr and 1 dc = 8 leaves.
ROUND 5: If continuing with the same colour as round 4 crochet sl sts to the top of leaf. If changing colour crochet 1 dc between the 2 dtr on first leaf. Continue as follows: * 8 ch, 1 dc between the 2 dtr on next leaf *, repeat from *-* = 8 ch-loops.
ROUND 6: In each ch-loop crochet 10 tr, finish with 1 sl st in first st on round.
ROUND 7: 10 ch (if changing colour, work 1 dc in sl st from previous round first), 1 htr between 5th and 6th tr on first loop, * 6 ch, 1 dc between the 10 tr on first loop and the 10 tr on second loop, 6 ch, 1 htr between 5th and 6th tr on second loop, 6 ch, 1 dtr between the 10 tr on second loop and the 10 tr on third loop, 6 ch, 1 htr between 5th and 6th tr on third loop *, repeat from *-* a total of 3 times, 6 ch, 1 dc between the 10 tr on last but one loop and the 10 tr on last loop, 6 ch, 1 htr between 5th and 6th tr on last loop, 6 ch, 1 sl st in 4th ch from beg of round.
ROUND 8: 6 ch, in 4th ch from beg of previous round crochet as follows: 1 triple-tr, 2 ch and 1 dtr, * 6 ch, 1 htr in htr from previous round, 6 ch, 1 dc in dc from previous round, 6 ch, 1 htr in htr from previous round, 6 ch, in dtr from previous round crochet: 1 dtr, 2 ch, 1 triple-tr, 2 ch and 1 dtr *, repeat from *-* a total of 3 times, 6 ch, 1 htr in htr from previous round, 6 ch, 1 dc in dc from previous round, 6 ch, 1 htr in htr from previous round, 6 ch, 1 sl st in 4th ch from beg of round.

HALF SQUARE:
Crochet 5 ch with crochet hook size 4 mm and form a ring with 1 sl st in first ch.
ROW 1: 12 tr in ring - SEE CROCHET TIP!
ROW 2: 2 tr in each of the 8 first tr = 16 tr, turn piece.
ROW 3: 5 ch, skip the 2 first tr, 1 dc in next tr, * 5 ch, skip 2 tr, 1 dc in next tr *, repeat from *-* a total of 4 times = 5 ch-loops, turn piece.
ROW 4: Crochet as follows in each ch-loop: 1 dc, 1 htr, 1 tr, 2 dtr, 1 tr, 1 htr and 1 dc = 5 leaves, turn piece.
ROW 5: If continuing with the same colour as round 4 crochet sl sts to the top of leaf. If changing colour crochet 1 dc between the 2 dtr on first leaf. Continue as follows: * 8 ch, 1 dc between the 2 dtr on next leaf *, repeat from *-* = 4 ch-loops, turn piece.
ROW 6: 3 ch, in each ch-loop crochet 10 tr, finish with 1 extra tr in the last ch-loop, turn piece.
ROW 7: 1 dc in first tr, 10 ch, 1 htr between 6th and 7th tr on first loop, 6 ch, 1 dc between the 11 tr on first loop and the 10 tr on second loop, 6 ch, 1 htr between 5th and 6th tr on second loop, 6 ch, 1 dtr between the 10 tr on second loop and the 10 tr on third loop, 6 ch, 1 htr between 5th and 6th tr on third loop, 6 ch, 1 dc between the 10 tr on third loop and the 10 tr on last loop, 6 ch, 1 htr between 5th and 6th tr on last loop, 6 ch, 1 dtr in last tr, turn piece.
ROW 8: 7 ch + 1 dtr in first dtr from previous row, * 6 ch, 1 htr in htr from previous row, 6 ch, 1 dc in dc from previous row, 6 ch, 1 htr in htr from previous row, 6 ch, in dtr from previous row crochet: 1 dtr, 2 ch, 1 triple-tr, 2 ch and 1 dtr *, repeat from *-* 1 more time, but the last time cut the thread after the triple-tr.

ASSEMBLY:
Place the squares as shown in fig-2. Crochet them tog as shown in fig-1 with red – beg by arrow-a: Crochet 1 dc in triple-tr in corner on square-7, 1 ch, 1 dc in triple-tr in corner on square-1, 2 ch, 1 dc in next dtr on square-7, 1 ch, 1 dc in next dtr on square-1, 5 ch, 1 dc in next htr on square-7, 1 ch, 1 dc in next htr on square-1, continue as shown in fig-1, crochet the whole row tog, i.e. until square-6 and square-27 are crochet tog.
Now crochet next row tog in the same way, i.e. square-12 and square-7. Crochet all rows tog in parallel. Then crochet all the crossed rows tog – beg by arrow-b.
Now crochet a border round the shawl with red as follows:
ROUND 1: Beg at the top along the half squares. Work 1 dc in first ch-loop, * 6 ch, skip approx 2 cm, 1 dc *, repeat from *-* all the way round, in corners crochet 1 dc, 6 ch and 1 dc in the same st, finish with 1 sl st in first dc on round.
ROUND 2: Work sl sts to the middle of first ch-loop, 1 dc in first ch-loop, * 6 ch, 1 dc in next ch-loop *, repeat from *-*, finish with 1 sl st in first dc on round.
ROUND 3: Like round 2, cut the thread.

Diagram

symbols = 1 ch
symbols = 1 dc
diagram
Do you have a question? See a list of frequently asked questions (FAQ)

Knitting tension is what determines the final measurements of your work, and is usually measured per 10 x 10 cm. It is provided like so: number of stitches in width x number of rows in height - eg: 19 stitches x 26 rows = 10 x 10 cm.

The knitting tension is very individual; some people knit/crochet loosely while others work tightly. You adjust the knitting tension with the needle size, which is why the suggested needle size is only meant as a guide! You need to adjust this (up or down) to ensure that YOUR knitting tension matches the knitting tension provided in the pattern. If you work with a different knitting tension than provided you will have a different yarn consumption, and your work will have different measurements than what the pattern suggests.

The knitting tension also determines which yarns can replace each other. As long as you achieve the same knitting tension you can replace one yarn with another.

See DROPS lesson: How to measure your tension/gauge

See DROPS video: How to make a gauge tension swatch

The required amount of yarn is provided in grams, eg: 450 g. To calculate how many balls you’ll need you first need to know how many grams are in 1 ball (25g, 50g or 100g). This information is available if you click on the individual yarn quality on our pages. Divide the amount required with the amount of each ball. For example, if each ball is 50g (the most common amount), the calculation will be as follows: 450 / 50 = 9 balls.

The important thing when changing from one yarn to another is that the knitting/crochet tension remains the same. This is so that the measurements of the finished piece will be the same as on the sketch provided. It is easier to achieve the same knitting tension using yarns from the same yarn group. It is also possible to work with multiple strands of a thinner yarn to achieve the knitting tension of a thicker one. Please try our yarn converter. We recommend you to always work a test swatch.

Please NOTE: when changing yarn the garment might have a different look and feel to the garment in the photo, due to individual properties and qualities of each yarn.

See DROPS lesson: Can I use a different yarn than the one mentioned in the pattern?

All our yarns are categorised into yarn groups (from A to F) according to thickness and knitting tension – group A contains the thinnest yarns and group F the thickest. This makes it easier for you to find alternative yarns to our patterns, should you wish to switch yarn. All yarns within the same group have a similar knitting tension and can easily replace each other. However, different yarn qualities have different structures and properties which will give the finished work a unique look and feel.

Click here for an overview of the yarns in each yarn group

At the top of all our patterns you’ll find a link to our yarn calculator, which is a helpful tool should you wish to use a different yarn than suggested. By filling in the yarn quality you wish to replace, the amount (in your size) and number of strands, the calculator will present good alternative yarns with the same knitting tension. Additionally it will tell you how much you’ll require in the new qualities and whether you’ll need to work with multiple strands. Most skeins are 50g (some are 25g or 100g).

If the pattern is worked with multiple colours, every colour will have to be calculated separately. Similarly, if the pattern is worked with several strands of different yarns (for example 1 strand Alpaca and 1 strand Kid-Silk) you will have to find alternatives for each, individually.

Click here to see our yarn calculator

Since different yarns have different qualities and textures we have chosen to keep the original yarn in our patterns. However, you can easily find options among our available qualities by using our yarn calculator, or simply pick a yarn from the same yarn group.

It is possible that some retailers still have discontinued yarns in stock, or that someone has a few skeins at home that they would like to find patterns for.

The yarn calculator will provide both alternative yarn as well as required amount in the new quality.

If you think it's hard to decide what size to make, it can be a good idea to measure a garment you own already and like the size of. Then you can pick the size by comparing those measures with the ones available in the pattern's size chart.

You'll find the size chart at the bottom of the pattern.

See DROPS lesson: How to read size chart

The needle size provided in the pattern serves only as a guide, the important thing is to follow the knitting tension. And since knitting tension is very individual, you will have to adjust the needle size to ensure that YOUR tension is the same as in the pattern – maybe you’ll have to adjust 1, or even 2 needle sizes, up or down to achieve the correct tension. For this, we recommend that you work test swatches.

Should you work with a different knitting tension than the one provided, the measurements of the finished garment might deviate from the measurement sketch.

See DROPS lesson: How to measure your tension/gauge

See DROPS video: How to make a tension/gauge swatch

Working a garment top-down provides more flexibility and room for personal adjustment. For example it is easier to try the garment on while working, as well as making adjustments to length of yoke and shoulder caps.

The instructions are carefully explaining every step, in the correct order. Diagrams are adjusted to the knitting direction and are worked as usual.

The diagram depicts all rows/rounds, and every stitch seen from the right side. It is read from bottom to top, from right to left. 1 square = 1 stitch.

When working back and forth, every other row is worked from the right side and every other row is worked from the wrong side. When working from the wrong side, the diagram will have to be worked reversed: from left to right, knit stitches are purled, purl stitches are knit etc.

When working in the round every round is worked from the right side and the diagram are worked from right to left on all rounds.

See DROPS lesson: How to read knitting diagrams

The diagram depicts all rows/rounds, and every stitch seen from the right side. It is worked from bottom to top, from right to left.

When working back and forth every other row is worked from the right side: from right to left and every other row is worked from the wrong side: from left to right.

When working in the round, every row in the diagram are worked from the right side, from right to left.

When working a circular diagram you start in the middle and work your way outwards, counter clockwise, row by row.

The rows usually start with a given number of chain stitches (equivalent to the height of the following stitch), this will either be depicted in the diagram or explained in the pattern.

See DROPS lesson: How to read crochet diagrams

Instructions for working several diagrams after each other on the same row/round, will often be written like so: “work A.1, A.2, A.3 a total of 0-0-2-3-4 times". This means you work A.1 once, then A.2 is worked once, and A.3 is repeated (in width) the number of times provided for your size – in this case like so: S = 0 times, M = 0 times, L=2 times, XL= 3 times and XXL = 4 times.

The diagrams are worked as usual: begin with the first row in A.1, then work the first row in A.2 etc.

See DROPS lesson: How to read knitting diagrams

See DROPS lesson: How to read crochet diagrams

The total width of the garment (from wrist-to-wrist) will be larger in the larger sizes, despite the actual sleeves being shorter. The larger sizes have longer sleeve caps and wider shoulders, so there will be a good fit in all sizes.

The measurement sketch/schematic drawing provides information regarding the full length of the garment. If it’s a jumper or a jacket the length is measured from the highest point on the shoulder closest to the neckline, and straight down to the bottom of the garment. It is NOT measured from the tip of shoulder. Similarly, the length of yoke is measured from the highest point on the shoulder and down to where yoke is split into body and sleeves.

On a jacket measures are never taken along bands, unless specifically stated. Always measure inside band stitches when measuring the length.

See DROPS lesson: How to read a schematic drawing

Diagrams are often repeated on the round or in height. 1 repeat is the diagram the way it appears in the pattern. If it says to work 5 repeats of A.1 in the round, then you work A.1 a total of 5 times after/next to each other in the round. If it says to work 2 repeats of A.1 vertically/in height you work the entire diagram once, then begin again at the start and work the entire diagram one more time.

Chain stitches are slightly narrower than other stitches and to avoid working the cast-on edge too tight, we simply chain more stitches to begin with. The stitch count will be adjusted on the following row to fit the pattern and measurement sketch.

The rib edge is more elastic and will contract slightly compared to, for example, stocking stitch. By increasing before the rib edge, you avoid a visible difference in width between the rib edge and the rest of the body.

It’s very easy to cast off too tightly, and by making yarn overs while casting off (and simultaneously casting these off) you avoid a too tight cast off edge.

See DROPS video: How to bind off with yarn overs (yo)

To achieve an even increase (or decrease) you can increase on, for example: every 3rd and 4th row alternately, like so: work 2 rows and increase on the 3rd row, work 3 rows and increase on the 4th. Repeat this until the increase is complete.

See DROPS lesson: Increase or decrease 1 st on every 3rd and 4th row alternately

Should you prefer to work in the round instead of back and forth, you may of course adjust the pattern. You’ll need to add steeks mid-front (usually 5 stitches), and follow the instructions. When you would normally turn and work from the wrong side, simply work across the steek and continue in the round. At the end you’ll cut the piece open, pick up stitches to work bands, and cover the cut edges.

See DROPS video: How to knit steeks and cut open

Should you prefer to work back and forth instead of in the round, you may of course adjust the pattern so you work the pieces separately and then assemble them at the end. Divide the stitches for the body in 2, add 1 edge stitch in each side (for sewing) and work the front and back pieces separately.

See DROPS lesson: Can I adapt a pattern for circular needles into straight needles?

Pattern repeats can vary slightly in the different sizes, in order to get the correct proportions. If you’re not working the exact same size as the garment in the photo, yours might deviate slightly. This has been carefully developed and adjusted so that the complete impression of the garment is the same in all sizes.

Make sure to follow instructions and diagrams for your size!

If you have found a pattern you like which is available in women’s size it’s not very difficult to convert it to men’s size. The biggest difference will be the length of sleeves and body. Start working on the women size that you think would fit across the chest. The additional length will be worked right before you cast off for the armhole/sleeve cap. If the pattern is worked top-down you can add the length right after the armhole or before the first decrease on sleeve.

Regarding additional yarn amount, this will depend on how much length you add, but it is better with a skein too many than too few.

All yarns will have excess fibres (from production) that might come off as lint or shedding. Brushed yarns (ie hairier yarns) have more of these loose, excess fibres, causing more shedding.

Shedding also depends on what is worn under or over the garment, and whether this pulls at the yarn fibres. It’s therefore not possible to guarantee that there will be no shedding

Below are some tips on how to get the best result when working with hairier yarns:

1. When the garment is finished (before you wash it) shake it vigorously so the looser hairs come off. NOTE: do NOT use a lint roller, brush or any method that pulls at the yarn.

2. Place the garment in a plastic bag and put it in your freezer - the temperature will cause the fibres to become less attached to each other, and excess fibres will come off easier.

3. Leave in the freezer for a few hours before taking it out and shaking it again.

4. Wash the garment according to the instructions on the yarn label.

Pilling is a natural process that happens to even the most exclusive of fibers. It's a natural sign of wear and tear that is hard to avoid, and that is most visible in high friction areas of your garment like a sweater's arms and cuffs.

You can make your garment look as new by removing the pilling, using a fabric comb or a pill/lint remover.

Still can't find the answer you need? Then scroll down and leave your question so one of our experts can try to help you. This will be done normally within 5 to 10 working days.
In the meantime, you can read the questions and answers that others have left to this pattern or join the DROPS Workshop on Facebook to get help from fellow knitters/crocheters!

Post a comment to pattern DROPS 117-34

We would love to hear what you have to say about this pattern!

If you want to leave a question, please make sure you select the correct category in the form below, to speed up the answering process. Required fields are marked *.

Comments / Questions (13)

country flag Irini Karistinos wrote:

Is er geen eenvoudiger uitleg voor tour 7 en 8?

25.06.2017 - 12:59

DROPS Design answered:

Hoi Irini, In de toeren 7 en 8 (ik neem aan dat je het heel vierkant bedoelt?) is ongeveer steek voor steek beschreven wat je moet doen. Misschien kun je aangeven waar je tegenaan loopt.

25.06.2017 - 20:08

country flag Cath Harris wrote:

After joining squares 1 and 7 how do I then join 2 and 8 and 3 and 9?

19.04.2015 - 14:05

DROPS Design answered:

Dear Mrs Harris, after first 2 squares have been joined (7 and 1) continue the same way with next 2 squares (8 and 2, then 9 and 3 ...) ie line a in Fig. 1. Then work same way following b under Fig.1 & 2. Happy crocheting!

20.04.2015 - 09:56

country flag Corinne wrote:

Bonjour, je pense qu'au 8 tour du carré entier, il faut dans la DB du rang précédent:1DB,2ml,1TB,2ML,1DB et non pas: 1dB,2ml,1TB,2ml,1DB.(comme pour le 1/2 carré au même endroit) Pouvez vous me le confirmer? Cordialement, Corinne

15.07.2014 - 14:08

DROPS Design answered:

Bonjour Corinne, c'est tout à fait exact, la correction a été faite, pour le 8ème rang du demi-motif aussi. Merci, bon crochet!

15.07.2014 - 14:20

country flag Malin wrote:

Hej, Jättefin och allt. Man jag är lite ovan på vrikning och fattar ärligt talat inte hur varv sju ska ta sig ut... Det blir ju som att jag virkar allt i och över vartannat. Jag fattar alla förkortningar men inte själva beskrivningen på hur. Hjälp med förtydligande!!!

03.07.2014 - 22:39

DROPS Design answered:

Hej Malin, det är svårt att beskriva annorlunda, ta arbetet med till butiken där du har köpt garnet, de kan säkert se var du är i beskrivningen.

11.09.2014 - 11:19

country flag Eline Oudes Kramer wrote:

Heb de omslagdoek gemaakt van resten katoen die ik had met hoofdkleur wit en donkerblauwe afwerkrand....PRACHTIG.... lekker retro!

04.09.2012 - 11:26

country flag Eline Oudes Kramer wrote:

Heb de omslagdoek gemaakt van resten katoen die ik had met hoofdkleur wit en donkerblauwe afwerkend.....PRACHTIG.... lekker retro!

04.09.2012 - 11:24

country flag Nguyen Cecilia wrote:

Jaimerai acheter ce poncho est ce possible de le commander

20.11.2009 - 15:28

country flag DROPS Design NL wrote:

Hoi Harriët. Toer 7 en 8 zijn de laatste 2 toeren om de "bloemen". Op de foto zijn dat de toeren gemaakt van wijnrood. Beide toeren zijn lang en heel uitvoerlijk beschreven. Zou je mij willen vertellen waar in de toeren het precies fout gaat? Dan kan ik dat stukje uitleggen. Gr. Tine

24.09.2009 - 15:46

country flag Harriët Van Boven wrote:

Hallo, Ik ben bezig met deze geweldige omslagdoek te haken, maar kom al twee weken niet verder dan toer 6. Vanaf toer 7 krijg je een soort spinnenweb te haken, maar ik kom er niet uit. Heb ervaren haaksters gevraagd om raad en die snappen het ook niet. Kan ik voor toer 7 en 8 een andere uitleg krijgen aub??

22.09.2009 - 22:34

country flag Elaine wrote:

Love it. looking for non-dorky crochet. very pretty.

30.07.2009 - 02:46