
Popular categories
Looking for a yarn?


|
|||||||||||||||||||
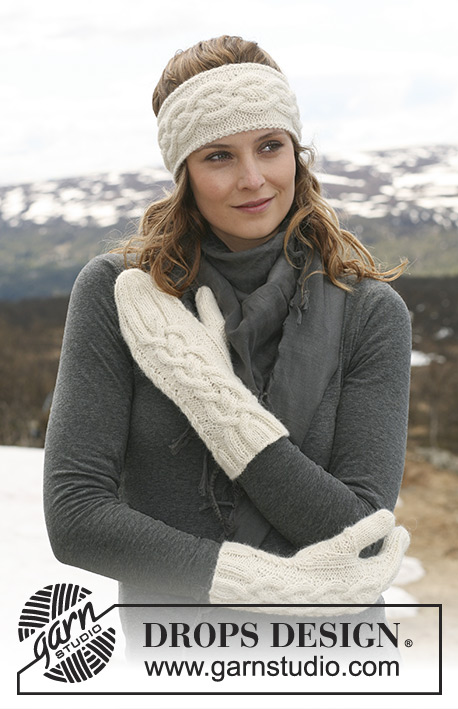
Alpine Twist Set |
|||||||||||||||||||
|
|
|||||||||||||||||||
DROPS hat with cables and neck warmer with cables and buttoned at front in ”Classic Alpaca” or "Puna".
DROPS 114-5 |
|||||||||||||||||||
|
GARTER ST (back and forth on needle): K all rows. PATTERN: See diagram M.1 and M.2. Diagram shows the pattern from RS. -------------------------------------------------------- -------------------------------------------------------- HAT: First work bottom edge back and forth on needle, then pick up sts in edge and continue in the round towards top of hat. EDGE: Worked back and forth on 2 double pointed needles from mid back to mid back. Cast on 23 sts on needle size 4 mm / US 6 with Classic Alpaca. K 1 row from WS. NOTE: Work the bottom st (= last st on first row) in double thread throughout to make the edge firmer, i.e. have an extra ball of yarn and use this only for this st. Work next row as follows (from RS): 2 GARTER STS – see above - P3, inc 1 st in next st and K both sts, K1, P3, K1, inc 1 st in each of the next 2 sts and K all 4 sts, K1, P3, K1, inc 1 st in next st and K both sts, P3 and 1 garter st = 27 sts. Continue as follows: 1 garter st, M.1 (first row = WS) and 2 garter sts (= towards bottom edge). Continue in pattern like this until piece measures approx 48 cm / 19", adjust to after the last but one row in M.1 (i.e. row from WS). Work next row as follows from RS: 2 garter sts, P3, K2 tog, K1, P3, K1, K2 tog, K2 tog, K1, P3, K1, K2 tog, P3 and 1 garter st = 23 sts. K 1 row on all sts from WS and then bind off. Sew tog, edge to edge, mid back. HAT: Pick up 104 sts with Classic Alpaca on circular needle size 4 mm / US 6 along the side of edge with only 1 garter st – pick up inside this garter st (approx 21 sts on 10 cm / 4"). Work stockinette st in the round. When piece measures 4 cm / 1½" from where sts were picked up insert 8 markers in piece with 13 sts between each. On next round dec 1 st before each marker by K2 tog. Repeat the dec on every other round a total of 11 times = 16 sts. Cut the thread, pull through remaining sts, tighten and fasten. Hat measures approx 22 cm / 8¾" in total. -------------------------------------------------------- NECK WARMER: Worked from side to side back and forth on needle. Cast on 45 sts on needle size 4 mm / US 6 with Classic Alpaca. Work GARTER ST (first row = RS) on all sts – see above – AT THE SAME TIME on row 5 make 1 buttonhole as follows: Work 37 sts, bind off 3 sts, work 5 sts. On next row cast on 3 new sts over bound off sts. After 10 rows garter st work next row as follows (from RS): 17 garter sts, P3, inc 1 st in next st and K both sts, K1, P3, K1, inc 1 st in each of the next 2 sts and K all 4 sts, K1, P3, K1, inc 1 st in next st and K both sts, P3 and 8 garter sts = 49 sts. Work next row as follows (= WS): 8 garter sts, M.1 (= 24 sts) and M.2 on 17 sts. Continue like this, AT THE SAME TIME (from next row) work shortened rows as follows: * 2 rows on all sts, 2 rows back and forth on the bottom 17 sts (= M.2) only *, repeat from *-* until piece measures approx 52 cm / 20½" on the shorter side - adjust to after the last but one row in M.1 (i.e row from WS). Work next row as follows (from RS): 17 garter st, P3, K2 tog, K1, P3, K1, K2 tog, K2 tog, K1, P3, K1, K2 tog, P3 and 8 garter sts = 45 sts. Work 10 rows garter st on all sts, bind off. Sew on button mid in M.1 approx 6 cm/ 2⅜" from the edge. |
|||||||||||||||||||
Diagram explanations |
|||||||||||||||||||
|
|||||||||||||||||||

|
|||||||||||||||||||
|
Have you made this or any other of our designs? Tag your pictures in social media with #dropsdesign so we can see them! Do you need help with this pattern?You'll find tutorial videos, a Comments/Questions area and more by visiting the pattern on garnstudio.com. © 1982-2024 DROPS Design A/S. We reserve all rights. This document, including all its sub-sections, has copyrights. Read more about what you can do with our patterns at the bottom of each pattern on our site. |
|||||||||||||||||||


With over 40 years in knitting and crochet design, DROPS Design offers one of the most extensive collections of free patterns on the internet - translated to 17 languages. As of today we count 304 catalogs and 11422 patterns - 11417 of which are translated into English (US/in).
We work hard to bring you the best knitting and crochet have to offer, inspiration and advice as well as great quality yarns at incredible prices! Would you like to use our patterns for other than personal use? You can read what you are allowed to do in the Copyright text at the bottom of all our patterns. Happy crafting!
Comments / Questions (77)
Schal war leicht zu stricken und sieht total schick aus.
25.11.2009 - 16:49Que de magnifiques modèles, merci pour tout.
21.11.2009 - 19:54Please,can you help me to knit this bottom st(in double thread)mean the edge,just can't make to look as in the picture,what am I doing wrong?
13.11.2009 - 12:36Sehr Schön.Ein echter Hinkucker.
27.10.2009 - 18:53Raffiniert, aber trotzdem schick. Super Teil.
27.10.2009 - 13:25Svetlana wrote:
Please,send me this cap description, how it will made. I am from Russia.
19.10.2009 - 11:40ALMA ROSA wrote:
Hola, desde Cd. de México. ha sido una fortuna encontrarlas, gracia por compartir. podrian enviarme las instrucciones del patron en español, gracias
06.10.2009 - 23:23Suzy wrote:
Lindissimo,
28.08.2009 - 04:18Modelo muito lindo amei
23.08.2009 - 20:37Unique styles and love the cables, by the way found out how to print off instructions to knit this wonderful pattern for a friend.Love your work. Keep it up....
20.08.2009 - 22:47