DROPS Snow
DROPS Snow
100% Wool
from 2.65 $ /50g
Get the yarn to make this pattern from 23.85$.

The yarn cost is calculated from the pattern’s smallest size and the yarn’s cheapest product type. Looking for an even better price? You might find it on the DROPS Deals!

DROPS SS24

Chocolate Fudge

Set comprises: DROPS hat and shoulder wrap knitted from side to side with cables and garter st in ”Snow”.

DROPS 114-31
DROPS design: Pattern no EE-261.

HAT:
Size: S/M – L/XL
Head circumference:
approx 54 - 58 cm / 21¼” - 22¾”
Materials: DROPS SNOW from Garnstudio
150-150 g color no 23, tan

DROPS POINTED NEEDLES size 7 mm / US 10½ - or size needed to get 12 sts x 24 rows in garter st = 10 x 10 cm / 4’’ x 4’’.

SHOULDER WRAP:
Size: S/M - L/XL - XXL/XXXL
Materials: DROPS SNOW from Garnstudio
400-400-450 g color no 48m, beige mix

DROPS CIRCULAR NEEDLE (80 cm / 32’’) size 8 mm/US 11- or size needed to get 11 sts x 22 rows in garter st = 10 x 10 cm / 4’’ x 4’’.

DROPS BUFFALO HORN BUTTON no 536: 5 pcs.

-------------------------------------------------------

Alternative Yarn – See how to change yarns here
Yarn Groups A to F – Use the same pattern and change the yarn here
Yarn usage using an alternative yarn – Use our yarn converter here

-------------------------------------------------------

DROPS Snow
DROPS Snow
100% Wool
from 2.65 $ /50g
Get the yarn to make this pattern from 23.85$.

The yarn cost is calculated from the pattern’s smallest size and the yarn’s cheapest product type. Looking for an even better price? You might find it on the DROPS Deals!

Pattern instructions

NOTE: This pattern is written in American English. All measurements in charts are in cm. For conversion from inches to cm - click here. There are different terms for crocheting in American and British English. If this pattern includes crochet, click for "crochet terms" here. For this pattern in British English, please click here.
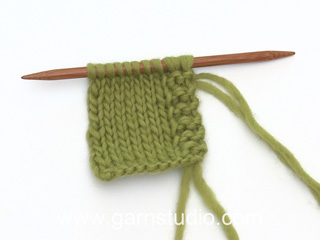
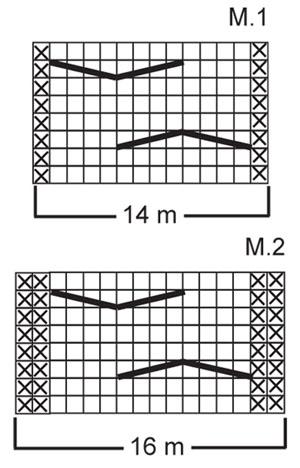
HAT:
--------------------------------------------------------
GARTER ST (back and forth on needle): K all rows.

PATTERN: See diagram M.1. Diagram shows the pattern from RS.
--------------------------------------------------------
--------------------------------------------------------

HAT: Worked from side to side, back and forth on needle. Work the first 2 sts from RS with double thread (to make edge firmer) in GARTER ST throughout - see above.
Cast on 38-42 sts on needle size 7 mm / US 10½ with Snow and work PATTERN as follows from RS: 2 garter sts – see above - M.1 (= 14 sts), 22-26 garter sts. Continue in pattern like this, AT THE SAME TIME work shortened rows, back and forth on needle, with start from RS as follows: * 2 rows on all sts, 2 rows on 36-40 sts, 2 rows on 34-38 sts, 2 rows on 31-35 sts *, repeat from *-*. REMEMBER THE GAUGE! Continue like this until there are 10-11 vertical repeats of M.1, piece measures approx 50-55 cm / 19¾”-21 5/8” where longest. Bind off loosely on the last row in the last pattern repeat.

ASSEMBLY: Sew cast on row to bind off row, edge to edge. Run a thread through sts at the top of hat, tighten and fasten.
--------------------------------------------------------

SHOULDER WRAP:
--------------------------------------------------------
GARTER ST (back and forth on needle): K all rows.

PATTERN: See diagram M.2. Diagram shows the pattern from RS.

BUTTONHOLES: Make buttonholes when piece measures 2 cm / 3/4’’ as follows from RS: Work 7-7-7 sts, bind off 1 st, * work 8-9-10 sts, bind off 1 st *, repeat from *-* a total of 4 times, finish with 3 sts = 5 buttonholes. Cast on new sts over bind off sts on return row.
--------------------------------------------------------
--------------------------------------------------------

SHOULDER WRAP: Worked from side to side, back and forth on circular needle. Cast on 47-51-55 sts on circular needle size 8 mm / US 11 with Snow. Work GARTER ST – see above - AT THE SAME TIME work the first 2 sts on every row from RS with double thread throughout. AT THE SAME TIME when piece measures 2 cm / 3/4’’ make BUTTONHOLES on next row from RS – see above! When piece measures 4 cm / 1½’’ inc as follows on row from WS: Work garter st on the first 4 sts, inc 6 sts evenly on the next 10 sts, garter st on the next 17-21-25 sts, inc 6 sts evenly on the next 10 sts, complete row in garter st = 59-63-67 sts.
READ ALL OF THE FOLLOWING SECTION BEFORE CONTINUING!
Continue in pattern and shortened rows as follows from RS: 2 garter sts, P 4 (K from WS), M.2 (= 16 sts), P2 (K from WS), garter st on the next 15-19-23 sts, M.2 (=16 sts), 4 garter sts - AT THE SAME TIME work shortened rows starting on RS as follows: * 1 row on all sts, 1 row on 20 sts, turn, work return row on 20 sts, 1 row on all sts, 2 rows on 37-41-45 sts, 2 rows on 33-37-41 sts, 2 rows on 29-33-37 sts, 2 rows on all sts, 2 rows on 37-41-45 sts, 2 rows on 33-37-41 sts, 2 rows on 29-33-37 sts *, repeat from *-*. REMEMBER THE GAUGE! Continue in pattern like this. When piece measures 128-148-168 cm / 50 3/8”-58 1/8”-66” measured along bottom edge (adjust to after a full repeat of M.2) work next row from RS as follows: Work garter st, AT THE SAME TIME dec 6 sts evenly on all cables = 47-51-55 sts. Continue in garter st on all sts. Bind off when edge in garter st measures 4 cm / 1½’’. Sew on buttons.

This pattern has been corrected.

Updated online: 18.12.2020
under SHOULDER WRAP (explanation of how to work from WS is added): …Continue in pattern and shortened rows as follows from RS: 2 garter sts, P 4 (K from WS), M.2 (= 16 sts), P2 (K from WS), garter st on the next 15-19-23 sts, M.2 (=16 sts), 4 garter…

Diagram

All measurements in charts are in cm.

symbols = K from RS, P from WS
symbols = P from RS, K from WS
symbols = slip 4 sts on cable needle behind piece, K4, K4 from cable needle
symbols = slip 4 sts on cable needle in front of piece, K4, K4 from cable needle
diagram
Do you have a question? See a list of frequently asked questions (FAQ)

Knitting tension is what determines the final measurements of your work, and is usually measured per 10 x 10 cm. It is provided like so: number of stitches in width x number of rows in height - eg: 19 stitches x 26 rows = 10 x 10 cm.

The knitting tension is very individual; some people knit/crochet loosely while others work tightly. You adjust the knitting tension with the needle size, which is why the suggested needle size only serve as a guide! You need to adjust this (up or down) to ensure that YOUR knitting tension matches the knitting tension provided in the pattern. If you work with a different knitting tension than provided you will have a different yarn consumption, and your work will have different measurements than what the pattern suggests.

The knitting tension also determines which yarns can replace each other. As long as you achieve the same knitting tension you can replace one yarn with another.

See DROPS lesson: How to measure your tension/gauge

See DROPS video: How to make a gauge tension swatch

The required amount of yarn is provided in grams, eg: 450 g. To calculate how many balls you’ll need you first need to know how many grams are in 1 ball (25g, 50g or 100g). This information is available if you click on the individual yarn quality on our pages. Divide the amount required with the amount of each ball. For example, if each ball is 50g (the most common amount), the calculation will be as follows: 450 / 50 = 9 balls.

The important thing when changing from one yarn to another is that the knitting/crochet tension remains the same. This is so that the measurements of the finished piece will be the same as on the sketch provided. It is easier to achieve the same knitting tension using yarns from the same yarn group. It is also possible to work with multiple strands of a thinner yarn to achieve the knitting tension of a thicker one. Please try our yarn converter. We recommend you to always work a test swatch.

Please NOTE: when changing yarn the garment might have a different look and feel to the garment in the photo, due to individual properties and qualities of each yarn.

See DROPS lesson: Can I use a different yarn than the one mentioned in the pattern?

All our yarns are categorised into yarn groups (from A to F) according to thickness and knitting tension – group A contains the thinnest yarns and group F the thickest. This makes it easier for you to find alternative yarns to our patterns, should you wish to switch yarn. All yarns within the same group have a similar knitting tension and can easily replace each other. However, different yarn qualities have different structures and properties which will give the finished work a unique look and feel.

Click here for an overview of the yarns in each yarn group

At the top of all our patterns you’ll find a link to our yarn converter, which is a helpful tool should you wish to use a different yarn than suggested. By filling in the yarn quality you wish to replace, the amount (in your size) and number of strands, the converter will present good alternative yarns with the same knitting tension. Additionally it will tell you how much you’ll require in the new qualities and whether you’ll need to work with multiple strands. Most skeins are 50g (some are 25g or 100g).

If the pattern is worked with multiple colours, every colour will have to be converted separately. Similarly, if the pattern is worked with several strands of different yarns (for example 1 strand Alpaca and 1 strand Kid-Silk) you will have to find alternatives for each, individually.

Click here to see our yarn converter

Since different yarns have different qualities and textures we have chosen to keep the original yarn in our patterns. However, you can easily find options among our available qualities by using our yarn converter, or simply pick a yarn from the same yarn group.

It is possible that some retailers still have discontinued yarns in stock, or that someone has a few skeins at home that they would like to find patterns for.

The yarn converter will provide both alternative yarn as well as required amount in the new quality.

If you think it's hard to decide what size to make, it can be a good idea to measure a garment you own already and like the size of. Then you can pick the size by comparing those measures with the ones available in the pattern's size chart.

You'll find the size chart at the bottom of the pattern.

See DROPS lesson: How to read size chart

The needle size provided in the pattern serves only as a guide, the important thing is to follow the knitting tension. And since knitting tension is very individual, you will have to adjust the needle size to ensure that YOUR tension is the same as in the pattern – maybe you’ll have to adjust 1, or even 2 needle sizes, up or down to achieve the correct tension. For this, we recommend that you work test swatches.

Should you work with a different knitting tension than the one provided, the measurements of the finished garment might deviate from the measurement sketch.

See DROPS lesson: How to measure your tension/gauge

See DROPS video: How to make a gauge tension swatch

Working a garment top-down provides more flexibility and room for personal adjustment. For example it is easier to try the garment on while working, as well as making adjustments to length of yoke and shoulder caps.

The instructions are carefully explaining every step, in the correct order. Diagrams are adjusted to the knitting direction and are worked as usual.

The diagram depicts all rows/rounds, and every stitch seen from the right side. It is read from bottom to top, from right to left. 1 square = 1 stitch.

When working back and forth, every other row is worked from the right side and every other row is worked from the wrong side. When working from the wrong side, the diagram will have to be worked reversed: from left to right, knit stitches are purled, purl stitches are knit etc.

When working in the round every round is worked from the right side and the diagram are worked from right to left on all rounds.

See DROPS lesson: How to read knitting diagrams

The diagram depicts all rows/rounds, and every stitch seen from the right side. It is worked from bottom to top, from right to left.

When working back and forth every other row is worked from the right side: from right to left and every other row is worked from the wrong side: from left to right.

When working in the round, every row in the diagram are worked from the right side, from right to left.

When working a circular diagram you start in the middle and work your way outwards, counter clockwise, row by row.

The rows usually start with a given number of chain stitches (equivalent to the height of the following stitch), this will either be depicted in the diagram or explained in the pattern.

See DROPS lesson: How to read crochet diagrams

Instructions for working several diagrams after each other on the same row/round, will often be written like so: “work A.1, A.2, A.3 a total of 0-0-2-3-4 times". This means you work A.1 once, then A.2 is worked once, and A.3 is repeated (in width) the number of times provided for your size – in this case like so: S = 0 times, M = 0 times, L=2 times, XL= 3 times and XXL = 4 times.

The diagrams are worked as usual: begin with the first row in A.1, then work the first row in A.2 etc.

See DROPS lesson: How to read knitting diagrams

See DROPS lesson: How to read crochet diagrams

The total width of the garment (from wrist-to-wrist) will be larger in the larger sizes, despite the actual sleeves being shorter. The larger sizes have longer sleeve caps and wider shoulders, so there will be a good fit in all sizes.

The measurement sketch/schematic drawing provides information regarding the full length of the garment. If it’s a jumper or a jacket the length is measured from the highest point on the shoulder (usually closest to the neckline), and straight down to the bottom of the garment. It is NOT measured from the tip of shoulder. Similarly, the length of yoke is measured from the highest point on the shoulder and down to where yoke is split into body and sleeves.

See DROPS lesson: How to read a schematic drawing

Diagrams are often repeated on the round or in height. 1 repeat is the diagram the way it appears in the pattern. If it says to work 5 repeats of A.1 in the round, then you work A.1 a total of 5 times after/next to each other in the round. If it says to work 2 repeats of A.1 vertically/in height you work the entire diagram once, then begin again at the start and work the entire diagram one more time.

Chain stitches are slightly narrower than other stitches and to avoid working the cast-on edge too tight, we simply chain more stitches to begin with. The stitch count will be adjusted on the following row to fit the pattern and measurement sketch.

The rib edge is more elastic and will contract slightly compared to, for example, stocking stitch. By increasing before the rib edge, you avoid a visible difference in width between the rib edge and the rest of the body.

It’s very easy to cast off too tightly, and by making yarn overs while casting off (and simultaneously casting these off) you avoid a too tight cast off edge.

See DROPS video: How to bind off with yarn overs (yo)

To achieve an even increase (or decrease) you can increase on, for example: every 3rd and 4th row alternately, like so: work 2 rows and increase on the 3rd row, work 3 rows and increase on the 4th. Repeat this until the increase is complete.

See DROPS lesson: Increase or decrease 1 st on every 3rd and 4th row alternately

Should you prefer to work in the round instead of back and forth, you may of course adjust the pattern. You’ll need to add steeks mid-front (usually 5 stitches), and follow the instructions. When you would normally turn and work from the wrong side, simply work across the steek and continue in the round. At the end you’ll cut the piece open, pick up stitches to work bands, and cover the cut edges.

See DROPS video: How to knit steeks and cut open

Should you prefer to work back and forth instead of in the round, you may of course adjust the pattern so you work the pieces separately and then assemble them at the end. Divide the stitches for the body in 2, add 1 edge stitch in each side (for sewing) and work the front and back pieces separately.

See DROPS lesson: Can I adapt a pattern for circular needles into straight needles?

Pattern repeats can vary slightly in the different sizes, in order to get the correct proportions. If you’re not working the exact same size as the garment in the photo, yours might deviate slightly. This has been carefully developed and adjusted so that the complete impression of the garment is the same in all sizes.

Make sure to follow instructions and diagrams for your size!

If you have found a pattern you like which is available in women’s size it’s not very difficult to convert it to men’s size. The biggest difference will be the length of sleeves and body. Start working on the women size that you think would fit across the chest. The additional length will be worked right before you cast off for the armhole/sleeve cap. If the pattern is worked top-down you can add the length right after the armhole or before the first decrease on sleeve.

Regarding additional yarn amount, this will depend on how much length you add, but it is better with a skein too many than too few.

All yarns will have excess fibres (from production) that might come off as lint or shedding. Brushed yarns (ie hairier yarns) have more of these loose, excess fibres, causing more shedding.

Shedding also depends on what is worn under or over the garment, and whether this pulls at the yarn fibres. It’s therefore not possible to guarantee that there will be no shedding

Below are some tips on how to get the best result when working with hairier yarns:

1. When the garment is finished (before you wash it) shake it vigorously so the looser hairs come off. NOTE: do NOT use a lint roller, brush or any method that pulls at the yarn.

2. Place the garment in a plastic bag and put it in your freezer - the temperature will cause the fibres to become less attached to each other, and excess fibres will come off easier.

3. Leave in the freezer for a few hours before taking it out and shaking it again.

4. Wash the garment according to the instructions on the yarn label.

Pilling is a natural process that happens to even the most exclusive of fibers. It's a natural sign of wear and tear that is hard to avoid, and that is most visible in high friction areas of your garment like a sweater's arms and cuffs.

You can make your garment look as new by removing the pilling, using a fabric comb or a pill/lint remover.

Still can't find the answer you need? Then scroll down and leave your question so one of our experts can try to help you. This will be done normally within 5 to 10 working days.
In the meantime, you can read the questions and answers that others have left to this pattern or join the DROPS Workshop on Facebook to get help from fellow knitters/crocheters!

Post a comment to pattern DROPS 114-31

We would love to hear what you have to say about this pattern!

If you want to leave a question, please make sure you select the correct category in the form below, to speed up the answering process. Required fields are marked *.

Comments / Questions (199)

country flag Grazia wrote:

Buon giorno sarei interessata al vs progetto Drops 114-31 è possibile avere le spiegazioni x ferri normali (che nr) e non circolari ed un suggerimento su che lana equivalente a quella del progetto che si possa lavare senza infeltrire purtroppo non sono molto esperta grazie x l'aiuto e buona giornata Grazia

17.01.2018 - 08:36

DROPS Design answered:

Buongiorno Grazia. Può usare i ferri dritti e seguire le spiegazioni senza alcuna modifica in quanto si lavora avanti e indietro sui ferri. Scelga la misura di ferri che le consente di avere il campione indicato. Al seguente link trova indicazioni utili per sostituire il filato. Buon lavoro!

17.01.2018 - 09:56

country flag Bettina wrote:

I am really confused about working the M2 section and the shortened row. First question - in the M2 diagram do I start the first row, 2 P, 12 K, 2 P and then 2nd row do I start the cable on the WS? Second question - 1st row is knitted as normal, no shortening 2nd row - I do a U-turn after 20 stitches- does this include the cable 3rd - normal 4 th row - I do U-turn after 37 st 5th row - same as 4 th row

28.11.2017 - 01:14

DROPS Design answered:

Dear Bettina, row 1 will be worked as you say. On row 2, work from WS on row 2 in pattern with short rows (from WS: read from the left towards the right): K2, P12, K2. On row 3 work row 3 in diagram (= cable) from RS. Turn and work next row from WS over all sts (= row 4 in 1st M.2 (seen from WS) and row 2 in 2nd M.2 (seen from WS). The cables in both M.2 will not be worked at the same time because of the short rows you will work at the top of neck warmer (collar, beg of row from WS) and at the bottom edge (beg of row from RS). Happy knintting!

28.11.2017 - 09:18

country flag France Morneau wrote:

Bonjour, Au 2 ième rang raccourcis , nous devons faire 20 mailles et tournez et refaire les 20 mailles. Quand c'est écrit 2 rangs de sur 37 mailles , est-ce la même chose ? On tricote les 37 mailles , on tourne et on refait les 37 mailles ?

15.04.2017 - 04:29

DROPS Design answered:

Bonjour Mme Morneau, tricotez d'abord 1 rang sur toutes les mailles, puis tricotez 20 m au rang suivant, tourner et tricotez 20 m, tournez et tricotez ensuite toutes les mailles au rang suivant, tournez, tricotez 37 m, tournez et tricotez les 37 m, tournez et tricotez 33 m, tournez et tricotez 33 m, tournez et tricotez 29 m, tournez et tricotez 29 m, tournez et tricotez 2 rangs sur toutes les mailles (= 1 aller-retour), tournez et tricotez 37 m, tournez et tricotez 37 m, tournez et tricotez 33 m, tournez et tricotez 33 m, tricotez 29 m, tournez et tricotez 29 m. Bon tricot!

18.04.2017 - 10:01

country flag Caroline CEDELLE wrote:

Bonjour, je suis en train de tricoter le chauffe-épaules et j'ai dû mal à comprendre quand tricoter le motif et quand tricoter les rangs raccourcis. Dois-je faire : - un rang de motif et un de rang raccourcis, - ou un rang de motif puis faire tous les rangs raccourcis et reprendre un rang de motif - ou encore après un rang de motif, faire un rang de retour et ensuite tricoter un rang raccourcis ? Pour moi ce n'est pas très clair Merci pour votre aide

24.03.2017 - 15:39

DROPS Design answered:

Bonjour Mme Cedelle, vous devez tricotez les rangs raccourcis comme indiqué, et en même temps tricoter la torsade sur les mailles concernées, les 2 motifs de M2 vont avancer à un rythme différent car l'un des 2 (en bas) sera tricoté plus souvent, mais vous devez continuer la torsade comme dans le diagramme dans les 2 cas, soit tous les 4 rangs tricotés sur ces mailles. Bon tricot!

24.03.2017 - 17:10

country flag LANGLOIS wrote:

Bonjour, oui j'ai compris le diagramme, on croise à R3/7/11/15 mais ensuite? c'est une série de 18 rangs , entre le R15 et le R3 de la série suivante il y a + de 3 rangs...

09.01.2017 - 17:43

DROPS Design answered:

Bonjour Mme Langlois, tricotez bien les mailles comme elles se présentent lorsque vous faites les rangs raccourcis. Les torsades des 2 motifs se feront à des intervalles différents, mais quand vous tricotez les mailles de chaque diagramme, suivez bien les rangs que vous tricotez et croisez quand nécessaire dans le diagramme. Bon tricot!

10.01.2017 - 09:12

country flag Langlois wrote:

Bonjour, j'ai un problème sur le chauffe épaule pour combiner les rangs raccourcis avec les torsades. Il y a une série de 18 rangs raccourcis alors que sur le diagramme M2 les torsades se font sur les rangs 3 et 7 SOIT tous les 4 rangs ce qui ne va pas (18 n'étant pas un multiple de 4). Ou est mon erreur svp? Merci De votre aide!

08.01.2017 - 09:43

DROPS Design answered:

Bonjour Mme Langlois, les torsades ne vont pas se faire tous les rangs, mais à chaque fois que vous tricotez ces mailles, suivez le diagramme, vous devez toujours avoir 3 rangs entre chaque torsade (= entre chaque croisement). Bon tricot!

09.01.2017 - 09:24

country flag Dianne wrote:

Bonjour, Merci pour vos superbes modèles!!! Je suis débutante et j'aimerais savoir si je dois monter toutes les mailles de départ en double fil (2 balles de laine séparées??? ou non- si oui j'ai besoin de quelle quantité de laine pour le tour) et continuer sur l'endroit 2m double fil et laisser un fil tomber pour les autres mailles. Quel défi pour moi de m'attaquer à ce modèle mais j'y arriverai peut-être avec de l'aide! Merci à l'avance de votre aide! Dianne

17.08.2016 - 19:41

DROPS Design answered:

Bonjour Dianne, monter les mailles avec le fil en double peut se faire avec 2 pelotes différentes en même temps - il existe différentes méthodes pour calculer la quantité de fil pour le montage des mailles, certaines tricoteuses comptent 3 fois la largeur du tricote à monter. Pour toute assistance individuelle n'hésitez mas à contacter votre magasin DROPS et/ou le forum DROPS. Bon tricot!

18.08.2016 - 09:57

country flag Simonetta Bellotto wrote:

Buon pomeriggio nn riesco proprio a capire la spiegazione del modello DROPS 114-31 per quanto riguarda i ferri accorciati mi potreste aiutare grazie per la cortesia

25.03.2016 - 18:24

DROPS Design answered:

Buonasera Simonetta, i ferri accorciati sono ferri in cui non si lavorano tutte le maglie ma solo una parte, per cui deve lavorare solo il n° di m indicato e poi girare il lavoro e tornare indietro. Provi a vedere se questo video sui ferri accorciati le può essere di aiuto. Ci sono diversi modi per lavorare i ferri accorciati, questo è il metodo base. Buon lavoro!

25.03.2016 - 18:58

country flag SIEDLECKI Martine wrote:

Bonsoir, je trouve vos modèles superbes je suis une bonne tricoteuse par contre je n'arrive pas à tricoter avec des aiguilles circulaires . Avez-vous un truc ou conseil pour m'aider à convertir un modèle fait en aiguilles circulaires en modèle avec des aiguilles longues classiques ? Merci de vos conseils,

16.02.2016 - 18:54

DROPS Design answered:

Bonjour Mme Siedlecki, certains de nos modèles, comme cet ensemble, se tricotent en allers et retours sur aiguille circulaire pour avoir suffisamment de place pour y loger toutes les mailles - vous pouvez ainsi utiliser des aiguilles droites, vos mailles seront juste plus serrées (attention à conserver la bonne tension) - voir également ici. Bon tricot!

17.02.2016 - 09:01

country flag Maria wrote:

Hallo, werden auch auf der Rückseite die letzten beiden Maschen mit zwei Fäden gestrickt oder nur auf der Vorderseite die ersten beiden? Vielen Dank!

10.02.2016 - 10:38

DROPS Design answered:

Es ist so gemeint, dass Sie die ersten 2 M der Hin-R mit doppeltem Faden stricken und entsprechend die letzten 2 M der Rück-R, sodass der untere Rand also zweifädig gestrickt wird.

15.02.2016 - 10:38