DROPS Fabel
DROPS Fabel
75% Wool, 25% Polyamide
from 2.30 £ /50g
DROPS Alpaca
DROPS Alpaca
100% Alpaca
from 3.40 £ /50g
Get the yarn to make this pattern from 46.80£.

The yarn cost is calculated from the pattern’s smallest size and the yarn’s cheapest product type. Looking for an even better price? You might find it on the DROPS Deals!

DROPS SS24

Zig-Zag Skies

DROPS jacket with stripes and zigzag pattern in ”Fabel” and ”Alpaca”. Size S – XXXL.

DROPS 114-23
DROPS design: Pattern no FA-085.

Size: S - M - L - XL - XXL/XXXL
Materials: DROPS FABEL
200-200-250-250-300 g colour no 901, candy mix
100-100-150-150-150 g colour no 674, heather mix
100-100-100-150-150 g colour no 671, blue/brown/mustard
100-100-100-100-150 g colour no 542, green mix
And use: DROPS ALPACA
150-200-200-250-250 g colour no 3770, dark pink
100-100-100-150-150 g colour no 2915, orange
100-100-100-150-150 g colour no 6790, royal blue

DROPS DOUBLE POINTED NEEDLES and CIRCULAR NEEDLE (80 and 40 cm) size 4.5 mm – or size needed to get 18 sts x 23 rows in stocking st and 23 sts x 25 rows in zigzag pattern with 2 threads = 10 x 10 cm.
DROPS BUFFALO HORN BUTTON, no 538:
6-6-7-7-8 pcs.

-------------------------------------------------------

Alternative Yarn – See how to change yarns here
Yarn Groups A to F – Use the same pattern and change the yarn here
Yarn usage using an alternative yarn – Use our yarn converter here

-------------------------------------------------------

DROPS Fabel
DROPS Fabel
75% Wool, 25% Polyamide
from 2.30 £ /50g
DROPS Alpaca
DROPS Alpaca
100% Alpaca
from 3.40 £ /50g
Get the yarn to make this pattern from 46.80£.

The yarn cost is calculated from the pattern’s smallest size and the yarn’s cheapest product type. Looking for an even better price? You might find it on the DROPS Deals!

Pattern instructions

NOTE: This pattern is written in British English. All measurements in charts are in cm. For conversion from cm to inches - click here. There are different terms for crocheting in British and American English. If this pattern includes crochet, click for "crochet terms" here. For this pattern in American English, please click here.
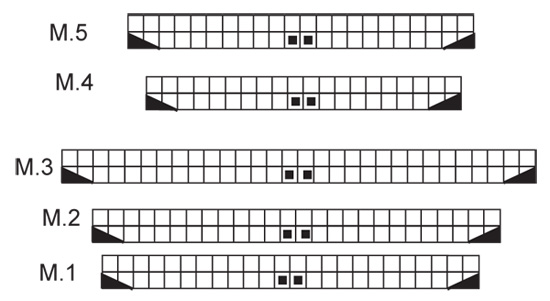
GARTER ST (back and forth on needle):
K all rows.
GARTER ST (in the round): K1 round, P 1 round.
STRIPES (BODY PIECE):
18-20-22-22-24 rows candy mix Fabel,
18-20-22-22-24 rows dark pink Alpaca,
18-20-22-22-24 rows heather mix Fabel,
18-20-22-22-24 rows blue/brown/mustard Fabel
18-20-22-22-24 rows orange Alpaca
18-20-22-22-24 rows green mix Fabel,
18-20-22-22-24 rows royal blue Alpaca,
18-20-22-22-24 rows candy mix Fabel,
18-20-22-22-24 rows dark pink Alpaca.
Work all stripes with 2 threads!
STRIPES (SLEEVE):
14 rounds dark pink Alpaca,
14 rounds heather mix Fabel,
14 rounds blue/brown/mustard Fabel,
14 rounds orange Alpaca,
14 rounds green mix Fabel,
14 rounds royal blue Alpaca,
14 rounds candy mix Fabel,
14 rounds dark pink Alpaca.
Work all stripes with 2 threads!
PATTERN:
See diagram M.1 to M.5. Diagram shows the pattern from RS. 1 diagram = 1 repeat.
DECREASING TIP-1:
Dec 2 sts per repeat by dec 1 st each side. Work repeat as follows:
K2 tog, stocking st on the whole repeat (without inc) until 2 sts remain, slip 1 st as if to K, K1, psso.
Continue working repeat as before but with 1 st less each side of the inc in the middle.
DECREASING TIP-2:
Dec 4 sts per repeat by dec 2 sts each side. Work repeat as follows:
K3 tog, stocking st on the whole repeat (without inc) until 3 sts remain, slip 1 st as if to K, K2 tog, psso.
BUTTONHOLES:
Make buttonholes on right front band.
1 buttonhole = cast off 5th and 6th front band st and cast on 2 new sts on next row.
Make buttonholes when piece measures:
SIZE S: 6, 13, 20, 27, 34 and 41 cm.
SIZE M: 7, 15, 23, 31, 39 and 47 cm.
SIZE L: 8, 16, 23, 30, 37, 45 and 53 cm.
SIZE XL: 8, 16, 23, 30, 37, 45 and 53 cm.
SIZE XXL/XXXL:
8, 15, 22, 29, 37, 44, 51 and 59 cm.
--------------------------------------------------------

BODY PIECE:
Worked back and forth on circular needle.
Cast on 260-280-308-332-380 sts (includes 10 sts for front bands each side towards mid front) on circular needle size 4.5 mm with 2 threads Fabel 901. Work 2 rows GARTER ST – see above. The 10 front band sts each side worked in garter sts throughout.
Now work STRIPES – see above, AT THE SAME TIME work next row as follows (from RS):
SIZE S + L:
10 front band sts, M.1 on the next 240-288 sts (= 10-12 repeats) and 10 front band sts.
SIZE M + XL:
10 front band sts, M.2 on the next 260-312 sts (= 10-12 repeats) and 10 front band sts.
SIZE XXL/XXXL:
10 front band sts, M.3 on the next 360 sts (= 12 repeats) and 10 front band sts.
Remember BUTTONHOLES – see above.
REMEMBER THE KNITTING TENSION!
After 2 stripes (piece measures approx 14-16-18-18-20 cm) dec 2 sts per repeat on next row from RS – See DECREASING TIP-1! – (a total of 20-20-24-24-24 dec sts) = 240-260-284-308-356 sts. Continue in pattern with 10 front band sts each side towards mid front.
After 4 stripes (piece measures approx 28-32-36-36-40 cm) dec 2 sts per repeat = 220-240-260-284-332 sts.
After 6 stripes continue as follows:
READ ALL OF THE FOLLOWING SECTION BEFORE CONTINUING!
Now continue on HALF REPEAT each side inside 10 front band sts towards mid front in stocking st without dec and inc (i.e. 10-11-10-11-13 sts). AT THE SAME TIME work collar as follows: work 1 extra st in garter st on every 4th row towards mid front a total of 10-11-10-11-13 times (i.e. no of garter sts inc and no of stocking sts dec = no of sts remain the same).
AT THE SAME TIME after 6.5 stripes insert 1 marker after 60-65-70-76-88 sts and 1 marker after 160-175-190-208-244 sts (= the sides). Now work 20-22-40-44-52 sts each side (i.e. 10-11-20-22-26 sts each side of marker) in stocking st, i.e. without dec and inc.
AT THE SAME TIME on next row from RS cast off 8 sts each side for armhole (= 4 sts each side of marker).
Now complete each piece separately.

BACK PIECE:
= 92-102-112-124-148 sts. Continue in pattern and 6-7-16-18-22 stocking sts each side. AT THE SAME TIME cast off for armhole each side on every other row: 2 sts 3-3-7-8-10 times and 1 st 0-1-2-2-2 times = 80-88-80-88-104 sts. Continue in pattern on all sts until you have worked 8.5 stripes (piece measures approx 61-68-76-76-85 cm). Now dec 4 sts per repeat on next row from RS – see DECREASING TIP-2 - (a total of 26 dec sts) = 64-72-64-72-88 sts. Now continue in stocking st on all sts.
When 6 rows remain of the last stripe cast off the middle 14-16-14-16-20 sts for neck = 25-28-25-28-34 sts left on each shoulder. Cast off 1 st on neckline on next row = 24-27-24-27-33 sts. Cast off after 9 stripes. Piece measures a total of approx 63-72-81-81-90 cm.

LEFT FRONT PIECE:
= 56-61-66-72-84 sts. Continue with collar towards mid front, pattern and 6-7-16-18-22 stocking sts at the side. AT THE SAME TIME cast off for armhole at the side as described for back piece = 50-54-50-54-62 sts. When inc for collar are complete there are 20-21-20-21-23 sts garter sts on front band/collar.
Continue until you have worked 8.5 stripes. Now dec 4 sts per repeat (a total of 6 dec sts, i.e. 4 dec sts in full repeat + 2 dec sts in half repeat) = 44-48-44-48-56 sts. Continue in stocking st with 20-21-20-21-23 front band/collar sts in garter st towards mid front. After 9 stripes cast off 24-27-24-27-33 sts from shoulder towards neckline = 20-21-20-21-23 sts left on collar. Work 1 row on collar and now work shortened rows as follows, back and forth on needle: * 2 rows on all sts, 2 rows on the 11 sts towards mid front only *, repeat from *-* until collar measures approx 5-6-5-6-7 cm from shoulder (measured on the shorter side). Cast off.

RIGHT FRONT PIECE:
Like left front piece, but mirrored.

SLEEVE:
Worked in the round on double pointed needles.
Cast on 60-60-66-66-72 sts on double pointed needles size 4.5 mm with 2 threads Fabel 901. Work 2 rounds GARTER ST – see above. Insert a marker at beg of round (= mid under sleeve). Continue as follows:
SIZE S + M:
M.4 (= 20 sts) on all sts (= 3 times).
SIZE L + XL:
M.5 (= 22 sts) on all sts (= 3 times).
SIZE XXL/XXXL:
M.1 (= 24 sts) on all sts (= 3 times).
When piece measures approx 8-8-9-9-9 cm dec 4 sts per repeat (dec on first row in repeat) – see DECREASING TIP-2 - (= a total of 12 dec sts) = 48-48-54-54-60 sts. Insert a marker, and now measure piece from here.
Continue in stocking st and STRIPES – see above. AT THE SAME TIME when piece measures 2-2-1-1-1 cm from marker inc 2 sts mid under sleeve (= 1 st each side of marker), and repeat the inc on every 11-4.5-4-3.5-2.5 cm a total of 4-8-9-10-12 times = 56-64-72-74-84 sts. When piece measures 39-38-37-36-34 cm from marker (less for the larger sizes because of longer sleeve cap and wider shoulder) cast off 8 sts mid under sleeve (= 4 sts each side of marker) and complete piece back and forth on needle in stripes – after the stripes complete piece in Fabel 674.
Cast off for sleeve cap each side st the beg of every row: 2 sts 2-3-2-3-4 times and 1 st 5-3-8-7-6 times, then 2 sts each side until piece measures 47-46-48-47-46 cm from marker, now cast off 4 sts each side 1 time and cast off remaining sts. Piece measures approx 48-47-49-48-47 cm from marker (approx 57-56-59-58-57 cm in total).

ASSEMBLY:
Sew shoulder seams. Set in sleeves. Sew tog collar mid back and sew to neckline.
Sew on buttons.

Diagram

symbols = K from RS, P from WS
symbols = work 2 sts in 1 st
symbols = slip 1 st as if to K, K1, psso
symbols = K2 tog
diagram
diagram

Each of our patterns has specific tutorial videos to help you.

Do you have a question? See a list of frequently asked questions (FAQ)

Knitting tension is what determines the final measurements of your work, and is usually measured per 10 x 10 cm. It is provided like so: number of stitches in width x number of rows in height - eg: 19 stitches x 26 rows = 10 x 10 cm.

The knitting tension is very individual; some people knit/crochet loosely while others work tightly. You adjust the knitting tension with the needle size, which is why the suggested needle size is only meant as a guide! You need to adjust this (up or down) to ensure that YOUR knitting tension matches the knitting tension provided in the pattern. If you work with a different knitting tension than provided you will have a different yarn consumption, and your work will have different measurements than what the pattern suggests.

The knitting tension also determines which yarns can replace each other. As long as you achieve the same knitting tension you can replace one yarn with another.

See DROPS lesson: How to measure your tension/gauge

See DROPS video: How to make a gauge tension swatch

The required amount of yarn is provided in grams, eg: 450 g. To calculate how many balls you’ll need you first need to know how many grams are in 1 ball (25g, 50g or 100g). This information is available if you click on the individual yarn quality on our pages. Divide the amount required with the amount of each ball. For example, if each ball is 50g (the most common amount), the calculation will be as follows: 450 / 50 = 9 balls.

The important thing when changing from one yarn to another is that the knitting/crochet tension remains the same. This is so that the measurements of the finished piece will be the same as on the sketch provided. It is easier to achieve the same knitting tension using yarns from the same yarn group. It is also possible to work with multiple strands of a thinner yarn to achieve the knitting tension of a thicker one. Please try our yarn converter. We recommend you to always work a test swatch.

Please NOTE: when changing yarn the garment might have a different look and feel to the garment in the photo, due to individual properties and qualities of each yarn.

See DROPS lesson: Can I use a different yarn than the one mentioned in the pattern?

All our yarns are categorised into yarn groups (from A to F) according to thickness and knitting tension – group A contains the thinnest yarns and group F the thickest. This makes it easier for you to find alternative yarns to our patterns, should you wish to switch yarn. All yarns within the same group have a similar knitting tension and can easily replace each other. However, different yarn qualities have different structures and properties which will give the finished work a unique look and feel.

Click here for an overview of the yarns in each yarn group

At the top of all our patterns you’ll find a link to our yarn calculator, which is a helpful tool should you wish to use a different yarn than suggested. By filling in the yarn quality you wish to replace, the amount (in your size) and number of strands, the calculator will present good alternative yarns with the same knitting tension. Additionally it will tell you how much you’ll require in the new qualities and whether you’ll need to work with multiple strands. Most skeins are 50g (some are 25g or 100g).

If the pattern is worked with multiple colours, every colour will have to be calculated separately. Similarly, if the pattern is worked with several strands of different yarns (for example 1 strand Alpaca and 1 strand Kid-Silk) you will have to find alternatives for each, individually.

Click here to see our yarn calculator

Since different yarns have different qualities and textures we have chosen to keep the original yarn in our patterns. However, you can easily find options among our available qualities by using our yarn calculator, or simply pick a yarn from the same yarn group.

It is possible that some retailers still have discontinued yarns in stock, or that someone has a few skeins at home that they would like to find patterns for.

The yarn calculator will provide both alternative yarn as well as required amount in the new quality.

If you think it's hard to decide what size to make, it can be a good idea to measure a garment you own already and like the size of. Then you can pick the size by comparing those measures with the ones available in the pattern's size chart.

You'll find the size chart at the bottom of the pattern.

See DROPS lesson: How to read size chart

The needle size provided in the pattern serves only as a guide, the important thing is to follow the knitting tension. And since knitting tension is very individual, you will have to adjust the needle size to ensure that YOUR tension is the same as in the pattern – maybe you’ll have to adjust 1, or even 2 needle sizes, up or down to achieve the correct tension. For this, we recommend that you work test swatches.

Should you work with a different knitting tension than the one provided, the measurements of the finished garment might deviate from the measurement sketch.

See DROPS lesson: How to measure your tension/gauge

See DROPS video: How to make a tension/gauge swatch

Working a garment top-down provides more flexibility and room for personal adjustment. For example it is easier to try the garment on while working, as well as making adjustments to length of yoke and shoulder caps.

The instructions are carefully explaining every step, in the correct order. Diagrams are adjusted to the knitting direction and are worked as usual.

The diagram depicts all rows/rounds, and every stitch seen from the right side. It is read from bottom to top, from right to left. 1 square = 1 stitch.

When working back and forth, every other row is worked from the right side and every other row is worked from the wrong side. When working from the wrong side, the diagram will have to be worked reversed: from left to right, knit stitches are purled, purl stitches are knit etc.

When working in the round every round is worked from the right side and the diagram are worked from right to left on all rounds.

See DROPS lesson: How to read knitting diagrams

The diagram depicts all rows/rounds, and every stitch seen from the right side. It is worked from bottom to top, from right to left.

When working back and forth every other row is worked from the right side: from right to left and every other row is worked from the wrong side: from left to right.

When working in the round, every row in the diagram are worked from the right side, from right to left.

When working a circular diagram you start in the middle and work your way outwards, counter clockwise, row by row.

The rows usually start with a given number of chain stitches (equivalent to the height of the following stitch), this will either be depicted in the diagram or explained in the pattern.

See DROPS lesson: How to read crochet diagrams

Instructions for working several diagrams after each other on the same row/round, will often be written like so: “work A.1, A.2, A.3 a total of 0-0-2-3-4 times". This means you work A.1 once, then A.2 is worked once, and A.3 is repeated (in width) the number of times provided for your size – in this case like so: S = 0 times, M = 0 times, L=2 times, XL= 3 times and XXL = 4 times.

The diagrams are worked as usual: begin with the first row in A.1, then work the first row in A.2 etc.

See DROPS lesson: How to read knitting diagrams

See DROPS lesson: How to read crochet diagrams

The total width of the garment (from wrist-to-wrist) will be larger in the larger sizes, despite the actual sleeves being shorter. The larger sizes have longer sleeve caps and wider shoulders, so there will be a good fit in all sizes.

The measurement sketch/schematic drawing provides information regarding the full length of the garment. If it’s a jumper or a jacket the length is measured from the highest point on the shoulder closest to the neckline, and straight down to the bottom of the garment. It is NOT measured from the tip of shoulder. Similarly, the length of yoke is measured from the highest point on the shoulder and down to where yoke is split into body and sleeves.

On a jacket measures are never taken along bands, unless specifically stated. Always measure inside band stitches when measuring the length.

See DROPS lesson: How to read a schematic drawing

Diagrams are often repeated on the round or in height. 1 repeat is the diagram the way it appears in the pattern. If it says to work 5 repeats of A.1 in the round, then you work A.1 a total of 5 times after/next to each other in the round. If it says to work 2 repeats of A.1 vertically/in height you work the entire diagram once, then begin again at the start and work the entire diagram one more time.

Chain stitches are slightly narrower than other stitches and to avoid working the cast-on edge too tight, we simply chain more stitches to begin with. The stitch count will be adjusted on the following row to fit the pattern and measurement sketch.

The rib edge is more elastic and will contract slightly compared to, for example, stocking stitch. By increasing before the rib edge, you avoid a visible difference in width between the rib edge and the rest of the body.

It’s very easy to cast off too tightly, and by making yarn overs while casting off (and simultaneously casting these off) you avoid a too tight cast off edge.

See DROPS video: How to bind off with yarn overs (yo)

To achieve an even increase (or decrease) you can increase on, for example: every 3rd and 4th row alternately, like so: work 2 rows and increase on the 3rd row, work 3 rows and increase on the 4th. Repeat this until the increase is complete.

See DROPS lesson: Increase or decrease 1 st on every 3rd and 4th row alternately

Should you prefer to work in the round instead of back and forth, you may of course adjust the pattern. You’ll need to add steeks mid-front (usually 5 stitches), and follow the instructions. When you would normally turn and work from the wrong side, simply work across the steek and continue in the round. At the end you’ll cut the piece open, pick up stitches to work bands, and cover the cut edges.

See DROPS video: How to knit steeks and cut open

Should you prefer to work back and forth instead of in the round, you may of course adjust the pattern so you work the pieces separately and then assemble them at the end. Divide the stitches for the body in 2, add 1 edge stitch in each side (for sewing) and work the front and back pieces separately.

See DROPS lesson: Can I adapt a pattern for circular needles into straight needles?

Pattern repeats can vary slightly in the different sizes, in order to get the correct proportions. If you’re not working the exact same size as the garment in the photo, yours might deviate slightly. This has been carefully developed and adjusted so that the complete impression of the garment is the same in all sizes.

Make sure to follow instructions and diagrams for your size!

If you have found a pattern you like which is available in women’s size it’s not very difficult to convert it to men’s size. The biggest difference will be the length of sleeves and body. Start working on the women size that you think would fit across the chest. The additional length will be worked right before you cast off for the armhole/sleeve cap. If the pattern is worked top-down you can add the length right after the armhole or before the first decrease on sleeve.

Regarding additional yarn amount, this will depend on how much length you add, but it is better with a skein too many than too few.

All yarns will have excess fibres (from production) that might come off as lint or shedding. Brushed yarns (ie hairier yarns) have more of these loose, excess fibres, causing more shedding.

Shedding also depends on what is worn under or over the garment, and whether this pulls at the yarn fibres. It’s therefore not possible to guarantee that there will be no shedding

Below are some tips on how to get the best result when working with hairier yarns:

1. When the garment is finished (before you wash it) shake it vigorously so the looser hairs come off. NOTE: do NOT use a lint roller, brush or any method that pulls at the yarn.

2. Place the garment in a plastic bag and put it in your freezer - the temperature will cause the fibres to become less attached to each other, and excess fibres will come off easier.

3. Leave in the freezer for a few hours before taking it out and shaking it again.

4. Wash the garment according to the instructions on the yarn label.

Pilling is a natural process that happens to even the most exclusive of fibers. It's a natural sign of wear and tear that is hard to avoid, and that is most visible in high friction areas of your garment like a sweater's arms and cuffs.

You can make your garment look as new by removing the pilling, using a fabric comb or a pill/lint remover.

Still can't find the answer you need? Then scroll down and leave your question so one of our experts can try to help you. This will be done normally within 5 to 10 working days.
In the meantime, you can read the questions and answers that others have left to this pattern or join the DROPS Workshop on Facebook to get help from fellow knitters/crocheters!

You might also like...

Post a comment to pattern DROPS 114-23

We would love to hear what you have to say about this pattern!

If you want to leave a question, please make sure you select the correct category in the form below, to speed up the answering process. Required fields are marked *.

Comments / Questions (28)

country flag Kristin wrote:

Hallo! Auch diese Jacke ist super schön geworden, vielen Dank für die tolle Anleitung! Bei so vielen Farben bleibt natürlich Wolle übrig - daraus habe ich den passenden Zickzack-Schal, aber nur mit einem Faden, gestrickt; der Schal ist 20 cm breit und auch 190 cm lang geworden. Schön!

25.05.2014 - 08:55

country flag DROPS Design NL wrote:

Hoi Anja. Nee, dat is niet zo. Het patroon geeft wel het motief aan zoals het moet zijn op de goede kant, maar de eerste rij is de goede kant, en de tweede rij verkeerde kant enz. Dit is standaard op onze patronen tenzij anders wordt vermeldt (bijvoorbeeld bij rondbreien enz). Succes. Gr. Tine

13.12.2010 - 11:24

country flag Anja wrote:

Hallo, ben vandag begonnen met dit prachtige vest en nog 1 vraag over het patroon wwarover ik twijfel Klopt het dat alle rechtse naalden gebreid worden in telpatroon? Mvg Anja

11.12.2010 - 23:22

country flag Anja wrote:

Morgen komt mijn garen binnen en dan mag dit mooie vest mijn pennen verblijden. ( ik doe er de sjaal ook maar bij ) Twijfelde even over het oranje maar toch maar gedaan na de positieve woorden van Veronique.

10.12.2010 - 16:35

country flag Drops Design wrote:

Jo der skal strikkes efter M.3 Str XXL/XXXL: 360/30m = 12 rapporter

25.08.2010 - 11:12

country flag Vibeke wrote:

Str. XXL må skulle strikkes efter dia 2 (ikke 3), ellers passer det ikke med maskeantal og gentage rapporten 12 gange.

24.08.2010 - 11:09

country flag Mammatillungar wrote:

Älskar färger!!!

02.10.2009 - 20:55

country flag Veronique wrote:

Ik ben bijna klaar met breien en hij wordt fantastisch. De kleuren lopen heel mooi in elkaar over en passen echt bij elkaar. Alleen het omrekenen naar gewoon breien was ingewikkeld, dus jammer dat het patroon alleen op rondbreinaalden beschreven is.

09.09.2009 - 16:48

country flag Mii wrote:

JätteTUFF!!!

11.07.2009 - 15:39

country flag Jill wrote:

Is the circus in town?

03.07.2009 - 04:24