
Popular categories
Looking for a yarn?


|
||||||||||||||||||||||||||||||||||||||||||||||
Alaska Cables |
||||||||||||||||||||||||||||||||||||||||||||||
|
|
||||||||||||||||||||||||||||||||||||||||||||||
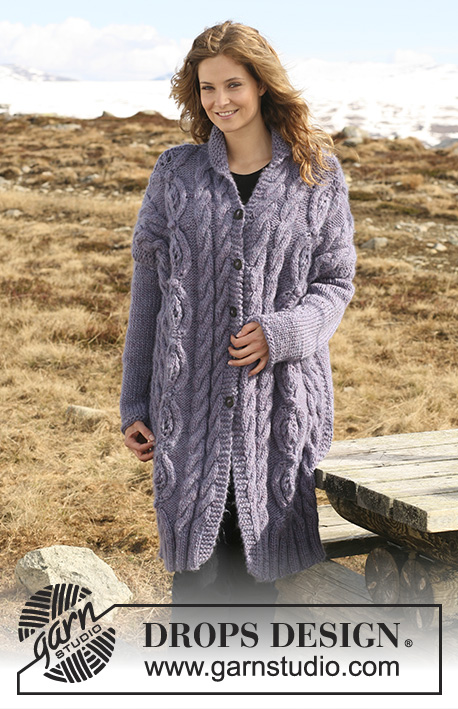
DROPS tunic in ”Snow” with cable pattern mid front. Size S to XXXL.
DROPS 117-18 |
||||||||||||||||||||||||||||||||||||||||||||||
|
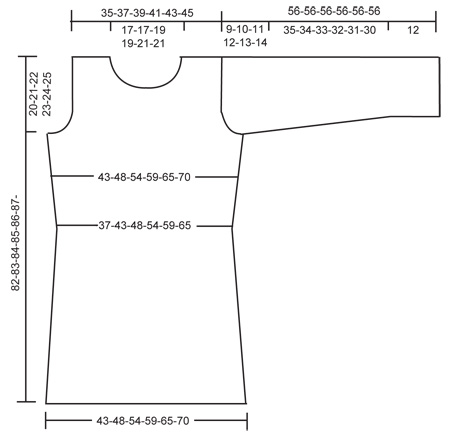
GARTER ST (back and forth on needle): K all rows. PATTERN: See diagram M.1, M.2 and M.3 – diagrams are seen from RS. In M.2 no of sts varies from 17 to 27 sts. ---------------------------------------------------------- ---------------------------------------------------------- FRONT PIECE: Worked back and forth on needle. Cast on 61-69-75-83-89-97 sts (includes 1 edge st each side) on needle size 7 mm / US 10 ½ with Snow. Continue as follows (row 1 = RS): SIZE S + L + XXL: 1 edge st in GARTER ST – see above, * K3, P4 * repeat from *-*, finish with K3 and 1 edge st in garter st. SIZE M + XL + XXXL: 1 edge st in GARTER ST – see above, * P4, K3 * repeat from *-*, finish with P4 and 1 edge st in garter st. When piece measures 4-4-4-5-5-5 cm / 1½''-1½''-1½''-2''-2''-2'' dec all P4 to P3 (as seen from RS) = 53-59-65-71-77-83 sts. Continue with K over K and P over P. When piece measures approx 8-8-9-10-10-11 cm / 3 1/8"-3 1/8"-3½"-4"-4"-4 3/8" (adjust so that next row is from RS) change to needle size 8 mm / US 11. Work next row as follows: 1 edge st in garter st, K 9-12-15-18-21-24, 1 garter st, P2, K2 in each of the next 3 sts (ie K3 becomes K6), P3, K3, P9, K3, P3, K2 in each of the next 3 (ie K3 becomes K6), P2, 1 garter st, K 9-12-15-18-21-24 and 1 edge st in garter st = 6 sts inc on row = 59-65-71-77-83-89 sts in total. Work return row with K over K and P over P. Work next row as follows: 1 edge st in garter st, 9-12-15-18-21-24 stockinette sts, 1 garter st, P2, M.1 (= 6 sts), M.2a (= 21 sts), M.3 (= 6 sts), P2, 1 garter st, 9-12-15-18-21-24 stockinette sts and 1 edge st in garter st. After M.2a continue in M.2b (work 4 vertical repeat of M.2b). REMEMBER THE GAUGE! AT THE SAME TIME when piece measures 25 cm / 9 3/4'' dec 1 st each side on next row from RS by K2 tog inside edge st each side, and repeat the dec when piece measures 30 and 35 cm / 11 3/4" and 13 3/4". When piece measures 45 cm / 17 3/4'' inc 1 st each side by K 2 sts in st inside edge st each side, and repeat the inc when piece measures 50 and 55 cm / 19 3/4" and 21 5/8". When piece measures 62 cm / 24 3/8'' (for all sizes) bind off for armhole each side at the beg of every row: 3 sts 1-1-1-1-2-2 times, 2 sts 0-1-2-2-2-3 times and 1 st 2-2-2-4-3-3 times. After 4 vertical repeats of M.2b piece measures approx 72 cm / 28 3/8''. Now work 1 vertical repeat of M.2c over M.2b. After M.2c there are 49-51-53-55-57-59 sts on needle. Now slip the middle 17-17-19-19-21-21 sts on a stitch holder for neck and complete each shoulder separately. Continue in pattern as before. Bind off to shape the neckline at the beg of every row from mid front by K tog the first 3 sts a total of 3 times = 10-11-11-12-12-13 sts left on shoulder. Bind off remaining sts when piece measures approx 82-83-84-85-86-87 cm / 32¼-32 3/4''-33''-33½''-33 7/8''-34¼''. BACK PIECE: Worked back and forth on needle. Cast on 62-68-76-82-90-96 sts (includes 1 edge st each side) on needle size 7 mm / US 10 ½ with Snow. Continue as follows (row 1 = RS): SIZE S + L + XXL: 1 edge st in garter st, * P4, K3 * repeat from *-*, finish with P4 and 1 edge st in garter st. SIZE M + XL + XXXL: 1 edge st in garter st, * K3, P4 * repeat from *-*, finish with K3 and 1 edge st in garter st. When piece measures 4-4-4-5-5-5 cm / 1½''-1½''-1½''-2''-2''-2'' dec all P4 to P3 (as seen from RS) = 53-59-65-71-77-83 sts. Continue with K over K and P over P. When piece measures approx 8-8-9-10-10-11 cm / 3 1/8"-3 1/8"-3½"-4"-4"-4 3/8" (adjust to front piece) change to needle size 8 mm / US 11. Continue in stockinette st – AT THE SAME TIME on row 1 dec 4 sts evenly = 49-55-61-67-73-79 sts. When piece measures 25, 30 and 35 cm / 9 3/4", 11 3/4" and 13 3/4" dec 1 st each side as described for front piece = 43-49-55-61-67-73 sts. When piece measures 45, 50 and 55 cm / 17 3/4", 19 3/4" and 21 5/8" inc 1 st each side as described for front piece = 49-55-61-67-73-79 sts. When piece measures 62 cm / 24 3/8'' bind off for armhole each side as described for front piece = 39-41-43-45-47-49 sts. When piece measures approx 79-80-81-82-83-84 cm / 31"-31½"-32"-32¼-32 3/4''-33'' (adjust to 3 cm / 1 1/8'' before finished measurements on front piece) bind off the middle 17-17-19-19-21-21 sts for neck and complete each shoulder separately. bind off 1 st on neckline on next row = 10-11-11-12-12-13 sts left on shoulder. Bind off when piece measures the same as front piece. SLEEVE: Worked back and forth on needle. Cast on 32-32-38-38-38-38 sts (includes 1 edge st each side) on needle size 7 mm / US 10 ½ with Snow. Work rib, K3/P3, with 1 edge st each side in garter st. When piece measures 12 cm / 4¾'' change to needle size 8 mm / US 11 and continue in stockinette st – AT THE SAME TIME on row 1 dec 2-0-4-2-0-0 sts evenly = 30-32-34-36-38-38 sts. When piece measures 14 cm / 5½'' inc 1 st each side, and repeat the inc on every 6-6-5.5-5.5-5-4 cm / 3 1/8"-3 1/8"-2 1/4"-2 1/4"-2"-1½" a total of 6-6-6-6-6-7 times = 42-44-46-48-50-52 sts. When piece measures 47-46-45-44-43-42 cm / 18½''-18''-17¾''-17¼''-17''-16½'' (less for the larger sizes because of longer sleeve cap and wider shoulder) bind off for sleeve cap each at the beg of every row: 4 sts 1 time and 2 sts 1 time, then 1 st each side until piece measures 54 cm / 21 1/4", now bind off 4 sts each side 1 time and bind off remaining sts. Piece measures approx 56 cm / 22''. ASSEMBLY: Sew shoulder seams. NECK: Pick up 60 to 72 sts round neckline (divisible by 6, incl sts on stitch holder at front) on circular needle size 7 mm / US 10½. Work rib = K3/P3 – make sure to place K sts over K sts in M.2 mid front. When neck measures 10 cm / 4'' inc all K3 to K4 = 70 to 84 sts. Continue with K4/P3 until neck measures 20 cm / 8''. Now inc all K4 to K5 = 80-96 sts. Continue with K5/P3 until neck measures 25 cm / 9 3/4''. Bind off loosely with K over K and P over P. FURTHER ASSEMBLY: Set in sleeves, sew sleeve and side seams inside 1 edge st. |
||||||||||||||||||||||||||||||||||||||||||||||
Diagram explanations |
||||||||||||||||||||||||||||||||||||||||||||||
|
||||||||||||||||||||||||||||||||||||||||||||||

|
||||||||||||||||||||||||||||||||||||||||||||||
|
||||||||||||||||||||||||||||||||||||||||||||||
|
Have you made this or any other of our designs? Tag your pictures in social media with #dropsdesign so we can see them! Do you need help with this pattern?You'll find tutorial videos, a Comments/Questions area and more by visiting the pattern on garnstudio.com. © 1982-2024 DROPS Design A/S. We reserve all rights. This document, including all its sub-sections, has copyrights. Read more about what you can do with our patterns at the bottom of each pattern on our site. |
||||||||||||||||||||||||||||||||||||||||||||||


With over 40 years in knitting and crochet design, DROPS Design offers one of the most extensive collections of free patterns on the internet - translated to 17 languages. As of today we count 304 catalogs and 11422 patterns - 11417 of which are translated into English (US/in).
We work hard to bring you the best knitting and crochet have to offer, inspiration and advice as well as great quality yarns at incredible prices! Would you like to use our patterns for other than personal use? You can read what you are allowed to do in the Copyright text at the bottom of all our patterns. Happy crafting!
Comments / Questions (62)
Gostaria muito de ver este casaco traduzido para o portugues,ele é lindissimo,desde já obrigada.
30.06.2009 - 01:21Flot!
27.06.2009 - 22:40Flot længde, krave og mønster. Er vild med denne sweater
26.06.2009 - 22:15Ein Traum. Tolle Farbe.
25.06.2009 - 15:35Herlig flettemønster,perfekt lengde.
22.06.2009 - 21:20An so einem kalten Sommertag wie heute ist es schade, dass ich diesen wunderschönen Pullover noch nicht stricken kann. Er wäre genau richtig.
21.06.2009 - 13:00Underbar stortröja! Härlig krage.
20.06.2009 - 14:47Fin genser - fin farge. Det er sikkert morsomt å strikke det fine mønsteret, gleder meg!
13.06.2009 - 08:11Kjempefin genser! Akkurat hva jeg har sett etter. Denne skal jeg strikke så fort mønsteret blir lagt ut.
12.06.2009 - 08:45Ist echt ein wunderschöner Zopfpulli, vor allem der mittlere Zopf ist mal was anderes! Freu mich sehr auf die Anleitung!
08.06.2009 - 17:43