DROPS Snow
DROPS Snow
100% Wool
from 2.00 £ /50g
Get the yarn to make this pattern from 18.00£.

The yarn cost is calculated from the pattern’s smallest size and the yarn’s cheapest product type. Looking for an even better price? You might find it on the DROPS Deals!

DROPS SS24

Endless Braid

DROPS Jacket knitted from side to side with cable pattern in ”Snow”. Size S to XXXL.

DROPS 116-25
DROPS design: Pattern no EE-254

Size: S - M - L - XL - XXL - XXXL
Materials: DROPS SNOW
450-500-550-600-700-750 g colour no 46, medium grey

DROPS CIRCULAR NEEDLE size 8 mm (80 cm) - or size needed to get 11 sts x 15 rows in stocking st = 10 x 10 cm.
DROPS BUFFALO HORN BUTTONS DARK, no 535: 4 pcs.

-------------------------------------------------------

Alternative Yarn – See how to change yarns here
Yarn Groups A to F – Use the same pattern and change the yarn here
Yarn usage using an alternative yarn – Use our yarn converter here

-------------------------------------------------------

DROPS Snow
DROPS Snow
100% Wool
from 2.00 £ /50g
Get the yarn to make this pattern from 18.00£.

The yarn cost is calculated from the pattern’s smallest size and the yarn’s cheapest product type. Looking for an even better price? You might find it on the DROPS Deals!

Pattern instructions

NOTE: This pattern is written in British English. All measurements in charts are in cm. For conversion from cm to inches - click here. There are different terms for crocheting in British and American English. If this pattern includes crochet, click for "crochet terms" here. For this pattern in American English, please click here.
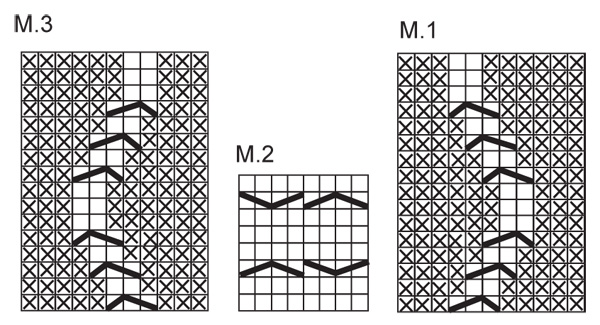
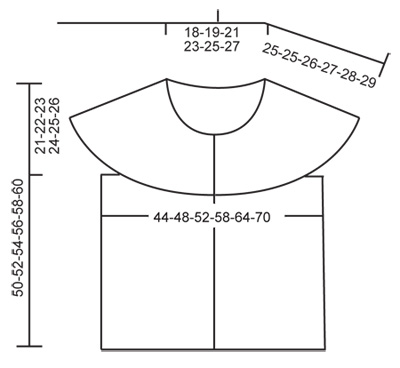
GARTER ST (back and forth on needle): K all rows.

PATTERN: See diagram M.1 to M.3. Diagram shows the pattern from RS.
TURNS: Work turns as follows:
* Work all sts from bottom edge to neckline, turn piece and work return row.
Work next row from bottom edge to Marker-1, turn piece and work return row – see KNITTING TIP.
Work next row to Marker-2, turn piece and work return row.
Work next row to Marker-3, turn piece and work return row.
Work next row on all sts, turn piece and work return row *. Repeat from *-*.

KNITTING TIP: When turning piece mid row, slip first st as if to K, tighten thread and continue (to avoid a hole in transition).

The jacket is worked from side to side. Rows from RS beg at bottom edge and finish at neckline. Beg mid front on left front piece, work the sleeve, back piece, the other sleeve, and finish with right front piece.

LEFT FRONT PIECE: Worked back and forth on needle. Loosely cast on 56-58-60-62-64-66 sts on circular needle size 8 mm with Snow. Work 4 cm GARTER ST – see above – and then K 1 row from WS, AT THE SAME TIME inc 12 sts evenly = 68-70-72-74-76-78 sts. Insert 3 markers from RS (from bottom edge towards neckline) as follows:
Marker-1 = after 32-33-34-35-36-37 sts.
Marker-2 = after 52-53-55-56-58-59 sts.
Marker-3 = after 63-65-67-69-71-73 sts. Leave markers in piece until finished measurements, so that the turns are worked in straight lines. Continue as follows from RS: 5 garter sts, 28-29-31-32-34-35 stocking sts, M.1 (= 11 sts), M.2 (= 8 sts), M.3 (= 11 sts), 0-1-1-2-2-3 stocking sts and finish with 5 garter sts. Continue in pattern like this until finished measurements. AT THE SAME TIME work TURNS – see above. Continue with turns until piece measures 26-28-30-33-36-39 cm from cast on row – measured at bottom of piece. Insert a marker in piece. Slip the bottom 29-30-31-32-33-34 sts on a stitch holder (to be used for back piece later). Now work left sleeve.

LEFT SLEEVE: = 39-40-41-42-43-44 sts on needle. Continue in pattern as before, but work the 3 sts towards sleeve edge in garter st. Now work the turns as follows:
* Work all sts from bottom edge to neckline, turn piece and work return row.
Work next row from bottom edge to Marker-2, turn piece and work return row – see KNITTING TIP.
Work next row to Marker 3, turn piece and work return row.
Work next row on all sts, turn piece and work return row *. Repeat from *-*.
Continue until sleeve measures 30-31-32-33-34-35 cm, measured at bottom.

BACK PIECE: Slip the 29-30-31-32-33-34 sts from stitch holder back on needle = 68-70-72-74-76-78 sts. Continue with turns and pattern as on front piece until piece measures 44-48-52-58-64-70 cm from the marker at the side (measured at bottom of piece). Slip the bottom 29-30-31-32-33-34 sts on a stitch holder (to be used for front piece later). Now work right sleeve.

RIGHT SLEEVE: Like left sleeve.

RIGHT FRONT PIECE: Slip the 29-30-31-32-33-34 sts from stitch holder back on needle = 68-70-72-74-76-78 sts. Continue with turns as on back piece. When piece measures 22-24-26-29-32-35 cm (adjust to the same no of rows as on left front piece), K 1 row from WS, AT THE SAME TIME dec 12 sts evenly = 56-58-60-62-64-66 sts. Continue in garter st. After 2 cm make buttonholes on next row from RS as follows: Work 14 sts, K2 tog, work 10-11-12-13-14-15 sts, K2 tog, work 10-10-11-11-12-12 sts, K2 tog, work 9-10-10-11-11-12 sts, K2 tog, work remaining sts. On next row cast on 1 new st before the K2 tog from previous row. Work a total of 4 cm garter st and cast off. Sew on buttons.

Diagram

symbols = K from RS, P from WS
symbols = P from RS, K from WS
symbols = slip 1 st on cable needle behind piece, K2, P1 from cable needle
symbols = slip 2 sts on cable needle in front of piece, P1, K2 from cable needle
symbols = slip 2 sts on cable needle behind piece, K2, K2 from cable needle
symbols = slip 2 sts on cable needle in front of piece, K2, K2 from cable needle
diagram
diagram
Do you have a question? See a list of frequently asked questions (FAQ)

Knitting tension is what determines the final measurements of your work, and is usually measured per 10 x 10 cm. It is provided like so: number of stitches in width x number of rows in height - eg: 19 stitches x 26 rows = 10 x 10 cm.

The knitting tension is very individual; some people knit/crochet loosely while others work tightly. You adjust the knitting tension with the needle size, which is why the suggested needle size is only meant as a guide! You need to adjust this (up or down) to ensure that YOUR knitting tension matches the knitting tension provided in the pattern. If you work with a different knitting tension than provided you will have a different yarn consumption, and your work will have different measurements than what the pattern suggests.

The knitting tension also determines which yarns can replace each other. As long as you achieve the same knitting tension you can replace one yarn with another.

See DROPS lesson: How to measure your tension/gauge

See DROPS video: How to make a gauge tension swatch

The required amount of yarn is provided in grams, eg: 450 g. To calculate how many balls you’ll need you first need to know how many grams are in 1 ball (25g, 50g or 100g). This information is available if you click on the individual yarn quality on our pages. Divide the amount required with the amount of each ball. For example, if each ball is 50g (the most common amount), the calculation will be as follows: 450 / 50 = 9 balls.

The important thing when changing from one yarn to another is that the knitting/crochet tension remains the same. This is so that the measurements of the finished piece will be the same as on the sketch provided. It is easier to achieve the same knitting tension using yarns from the same yarn group. It is also possible to work with multiple strands of a thinner yarn to achieve the knitting tension of a thicker one. Please try our yarn converter. We recommend you to always work a test swatch.

Please NOTE: when changing yarn the garment might have a different look and feel to the garment in the photo, due to individual properties and qualities of each yarn.

See DROPS lesson: Can I use a different yarn than the one mentioned in the pattern?

All our yarns are categorised into yarn groups (from A to F) according to thickness and knitting tension – group A contains the thinnest yarns and group F the thickest. This makes it easier for you to find alternative yarns to our patterns, should you wish to switch yarn. All yarns within the same group have a similar knitting tension and can easily replace each other. However, different yarn qualities have different structures and properties which will give the finished work a unique look and feel.

Click here for an overview of the yarns in each yarn group

At the top of all our patterns you’ll find a link to our yarn calculator, which is a helpful tool should you wish to use a different yarn than suggested. By filling in the yarn quality you wish to replace, the amount (in your size) and number of strands, the calculator will present good alternative yarns with the same knitting tension. Additionally it will tell you how much you’ll require in the new qualities and whether you’ll need to work with multiple strands. Most skeins are 50g (some are 25g or 100g).

If the pattern is worked with multiple colours, every colour will have to be calculated separately. Similarly, if the pattern is worked with several strands of different yarns (for example 1 strand Alpaca and 1 strand Kid-Silk) you will have to find alternatives for each, individually.

Click here to see our yarn calculator

Since different yarns have different qualities and textures we have chosen to keep the original yarn in our patterns. However, you can easily find options among our available qualities by using our yarn calculator, or simply pick a yarn from the same yarn group.

It is possible that some retailers still have discontinued yarns in stock, or that someone has a few skeins at home that they would like to find patterns for.

The yarn calculator will provide both alternative yarn as well as required amount in the new quality.

If you think it's hard to decide what size to make, it can be a good idea to measure a garment you own already and like the size of. Then you can pick the size by comparing those measures with the ones available in the pattern's size chart.

You'll find the size chart at the bottom of the pattern.

See DROPS lesson: How to read size chart

The needle size provided in the pattern serves only as a guide, the important thing is to follow the knitting tension. And since knitting tension is very individual, you will have to adjust the needle size to ensure that YOUR tension is the same as in the pattern – maybe you’ll have to adjust 1, or even 2 needle sizes, up or down to achieve the correct tension. For this, we recommend that you work test swatches.

Should you work with a different knitting tension than the one provided, the measurements of the finished garment might deviate from the measurement sketch.

See DROPS lesson: How to measure your tension/gauge

See DROPS video: How to make a tension/gauge swatch

Working a garment top-down provides more flexibility and room for personal adjustment. For example it is easier to try the garment on while working, as well as making adjustments to length of yoke and shoulder caps.

The instructions are carefully explaining every step, in the correct order. Diagrams are adjusted to the knitting direction and are worked as usual.

The diagram depicts all rows/rounds, and every stitch seen from the right side. It is read from bottom to top, from right to left. 1 square = 1 stitch.

When working back and forth, every other row is worked from the right side and every other row is worked from the wrong side. When working from the wrong side, the diagram will have to be worked reversed: from left to right, knit stitches are purled, purl stitches are knit etc.

When working in the round every round is worked from the right side and the diagram are worked from right to left on all rounds.

See DROPS lesson: How to read knitting diagrams

The diagram depicts all rows/rounds, and every stitch seen from the right side. It is worked from bottom to top, from right to left.

When working back and forth every other row is worked from the right side: from right to left and every other row is worked from the wrong side: from left to right.

When working in the round, every row in the diagram are worked from the right side, from right to left.

When working a circular diagram you start in the middle and work your way outwards, counter clockwise, row by row.

The rows usually start with a given number of chain stitches (equivalent to the height of the following stitch), this will either be depicted in the diagram or explained in the pattern.

See DROPS lesson: How to read crochet diagrams

Instructions for working several diagrams after each other on the same row/round, will often be written like so: “work A.1, A.2, A.3 a total of 0-0-2-3-4 times". This means you work A.1 once, then A.2 is worked once, and A.3 is repeated (in width) the number of times provided for your size – in this case like so: S = 0 times, M = 0 times, L=2 times, XL= 3 times and XXL = 4 times.

The diagrams are worked as usual: begin with the first row in A.1, then work the first row in A.2 etc.

See DROPS lesson: How to read knitting diagrams

See DROPS lesson: How to read crochet diagrams

The total width of the garment (from wrist-to-wrist) will be larger in the larger sizes, despite the actual sleeves being shorter. The larger sizes have longer sleeve caps and wider shoulders, so there will be a good fit in all sizes.

The measurement sketch/schematic drawing provides information regarding the full length of the garment. If it’s a jumper or a jacket the length is measured from the highest point on the shoulder closest to the neckline, and straight down to the bottom of the garment. It is NOT measured from the tip of shoulder. Similarly, the length of yoke is measured from the highest point on the shoulder and down to where yoke is split into body and sleeves.

On a jacket measures are never taken along bands, unless specifically stated. Always measure inside band stitches when measuring the length.

See DROPS lesson: How to read a schematic drawing

Diagrams are often repeated on the round or in height. 1 repeat is the diagram the way it appears in the pattern. If it says to work 5 repeats of A.1 in the round, then you work A.1 a total of 5 times after/next to each other in the round. If it says to work 2 repeats of A.1 vertically/in height you work the entire diagram once, then begin again at the start and work the entire diagram one more time.

Chain stitches are slightly narrower than other stitches and to avoid working the cast-on edge too tight, we simply chain more stitches to begin with. The stitch count will be adjusted on the following row to fit the pattern and measurement sketch.

The rib edge is more elastic and will contract slightly compared to, for example, stocking stitch. By increasing before the rib edge, you avoid a visible difference in width between the rib edge and the rest of the body.

It’s very easy to cast off too tightly, and by making yarn overs while casting off (and simultaneously casting these off) you avoid a too tight cast off edge.

See DROPS video: How to bind off with yarn overs (yo)

To achieve an even increase (or decrease) you can increase on, for example: every 3rd and 4th row alternately, like so: work 2 rows and increase on the 3rd row, work 3 rows and increase on the 4th. Repeat this until the increase is complete.

See DROPS lesson: Increase or decrease 1 st on every 3rd and 4th row alternately

Should you prefer to work in the round instead of back and forth, you may of course adjust the pattern. You’ll need to add steeks mid-front (usually 5 stitches), and follow the instructions. When you would normally turn and work from the wrong side, simply work across the steek and continue in the round. At the end you’ll cut the piece open, pick up stitches to work bands, and cover the cut edges.

See DROPS video: How to knit steeks and cut open

Should you prefer to work back and forth instead of in the round, you may of course adjust the pattern so you work the pieces separately and then assemble them at the end. Divide the stitches for the body in 2, add 1 edge stitch in each side (for sewing) and work the front and back pieces separately.

See DROPS lesson: Can I adapt a pattern for circular needles into straight needles?

Pattern repeats can vary slightly in the different sizes, in order to get the correct proportions. If you’re not working the exact same size as the garment in the photo, yours might deviate slightly. This has been carefully developed and adjusted so that the complete impression of the garment is the same in all sizes.

Make sure to follow instructions and diagrams for your size!

If you have found a pattern you like which is available in women’s size it’s not very difficult to convert it to men’s size. The biggest difference will be the length of sleeves and body. Start working on the women size that you think would fit across the chest. The additional length will be worked right before you cast off for the armhole/sleeve cap. If the pattern is worked top-down you can add the length right after the armhole or before the first decrease on sleeve.

Regarding additional yarn amount, this will depend on how much length you add, but it is better with a skein too many than too few.

All yarns will have excess fibres (from production) that might come off as lint or shedding. Brushed yarns (ie hairier yarns) have more of these loose, excess fibres, causing more shedding.

Shedding also depends on what is worn under or over the garment, and whether this pulls at the yarn fibres. It’s therefore not possible to guarantee that there will be no shedding

Below are some tips on how to get the best result when working with hairier yarns:

1. When the garment is finished (before you wash it) shake it vigorously so the looser hairs come off. NOTE: do NOT use a lint roller, brush or any method that pulls at the yarn.

2. Place the garment in a plastic bag and put it in your freezer - the temperature will cause the fibres to become less attached to each other, and excess fibres will come off easier.

3. Leave in the freezer for a few hours before taking it out and shaking it again.

4. Wash the garment according to the instructions on the yarn label.

Pilling is a natural process that happens to even the most exclusive of fibers. It's a natural sign of wear and tear that is hard to avoid, and that is most visible in high friction areas of your garment like a sweater's arms and cuffs.

You can make your garment look as new by removing the pilling, using a fabric comb or a pill/lint remover.

Still can't find the answer you need? Then scroll down and leave your question so one of our experts can try to help you. This will be done normally within 5 to 10 working days.
In the meantime, you can read the questions and answers that others have left to this pattern or join the DROPS Workshop on Facebook to get help from fellow knitters/crocheters!

Post a comment to pattern DROPS 116-25

We would love to hear what you have to say about this pattern!

If you want to leave a question, please make sure you select the correct category in the form below, to speed up the answering process. Required fields are marked *.

Comments / Questions (78)

country flag Cécile wrote:

Bonjour, je voudrais savoir si le bas du pull est en jersey envers? Merci

28.11.2022 - 09:05

DROPS Design answered:

Bonjour Cécile, le bas du gilet (sous les emmanchures) se tricote en jersey (= 28-29-31-32-34-35 m jersey) avec 5 m point mousse en bas. Bon tricot!

28.11.2022 - 10:28

country flag Faustine wrote:

Bonjour, Merci pour ce beau patron ! Pensez-vous qu'il soit envisageable d'ajouter des manches longues ou 3/4 ? Si oui, auriez-vous des conseils ? Merci d'avance

10.10.2019 - 11:16

DROPS Design answered:

Bonjour Faustine, vous pouvez ajouter des manches 3/4 si vous le voulez, vous pourrez vous inspirer d'un modèle avec la même tension, comme Pink Rum par exemple, en faisant les ajustements nécessaires. Bon tricot!

10.10.2019 - 13:11

country flag Caroline wrote:

Je souhaite créer ce modele avec lallaine big merino . pouvez-vous me donner la conversion du modele s'il vous plaît.

06.01.2019 - 15:42

DROPS Design answered:

Bonjour Caroline, pour tricoter ce modèle en Big Merino, il vous faudra l'utiliser en double (2 fils groupe C = 1 fil groupe E) - essayez notre convertisseur pour connaître la quantité nécessaire. Si vous souhaitez tricoter Big Merino en simple, il vous faudra alors rechercher un modèle plus adapté (= groupe C, avec 1 seul fil) ou alors recalculer en fonction de votre échantillon. Votre magasin saura vous aider - même par mail ou téléphone - si besoin. Bon tricot!

07.01.2019 - 11:21

country flag Paula Silva wrote:

Olá Fiz o modelo em questão e ficou muito bonito. No entanto, o decote da gola ficou muito largo. Podem-me dar alguma sugestão? Obrigada,

06.01.2019 - 15:13

DROPS Design answered:

Olá, Como a gola é decotada de um lado ao outro e não pode ser desmanchada, aconselhamos a que passe um fio mais fino pelo rebordo da gola pelo lado como se fosse um pesponto do avesso para apertar um pouco mais o decote. Bom Tricô!

07.01.2019 - 15:02

country flag Gretele wrote:

Hallo, danke für das schöne Muster! Kann es sein, dass M. 3 und M. 1 Hin- und Rückreihen zeigt, während M. 2 aber nur Hinreihen zeigt?

11.09.2018 - 21:42

DROPS Design answered:

Liebe Gretele, alle Diagramme zeigen Hin- und Rückreihen, dh M.1 und M.3 sowie M.3. Viel Spaß beim stricken!

12.09.2018 - 07:31

country flag DROPS Deutsch wrote:

Ja, am Anfang und am Schluss des Rapportes wird über alle M. gestrickt.

08.01.2012 - 16:43

country flag Marita wrote:

Hallo, ich bin mir nicht sicher, ob ich die Anleitung für den Ärmel richtig verstanden habe: Zwischen den * steht über alle M arbeiten, dann bis zur 2., dann bis zur 3. Markierung und dann wieder über alle M. Also stricke ich 2 Mal hintereinander über alle M? Mir erscheint der Kragen zu groß zu werden. Danke für die Hilfe!

07.01.2012 - 08:31

country flag Drops Design wrote:

Du sætter mærketråde i arbejdet og følger VENDINGER som står forklaret øverst i opskriften. Der findes også flere videoer som viser hvordan man laver fine vendinger. God fornøjelse!

14.03.2011 - 11:58

country flag Karolina wrote:

Er det mening at man strikker frem til 1 snor, og vrang tilbage, frem igen fra start pind til og med anden snor og retur vrang til anden snors begyndelse, frem fra 2 snor til 3 snor, tilbage vrang til slutning af 2 snor, frem igen til resten af pinden?

11.03.2011 - 16:43

country flag Karolina wrote:

Øv, jeg kan simpelthen ikke finde ud af hvordan det med de vendinger skal laves. I mit hovede skal det bare strikkes uden vendinger. Hvad er formålet med dem??

10.03.2011 - 20:06