Clicking the ORDER button will redirect you to Wool Warehouse Direct Ltd website
The yarn cost is calculated from the pattern’s smallest size and the yarn’s cheapest product type. Looking for an even better price? You might find it on the DROPS Deals!
-------------------------------------------------------
Alternative Yarn – See how to change yarns here
Yarn Groups A to F – Use the same pattern and change the yarn here
Yarn usage using an alternative yarn – Use our yarn converter here
-------------------------------------------------------
Clicking the ORDER button will redirect you to Wool Warehouse Direct Ltd website
The yarn cost is calculated from the pattern’s smallest size and the yarn’s cheapest product type. Looking for an even better price? You might find it on the DROPS Deals!
This pattern has been corrected. Click here to see the correction/s.
= K from RS, P from WS | |
= From RS: K2 tog. From WS: P2 tog | |
= From RS: slip 1 st as if to K, K1, psso. From WS: P2 tog into back of loop | |
= slip 1 st as if to K, K2 tog, psso | |
= 1 YO between 2 sts |
Each of our patterns has specific tutorial videos to help you.
These step-by-step tutorials might also help you:
Why is the knitting/crochet tension so important?
Knitting tension is what determines the final measurements of your work, and is usually measured per 10 x 10 cm. It is provided like so: number of stitches in width x number of rows in height - eg: 19 stitches x 26 rows = 10 x 10 cm.
The knitting tension is very individual; some people knit/crochet loosely while others work tightly. You adjust the knitting tension with the needle size, which is why the suggested needle size is only meant as a guide! You need to adjust this (up or down) to ensure that YOUR knitting tension matches the knitting tension provided in the pattern. If you work with a different knitting tension than provided you will have a different yarn consumption, and your work will have different measurements than what the pattern suggests.
The knitting tension also determines which yarns can replace each other. As long as you achieve the same knitting tension you can replace one yarn with another.
See DROPS lesson: How to measure your tension/gauge
See DROPS video: How to make a gauge tension swatch
How do I know how many balls of yarn I need?
The required amount of yarn is provided in grams, eg: 450 g. To calculate how many balls you’ll need you first need to know how many grams are in 1 ball (25g, 50g or 100g). This information is available if you click on the individual yarn quality on our pages. Divide the amount required with the amount of each ball. For example, if each ball is 50g (the most common amount), the calculation will be as follows: 450 / 50 = 9 balls.
Can I use a different yarn than what the pattern suggests?
The important thing when changing from one yarn to another is that the knitting/crochet tension remains the same. This is so that the measurements of the finished piece will be the same as on the sketch provided. It is easier to achieve the same knitting tension using yarns from the same yarn group. It is also possible to work with multiple strands of a thinner yarn to achieve the knitting tension of a thicker one. Please try our yarn converter. We recommend you to always work a test swatch.
Please NOTE: when changing yarn the garment might have a different look and feel to the garment in the photo, due to individual properties and qualities of each yarn.
See DROPS lesson: Can I use a different yarn than the one mentioned in the pattern?
What are the yarn groups?
All our yarns are categorised into yarn groups (from A to F) according to thickness and knitting tension – group A contains the thinnest yarns and group F the thickest. This makes it easier for you to find alternative yarns to our patterns, should you wish to switch yarn. All yarns within the same group have a similar knitting tension and can easily replace each other. However, different yarn qualities have different structures and properties which will give the finished work a unique look and feel.
How do I use the yarn calculator?
At the top of all our patterns you’ll find a link to our yarn calculator, which is a helpful tool should you wish to use a different yarn than suggested. By filling in the yarn quality you wish to replace, the amount (in your size) and number of strands, the calculator will present good alternative yarns with the same knitting tension. Additionally it will tell you how much you’ll require in the new qualities and whether you’ll need to work with multiple strands. Most skeins are 50g (some are 25g or 100g).
If the pattern is worked with multiple colours, every colour will have to be calculated separately. Similarly, if the pattern is worked with several strands of different yarns (for example 1 strand Alpaca and 1 strand Kid-Silk) you will have to find alternatives for each, individually.
Why do you show discontinued yarns in the patterns?
Since different yarns have different qualities and textures we have chosen to keep the original yarn in our patterns. However, you can easily find options among our available qualities by using our yarn calculator, or simply pick a yarn from the same yarn group.
It is possible that some retailers still have discontinued yarns in stock, or that someone has a few skeins at home that they would like to find patterns for.
The yarn calculator will provide both alternative yarn as well as required amount in the new quality.
What size should I knit?
If you think it's hard to decide what size to make, it can be a good idea to measure a garment you own already and like the size of. Then you can pick the size by comparing those measures with the ones available in the pattern's size chart.
You'll find the size chart at the bottom of the pattern.
See DROPS lesson: How to read size chart
Why do I get the wrong knitting tension with the suggested needle size?
The needle size provided in the pattern serves only as a guide, the important thing is to follow the knitting tension. And since knitting tension is very individual, you will have to adjust the needle size to ensure that YOUR tension is the same as in the pattern – maybe you’ll have to adjust 1, or even 2 needle sizes, up or down to achieve the correct tension. For this, we recommend that you work test swatches.
Should you work with a different knitting tension than the one provided, the measurements of the finished garment might deviate from the measurement sketch.
See DROPS lesson: How to measure your tension/gauge
See DROPS video: How to make a tension/gauge swatch
Why is the pattern worked top-down?
Working a garment top-down provides more flexibility and room for personal adjustment. For example it is easier to try the garment on while working, as well as making adjustments to length of yoke and shoulder caps.
The instructions are carefully explaining every step, in the correct order. Diagrams are adjusted to the knitting direction and are worked as usual.
How do I work according to a knitting diagram?
The diagram depicts all rows/rounds, and every stitch seen from the right side. It is read from bottom to top, from right to left. 1 square = 1 stitch.
When working back and forth, every other row is worked from the right side and every other row is worked from the wrong side. When working from the wrong side, the diagram will have to be worked reversed: from left to right, knit stitches are purled, purl stitches are knit etc.
When working in the round every round is worked from the right side and the diagram are worked from right to left on all rounds.
See DROPS lesson: How to read knitting diagrams
How do I work according to a crochet diagram?
The diagram depicts all rows/rounds, and every stitch seen from the right side. It is worked from bottom to top, from right to left.
When working back and forth every other row is worked from the right side: from right to left and every other row is worked from the wrong side: from left to right.
When working in the round, every row in the diagram are worked from the right side, from right to left.
When working a circular diagram you start in the middle and work your way outwards, counter clockwise, row by row.
The rows usually start with a given number of chain stitches (equivalent to the height of the following stitch), this will either be depicted in the diagram or explained in the pattern.
See DROPS lesson: How to read crochet diagrams
How do I work several diagrams simultaneously on the same row/round?
Instructions for working several diagrams after each other on the same row/round, will often be written like so: “work A.1, A.2, A.3 a total of 0-0-2-3-4 times". This means you work A.1 once, then A.2 is worked once, and A.3 is repeated (in width) the number of times provided for your size – in this case like so: S = 0 times, M = 0 times, L=2 times, XL= 3 times and XXL = 4 times.
The diagrams are worked as usual: begin with the first row in A.1, then work the first row in A.2 etc.
See DROPS lesson: How to read knitting diagrams
See DROPS lesson: How to read crochet diagrams
Why are the sleeves shorter in larger sizes?
The total width of the garment (from wrist-to-wrist) will be larger in the larger sizes, despite the actual sleeves being shorter. The larger sizes have longer sleeve caps and wider shoulders, so there will be a good fit in all sizes.
Where on the garment is the length measured?
The measurement sketch/schematic drawing provides information regarding the full length of the garment. If it’s a jumper or a jacket the length is measured from the highest point on the shoulder closest to the neckline, and straight down to the bottom of the garment. It is NOT measured from the tip of shoulder. Similarly, the length of yoke is measured from the highest point on the shoulder and down to where yoke is split into body and sleeves.
On a jacket measures are never taken along bands, unless specifically stated. Always measure inside band stitches when measuring the length.
See DROPS lesson: How to read a schematic drawing
What is a repeat?
Diagrams are often repeated on the round or in height. 1 repeat is the diagram the way it appears in the pattern. If it says to work 5 repeats of A.1 in the round, then you work A.1 a total of 5 times after/next to each other in the round. If it says to work 2 repeats of A.1 vertically/in height you work the entire diagram once, then begin again at the start and work the entire diagram one more time.
Why does the piece start with more chain stitches than it’s worked with?
Chain stitches are slightly narrower than other stitches and to avoid working the cast-on edge too tight, we simply chain more stitches to begin with. The stitch count will be adjusted on the following row to fit the pattern and measurement sketch.
Why increase before the rib edge when the piece is worked top-down?
The rib edge is more elastic and will contract slightly compared to, for example, stocking stitch. By increasing before the rib edge, you avoid a visible difference in width between the rib edge and the rest of the body.
Why increase in the cast-off edge?
It’s very easy to cast off too tightly, and by making yarn overs while casting off (and simultaneously casting these off) you avoid a too tight cast off edge.
See DROPS video: How to bind off with yarn overs (yo)
How do I increase/decrease on every 3rd and 4th row/round alternately?
To achieve an even increase (or decrease) you can increase on, for example: every 3rd and 4th row alternately, like so: work 2 rows and increase on the 3rd row, work 3 rows and increase on the 4th. Repeat this until the increase is complete.
See DROPS lesson: Increase or decrease 1 st on every 3rd and 4th row alternately
How can I work a jacket in the round instead of back and forth?
Should you prefer to work in the round instead of back and forth, you may of course adjust the pattern. You’ll need to add steeks mid-front (usually 5 stitches), and follow the instructions. When you would normally turn and work from the wrong side, simply work across the steek and continue in the round. At the end you’ll cut the piece open, pick up stitches to work bands, and cover the cut edges.
See DROPS video: How to knit steeks and cut open
Can I work a jumper back and forth instead of in the round?
Should you prefer to work back and forth instead of in the round, you may of course adjust the pattern so you work the pieces separately and then assemble them at the end. Divide the stitches for the body in 2, add 1 edge stitch in each side (for sewing) and work the front and back pieces separately.
See DROPS lesson: Can I adapt a pattern for circular needles into straight needles?
Why is the pattern slightly different than what I see in the photo?
Pattern repeats can vary slightly in the different sizes, in order to get the correct proportions. If you’re not working the exact same size as the garment in the photo, yours might deviate slightly. This has been carefully developed and adjusted so that the complete impression of the garment is the same in all sizes.
Make sure to follow instructions and diagrams for your size!
How do I make a women’s size garment into a men’s size one?
If you have found a pattern you like which is available in women’s size it’s not very difficult to convert it to men’s size. The biggest difference will be the length of sleeves and body. Start working on the women size that you think would fit across the chest. The additional length will be worked right before you cast off for the armhole/sleeve cap. If the pattern is worked top-down you can add the length right after the armhole or before the first decrease on sleeve.
Regarding additional yarn amount, this will depend on how much length you add, but it is better with a skein too many than too few.
How do I prevent a hairy garment from shedding?
All yarns will have excess fibres (from production) that might come off as lint or shedding. Brushed yarns (ie hairier yarns) have more of these loose, excess fibres, causing more shedding.
Shedding also depends on what is worn under or over the garment, and whether this pulls at the yarn fibres. It’s therefore not possible to guarantee that there will be no shedding
Below are some tips on how to get the best result when working with hairier yarns:
1. When the garment is finished (before you wash it) shake it vigorously so the looser hairs come off. NOTE: do NOT use a lint roller, brush or any method that pulls at the yarn.
2. Place the garment in a plastic bag and put it in your freezer - the temperature will cause the fibres to become less attached to each other, and excess fibres will come off easier.
3. Leave in the freezer for a few hours before taking it out and shaking it again.
4. Wash the garment according to the instructions on the yarn label.
Why does my garment pill?
Pilling is a natural process that happens to even the most exclusive of fibers. It's a natural sign of wear and tear that is hard to avoid, and that is most visible in high friction areas of your garment like a sweater's arms and cuffs.
You can make your garment look as new by removing the pilling, using a fabric comb or a pill/lint remover.
Spanish Flower |
||||||||||||||||
|
||||||||||||||||
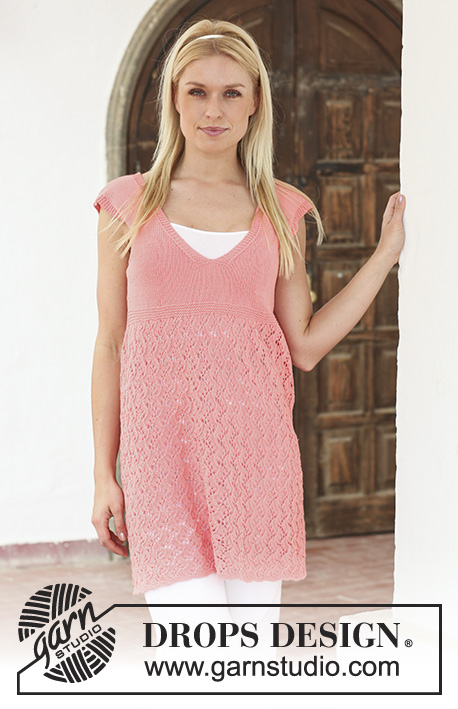
DROPS bolero in ”Paris” with short, wide sleeves in lace pattern. Size S – XXXL.
DROPS 113-23 |
||||||||||||||||
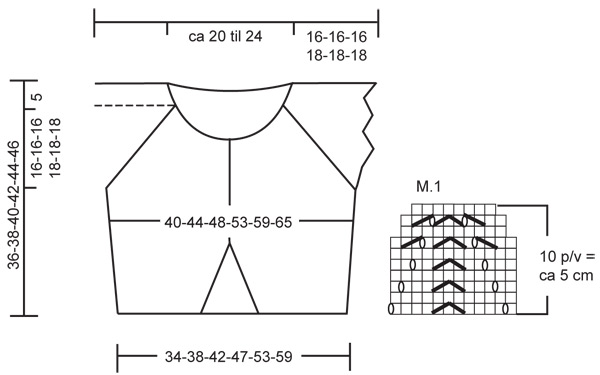
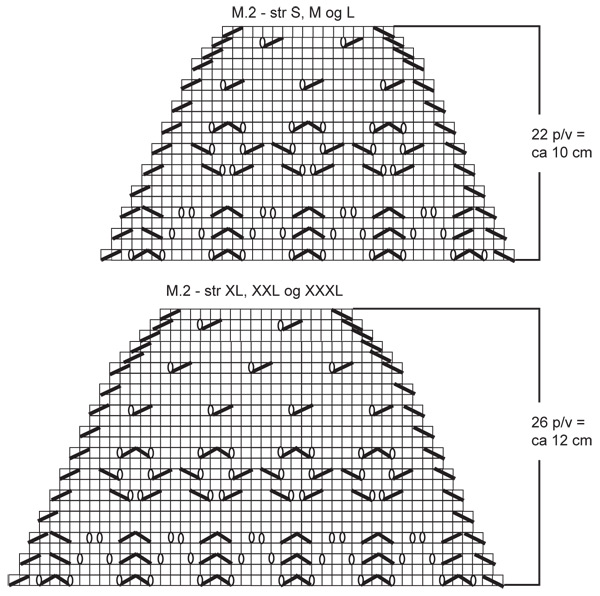
GARTER ST (back and forth on needle): K all rows. INCREASING TIP: Inc 1 st towards mid front from RS inside 5 garter sts by making 1 YO. Work YO into back of loop on return row to avoid a hole. PATTERN: See diagram M.1 and M.2 – the diagrams show the pattern from the RS. BUTTONHOLES: Make buttonholes on right front band. 1 buttonhole = K tog 2nd and 3rd st from mid front and make 1 YO. Make buttonholes when piece measures: SIZE S: 14, 20 and 26 cm. SIZE M: 15, 21 and 27 cm. SIZE L: 15, 22 and 29 cm. SIZE XL: 16, 23 and 30 cm. SIZE XXL: 16, 24 and 32 cm. SIZE XXXL: 17, 25 and 33 cm. RAGLAN DECREASES: Dec 1 st on each side of 4 garter sts. From RS: Before 4 garter sts: K2 tog. After 4 garter sts: slip 1 st as if to K, K1, psso. From WS: Before 4 garter sts: P2 tog into back of loops After 4 garter sts: P2 tog --------------------------------------------------------------------- BODY PIECE: Worked back and forth on circular needle from mid front. Cast on 102-114-130-146-166-186 sts (includes 5 front band sts each side towards mid front) on circular needle size 5 mm with Paris. Insert a marker 22-25-29-33-38-43 sts in from each side (= 58-64-72-80-90-100 sts on back piece). Work 4 rows garter st – SEE ABOVE - (first row = RS). Continue in stocking st with 5 front band sts in garter st each side. AT THE SAME TIME on first row in stocking st inc 1 st inside the 5 front band sts each side – SEE INCREASING TIP – and repeat the inc on every other row a total of 12 times. AT THE SAME TIME when piece measures 4 cm inc 1 st on each side of both markers at the sides and repeat the inc on every 2-2.5-3-3-3.5-3.5 cm a total of 5 times. AT THE SAME TIME when piece measures 14-15-15-16-16-17 cm make BUTTONHOLE on right front piece – see above. REMEMBER THE KNITTING TENSION! When inc mid front and at the sides are complete there are 146-158-174-190-210-230 sts on row. When piece measures approx 15-17-19-19-21-23 cm – adjust so that next row is from WS – work 2 rows garter st on 18 sts each side (= 9 sts on each side of marker) with remaining sts as before. After these 2 rows cast off 10 sts each side (= 5 sts of each side of marker) for armhole – cast off with K sts from WS. On next row (from RS) loosely cast on 69-69-69-81-81-81 new sts for sleeves over each armhole = 264-276-292-332-352-372 sts – continue in garter st on the 4 sts on each side of sleeve. WORK NEXT ROW AS FOLLOWS: (= WS): 5 garter sts, P 25-28-32-36-41-46 sts, K 77-77-77-89-89-89 sts, P 50-56-64-72-82-92 sts, K 77-77-77-89-89-89 sts, P 25-28-32-36-41-46 sts, 5 garter sts. Now work 2 rows stocking st on the 69-69-69-81-81-81 sleeve sts each side with remaining sts as before. NOW READ ALL OF THE FOLLOWING SECTION BEFORE CONTINUING! Continue as follows: 5 front band sts in garter st, 25-28-32-36-41-46 stocking sts, 4 garter sts, 4 stocking sts, M.1 on 60-60-60-72-72-72 sts, 5 stocking sts, 4 garter sts, 50-56-64-72-82-92 stocking sts, 4 garter sts, 4 stocking sts, M.1 on 60-60-60-72-72-72 sts, 5 stocking sts, 4 garter sts, 25-28-32-36-41-46 stocking sts and 5 front band sts in garter st. RAGLAN DECREASES: at the same time on row 3 of M.1 dec for RAGLAN – see above – on every other row a total of 14-14-14-15-15-15 times and then on every row 3-3-3-5-5-5 times. AT THE SAME TIME after M.1 (41-41-41-49-49-49 sts left on each sleeve) work M.2 (see diagram for your size) on sleeves – AT THE SAME TIME continue dec for raglan (marked in M.2). NECKLINE: at the same time when piece measures 27-28-30-31-33-34 cm (from cast on row) slip 7-8-9-11-11-12 sts each side towards mid front on stitch holders for neck. Dec 1 st each side towards mid front at the beg of every row until raglan dec are complete. After M.2 there are approx 68-78-92-98-116-134 sts on row. NECK: Pick up 12 to 17 sts (incl sts on stitch holders) on each neckline on front pieces = approx 92 to 168 sts. K 1 row from WS, AT THE SAME TIME dec evenly to 90-94-96-104-108-112 sts (do not dec on front bands and raglan). K 2 rows and cast off loosely. CROCHET BORDER: Crochet a border along cast on row on sleeves with crochet size 4 mm as follows: 1 dc in first st, *3 ch, skip approx 1 cm, 1 dc in next st *, repeat from *-*. Sew on buttons. |
||||||||||||||||
Diagram explanations |
||||||||||||||||
|
||||||||||||||||
Have you made this or any other of our designs? Tag your pictures in social media with #dropsdesign so we can see them! Do you need help with this pattern?You'll find tutorial videos, a Comments/Questions area and more by visiting the pattern on garnstudio.com. © 1982-2024 DROPS Design A/S. We reserve all rights. This document, including all its sub-sections, has copyrights. Read more about what you can do with our patterns at the bottom of each pattern on our site. |
With over 40 years in knitting and crochet design, DROPS Design offers one of the most extensive collections of free patterns on the internet - translated to 17 languages. As of today we count 304 catalogues and 11422 patterns - 11422 of which are translated into English (UK/cm).
We work hard to bring you the best knitting and crochet have to offer, inspiration and advice as well as great quality yarns at incredible prices! Would you like to use our patterns for other than personal use? You can read what you are allowed to do in the Copyright text at the bottom of all our patterns. Happy crafting!
Comments / Questions (91)
Karen wrote:
Dear Drops, me again! I have managed to cast on my sleeves after your help, thank you. I'm struggling now to read M1. I understand that I read the pattern from the bottom right hand side? Does this mean I should repeat M1 across six times because I should work M1 on 60 stitches according to the pattern. Also, I am little confused about why the top 3 rows appear to have less stitches? Are there written instructions available for DROPS patterns instead of diagrams?
20.05.2014 - 08:33DROPS Design answered:
Dear Karen, on the sleeve you will repeat M.1 (= 12 sts) a total of 5 times (= over 60 sts). on the last rows, you will have less sts because there will be more dec than yos. Happy knitting!
20.05.2014 - 09:16Karen wrote:
Dear Drops, Thank you for answering my last two questions. However, I am still unsure how to proceed. When you say I should cast on the stitches over the armholes, should I literally cast them onto (i.e. attach them to) the armhole stitches I cast off? Or should I just cast them onto the left needle, knit them onto the right after the first garter stitches at the beginning of the armhole and continue as normal? Sorry for the continuous questions! Karen
17.05.2014 - 20:39DROPS Design answered:
Dear Karen, you cast on sts for sleeves "litterally" - see video below - over the sts bound off for armholes between front & back piece. Happy knitting!
19.05.2014 - 08:49Karen wrote:
Dear Drops, I have a question about casting on stitches over the armholes. When it says in the pattern 'On next row (from RS) loosely cast on 69-69-69-81-81-81 new sts for sleeves over each armhole = 264-276-292-332-352-372 sts ', where exactly do I cast on these stitches? It might be a silly question but I'm fairly new to reading patterns. Hopefully you can help me :) Best wishes, Karen
16.05.2014 - 21:39DROPS Design answered:
Dear Karen, after binding off sts for armholes at each marker, work a new row from RS and cast on 69-81 sts (see size) over the 18 sts bound off over each armhole, ie, work first front piece, cast on sts for sleeve, work back piece, cast on sts for sleeve and work 2nd front piece. Happy knitting!
17.05.2014 - 09:26Karen wrote:
For the increases at the beginning would it be okay to knit into the back and front of a stitch? I find this an easy way to make an increase
12.05.2014 - 16:01DROPS Design answered:
Dear Karen, you may use the increase technique you are more at ease with, ie, knit into back and front will also work. Happy knitting!
13.05.2014 - 09:05Paula wrote:
In this video, I clearly see a hole made by the yarn over, but the pattern instructions say there is a way to avoid the hole. Is there a video for that?
17.01.2014 - 16:19Paula wrote:
Hi, These instructions say to increase using a yarn over, and then to work the back of the stitch on the returning row in order to avoid a hole. No matter what I do, I get a hole. Do you have a video explaining how to do this? thanks
17.01.2014 - 13:53DROPS Design answered:
Dear Paula, please see the video below - you may also use another increase way if you rather to. Happy knitting!
17.01.2014 - 14:53Hatice wrote:
Vielen Dank. Sie haben Recht, nach ein paar Reihen legt sich das wieder. Für mich war abzuklären, ob es da einen Trick gibt. Was man auf jeden Fall beachten sollte ist, LOCKERE Maschen anzuschlagen. Hilft sehr. Danke und LG.
15.01.2014 - 18:32Hatice wrote:
"Nach diesen 2 R. auf beiden Seiten 10 M. für das Armloch abk. [...] Bei der nächsten R. (= rechte Seite) über dem Ärmel locker je 69-69-69-81-81-81 neue M. anschlagen " Diese Stelle meine ich. Die neuen Maschen werden über dem Ärmel angeschlagen. Aber über dem Ärmel (über den 10 abgeketteten M.?) ist es sehr mit den neuen M. sehr eng, so dass ich nicht weiter stricken kann, weil die neuen M. viel länger sind (als die Stelle mit den zehn abgeketteten M.). LG
13.01.2014 - 15:14DROPS Design answered:
Liebe Hatice, das stimmt, bei neu angeschlagenen Maschen sind die ersten 2-3 Reihen manchmal etwas schwierig zu stricken. Schieben Sie die Maschen auf der Rundnadel so zurecht, dass es geht (evtl. etwas Seil zwischen den Maschen herausziehen, dass die M nach vorne gleiten). Es legt sich schon in der 2. R und man kann bald ganz normal weiter stricken.
14.01.2014 - 07:51Hatice wrote:
Hallo. Ich habe ein Problem damit über dem Ärmel neue Maschen anzuschlagen. Damit ist gemeint, dass man über den 10 abgeketteten Maschen neue anschlagen soll, allerdings ist es danach schwer zu stricken, weil die Spitzen der Naseln sich nicht mehr berühren können, da die Spannweite nicht ausreicht. Ich weiß leider nicht mehr, wie ich weiter machen soll. LG
12.01.2014 - 21:57DROPS Design answered:
Liebe Hatice, leider habe ich Ihr Problem nicht ganz verstanden. Könnten Sie das bitte genauer erklären oder sich die Ausführung von dem Laden erklären lassen, in dem Sie die Wolle gekauft haben.
13.01.2014 - 10:03Valeria wrote:
Grazie per la risposta veloce.per le asole tutto ok.non avevo ben capito...invece per gli aumenti nn trovo riscontro.-Sto realizzando per la taglia M. e alla fine mi ritrovo non con 158 m. 148 maglie.Dove sbaglio? grazie
25.03.2013 - 16:31DROPS Design answered:
Buongiorno, vediamo di analizzare insieme gli aumenti, magari troviamo la soluzione. Allora, gli aumenti iniziano con 1° f. a m. rasata, 1 aumento per lato per 12 volte, quindi da 114 m. dovremmo averne 138 per la taglia M. Poi quando il lavoro misura 4 cm bisogna aumentare 1 m. a entrambi i lati dei due segnapunti ai lati, quindi 4 aumenti per f., per 5 volte, per cui 20 aumenti in totale: da 138 si passa a 158 m.. Spero che sia tutto chiaro e che possa proseguire nel suo lavoro. Buon lavoro!!
25.03.2013 - 18:03