DROPS Silke Alpaca
DROPS Silke Alpaca
80% Wool, 20% Silk
Discontinued
find alternatives
DROPS SS24

Country Love

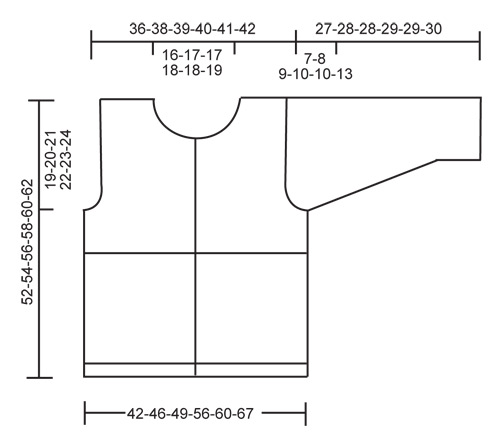
DROPS jacket with textured pattern in ”Silke-Alpaca” or ”Bomull-Lin”. Size S - XXXL.

DROPS 112-21
Size: S - M - L - XL - XXL - XXXL
Materials: DROPS SILKE-ALPACA from Garnstudio
500-550-600-650-750-800 g colour no 100, off-white

Or use:
DROPS BOMULL-LIN from Garnstudio
400-400-450-500-550-600 g colour no 100, off-white

DROPS POINTED NEEDLES size 4.5 mm – or size needed to get 17 sts x 22 rows in stocking st = 10 x 10 cm.
DROPS POINTED NEEDLES size 4 mm – for garter st and rib.
DROPS Buffalo horn buttons, no 537:
5-5-6-6-6-6 pcs.

-------------------------------------------------------

Alternative Yarn – See how to change yarns here
Yarn Groups A to F – Use the same pattern and change the yarn here
Yarn usage using an alternative yarn – Use our yarn converter here

-------------------------------------------------------

DROPS Silke Alpaca
DROPS Silke Alpaca
80% Wool, 20% Silk
Discontinued
find alternatives

Pattern instructions

NOTE: This pattern is written in British English. All measurements in charts are in cm. For conversion from cm to inches - click here. There are different terms for crocheting in British and American English. If this pattern includes crochet, click for "crochet terms" here. For this pattern in American English, please click here.
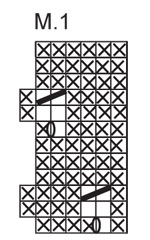
GARTER ST (back and forth on needle):
K all rows.

PATTERN: See diagram M.1 The diagram shows the pattern from the RS.

BUTTONHOLES:
Make buttonholes on right front band. 1 buttonhole = cast off the 7th front band st and cast on 1 new st on return row.
Make buttonholes when piece measures:
SIZE S: 11, 19, 27, 35 and 43 cm.
SIZE: M: 12, 20, 28, 36 and 44 cm.
SIZE L: 11, 18, 25, 32, 39 and 46 cm.
SIZE XL: 12, 19, 26, 33, 40 and 47 cm.
SIZE: XXL: 9, 17, 25, 33, 41and 49 cm.
SIZE XXXL: 10, 18, 26, 34, 42 and 50 cm.
--------------------------------------------------------

BACK PIECE:
Cast on 91-100-106-121-130-145 sts (includes 1 edge st each side) on needle size 4 mm with Silke-Alpaca or Bomull-Lin. P 1 row from WS and continue in rib from RS as follows: 1 edge st, * P2, K1 *, repeat from *-* and finish with P2 and 1 edge st. When rib measures approx 2 cm change to needle size 4.5 mm, K 1 row from RS, AT THE SAME TIME dec 17-20-20-23-26-29 sts evenly = 74-80-86-98-104-116 sts. K 1 row from WS and continue in reverse stocking st until piece measures 24 cm. Now work M.1 with 1 edge st each side (first row = RS).
When piece measures 33-34-35-36-37-38 cm cast off 4 sts each side for armhole and cast off to shape the armhole each side at the beg of every row: 2 sts 0-1-2-5-6-8 times and 1 st 2-2-2-1-1-2 times = 62-64-66-68-70-72 sts. Continue in pattern as before until piece measures 50-52-54-56-58-60 cm. Now cast off the middle 24-26-26-28-28-30 sts for neck and complete each shoulder separately. Cast off 1 st on neckline on next row = 18-18-19-19-20-20 sts left on shoulder. Cast off when piece measures 52-54-56-58-60-62 cm.

LEFT FRONT PIECE:
Cast on 58-61-64-73-76-85 sts (includes 1 edge st at the side and 12 front band sts towards mid front) on needle size 4 mm with Silke-Alpaca or Bomull-Lin.
P 1 row from WS and continue in rib as follows from RS: 1 edge st, * K1, P2 *, repeat from *-* and finish with K1 and 2 garter sts. When rib measures approx 2 cm change to needle size 4.5 mm. Continue in rib on the 12 front band sts.
K 1 row from RS, AT THE SAME TIME dec 9-6-9-12-9-12 sts evenly (do not dec on front band) = 49-55-55-61-67-73 sts. K 1 row from WS and continue in reverse stocking st with front band in rib as before.
When piece measures 24 cm continue in M.1 with 1 edge st at the side and 12 front band sts towards mid front as before. When piece measures 33-34-35-36-37-38 cm cast off for armhole at the side as described for back piece = 43-47-45-46-50-51 sts. When piece measures 44-45-47-48-50-51 cm slip 14 sts towards mid front on a stitch holder for neck. Cast off to shape the neckline at the beg of every row from mid front: 3 sts 2-3-2-2-3-3 times, 2 sts 1-2-1-2-2-2 times and 1 st 3-2-4-3-3-4 times = 18-18-19-19-20-20 sts left on shoulder. Continue until piece measures 52-54-56-58-60-62 cm. Cast off loosely.

RIGHT FRONT PIECE:
Like left front piece, but mirrored. Remember BUTTONHOLES – see above.

SLEEVE:
Worked back and forth on needle.
Cast on 44-44-44-50-50-50 sts (includes 1 edge st each side) on needle size 4 mm with Silke-Alpaca or Bomull-Lin. Work 6 rows garter st – see above. Change to needle size 4.5 mm and continue in M.1 with 1 edge st each side. When piece measures 4-4-4-4-6-6 cm inc 1 st each side on every 2-1.5-1-1- 0.5-0.5 cm a total of 7-9-11-11-13-15 times = 58-62-66-72-76-80 sts. Incorporate the inc sts in pattern as you go along. When piece measures 20-20-19-19-19-17 cm cast off 4 sts each side for armhole and cast off to shape the sleeve cap each side at the beg of every row: 2 sts 3-3-4-4-4-4 times and 1 st 2-2-1-3-4-6 times.
NOTE! Make sure to keep pattern in line when dec.
Now cast off 2 sts each side at the beg of every row until piece measures 26-27-27-28-28-29 cm, cast off 3 sts each side 1 time and cast off remaining sts. Piece now measures approx 27-28-28-29-29-30 cm.

ASSEMBLY:
Sew shoulder seams. Set in sleeves. Sew sleeve and side seams inside 1 edge st. Sew on buttons.

NECKLINE:
Pick up 92 to 108 sts (incl sts on stitch holders) round neckline on needle size 4 mm with Silke-Alpaca or Bomull-Lin. K 1 row from WS, work 4 rows garter st and cast off loosely – work front bands in rib as before

This pattern has been corrected.

Updated online: 17.02.2009
chart symbol no 2 from top:
K from RS, P from WS

Diagram

symbols = P from RS, K from WS
symbols = K from RS, P from WS
symbols = 1 YO between 2 sts
symbols = K2 tog
diagram
diagram

Each of our patterns has specific tutorial videos to help you.

Do you have a question? See a list of frequently asked questions (FAQ)

Knitting tension is what determines the final measurements of your work, and is usually measured per 10 x 10 cm. It is provided like so: number of stitches in width x number of rows in height - eg: 19 stitches x 26 rows = 10 x 10 cm.

The knitting tension is very individual; some people knit/crochet loosely while others work tightly. You adjust the knitting tension with the needle size, which is why the suggested needle size is only meant as a guide! You need to adjust this (up or down) to ensure that YOUR knitting tension matches the knitting tension provided in the pattern. If you work with a different knitting tension than provided you will have a different yarn consumption, and your work will have different measurements than what the pattern suggests.

The knitting tension also determines which yarns can replace each other. As long as you achieve the same knitting tension you can replace one yarn with another.

See DROPS lesson: How to measure your tension/gauge

See DROPS video: How to make a gauge tension swatch

The required amount of yarn is provided in grams, eg: 450 g. To calculate how many balls you’ll need you first need to know how many grams are in 1 ball (25g, 50g or 100g). This information is available if you click on the individual yarn quality on our pages. Divide the amount required with the amount of each ball. For example, if each ball is 50g (the most common amount), the calculation will be as follows: 450 / 50 = 9 balls.

The important thing when changing from one yarn to another is that the knitting/crochet tension remains the same. This is so that the measurements of the finished piece will be the same as on the sketch provided. It is easier to achieve the same knitting tension using yarns from the same yarn group. It is also possible to work with multiple strands of a thinner yarn to achieve the knitting tension of a thicker one. Please try our yarn converter. We recommend you to always work a test swatch.

Please NOTE: when changing yarn the garment might have a different look and feel to the garment in the photo, due to individual properties and qualities of each yarn.

See DROPS lesson: Can I use a different yarn than the one mentioned in the pattern?

All our yarns are categorised into yarn groups (from A to F) according to thickness and knitting tension – group A contains the thinnest yarns and group F the thickest. This makes it easier for you to find alternative yarns to our patterns, should you wish to switch yarn. All yarns within the same group have a similar knitting tension and can easily replace each other. However, different yarn qualities have different structures and properties which will give the finished work a unique look and feel.

Click here for an overview of the yarns in each yarn group

At the top of all our patterns you’ll find a link to our yarn calculator, which is a helpful tool should you wish to use a different yarn than suggested. By filling in the yarn quality you wish to replace, the amount (in your size) and number of strands, the calculator will present good alternative yarns with the same knitting tension. Additionally it will tell you how much you’ll require in the new qualities and whether you’ll need to work with multiple strands. Most skeins are 50g (some are 25g or 100g).

If the pattern is worked with multiple colours, every colour will have to be calculated separately. Similarly, if the pattern is worked with several strands of different yarns (for example 1 strand Alpaca and 1 strand Kid-Silk) you will have to find alternatives for each, individually.

Click here to see our yarn calculator

Since different yarns have different qualities and textures we have chosen to keep the original yarn in our patterns. However, you can easily find options among our available qualities by using our yarn calculator, or simply pick a yarn from the same yarn group.

It is possible that some retailers still have discontinued yarns in stock, or that someone has a few skeins at home that they would like to find patterns for.

The yarn calculator will provide both alternative yarn as well as required amount in the new quality.

If you think it's hard to decide what size to make, it can be a good idea to measure a garment you own already and like the size of. Then you can pick the size by comparing those measures with the ones available in the pattern's size chart.

You'll find the size chart at the bottom of the pattern.

See DROPS lesson: How to read size chart

The needle size provided in the pattern serves only as a guide, the important thing is to follow the knitting tension. And since knitting tension is very individual, you will have to adjust the needle size to ensure that YOUR tension is the same as in the pattern – maybe you’ll have to adjust 1, or even 2 needle sizes, up or down to achieve the correct tension. For this, we recommend that you work test swatches.

Should you work with a different knitting tension than the one provided, the measurements of the finished garment might deviate from the measurement sketch.

See DROPS lesson: How to measure your tension/gauge

See DROPS video: How to make a tension/gauge swatch

Working a garment top-down provides more flexibility and room for personal adjustment. For example it is easier to try the garment on while working, as well as making adjustments to length of yoke and shoulder caps.

The instructions are carefully explaining every step, in the correct order. Diagrams are adjusted to the knitting direction and are worked as usual.

The diagram depicts all rows/rounds, and every stitch seen from the right side. It is read from bottom to top, from right to left. 1 square = 1 stitch.

When working back and forth, every other row is worked from the right side and every other row is worked from the wrong side. When working from the wrong side, the diagram will have to be worked reversed: from left to right, knit stitches are purled, purl stitches are knit etc.

When working in the round every round is worked from the right side and the diagram are worked from right to left on all rounds.

See DROPS lesson: How to read knitting diagrams

The diagram depicts all rows/rounds, and every stitch seen from the right side. It is worked from bottom to top, from right to left.

When working back and forth every other row is worked from the right side: from right to left and every other row is worked from the wrong side: from left to right.

When working in the round, every row in the diagram are worked from the right side, from right to left.

When working a circular diagram you start in the middle and work your way outwards, counter clockwise, row by row.

The rows usually start with a given number of chain stitches (equivalent to the height of the following stitch), this will either be depicted in the diagram or explained in the pattern.

See DROPS lesson: How to read crochet diagrams

Instructions for working several diagrams after each other on the same row/round, will often be written like so: “work A.1, A.2, A.3 a total of 0-0-2-3-4 times". This means you work A.1 once, then A.2 is worked once, and A.3 is repeated (in width) the number of times provided for your size – in this case like so: S = 0 times, M = 0 times, L=2 times, XL= 3 times and XXL = 4 times.

The diagrams are worked as usual: begin with the first row in A.1, then work the first row in A.2 etc.

See DROPS lesson: How to read knitting diagrams

See DROPS lesson: How to read crochet diagrams

The total width of the garment (from wrist-to-wrist) will be larger in the larger sizes, despite the actual sleeves being shorter. The larger sizes have longer sleeve caps and wider shoulders, so there will be a good fit in all sizes.

The measurement sketch/schematic drawing provides information regarding the full length of the garment. If it’s a jumper or a jacket the length is measured from the highest point on the shoulder closest to the neckline, and straight down to the bottom of the garment. It is NOT measured from the tip of shoulder. Similarly, the length of yoke is measured from the highest point on the shoulder and down to where yoke is split into body and sleeves.

On a jacket measures are never taken along bands, unless specifically stated. Always measure inside band stitches when measuring the length.

See DROPS lesson: How to read a schematic drawing

Diagrams are often repeated on the round or in height. 1 repeat is the diagram the way it appears in the pattern. If it says to work 5 repeats of A.1 in the round, then you work A.1 a total of 5 times after/next to each other in the round. If it says to work 2 repeats of A.1 vertically/in height you work the entire diagram once, then begin again at the start and work the entire diagram one more time.

Chain stitches are slightly narrower than other stitches and to avoid working the cast-on edge too tight, we simply chain more stitches to begin with. The stitch count will be adjusted on the following row to fit the pattern and measurement sketch.

The rib edge is more elastic and will contract slightly compared to, for example, stocking stitch. By increasing before the rib edge, you avoid a visible difference in width between the rib edge and the rest of the body.

It’s very easy to cast off too tightly, and by making yarn overs while casting off (and simultaneously casting these off) you avoid a too tight cast off edge.

See DROPS video: How to bind off with yarn overs (yo)

To achieve an even increase (or decrease) you can increase on, for example: every 3rd and 4th row alternately, like so: work 2 rows and increase on the 3rd row, work 3 rows and increase on the 4th. Repeat this until the increase is complete.

See DROPS lesson: Increase or decrease 1 st on every 3rd and 4th row alternately

Should you prefer to work in the round instead of back and forth, you may of course adjust the pattern. You’ll need to add steeks mid-front (usually 5 stitches), and follow the instructions. When you would normally turn and work from the wrong side, simply work across the steek and continue in the round. At the end you’ll cut the piece open, pick up stitches to work bands, and cover the cut edges.

See DROPS video: How to knit steeks and cut open

Should you prefer to work back and forth instead of in the round, you may of course adjust the pattern so you work the pieces separately and then assemble them at the end. Divide the stitches for the body in 2, add 1 edge stitch in each side (for sewing) and work the front and back pieces separately.

See DROPS lesson: Can I adapt a pattern for circular needles into straight needles?

Pattern repeats can vary slightly in the different sizes, in order to get the correct proportions. If you’re not working the exact same size as the garment in the photo, yours might deviate slightly. This has been carefully developed and adjusted so that the complete impression of the garment is the same in all sizes.

Make sure to follow instructions and diagrams for your size!

If you have found a pattern you like which is available in women’s size it’s not very difficult to convert it to men’s size. The biggest difference will be the length of sleeves and body. Start working on the women size that you think would fit across the chest. The additional length will be worked right before you cast off for the armhole/sleeve cap. If the pattern is worked top-down you can add the length right after the armhole or before the first decrease on sleeve.

Regarding additional yarn amount, this will depend on how much length you add, but it is better with a skein too many than too few.

All yarns will have excess fibres (from production) that might come off as lint or shedding. Brushed yarns (ie hairier yarns) have more of these loose, excess fibres, causing more shedding.

Shedding also depends on what is worn under or over the garment, and whether this pulls at the yarn fibres. It’s therefore not possible to guarantee that there will be no shedding

Below are some tips on how to get the best result when working with hairier yarns:

1. When the garment is finished (before you wash it) shake it vigorously so the looser hairs come off. NOTE: do NOT use a lint roller, brush or any method that pulls at the yarn.

2. Place the garment in a plastic bag and put it in your freezer - the temperature will cause the fibres to become less attached to each other, and excess fibres will come off easier.

3. Leave in the freezer for a few hours before taking it out and shaking it again.

4. Wash the garment according to the instructions on the yarn label.

Pilling is a natural process that happens to even the most exclusive of fibers. It's a natural sign of wear and tear that is hard to avoid, and that is most visible in high friction areas of your garment like a sweater's arms and cuffs.

You can make your garment look as new by removing the pilling, using a fabric comb or a pill/lint remover.

Still can't find the answer you need? Then scroll down and leave your question so one of our experts can try to help you. This will be done normally within 5 to 10 working days.
In the meantime, you can read the questions and answers that others have left to this pattern or join the DROPS Workshop on Facebook to get help from fellow knitters/crocheters!

You might also like...

Post a comment to pattern DROPS 112-21

We would love to hear what you have to say about this pattern!

If you want to leave a question, please make sure you select the correct category in the form below, to speed up the answering process. Required fields are marked *.

Comments / Questions (28)

country flag Judy Tergis wrote:

Why does it say "GARTER ST (back and forth on needle): K all rows" at the top but "reverse stockinette st" in the pattern? Confusing.

30.04.2022 - 02:00

DROPS Design answered:

Dear Judy, you use both types of stitches in the pattern. In the sleeve edge and sometimes in the body you work with garter stitch. The rest is worked in reverse stockinette stitch. Happy knitting!

30.04.2022 - 22:12

country flag Torill Stokka wrote:

Hvor i denne oppskriften står mål oppgitt? Må vite det for å få riktig størrelse. mvh Torill

21.01.2021 - 17:33

DROPS Design answered:

Hei Torill, Du finner en skisse på bunnen av oppskriften med mål for alle størrelser. God fornøyelse!

22.01.2021 - 08:07

country flag Ria Beems-Whien wrote:

Ik ben dit patroon aan het breien met Bomull-lin. Het patroon geeft aan dat er gebreid wordt met pen 4 en 4 1/2 . De wol geeft aan 5 en 5 1/2. Mijn vraag is met welke pen moet ik nu breien?

12.01.2021 - 22:49

DROPS Design answered:

Dag Ria,

Je gebruikt de aangegeven pendikte in het patroon, maar het belangrijkste is dat de stekenverhouding overeen komt. Dus maak een proeflapje en pas evt. de pendikte aan zodat je de juiste stekenverhouding hebt.

17.01.2021 - 11:53

country flag Chantal wrote:

Peut on remplacer le fil par du safran. merci pour votre réponse

05.06.2019 - 17:59

DROPS Design answered:

Bonjour Chantal! C'est possible, mais vous devez travailler avec 2 fils ensemble, cela vous donne le groupe C, comme dans le modele. Bon tricot!

06.06.2019 - 08:06

country flag Annikki wrote:

Kan jag få mönsterbeskrivning?

08.03.2019 - 09:02

DROPS Design answered:

Hei Annikki. Du strikker vrangbord nederst i 2 cm og videre strikkes glattstrikk med vrangen ut til arbeidet måler 24 cm. Herfra strikker du etter M.1 som du finner nederst på siden, sammen med målskissen. Du gjentar M.1 over alle maskene (med 1 kantmaske i rille i hver side). Symbolene i M.1 er forklart i symbolforklaringen. Diagrammet leses fra høyre mot venstre, nedenfra og opp. Du begynner altså med symbolet nederst i høyre hjørnet (=1 vrang fra retten). Hvis det er noe spesifikt med M.1 du ikke forstår, så spør oss gjerne. God fornøyelse

11.03.2019 - 11:26

country flag Claire wrote:

Concernant la manche : Je fais une diminution chaque côté 11 fois, mais à combien de rangs entre les augmentations? C'est indiqué 5-0, je n'ai pas bien saisi. Merci.

21.06.2016 - 21:45

DROPS Design answered:

Bonjour Claire, on augmente pour les manches 1 m de chaque côté, 11 fois (en taille L et XL) tous les 1 cm = on a ainsi 66-72 m. Bon tricot!

22.06.2016 - 09:38

country flag Beatriz wrote:

Hola Me gustaría que me aclarasen una duda respecto al diagrama M1. ¿Cómo se hacen las vueltas del revés? Estoy confusa porque no sé si en dicho diagrama también se muestran las vueltas impares o sólo las del derecho. Muchas gracias.

09.07.2015 - 16:09

DROPS Design answered:

Hola Beatriz. El diagrama muestra todas las filas del patrón vistas por el LD. En la fila de vta trabajas según el diagrama, es decir los cuadrados con cruz se trabajan de derecho y los cuadrados blancos de revés.

10.07.2015 - 10:54

country flag Nina wrote:

Hi, I'm making this sweater right now, love the model.But have a question regarding the back of the sweater/the sleaves.. Did anyone make it? Because the count doesn't add up (for the sleeves) thank you for the help..

01.03.2012 - 19:50

DROPS Design answered:

Hoi Nina. Kan je mij vertellen welke maat je breit en waar het precies fout gaat? Dear Nina, can you tell me which size you knit and where exactly you run into problems? Dank je

04.03.2012 - 15:43

country flag Alea wrote:

Nice sweater. I love the lenght of the sleeves, summer! I plan to make the sweater 5 or 10 cm longer, so it fits better over my tummy :)

22.04.2010 - 22:03

Kimi wrote:

Very nice, I will try to knit with cotton for summer holiday. sorry for gammar, I am from BiH, but I am excellent in knitting.

27.02.2009 - 22:35