DROPS Muskat
DROPS Muskat
100% Cotton
from 1.85 £ /50g
Get the yarn to make this pattern from 20.35£.

The yarn cost is calculated from the pattern’s smallest size and the yarn’s cheapest product type. Looking for an even better price? You might find it on the DROPS Deals!

DROPS SS24

Endless Summer

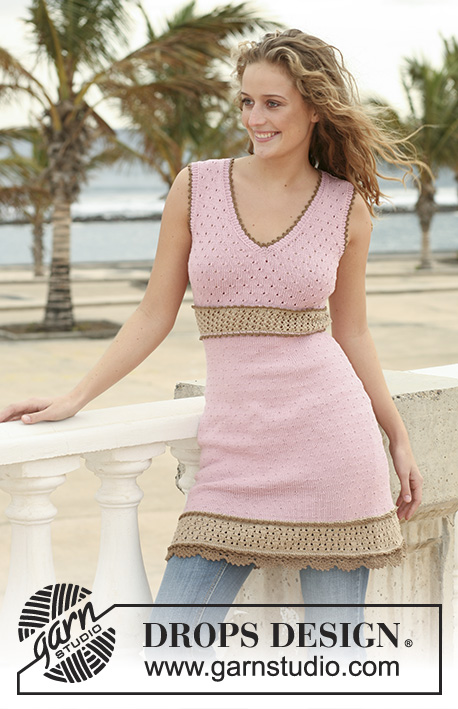
DROPS dress in ”Muskat” with lace pattern, short sleeves and crochet borders. Size XS - XXL.

DROPS 111-4
Size: XS - S - M - L - XL - XXL
Materials: DROPS MUSKAT from Garnstudio
500-550-600-650-750-800 g colour no 30, yellow

DROPS POINTED NEEDLES and CIRCULAR NEEDLE (80 cm) size 4.5 mm – or size needed to get 20 sts x 26 rows in stocking st = 10 x 10 cm.
DROPS CROCHET HOOK size 4 mm.

-------------------------------------------------------

Alternative Yarn – See how to change yarns here
Yarn Groups A to F – Use the same pattern and change the yarn here
Yarn usage using an alternative yarn – Use our yarn converter here

-------------------------------------------------------

DROPS Muskat
DROPS Muskat
100% Cotton
from 1.85 £ /50g
Get the yarn to make this pattern from 20.35£.

The yarn cost is calculated from the pattern’s smallest size and the yarn’s cheapest product type. Looking for an even better price? You might find it on the DROPS Deals!

Pattern instructions

NOTE: This pattern is written in British English. All measurements in charts are in cm. For conversion from cm to inches - click here. There are different terms for crocheting in British and American English. If this pattern includes crochet, click for "crochet terms" here. For this pattern in American English, please click here.
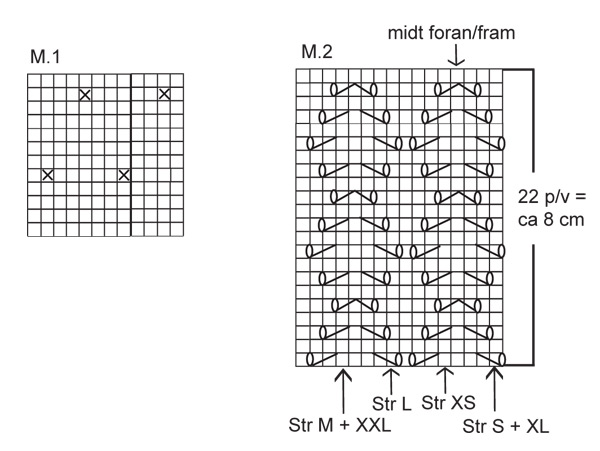
GARTER ST (in the round):
K 1 round, P 1 round.

GARTER ST (back and forth on needle):
K all rows.

PATTERN: See diagram M.1 and M.2 – the diagrams show the pattern from the RS.

DECREASING TIP-1:
Dec as follows before marker: K2 tog.
Dec as follows after marker: slip 1 st as if to K, K1, psso. NOTE! Make sure not to shift P sts in M.1 when decreasing.

DECREASING TIP-2:
Make all dec from RS inside 9 pattern sts and 3 garter sts = 12 sts.
Dec as follows before 12 sts: K2 tog.
Dec as follows after 12 sts: slip 1 st as if to K, K1, psso.

INCREASING TIP: Inc 1 st on each side of st with marker by making 1 YO. Work YO into back of loop on return row to avoid a hole.
----------------------------------------------------------

DRESS: Worked in the round on circular needle. Cast on 204-216-240-252-276-288 sts on circular needle size 4.5 mm with Muskat. P 1 round, K 1 round, P 1 round and continue in M.1.
REMEMBER THE KNITTING TENSION!
When piece measures 18-18-18-20-22-26 cm insert 6 markers in piece as follows: Work 32-34-38-40-44-46 sts, insert Marker-1, work 37-39-43-45-49-51 sts, insert Marker-2, work 33-35-39-41-45-47 sts, insert Marker-3 in the last of these sts (= the side), work 32-34-38-40-44-46 sts, insert Marker-4, work 37-39-43-45-49-51 sts, insert Marker-5, work 33-35-39-41-45-47 sts, insert Marker-6 in the last of these sts (= the other side). On next round dec 1 st on each side of Marker-3 and -6 (i.e. at the sides) – SEE DECREASING TIP-1 – and repeat the dec on every 6th round a total of 13-12-14-13-11-10 times.
AT THE SAME TIME when doing the 8-7-9-8-6-5 dec, also dec 1 st by the other markers as follows: AFTER Marker-1 and Marker-4 and BEFORE Marker-2 and Marker-5 – SEE DECREASING TIP-1. Repeat these dec on every 6th round (i.e. on the same rounds as dec at the sides) a total of 6 times.
When all dec are complete there are 128-144-160-176-208-224 sts on round. Continue in M.1 until piece measures approx 47-48-49-50-51-52 cm – adjust to after at least 2 rounds stocking st. Now remove Marker-1, -2, -4 and -5. Continue in M.2 – beg by arrow for your size at bottom of diagram so that st mid front = arrow at top of diagram. After 1 vertical repeat of M.2 work next round as follows:
19-23-27-31-39-43 stocking sts, M.2 (continue from row 7 in chart and repeat from row 7-22) on 25 sts mid front and stocking st on remaining sts on round. AT THE SAME TIME on round 4 inc 1 st on each side of the markers at sides – SEE INCREASING TIP – and repeat the inc on every 4 round a total of 7 times = 156-172-188-204-236-252 sts. When piece measures approx 67-68-69-70-71-72 cm (adjust so that next round is a round with YO) work 4 rounds garter st – see above – on 7 sts mid front, with remaining sts as before. On next round cast off the middle st at front for split and on the same round cast off 7 sts each side for armhole (= st with marker + 3 sts on each side of this).
Now complete each piece separately.

LEFT FRONT PIECE: = 35-39-43-47-55-59 sts. Continue with 3 garter sts towards neckline, 9 sts of M.2 and stocking st on remaining sts. AT THE SAME TIME dec for neckline and armhole as follows:
NECKLINE: Dec 1 st on neckline inside 12 sts – SEE DECREASING TIP-2 - and repeat the dec on every other row a total of 9-10-10-10-10-11 times and then on every 4th row 5-5-5-6-6-6 times.
ARMHOLE: Cast off for armhole at the beg of every row from the side: 3 sts 0-0-1-1-2-2 times, 2 sts 0-1-1-2-3-4 times and 1 st 1-2-2-3-3-4 times. When all dec are complete there are 20-20-21-21-24-24 sts left on shoulder. Cast off when piece measures 86-88-90-92-94-96 cm.

RIGHT FRONT PIECE: Like left front piece, but mirrored.

BACK PIECE: = 71-79-87-95-111-119 sts. Continue in stocking at and cast off for armhole each side as described for front piece = 69-71-73-75-81-83 sts. When piece measures 83-85-87-89-91-93 cm work 4 rows garter st on the middle 35-37-37-39-39-41 sts, with remaining sts in stocking st. Now cast off the middle 29-31-31-33-33-35 sts for neck and complete each shoulder separately. Continue in stocking st with 3 garter sts towards neckline and cast off when piece measures 86-88-90-92-94-96 cm.

SLEEVE: Worked back and forth on needle. Cast on 62-62-68-68-74-80 sts (includes 1 edge st each side) on needle size 4.5 mm with Muskat. Work 4 rows garter st and continue in M.1 with 1 edge st each side. When piece measures 2 cm inc 1 st each side, and repeat the inc on every other row a total of 2-4-3-5-5-4 times, work inc sts in stocking st = 66-70-74-78-84-88 sts. When piece measures 6 cm cast off for sleeve cap each side at the beg of every row: 4 sts 1 time, 2 sts 3 times and 1 st 1-2-4-5-6-8 times, then 2 sts each side until piece measures 12-13-14-15-16-17 cm, now cast off 4 sts each side 1 time and cast off remaining sts, piece measures approx 13-14-15-16-17-18 cm.

ASSEMBLY: Sew shoulder seams. Sew sleeve seams inside 1 edge st and set in sleeves.

CROCHET BORDERS: Crochet a border with crochet hook size 4 mm and Muskat round sleeve edges and along bottom edge of dress as follows:
ROUND 1: 1 dc in first st, * 4 ch, skip 2 sts, 1 dc in next st *, repeat from *-*, and finish with 1 sl st in first dc from beg of round.
ROUND 2: Work sl sts to the middle of the first ch-loop, 1 dc round ch-loop, * 2 ch, 1 dc round next ch-loop, 5 ch, 1 dc round next ch-loop *, repeat from *-* but fasten the last loop with 1 sl st in first dc from beg of round.
ROUND 3: Crochet 1 dc in each of the small ch-loops and crochet 1 dc, 5 tr and 1 dc in each of the large ch-loops, finish round with 1 sl st in first dc.
Crochet a border round neckline with crochet hook size 4 mm and Muskat as follows – beg mid back: 1 dc in first st, * 1 picot (= 4 ch, 1 st in first ch), skip approx 1.5 cm, 1 dc in next st *, repeat from *-* and finish round with 1 sl st in first dc from beg of round.

This pattern has been corrected.

Updated online: 07.05.2009
After 1 vertical repeat of M.2 work next round as follows:
19-23-27-31-39-43 stocking sts, M.2 (continue from row 7 in chart and repeat from row 7-22) on 25 sts mid front and stocking st on remaining sts on round.

Diagram

symbols = K from RS, P from WS
symbols = P from RS, K from WS
symbols = K2 tog, 1 YO
symbols = 1 YO, slip 1 st as if to K, K1, psso
symbols = 1 YO, slip 1 st as if to K, K2 tog, psso, 1 YO
diagram
diagram

Each of our patterns has specific tutorial videos to help you.

Do you have a question? See a list of frequently asked questions (FAQ)

Knitting tension is what determines the final measurements of your work, and is usually measured per 10 x 10 cm. It is provided like so: number of stitches in width x number of rows in height - eg: 19 stitches x 26 rows = 10 x 10 cm.

The knitting tension is very individual; some people knit/crochet loosely while others work tightly. You adjust the knitting tension with the needle size, which is why the suggested needle size is only meant as a guide! You need to adjust this (up or down) to ensure that YOUR knitting tension matches the knitting tension provided in the pattern. If you work with a different knitting tension than provided you will have a different yarn consumption, and your work will have different measurements than what the pattern suggests.

The knitting tension also determines which yarns can replace each other. As long as you achieve the same knitting tension you can replace one yarn with another.

See DROPS lesson: How to measure your tension/gauge

See DROPS video: How to make a gauge tension swatch

The required amount of yarn is provided in grams, eg: 450 g. To calculate how many balls you’ll need you first need to know how many grams are in 1 ball (25g, 50g or 100g). This information is available if you click on the individual yarn quality on our pages. Divide the amount required with the amount of each ball. For example, if each ball is 50g (the most common amount), the calculation will be as follows: 450 / 50 = 9 balls.

The important thing when changing from one yarn to another is that the knitting/crochet tension remains the same. This is so that the measurements of the finished piece will be the same as on the sketch provided. It is easier to achieve the same knitting tension using yarns from the same yarn group. It is also possible to work with multiple strands of a thinner yarn to achieve the knitting tension of a thicker one. Please try our yarn converter. We recommend you to always work a test swatch.

Please NOTE: when changing yarn the garment might have a different look and feel to the garment in the photo, due to individual properties and qualities of each yarn.

See DROPS lesson: Can I use a different yarn than the one mentioned in the pattern?

All our yarns are categorised into yarn groups (from A to F) according to thickness and knitting tension – group A contains the thinnest yarns and group F the thickest. This makes it easier for you to find alternative yarns to our patterns, should you wish to switch yarn. All yarns within the same group have a similar knitting tension and can easily replace each other. However, different yarn qualities have different structures and properties which will give the finished work a unique look and feel.

Click here for an overview of the yarns in each yarn group

At the top of all our patterns you’ll find a link to our yarn calculator, which is a helpful tool should you wish to use a different yarn than suggested. By filling in the yarn quality you wish to replace, the amount (in your size) and number of strands, the calculator will present good alternative yarns with the same knitting tension. Additionally it will tell you how much you’ll require in the new qualities and whether you’ll need to work with multiple strands. Most skeins are 50g (some are 25g or 100g).

If the pattern is worked with multiple colours, every colour will have to be calculated separately. Similarly, if the pattern is worked with several strands of different yarns (for example 1 strand Alpaca and 1 strand Kid-Silk) you will have to find alternatives for each, individually.

Click here to see our yarn calculator

Since different yarns have different qualities and textures we have chosen to keep the original yarn in our patterns. However, you can easily find options among our available qualities by using our yarn calculator, or simply pick a yarn from the same yarn group.

It is possible that some retailers still have discontinued yarns in stock, or that someone has a few skeins at home that they would like to find patterns for.

The yarn calculator will provide both alternative yarn as well as required amount in the new quality.

If you think it's hard to decide what size to make, it can be a good idea to measure a garment you own already and like the size of. Then you can pick the size by comparing those measures with the ones available in the pattern's size chart.

You'll find the size chart at the bottom of the pattern.

See DROPS lesson: How to read size chart

The needle size provided in the pattern serves only as a guide, the important thing is to follow the knitting tension. And since knitting tension is very individual, you will have to adjust the needle size to ensure that YOUR tension is the same as in the pattern – maybe you’ll have to adjust 1, or even 2 needle sizes, up or down to achieve the correct tension. For this, we recommend that you work test swatches.

Should you work with a different knitting tension than the one provided, the measurements of the finished garment might deviate from the measurement sketch.

See DROPS lesson: How to measure your tension/gauge

See DROPS video: How to make a tension/gauge swatch

Working a garment top-down provides more flexibility and room for personal adjustment. For example it is easier to try the garment on while working, as well as making adjustments to length of yoke and shoulder caps.

The instructions are carefully explaining every step, in the correct order. Diagrams are adjusted to the knitting direction and are worked as usual.

The diagram depicts all rows/rounds, and every stitch seen from the right side. It is read from bottom to top, from right to left. 1 square = 1 stitch.

When working back and forth, every other row is worked from the right side and every other row is worked from the wrong side. When working from the wrong side, the diagram will have to be worked reversed: from left to right, knit stitches are purled, purl stitches are knit etc.

When working in the round every round is worked from the right side and the diagram are worked from right to left on all rounds.

See DROPS lesson: How to read knitting diagrams

The diagram depicts all rows/rounds, and every stitch seen from the right side. It is worked from bottom to top, from right to left.

When working back and forth every other row is worked from the right side: from right to left and every other row is worked from the wrong side: from left to right.

When working in the round, every row in the diagram are worked from the right side, from right to left.

When working a circular diagram you start in the middle and work your way outwards, counter clockwise, row by row.

The rows usually start with a given number of chain stitches (equivalent to the height of the following stitch), this will either be depicted in the diagram or explained in the pattern.

See DROPS lesson: How to read crochet diagrams

Instructions for working several diagrams after each other on the same row/round, will often be written like so: “work A.1, A.2, A.3 a total of 0-0-2-3-4 times". This means you work A.1 once, then A.2 is worked once, and A.3 is repeated (in width) the number of times provided for your size – in this case like so: S = 0 times, M = 0 times, L=2 times, XL= 3 times and XXL = 4 times.

The diagrams are worked as usual: begin with the first row in A.1, then work the first row in A.2 etc.

See DROPS lesson: How to read knitting diagrams

See DROPS lesson: How to read crochet diagrams

The total width of the garment (from wrist-to-wrist) will be larger in the larger sizes, despite the actual sleeves being shorter. The larger sizes have longer sleeve caps and wider shoulders, so there will be a good fit in all sizes.

The measurement sketch/schematic drawing provides information regarding the full length of the garment. If it’s a jumper or a jacket the length is measured from the highest point on the shoulder closest to the neckline, and straight down to the bottom of the garment. It is NOT measured from the tip of shoulder. Similarly, the length of yoke is measured from the highest point on the shoulder and down to where yoke is split into body and sleeves.

On a jacket measures are never taken along bands, unless specifically stated. Always measure inside band stitches when measuring the length.

See DROPS lesson: How to read a schematic drawing

Diagrams are often repeated on the round or in height. 1 repeat is the diagram the way it appears in the pattern. If it says to work 5 repeats of A.1 in the round, then you work A.1 a total of 5 times after/next to each other in the round. If it says to work 2 repeats of A.1 vertically/in height you work the entire diagram once, then begin again at the start and work the entire diagram one more time.

Chain stitches are slightly narrower than other stitches and to avoid working the cast-on edge too tight, we simply chain more stitches to begin with. The stitch count will be adjusted on the following row to fit the pattern and measurement sketch.

The rib edge is more elastic and will contract slightly compared to, for example, stocking stitch. By increasing before the rib edge, you avoid a visible difference in width between the rib edge and the rest of the body.

It’s very easy to cast off too tightly, and by making yarn overs while casting off (and simultaneously casting these off) you avoid a too tight cast off edge.

See DROPS video: How to bind off with yarn overs (yo)

To achieve an even increase (or decrease) you can increase on, for example: every 3rd and 4th row alternately, like so: work 2 rows and increase on the 3rd row, work 3 rows and increase on the 4th. Repeat this until the increase is complete.

See DROPS lesson: Increase or decrease 1 st on every 3rd and 4th row alternately

Should you prefer to work in the round instead of back and forth, you may of course adjust the pattern. You’ll need to add steeks mid-front (usually 5 stitches), and follow the instructions. When you would normally turn and work from the wrong side, simply work across the steek and continue in the round. At the end you’ll cut the piece open, pick up stitches to work bands, and cover the cut edges.

See DROPS video: How to knit steeks and cut open

Should you prefer to work back and forth instead of in the round, you may of course adjust the pattern so you work the pieces separately and then assemble them at the end. Divide the stitches for the body in 2, add 1 edge stitch in each side (for sewing) and work the front and back pieces separately.

See DROPS lesson: Can I adapt a pattern for circular needles into straight needles?

Pattern repeats can vary slightly in the different sizes, in order to get the correct proportions. If you’re not working the exact same size as the garment in the photo, yours might deviate slightly. This has been carefully developed and adjusted so that the complete impression of the garment is the same in all sizes.

Make sure to follow instructions and diagrams for your size!

If you have found a pattern you like which is available in women’s size it’s not very difficult to convert it to men’s size. The biggest difference will be the length of sleeves and body. Start working on the women size that you think would fit across the chest. The additional length will be worked right before you cast off for the armhole/sleeve cap. If the pattern is worked top-down you can add the length right after the armhole or before the first decrease on sleeve.

Regarding additional yarn amount, this will depend on how much length you add, but it is better with a skein too many than too few.

All yarns will have excess fibres (from production) that might come off as lint or shedding. Brushed yarns (ie hairier yarns) have more of these loose, excess fibres, causing more shedding.

Shedding also depends on what is worn under or over the garment, and whether this pulls at the yarn fibres. It’s therefore not possible to guarantee that there will be no shedding

Below are some tips on how to get the best result when working with hairier yarns:

1. When the garment is finished (before you wash it) shake it vigorously so the looser hairs come off. NOTE: do NOT use a lint roller, brush or any method that pulls at the yarn.

2. Place the garment in a plastic bag and put it in your freezer - the temperature will cause the fibres to become less attached to each other, and excess fibres will come off easier.

3. Leave in the freezer for a few hours before taking it out and shaking it again.

4. Wash the garment according to the instructions on the yarn label.

Pilling is a natural process that happens to even the most exclusive of fibers. It's a natural sign of wear and tear that is hard to avoid, and that is most visible in high friction areas of your garment like a sweater's arms and cuffs.

You can make your garment look as new by removing the pilling, using a fabric comb or a pill/lint remover.

Still can't find the answer you need? Then scroll down and leave your question so one of our experts can try to help you. This will be done normally within 5 to 10 working days.
In the meantime, you can read the questions and answers that others have left to this pattern or join the DROPS Workshop on Facebook to get help from fellow knitters/crocheters!

You might also like...

Post a comment to pattern DROPS 111-4

We would love to hear what you have to say about this pattern!

If you want to leave a question, please make sure you select the correct category in the form below, to speed up the answering process. Required fields are marked *.

Comments / Questions (137)

Jinky wrote:

Hello, I would like to know which size would be appropriate to follow to knit if my chest size is 41" and my natural waist size is 39. Thank you.

22.05.2018 - 23:15

DROPS Design answered:

Dear Jinky, all measurements in chart are in cm and taken flat from side to side. Compare these measurements to a similar garment you have and like the shape to find out the matching size - read more here. Happy knitting!

23.05.2018 - 08:24

country flag Anna wrote:

Credo ci sia un errore nelle istruzioni quando dice "Quando il lavoro misura circa 67-68-69-70-71-72 cm (aggiustarlo in modo che il giro successivo sia un giro con gettati) lavorare 4 giri a m. legaccio" . Nella foto non c'è il motivo a legaccio ma segue il diagramma M2

17.12.2017 - 13:02

DROPS Design answered:

Buongiorno Anna. Bisogna lavorare a legaccio solo le 7 maglie centrali sul davanti. Sulle rimanenti maglie prosegue come già impostato. Buon lavoro!

18.12.2017 - 08:31

country flag Elisabeth Pettifor wrote:

Hi, I'm working on the S pattern. I am now at the narrowest part of the waste and I have 168 stitches where I should have 144. This is 24 st. difference. The pattern says to decrease at the sides 12 times and at markers 1,2,4,and 5 only 6 times, but since I am missing exactly 24 stitches I am wondering if I should have increased at the four markers 12 times instead of 6. Is the pattern incorrect?

28.06.2017 - 16:12

DROPS Design answered:

Dear Mrs Pettifor, you dec 4 sts x 12 times (1 st on each side of marker 3 and 6)= 48 sts dec + 2 sts (marker 1 and 4) and 2 sts (marker 2 and 5) x 6 times = 24 sts dec. There were 216 sts - 48 - 24 = 144 sts. Happy knitting!

28.06.2017 - 18:09

country flag Carol wrote:

Hi, I'm knitting this in small but I cannot work out where to start the lace pattern for my size on M2. The diagram isn't ver clear. Can you help please. Thanks

12.06.2017 - 17:32

DROPS Design answered:

Hi Carol, After working stocking stitch for 47 cm, you start M2 (lace pattern) the next round is worked from the right in the diagram. The first square on the right of the diagram (first stitch on next round) is marked with an arrow for your size and you start with 1 YO, slip a stitch as if to K, K1 and psso. Then K3 and K2 tog, 1 YO. Continue according to the diagram for the complete round. K the next round which allows the lace pattern holes you are wanting. Carry on with M2 as instructed in the text. I hope this helps. Kind regards, Deirdre

13.06.2017 - 08:22

country flag Neeltje wrote:

Hallo, Ik begrijp de volgende zin niet:"Minder TEGELIJKERTIJD als u de 8-7-9-8-6-5 minderingen maakt". het woordje de suggereert dat het terugverwijst naar iets eerders. Maar daar kom ik niet uit. Als ik de minderen bereken voor maat M dan kom ik uit op 14*4 en 6*4 is 80, en dan houd ik zoals geschreven 160 steken over. Maar waar moeten er nog 9 af dan? Ik hoop dat u mij kunt helpen. vr gr.

14.02.2017 - 19:25

DROPS Design answered:

Hoi Neeltje. Ik snap dat het een beetje krom staat, maar je moet het zo begrijpen dat tegelijkertijd dat je begint met de 8e-7e-9e-8e-6e-5e mindering maakt (dus afhankelijk van jouw maat) begint met de minderingen bij de overige 4 markeerders. Ik heb "e" toegevoegd in het patroon om het wat duidelijker te krijgen.

23.02.2017 - 13:53

country flag Hanne wrote:

Er blevet færdig med min kjole. Er virkelig glad for den, den passer perfekt. 😊

09.06.2016 - 16:42

country flag Sarah wrote:

Hallo, ik ben dit erg leuke jurkje aan het breien in maat M. Nu ben ik aangekomen in de rij waar ik voor het eerst moet gaan minderen (18cm). Om de zoveel naalden moet ik minderen, maar de rest zal ik in M1 moeten breien. Maar moet ik M1 dan aanpassen, omdat ik minder steken op mijn naald heb? Of kan ik gewoon in M1 verder breien, en blijft het patroon hetzelfde? Ik heb namelijk zo'n idee dat het m1 patroon dan scheef gaat staan omdat er minder steken zijn dan voorheen. Alvast bedankt!

20.10.2015 - 16:26

DROPS Design answered:

Hoi Sarah. Je breit door volgens M.1 zoals eerst, je moet het patroon niet laten verspringen (scheef maken). Je laat het patroon dus recht boven elkaar blijven.

21.10.2015 - 16:58

country flag Marina wrote:

Bij dit patroon (111-4) staat er bij de patroonbeschrijving een foutmelding, waardoor er bij de werkwijze niets te lezen is. Ik zou dit patroon heel graag willen breien, wilt u er eens naar kijken? Alvast bedankt!

13.04.2015 - 11:52

DROPS Design answered:

Hoi Marina. Door een update was onze site eventjes niet bereikbaar. Als je nu naar het patroon kijkt, dan is alles in orde.

13.04.2015 - 12:15

country flag Mick's Moll wrote:

Such a pretty dress, I want to start knitting it immediately!

22.01.2015 - 08:15

country flag Christine wrote:

Hallo zusammen, ich bin gerade in der 5. Reihe des Muster 2 (M2) und ich stricke Größe M. Beginn der Reihe ist eine überzogene re Ma. Wie starte ich die Reihe? Mit einer normalen re Masche, um dann die letzte mit der ersten wieder zusammen zu stricken? Ich hoffe ihr versteht was ich meine. Denn das problem ist bei Reihe 5, das Muster richtig anschließen zu lassen. Vielen Dank für die Beantwortung meiner Frage, vielleicht hat ja noch jemand dieses Problem bei Größe M bemerkt, sonnige Grüße

04.08.2013 - 17:20

DROPS Design answered:

Lieb Christine, ja, machen Sie es so wie schreiben. Das Muster wird ja rund gestrickt und es soll keinen Übergang geben. Achten Sie auch auf die vordere Mitte (im Diagramm mit dem Pfeil von oben markiert).

06.08.2013 - 13:57