
Popular categories
Looking for a yarn?


|
||||||||||||||||
Lykkeliten |
||||||||||||||||
 |
 |
|||||||||||||||
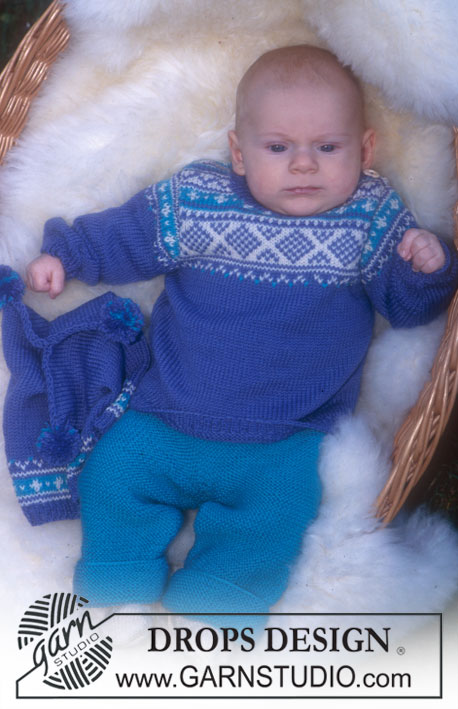
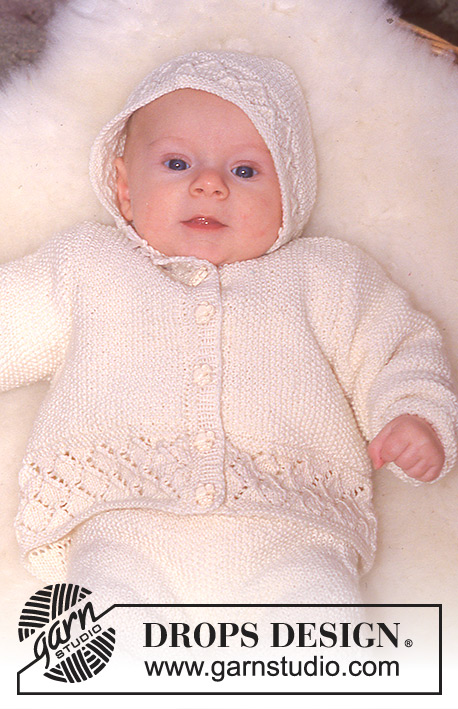
Jacket, trousers/jumpsuit and hat in BabyMerino
DROPS Baby 10-11 |
||||||||||||||||
|
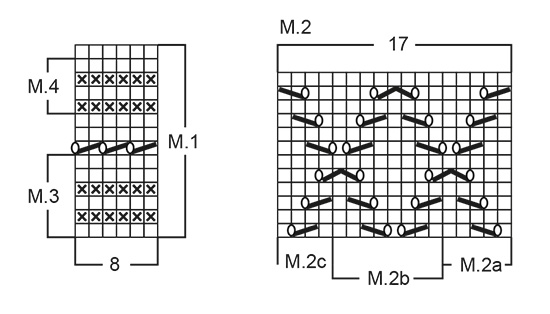
Knitting tension: 26 sts x 52 rows with Baby-ull on needle size 2.5 mm in moss sts = 10 x 10 cm. Garter sts (back and forth on needle): Knit all rows. Moss sts: 1st row: *K1, P1*, repeat from *-*. 2nd row: P over K and K over P. Repeat 2nd row. Rib: *K1,P1*, repeat from *-*. Pattern: See diagrams M.1-M.4. The diagram shows the pattern from the right side. ____________________________________________________________________ JACKET: Back and front piece: The jacket is knitted back and forth on circular needle from mid front. Cast on 139-155-179 sts (incl 1 edge st each side towards mid front) on needle size 2.5 mm. Knit M.3 with edge sts in garter sts. After M.3 knit next row as follows: 1 edge st, 5-5-5 sts of M.2A, 128-144-168 sts of M.2B, 4-4-4 sts in M.2C, 1 edge st. Knit 2 vertical repeats of M.2, 1 repeat of M.4 and finish the piece in moss sts. Remember the knitting tension! At the same time when piece measures 14-15-17 cm knit next row as follows: knit 32-36-42 sts (= front piece), cast off 6 sts for armhole, knit 63-71-83 sts (= back piece), cast off 6 sts for armhole, knit 32-36-42 sts (= front piece). Now complete each piece separately. Left front: = 32-36-42 sts. Cast off for sleeve cap on every other row: 2 sts 2-1-2 times and 1 st 4-5-6 times = 24-29-32 sts. When piece measures 21-23-25 cm cast off 5-6-7 sts mid front for neck and dec to shape the neckline on every other row: 2 sts 1-1-1 time and 1 st 3-4-4 times = 14-17-19 sts left on shoulder. Cast off when piece measures 26-28-31 cm. Right front: = 32-36-42 sts. Continue as for left front, but mirrored. Back: = 63-71-83 sts. Cast off for sleeve cap each side as described for front piece = 47-57-63 sts. When piece measures 25-27-30 cm cast off the middle 17-21-23 sts for neck and dec 1 st on neckline on next row = 14-17-19 sts left on each shoulder. Cast off when piece measures 26-28-31 cm. Sleeves: Knitted back and forth on needles. Loosely cast on 40-42-44 sts on needles size 2.5 mm. Knit 2 cm Rib and continue in M.1 with 1 edge st each side in garter sts. After M.1 finish sleeve in moss sts. At the same time when piece measures 5 cm inc 1 st each side a total of 10-11-12 times on every 6 row = 60-64-68 sts. When piece measures 17-19-20 cm cast off for sleeve cap each side on every other row: 3 sts 1-1-1 time, 2 sts 1-1-1 time and then 2 sts until sleeve measures 24-25-27 cm. Cast off remaining sts. Assembly: Sew shoulder seams. Pick up approx 55 to 65 sts along left front edge on needle size 2.5 mm. Knit M.4 and then 2 cm Rib. Cast off in Rib. Repeat along right front edge, but after 0.5 cm make 5 buttonholes evenly distributed on row, the bottom and top ones 1 cm from edges. 1 buttonhole = cast off 2 sts and cast on 2 new sts on the return row. Pick up approx 60 to 70 sts (divisible by 2) round the neck (incl front edges) on needle size 2.5 mm and knit M.1 with 2 edge sts each side in garter sts. Knit row 7 in M.1 as follows: 2 edge sts, *K2 tog, yo”, repeat from *-* and finish with K2 tog and 2 edge sts. Cast off after M.1. Sew sleeve seams, set in sleeves and sew on buttons. ____________________________________________________________________ TROUSERS/JUMPSUIT: Left leg: Start mid under food and knit back and forth on circular needle. Cast on 54-60-64 sts (incl 1 edge st each side) on circular needles size 2.5 mm and knit garter sts. When piece measures 2 cm insert a marker and measure piece from here. After 4-4-5 cm dec each side on every other row: 3 sts 0-1-1 time and 2 sts 3-2-2 times = 42-46-50 sts. Distribute the sts on double pointed needles size 2.5 mm and knit round in Rib. After 2 cm continue in M.1, at the same time inc 20 sts evenly on 1st round = 62-66-70 sts. After M.1 divide piece at inner side of leg (= split to facilitate putting legs on the same circular needle later). Finish leg back and forth on needle and inc 1 st each side for seam = 64-68-72 sts. Continue in moss sts and inc 1 st each side on every 6 row a total of 6-8-9 times = 74-84-90 sts. When piece measures 21-23-26 cm cast off 5 sts each side = 66-74-80 sts. Put the piece aside and knit the other leg. Right leg: Cast on and knit as left leg but with the split the other side. Body: Put both legs on the same circular needle = 132-148-160 sts. Insert a marker mid front. Continue in moss sts back and forth on needle from mid back. At the same time inc 1 st each side for seam = 134-150-162 sts. After 4 rows inc each side mid back and dec mid front (all dec and inc done from RS) as follows: Inc mid back (each side): 1 st inside 2 edge sts on every other row a total of 8 times. Dec mid front: K/P2 tog before MT, slip 1 st as if to K/P, K/P1, psso after marker. Continue as follows: Trousers: When piece measures 42-46-50 cm P 1 row from RS and knit 2 cm stocking sts (= casing). Cast off. Jumpsuit: When piece measures 42-51-56 cm knit M.1 with 1 edge st each side in garter sts and after M.1 finish piece in moss sts. When piece measures 46-55-60 cm cast off for armholes as follows: knit 31-35-38 sts (= half back piece), cast off 6 sts for armhole, knit 60-68-74 sts (= front piece), cast off 6 sts for armhole, knit 31-35-38 sts (= half back piece). Now finish each piece separately. Front piece: = 60-68-74 sts. Dec for armhole each side on every other row: 2 sts 1-1-1 time and 1 st 2-3-4 times = 52-58-62 sts. When piece measures 49-59-64 cm cast off the middle 14-16-18 sts for neck and dec to shape the neckline on every other row: 2 sts 1-1-1 time and 1 st 4-4-4 times = 13-15-16 sts left on each shoulder. When piece measures 54-64-70 cm continue in garter sts over all shoulder sts, at the same time after 2 rows make 2 buttonholes as follows: K2, cast off 2 sts, K 5-7-8 sts, cast off 2 sts, K1. On the return row cast on 2 sts over the cast off sts. Cast off after 6 rows in garter sts. Knit the other shoulder the same way. Left back piece: = 31-35-38 sts. Dec for armhole at side as done for front piece = 27-30-32 sts. When piece measures 53-63-69 cm cast off 13-14-15 sts for neck and dec 1 st on neckline on next row = 13-15-16 sts left on shoulder. When piece measures 54-64-70 cm knit 6 rows in garter sts over all shoulder sts and cast off. Right back piece: = 31-35-38 sts. Knit as left front piece, but reversed. Assembly: Trousers: Sew leg seams and seam mid back. Fold casing double towards WS and insert an elastic ribbon. Jumpsuit: Sew leg seams and seam mid back. Pick up approx 65 to 75 sts round right armhole on needle size 2.5 mm and knit 4 rows garter sts. Cast off. Repeat round left armhole. Pick up 50 to 70 sts round front neck on needle size 2.5 mm and knit 4 rows garter sts. Cast off. Pick up 35 to 50 sts round back neck on needle size 2.5 mm and knit 4 rows garter sts. Cast off. Sew on buttons. Sew the seam under foot from the heel and up over the toes, sew inside 1 edge st. Sew on the buttons. ____________________________________________________________________ HAT: To fit head circumference: 41-44-47 cm Cast on 75-91-99 sts on needle size 2.5 and knit M.3. After M.3 knit next row as follows: 1 garter st, 5 sts of M.2A, 64-80-88 sts in M.2B, 4 sts in M.2C, 1 garter sts. Knit 1 vertical repeat of M.2 and finish piece in moss sts. When piece measures 10-11-12 cm cast off 24-31-34 sts each side and continue in moss sts over the middle 27-29-31 sts until piece measures 20-22-24 cm. Cast off. Sew the piece mid back to side pieces. Pick up approx 80 to 90 sts along lower edge and knit M.1 with 2 edge sts in garter sts each side. Knit row 7 in M.1 as follows: 2 edge sts, *K2 tog, yo”, repeat from *-* and finish with K2 tog and 2 edge sts. Cast off after M.1. Cut a thread measuring approx 3 meters, fold it double, twist into a ribbon and pull through row of holes on bottom edge |
||||||||||||||||
Diagram explanations |
||||||||||||||||
|
||||||||||||||||
|
||||||||||||||||

|
||||||||||||||||

|
||||||||||||||||
|
Have you made this or any other of our designs? Tag your pictures in social media with #dropsdesign so we can see them! Do you need help with this pattern?You'll find tutorial videos, a Comments/Questions area and more by visiting the pattern on garnstudio.com. © 1982-2024 DROPS Design A/S. We reserve all rights. This document, including all its sub-sections, has copyrights. Read more about what you can do with our patterns at the bottom of each pattern on our site. |
||||||||||||||||


With over 40 years in knitting and crochet design, DROPS Design offers one of the most extensive collections of free patterns on the internet - translated to 17 languages. As of today we count 304 catalogues and 11422 patterns - 11422 of which are translated into English (UK/cm).
We work hard to bring you the best knitting and crochet have to offer, inspiration and advice as well as great quality yarns at incredible prices! Would you like to use our patterns for other than personal use? You can read what you are allowed to do in the Copyright text at the bottom of all our patterns. Happy crafting!
Comments / Questions (102)
Jeg har nu strikket buksedragten færdig. Men jeg syntes foden ligner er pose! Og ja, jeg har syet som beskrevet i monterings vejledning Måske i kunne ændre opskriften, det skæmme den ellers fine dragt Mvh
29.04.2023 - 21:18DROPS Design answered:
Hei Lene Takk for din tilbakemeldig. Den er blitt oversendt design avd. slik at de kan ta en vurdering. mvh DROPS Design
02.05.2023 - 12:46Est ce que la veste se débute en point jersey ou en point mousse pour le diagramme m.3 merci!
03.01.2023 - 04:56DROPS Design answered:
Bonjour Therese, les 4 premiers rangs de M.3 se tricotent à l'endroit (= 2 côtes mousse), puis vous tricotez 2 rangs jersey. Bon tricot!
03.01.2023 - 09:42Wie muss ich das verstehen wo die untere kante bei der Mütze ist Da man 80 bis 90 Maschen aufnehmen muss Bitte um Hilfe danke
02.01.2023 - 21:50DROPS Design answered:
Liebe Frau Schneider, die untere Kante der Mütze ist derTeil, der gegen Hals ist, dh die Maschen werden ab der Öffnung für das Gesicht an der 1. Seite, dann an den hinteren Teil und an der 2. Seite aufgefassen. Viel Spaß beim stricken!
03.01.2023 - 09:22Jeg forstår ikke pind 5 i M2. Omslag går over m2 og m2, så er det svært at strikke m2b over 128 masker. Hvad skal man gøre?
11.11.2021 - 17:46DROPS Design answered:
Hei Pia. Du strikker M.2b over 128 masker (16 rapporter av M.2b på 8 masker = 128 masker). Når du strikker siste rapport av M.2b, strikker du siste maske av M.2b sammen med første maske av M.2c. mvh DROPS Design
15.11.2021 - 09:10I’m knitting the first sleeve. Do I continue to decrease 2 stitches every other row until the sleeve reaches the correct length or do I just do the final 2 stitch decrease and then knit straight until the correct length?
06.10.2021 - 21:45DROPS Design answered:
Dear Sheile, yes, after you cast off th e3 stitches, you should cast off 2 stitches at the beginning of each row, until you reach the correct length of the sleeve-head. Happy Stitching!
06.10.2021 - 22:51Gut zu wissen ist, dass bei der Mütze die Anzahl der Maschen, die man fast am Schluss unten aufnimmt (80 bis 90 steht in der Anleitung) durch 2 teilbar sein muss, aber nicht durch 4 teilbar sein darf, damit man hinterher die richtige Anzahl Löcher für die Kordel hat (sie also entweder auf beiden Seiten unten rauskommt oder oben). Ich habe leider den Fehler gemacht, eine durch 4 teilbare Anzahl Maschen aufzunehmen.
05.05.2021 - 19:14Når jeg ser på billedet af huen ser det ud som moder er strikket 6 pinde ret ,og ikke mønster M3 . Desuden ruller arbejdet med M 3 . Jeg kan ikke se nogen rettelser til arbejdet
30.01.2021 - 21:40DROPS Design answered:
Hej Sonja, Du starter med M.3 som modsvarer 5 pinde retstrik og sidste pind vrang fra vrangen. God fornøjelse!
03.02.2021 - 14:09Hej. Jeg undrer bare om oplægningen er den første pinde? Eller om vrangsider er den 1 pind? Det er mange gange forskel på opskrifterne. Jeg vil synes at oplægningen er den første pinde. Vh Linda
06.12.2020 - 22:09DROPS Design answered:
Hei Linda. Som regel legger man opp og deretter strikker man første pinne fra retten. I noen oppskrifter kan det stå f.eks Legg opp x antall masker og strikke 1. pinne (= vrangen). Så dette kan variere. Står det ikke noe spesifikk i oppskriften eller det vises med diagrammer, er nok 1. pinne fra retten, ikke oppleggsmaskene. mvh DROPS design
09.12.2020 - 15:06Utrulig uforståelig mønster..strikker jakken å etter fjerde forsøk knekte jeg koden her på bolen. Skulle stått at man skal strikke vrang på pinne 2 -4-6 osv Har strikket i over 40 år så er ikke nybegynner.
13.08.2020 - 18:07Vedr. de 60-70 maskene som skal plukkes opp rundt halsen: Når M1 er ferdigstrikket, skal denne brettes ned som en krave? Det er jo viktig å vite når man begynner på denne halskanten, så retten på mønsteret kommer der den skal være.
24.07.2020 - 10:28DROPS Design answered:
Hej Turid, hvis du vælger at brette den ned som en krave, så gør det mod vrangen, så du får retsiden ud. God fornøjelse!
04.08.2020 - 11:09