DROPS Paris
DROPS Paris
100% Cotton
from 1.10 £ /50g
DROPS Paris
DROPS Paris
100% Cotton
from 1.10 £ /50g
Get the yarn to make this pattern from 20.90£.

The yarn cost is calculated from the pattern’s smallest size and the yarn’s cheapest product type. Looking for an even better price? You might find it on the DROPS Deals!

DROPS SS24

Fiocco di neve

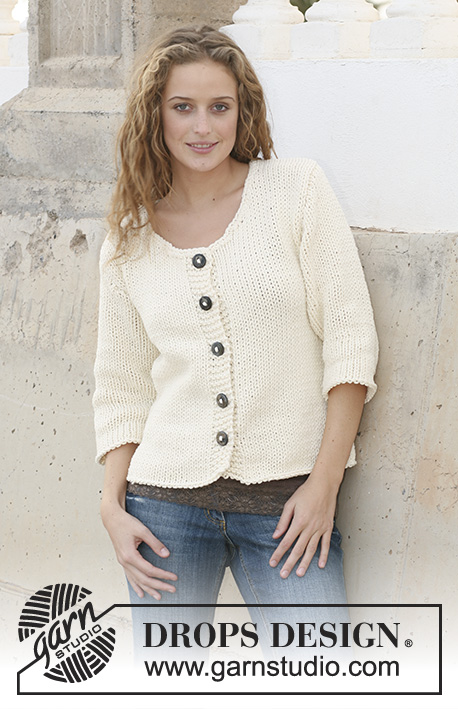
DROPS jacket with 3/4 sleeves or long sleeves in ”Paris”. Size S - XXXL.

DROPS 112-25
Size: S - M - L - XL - XXL - XXXL
Materials: DROPS PARIS from Garnstudio
Colour no 16, white:
3/4 sleeves: 450-500-550-600-650-750 g
Long sleeves: 500-550-600-650-700-800 g

DROPS DOUBLE POINTED NEEDLES and CIRCULAR NEEDLE (80 cm) size 5 mm – or size needed to get 17 sts x 22 rows in stocking st = 10 x 10 cm.
DROPS Mother-of pearl buttons w/hole no 522: 3 pcs

-------------------------------------------------------

Alternative Yarn – See how to change yarns here
Yarn Groups A to F – Use the same pattern and change the yarn here
Yarn usage using an alternative yarn – Use our yarn converter here

-------------------------------------------------------

DROPS Paris
DROPS Paris
100% Cotton
from 1.10 £ /50g
DROPS Paris
DROPS Paris
100% Cotton
from 1.10 £ /50g
Get the yarn to make this pattern from 20.90£.

The yarn cost is calculated from the pattern’s smallest size and the yarn’s cheapest product type. Looking for an even better price? You might find it on the DROPS Deals!

Pattern instructions

NOTE: This pattern is written in British English. All measurements in charts are in cm. For conversion from cm to inches - click here. There are different terms for crocheting in British and American English. If this pattern includes crochet, click for "crochet terms" here. For this pattern in American English, please click here.
GARTER ST (back and forth on needle):
K all rows.

GARTER ST (in the round):
K 1 round, P 1 round.

DECREASING TIP (applies to neckline):
Make all dec from the RS.
Before 7 front band sts: K2 tog.
After 7 front band sts: Slip 1 st as if to K, K1, psso.

BUTTONHOLES:
Make buttonholes on right front band. 1 buttonhole = K tog 3rd and 4th st from mid front and make 1 YO.
Make buttonholes when piece measures:
SIZE S: 18, 24 and 30 cm.
SIZE M: 17, 24 and 31 cm.
SIZE L: 19, 26 and 33 cm.
SIZE XL: 18, 26 and 34 cm.
SIZE XXL- XXXL: 19, 27 and 35 cm.
--------------------------------------------------------

JACKET:
Worked back and forth on circular needle from mid front. Cast on 170-182-198-214-234-254 sts on circular needle size 5 mm with Paris. Work 2 rows stocking st and then 4 rows garter st – see above. Insert 2 markers in piece, 46-49-53-57-62-67 sts in from each side (back piece = 78-84-92-100-110-120 sts). Continue as follows from RS: 7 garter sts, stocking st until 7 sts remain, 7 garter sts. 7 garter sts each side = front bands, worked in garter st throughout. REMEMBER THE KNITTING TENSION!
READ ALL OF THE FOLLOWING SECTION BEFORE CONTINUING!
When piece measures 8 cm dec 1 st on each side of both markers and repeat the dec on every 5-5.5-6-6-6.5-6.5 cm a total of 5 times = 150-162-178-194-214-234 sts.
AT THE SAME TIME when piece measures 18-17-19-18-19-19 cm make BUTTONHOLE on right front band – see above.
When piece measures approx 31-32-34-35-36-36 cm work 2 rows garter st on the 7 front band sts on the right side of piece only, work 1 row on all sts and now work 2 rows garter st on the 7 front band sts the other side only. Work 1 row on all sts (to make the neckline neater). On next row dec 1 st for neck inside front band sts – SEE DECREASING TIP!
Repeat the dec on every 1 cm a total of 15-16-16-17-18-19 times.
AT THE SAME TIME when piece measures 33-34-35-36-37-38 cm cast off 4-6-6-6-6-6 sts each side for armhole (= 2-3-3-3-3-3 sts on each side of marker) and now complete each piece separately.

BACK PIECE:
= 64-68-76-84-94-104 sts. Cast off for armhole each side at the beg of every row: 2 sts 0-1-2-3-5-7 times and 1 st 0-0-1-2-2-2 times = 64-64-66-68-70-72 sts. When piece measures 49-51-53-55-57-59 cm work 4 rows garter st on the middle 30-32-32-34-36-38 sts, with remaining sts as before. Now cast off the middle 14-16-16-18-20-22 sts and complete each shoulder separately. Cast off 1 st on neckline on next row = 24-23-24-24-24-24 sts left on shoulder. Continue with 7 garter sts towards neckline. Cast off when piece measures 52-54-56-58-60-62 cm.

LEFT FRONT PIECE:
Continue dec for neckline, AT THE SAME TIME cast off for armhole at the side as described for back piece. Cast off when piece measures 52-54-56-58-60-62 cm.

RIGHT FRONT PIECE:
Like left front piece, but mirrored.

3/4 SLEEVES:
(For long sleeves – see below)
Worked in the round on double pointed needles.
Cast on 38-40-42-44-46-48 sts on double pointed needles size 5 mm with Paris. Work 2 rounds stocking st, 4 rounds garter st and now continue in stocking st. Insert a marker at beg of round (= mid under sleeve). When piece measures 5 cm inc 1 st on each side of marker and repeat the inc on every 3-2.5-2-2-1.5-1.5 cm a total of 9-11-12-12-14-15 times = 56-62-66-68-74-78 sts. When piece measures 35-35-34-33-31-30 cm (less for the larger sizes because of longer sleeve cap and wider shoulder) cast off 8-8-8-6-6-6 sts mid under arm (= 4-4-4-3-3-3 sts on each side of marker) and complete piece back and forth on needle. Cast off to shape the sleeve cap each side at the beg of every row: 2 sts 2-2-3-4-5-5 times, 1 st 0-1-0-1-1-3 times, then 2 sts each side until piece measures 40-41-41-42-42-43 cm, now cast off 3 sts each side 1 time and cast off remaining sts on next row. Piece measures approx 41-42-42-43-43-44 cm.

LONG SLEEVES:
(For 3/4 sleeves – see above)
Worked in the round on double pointed needles.
Cast on 34-36-38-40-42-44 sts on double pointed needles size 5 mm with Paris. Work 2 rounds stocking st, 4 rounds garter st and now continue in stocking st. Insert a marker at beg of round (= mid under sleeve). When piece measures 5 cm inc 1 st on each side of marker and repeat the inc on every 4-3-3-3-2.5-2 cm a total of 11-13-14-14-16-17 times = 56-62-66-68-74-78 sts. When piece measures 49-49-49-47-46-44 cm (less for the larger sizes because of longer sleeve cap and wider shoulder) cast off 8-8-8-6-6-6 sts mid under arm (= 4-4-4-3-3-3 sts on each side of marker) and complete piece back and forth on needle. Cast off to shape the sleeve cap each side at the beg of every row: 2 sts 2-2-3-4-5-5 times, 1 st 0-1-0-1-1-3 times, then 2 sts each side until piece measures 54-55-56-56-57-57 cm, now cast off 3 sts each side 1 time and cast off remaining sts on next row. Piece measures approx 55-56-57-57-58-58 cm.

ASSEMBLY:
Sew shoulder seams. Set in sleeves. Sew on buttons.

This pattern has been corrected.

Updated online: 05.02.2009
AT THE SAME TIME when piece measures 18-17-19-18-19-19 cm make BUTTONHOLE on right front band..

Diagram

diagram measurements

Each of our patterns has specific tutorial videos to help you.

Do you have a question? See a list of frequently asked questions (FAQ)

Knitting tension is what determines the final measurements of your work, and is usually measured per 10 x 10 cm. It is provided like so: number of stitches in width x number of rows in height - eg: 19 stitches x 26 rows = 10 x 10 cm.

The knitting tension is very individual; some people knit/crochet loosely while others work tightly. You adjust the knitting tension with the needle size, which is why the suggested needle size is only meant as a guide! You need to adjust this (up or down) to ensure that YOUR knitting tension matches the knitting tension provided in the pattern. If you work with a different knitting tension than provided you will have a different yarn consumption, and your work will have different measurements than what the pattern suggests.

The knitting tension also determines which yarns can replace each other. As long as you achieve the same knitting tension you can replace one yarn with another.

See DROPS lesson: How to measure your tension/gauge

See DROPS video: How to make a gauge tension swatch

The required amount of yarn is provided in grams, eg: 450 g. To calculate how many balls you’ll need you first need to know how many grams are in 1 ball (25g, 50g or 100g). This information is available if you click on the individual yarn quality on our pages. Divide the amount required with the amount of each ball. For example, if each ball is 50g (the most common amount), the calculation will be as follows: 450 / 50 = 9 balls.

The important thing when changing from one yarn to another is that the knitting/crochet tension remains the same. This is so that the measurements of the finished piece will be the same as on the sketch provided. It is easier to achieve the same knitting tension using yarns from the same yarn group. It is also possible to work with multiple strands of a thinner yarn to achieve the knitting tension of a thicker one. Please try our yarn converter. We recommend you to always work a test swatch.

Please NOTE: when changing yarn the garment might have a different look and feel to the garment in the photo, due to individual properties and qualities of each yarn.

See DROPS lesson: Can I use a different yarn than the one mentioned in the pattern?

All our yarns are categorised into yarn groups (from A to F) according to thickness and knitting tension – group A contains the thinnest yarns and group F the thickest. This makes it easier for you to find alternative yarns to our patterns, should you wish to switch yarn. All yarns within the same group have a similar knitting tension and can easily replace each other. However, different yarn qualities have different structures and properties which will give the finished work a unique look and feel.

Click here for an overview of the yarns in each yarn group

At the top of all our patterns you’ll find a link to our yarn calculator, which is a helpful tool should you wish to use a different yarn than suggested. By filling in the yarn quality you wish to replace, the amount (in your size) and number of strands, the calculator will present good alternative yarns with the same knitting tension. Additionally it will tell you how much you’ll require in the new qualities and whether you’ll need to work with multiple strands. Most skeins are 50g (some are 25g or 100g).

If the pattern is worked with multiple colours, every colour will have to be calculated separately. Similarly, if the pattern is worked with several strands of different yarns (for example 1 strand Alpaca and 1 strand Kid-Silk) you will have to find alternatives for each, individually.

Click here to see our yarn calculator

Since different yarns have different qualities and textures we have chosen to keep the original yarn in our patterns. However, you can easily find options among our available qualities by using our yarn calculator, or simply pick a yarn from the same yarn group.

It is possible that some retailers still have discontinued yarns in stock, or that someone has a few skeins at home that they would like to find patterns for.

The yarn calculator will provide both alternative yarn as well as required amount in the new quality.

If you think it's hard to decide what size to make, it can be a good idea to measure a garment you own already and like the size of. Then you can pick the size by comparing those measures with the ones available in the pattern's size chart.

You'll find the size chart at the bottom of the pattern.

See DROPS lesson: How to read size chart

The needle size provided in the pattern serves only as a guide, the important thing is to follow the knitting tension. And since knitting tension is very individual, you will have to adjust the needle size to ensure that YOUR tension is the same as in the pattern – maybe you’ll have to adjust 1, or even 2 needle sizes, up or down to achieve the correct tension. For this, we recommend that you work test swatches.

Should you work with a different knitting tension than the one provided, the measurements of the finished garment might deviate from the measurement sketch.

See DROPS lesson: How to measure your tension/gauge

See DROPS video: How to make a tension/gauge swatch

Working a garment top-down provides more flexibility and room for personal adjustment. For example it is easier to try the garment on while working, as well as making adjustments to length of yoke and shoulder caps.

The instructions are carefully explaining every step, in the correct order. Diagrams are adjusted to the knitting direction and are worked as usual.

The diagram depicts all rows/rounds, and every stitch seen from the right side. It is read from bottom to top, from right to left. 1 square = 1 stitch.

When working back and forth, every other row is worked from the right side and every other row is worked from the wrong side. When working from the wrong side, the diagram will have to be worked reversed: from left to right, knit stitches are purled, purl stitches are knit etc.

When working in the round every round is worked from the right side and the diagram are worked from right to left on all rounds.

See DROPS lesson: How to read knitting diagrams

The diagram depicts all rows/rounds, and every stitch seen from the right side. It is worked from bottom to top, from right to left.

When working back and forth every other row is worked from the right side: from right to left and every other row is worked from the wrong side: from left to right.

When working in the round, every row in the diagram are worked from the right side, from right to left.

When working a circular diagram you start in the middle and work your way outwards, counter clockwise, row by row.

The rows usually start with a given number of chain stitches (equivalent to the height of the following stitch), this will either be depicted in the diagram or explained in the pattern.

See DROPS lesson: How to read crochet diagrams

Instructions for working several diagrams after each other on the same row/round, will often be written like so: “work A.1, A.2, A.3 a total of 0-0-2-3-4 times". This means you work A.1 once, then A.2 is worked once, and A.3 is repeated (in width) the number of times provided for your size – in this case like so: S = 0 times, M = 0 times, L=2 times, XL= 3 times and XXL = 4 times.

The diagrams are worked as usual: begin with the first row in A.1, then work the first row in A.2 etc.

See DROPS lesson: How to read knitting diagrams

See DROPS lesson: How to read crochet diagrams

The total width of the garment (from wrist-to-wrist) will be larger in the larger sizes, despite the actual sleeves being shorter. The larger sizes have longer sleeve caps and wider shoulders, so there will be a good fit in all sizes.

The measurement sketch/schematic drawing provides information regarding the full length of the garment. If it’s a jumper or a jacket the length is measured from the highest point on the shoulder closest to the neckline, and straight down to the bottom of the garment. It is NOT measured from the tip of shoulder. Similarly, the length of yoke is measured from the highest point on the shoulder and down to where yoke is split into body and sleeves.

On a jacket measures are never taken along bands, unless specifically stated. Always measure inside band stitches when measuring the length.

See DROPS lesson: How to read a schematic drawing

Diagrams are often repeated on the round or in height. 1 repeat is the diagram the way it appears in the pattern. If it says to work 5 repeats of A.1 in the round, then you work A.1 a total of 5 times after/next to each other in the round. If it says to work 2 repeats of A.1 vertically/in height you work the entire diagram once, then begin again at the start and work the entire diagram one more time.

Chain stitches are slightly narrower than other stitches and to avoid working the cast-on edge too tight, we simply chain more stitches to begin with. The stitch count will be adjusted on the following row to fit the pattern and measurement sketch.

The rib edge is more elastic and will contract slightly compared to, for example, stocking stitch. By increasing before the rib edge, you avoid a visible difference in width between the rib edge and the rest of the body.

It’s very easy to cast off too tightly, and by making yarn overs while casting off (and simultaneously casting these off) you avoid a too tight cast off edge.

See DROPS video: How to bind off with yarn overs (yo)

To achieve an even increase (or decrease) you can increase on, for example: every 3rd and 4th row alternately, like so: work 2 rows and increase on the 3rd row, work 3 rows and increase on the 4th. Repeat this until the increase is complete.

See DROPS lesson: Increase or decrease 1 st on every 3rd and 4th row alternately

Should you prefer to work in the round instead of back and forth, you may of course adjust the pattern. You’ll need to add steeks mid-front (usually 5 stitches), and follow the instructions. When you would normally turn and work from the wrong side, simply work across the steek and continue in the round. At the end you’ll cut the piece open, pick up stitches to work bands, and cover the cut edges.

See DROPS video: How to knit steeks and cut open

Should you prefer to work back and forth instead of in the round, you may of course adjust the pattern so you work the pieces separately and then assemble them at the end. Divide the stitches for the body in 2, add 1 edge stitch in each side (for sewing) and work the front and back pieces separately.

See DROPS lesson: Can I adapt a pattern for circular needles into straight needles?

Pattern repeats can vary slightly in the different sizes, in order to get the correct proportions. If you’re not working the exact same size as the garment in the photo, yours might deviate slightly. This has been carefully developed and adjusted so that the complete impression of the garment is the same in all sizes.

Make sure to follow instructions and diagrams for your size!

If you have found a pattern you like which is available in women’s size it’s not very difficult to convert it to men’s size. The biggest difference will be the length of sleeves and body. Start working on the women size that you think would fit across the chest. The additional length will be worked right before you cast off for the armhole/sleeve cap. If the pattern is worked top-down you can add the length right after the armhole or before the first decrease on sleeve.

Regarding additional yarn amount, this will depend on how much length you add, but it is better with a skein too many than too few.

All yarns will have excess fibres (from production) that might come off as lint or shedding. Brushed yarns (ie hairier yarns) have more of these loose, excess fibres, causing more shedding.

Shedding also depends on what is worn under or over the garment, and whether this pulls at the yarn fibres. It’s therefore not possible to guarantee that there will be no shedding

Below are some tips on how to get the best result when working with hairier yarns:

1. When the garment is finished (before you wash it) shake it vigorously so the looser hairs come off. NOTE: do NOT use a lint roller, brush or any method that pulls at the yarn.

2. Place the garment in a plastic bag and put it in your freezer - the temperature will cause the fibres to become less attached to each other, and excess fibres will come off easier.

3. Leave in the freezer for a few hours before taking it out and shaking it again.

4. Wash the garment according to the instructions on the yarn label.

Pilling is a natural process that happens to even the most exclusive of fibers. It's a natural sign of wear and tear that is hard to avoid, and that is most visible in high friction areas of your garment like a sweater's arms and cuffs.

You can make your garment look as new by removing the pilling, using a fabric comb or a pill/lint remover.

Still can't find the answer you need? Then scroll down and leave your question so one of our experts can try to help you. This will be done normally within 5 to 10 working days.
In the meantime, you can read the questions and answers that others have left to this pattern or join the DROPS Workshop on Facebook to get help from fellow knitters/crocheters!

You might also like...

Post a comment to pattern DROPS 112-25

We would love to hear what you have to say about this pattern!

If you want to leave a question, please make sure you select the correct category in the form below, to speed up the answering process. Required fields are marked *.

Comments / Questions (24)

country flag Gunilla Skoogh wrote:

Varför 2 räta varv innan minskningen för v-ringningen? Om jag på nästa varv stickar 7 räta o därefter 1 ödhpt, får jag ett litet "hål". Skall det verkligen vara så? Stickar jag 2 maskor tillsammans o därefter 7 räta i slutet av varvet?

17.01.2024 - 15:09

DROPS Design answered:

Hei Gunilla. Fordi da får du en "knekk" der V-halsen starter, dette gjøres for at halskanten skal bli penere. For å unngå hull, kan du bruke Garman Short Rows teknikken for å minske hullet. Se evnt video på hvordan det gjøres. Det felles innenfor stolpemaskene, altså strikk 7 stoplemasker, fell, strikk til det gjenstår 9 masker, fell, strikk de siste 7 stolpemaskene. Les under FELLETIPS (halsfelling) hvordan maskene skal felles. mvh DROPS Design

18.01.2024 - 08:50

country flag Maria wrote:

Helaas ben ik nog niet zo een ervaren breister. Met een rondbreinaald kan ik helaas niet overweg, dus brei ik nu apart voorpanden, achterpand en mouwen op gewone naalden. Gaat goed, behalve kop van de mouw. Het schema van afkanten begrijp ik niet helemaal. Is er ook een tekening van de juiste maten van de losse mouw? Heel graag !

19.07.2021 - 23:08

DROPS Design answered:

Dag Maria,

Nee, helaas is er geen schema/tekening van de losse mouw. Als je bij de mouwkop bent, kant je eerst 4-4-4-6-6-6 steken af aan beide kanten (in plaats van 8-8-8-6-6-6 midden onder bij rondbreien). Daarna kan je het patroon verder volgen, omdat er dan in het patroon ook heen en weer gebreid wordt voor de mouwkop.

20.07.2021 - 14:13

country flag Ernestine Tayabas-Kim wrote:

If I'm reading the pattern correctly, I have two choices to knit it up: 1) as a jacket, worked on circular needles from bottom up until you get to armhole (no side seams); or 2) as separate pieces with instructions for back, left front, right front, and sleeves, then assemble with side seams. Is that right? I'm new to sweater knitting and would love to make this sweater. Thanks for your help.

17.04.2021 - 20:07

DROPS Design answered:

Dear Ernestine Tayabas-Kim, this sweater's body is knitted on one circular needle, back and forth, up to the armholes, and then the fronts and the back are separated, and finished separately. Sleeves are also knitted separately. At the end, you sew up the shoulders, and sew in the two sleeves into the armholes. (No instructions on how to knit each piece separately). Happy Knitting!

17.04.2021 - 22:36

country flag Loretta wrote:

È possibile avere le spiegazioni per ferri a doppia punta? Grazie

07.02.2021 - 17:24

DROPS Design answered:

Buonasera Loretta, questo modello è un cardigan lavorato in piano. I ferri a doppia punta servono per la lavorazione delle maniche in tondo. Buon lavoro!

07.02.2021 - 22:46

country flag Marie-noelle Eyssartier wrote:

Bonjour comment faire ce modèle avec deux aiguilles dans l'attente je vous remercie de votre compréhension

02.02.2021 - 16:43

DROPS Design answered:

Bonjour Mme Eyssartier, cette leçon explique comment vous pourrez facilement ajuster ce modèle sur aiguilles droites. Bon tricot!

02.02.2021 - 16:49

country flag Jody Sircey wrote:

There seems to be two sets of instructions, one for the jacket and then one for back, front sleeves.Not sure what’s up?

15.07.2019 - 15:31

DROPS Design answered:

Dear Mrs Sircey, jacket is worked bottom up in one piece to the armhole, then you work the back piece and each front piece separately. Then work sleeves choosing either 3/4 length or long sleeves. Happy knitting!

15.07.2019 - 16:29

country flag Rosita wrote:

Aiuto!!!vorrei eseguire questo cardigan ma ho preso un filato diverso perche' mi piaceva il colore,drops loves you(ferri 3,50)ma il modello richiede paris ferri nr.5 come posso fare?devo eseguire una taglia in piu'? Grazie

14.02.2018 - 14:09

DROPS Design answered:

Buongiorno Rosita. Provi a fare un campione per vedere quante maglie le occorrono per avere 10 cm in larghezza. Riproporzionando le indicazioni date nel modello in base al suo campione, può trovare la taglia da seguire. Per ogni ulteriore aiuto personalizzato, può rivolgersi al suo rivenditore Drops di fiducia. Buon lavoro!

14.02.2018 - 15:38

country flag Maria wrote:

Heel fijn vest. Ik maakte het vest met de 3/4 mouwen maar had wel een bol meer nodig dan staat aangegeven!

12.09.2015 - 14:17

country flag Maria wrote:

Mooi patroon, ik ga het vestje nu ook voor een vriendin maken!

12.09.2015 - 14:15

country flag Marianne wrote:

Hej! Ovanlig nederkant! Bara rätstickning är väl vanligare? Ska första varvet stickas från rätan eller avigan?

16.01.2015 - 09:32

DROPS Design answered:

Hej Marianne. Första varvet er rätan.

16.01.2015 - 15:43