DROPS Merino Extra Fine
100% Wool
from 3.75 € /50g
Get the yarn to make this pattern from 22.50€.

The yarn cost is calculated from the pattern’s smallest size and the yarn’s cheapest product type. Looking for an even better price? You might find it on the DROPS Deals!

DROPS SS24

Vanilla Sprite

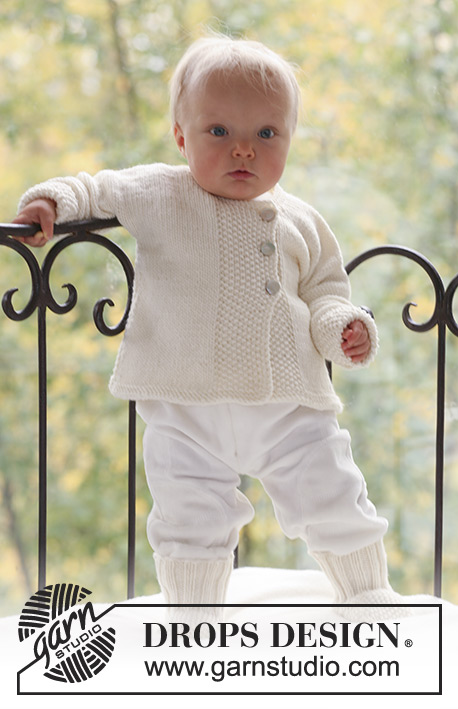
Set of knitted cable jacket with raglan sleeve and pants for baby and children in DROPS Merino Extra Fine

DROPS Baby 18-4
Size: 1/3 - 6/9 - 12/18 months (2 - 3/4) years
Size in cm: 50/56-62/68-74/80 (86/92-98/104)
Materials: DROPS MERINO EXTRA FINE from Garnstudio
JACKET:
150-200-200 (250-300) g colour no 01, off-white
PANTS:
150-150-200 (200-250) g colour no 01, off-white

JACKET:
DROPS DOUBLE POINTED AND CIRCULAR NEEDLE (60 cm) size 4.5 mm – or size needed to get 20 sts x 26 rows in stocking st = 10 x 10 cm.
DROPS DOUBLE POINTED AND CIRCULAR NEEDLE (60 cm) size 3.5 mm – for rib.
DROPS WOODEN BUTTON no 513: 5-5-6 (6-6) pcs.

PANTS:
DROPS DOUBLE POINTED AND CIRCULAR NEEDLE (40 cm) size 4.5 mm – or size needed to get 20 sts x 26 rows in stocking st = 10 x 10 cm.
DROPS DOUBLE POINTED AND CIRCULAR NEEDLE (40 cm) size 3.5 mm – for rib.

-------------------------------------------------------

Alternative Yarn – See how to change yarns here
Yarn Groups A to F – Use the same pattern and change the yarn here
Yarn usage using an alternative yarn – Use our yarn converter here

-------------------------------------------------------

DROPS Merino Extra Fine
100% Wool
from 3.75 € /50g
Get the yarn to make this pattern from 22.50€.

The yarn cost is calculated from the pattern’s smallest size and the yarn’s cheapest product type. Looking for an even better price? You might find it on the DROPS Deals!

Pattern instructions

JACKET:

GARTER ST (back and forth on needle):
K all rows.

DECREASING TIP: Make all dec from RS.
Dec as follows before marker: K2 tog.
Dec as follows after marker: Slip 1 st as if to K, K1, psso.

BUTTONHOLES: Make buttonholes on right front band by K tog 2nd and 3rd st from mid front and make 1 YO.
Make buttonholes when piece measures: SIZE 1/3 months: 2, 8, 13 and 18 cm
SIZE 6/9 months: 2, 8, 14 and 20 cm
SIZE 12/18 months: 2, 8, 13, 18 and 23 cm
SIZE 2 years: 2, 8, 14, 20 and 26 cm
SIZE 3/4 years: 2, 9, 16, 23 and 29 cm
NOTE: The last buttonhole is made on neckline.
------------------------------------------------------------
JACKET

BODY PIECE: Worked back and forth on circular needle from mid front.
Cast on 139-157-169 (187-199) sts (includes 5 front band sts each side towards mid front) on circular needle size 3.5 mm with Merino Extra Fine. P 1 row from WS and continue as follows from RS: 5 front band sts in garter sts – SEE ABOVE, * K3, P3 *, repeat from *-* and finish with K3 and 5 front band sts in garter st. Continue like this, AT THE SAME TIME when piece measures 2 cm make buttonhole on right front band – SEE ABOVE. When piece measures approx 3 cm K 1 row from RS, AT THE SAME TIME dec 29-35-35 (41-41) sts evenly (do not dec on front bands) = 110-122-134 (146-158) sts. Change to circular needle size 4.5 mm, K 3 rows and continue in stocking st with 5 garter sts each side. When piece measures 16-17-20 (23-25) cm work next row as follows from RS: 26-29-32 (35-38) sts = right front piece, cast off 8 sts for armhole, 42-48-54 (60-66) sts = back piece, cast off 8 sts for armhole, 26-29-32 (35-38) sts = left front piece. Put piece aside and knit the sleeves.

SLEEVE: Worked in the round on double poited needles.
Cast on 36-42-42 (48-48) sts on double pointed needles size 3.5 mm with Merino Extra Fine. K 1 row and continue in rib, K3/P3, When piece measures approx 3 cm K 1 round, AT THE SAME TIME dec 6-10-8 (12-10) sts evenly = 30-32-34 (36-38) sts. Change to needle size 4.5 mm, P 1 round, K 1 round and P 1 round. Insert a marker at beg of round = mid under arm. Continue as follows: K 11-12-13 (14-15), P2, M.1 (= 4 sts), P2 and K 11-12-13 (14-15). AT THE SAME TIME when piece measures 5 cm inc 1 st on each side of marker, and repeat the inc on every 5-5-6 (6-6) round a total of 6-6-7 (8-9) times = 42-44-48 (52-56) sts. When piece measures 17-18-21 (24-28) cm cast off 8 sts mid under arm = 34-36-40 (44-48) sts. Put piece aside and knit the other sleeve. NOTE! On the other sleeve work M.2 instead of M.1.

YOKE:
Slip sleeves on the same circular needle as body piece where cast off for armholes = 162-178-198 (218-238) sts. Insert a marker in all transitions between body piece and sleeves = 4 markers. Continue as before back and forth on needle, AT THE SAME on 3rd row dec 1 st on each side of all markers for raglan – SEE DECREASING TIP, and repeat the dec on every other row a total of 10-11-12 (13-15) times.
NECKLINE: At the same time when piece measures 23-25-28 (32-35) cm cast off to shape the neckline each side at the beg of every row from mid front: 10-11-13 (14-15) sts 1 time and 1 st 2 times. After all dec for raglan and neckline there are 58-64-72 (82-84) sts left on row and piece measures approx 27-29-33 (37-40) cm.

NECKLINE:
Slip sts from body piece on circular needle size 3.5 mm and pick up 12 to 18 sts on neckline each side at the front = approx 82 to 120 sts. K 1 row from WS, AT THE SAME TIME K tog the 4 sts on M.1 and M.2, 2 by 2. K 1 row from RS, AT THE SAME TIME adjust no of sts evenly to 73-73-79 (79-85) – do not dec on front bands. Continue in rib, K3/P3, with K3 (as seen from WS) and 5 garter sts each side towards mid front. AT THE SAME TIME after 1 cm make 1 buttonhole in line with the others on front band. Cast off when neck measures 2 cm.

POCKET: Cast on 12-16-16 (20-20) sts on double pointed needle size 3.5 mm and work garter st back and forth on needles for 4-5-5 (6-7) cm, AT THE SAME TIME on last row inc 4 sts evenly = 16-20-20 (24-24) sts. Work next row as follows from RS: 3 garter sts, * K2, P2 *, repeat from *-*, and finish with K2 and 3 garter st. Continue in rib until pocket measures 6-7-7 (8-9) cm, cast off.

ASSEMBLY: Sew openings under arms. Sew on buttons. Sew on pocket, place it mid between side seam and front band, approx 6-6-7 (7-8) cm from bottom edge.
------------------------------------------------------------
PANTS:

DECREASING TIP:
Dec as follows before marker: K2 tog.
Dec as follows after marker: Slip 1 st as if to K, K1, psso.

PANTS: Worked in the round on circular needle from waist down.
Cast on 120-126-132 (138-144) sts on circular needle size 3.5 mm with Merino Extra Fine. Work rib, K3/P3, for 8-9-9 (10-10) cm. Change to needle size 4.5 mm and K 1 round, AT THE SAME TIME dec 24-26-28 (26-28) sts evenly = 96-100-104 (112-116) sts. Insert 1 marker mid front and 1 marker mid back (= 48-50-52 (56-58) sts between markers). Continue in stocking st.
REMEMBER THE KNITTING TENSION!
When piece measures 12-14-15 (16-17) cm inc 1 st on each side of the 4 middle sts at front – inc by picking up st from previous round and K this. Repeat the inc on every other round a total of 9-9-9 (10-10) times = 114-118-122 (132-136) sts. After all inc are complete piece measures approx 18-20-21 (23-24) cm. On next round dec 4 sts mid front and mid back (= 2 sts on each side of markers), and now complete the legs separately. Slip sts from one leg on a stitch holder and slip sts from the other leg on double pointed needles size 4.5 mm.

LEG: = 53-55-57 (62-64) sts. Continue in stocking st. Insert a marker at beg of round = inside of leg. When leg measures 3 cm dec 1 st on each side of marker – SEE DECREASING TIP, and repeat the dec on every 2-3-4 (5-6) cm a total of 4 times = 45-47-49 (54-56) sts. When leg measures 10-13-16 (19-25) cm change to double pointed needles size 3.5 mm and K 1 round, AT THE SAME TIME inc 9-7-11 (6-10) sts evenly = 54-54-60 (60-66) sts. P 1 round, K 1 round, P 1 round and now continue in rib, K3/P3, until ;eg measures 18-22-25 (29-35) cm , Cast off loosely in rib.
Work the other leg in the same way.
Pants measures approx 36-42-46 (52-59) cm.

ASSEMBLY: Sew opening between legs.

Diagram

symbols = K from RS, P from WS
symbols = slip 2 sts on cable needle in front of piece, K2, K2 from cable needle
symbols = slip 2 sts on cable needle behind piece, K2, K2 from cable needle
diagram
diagram
Do you have a question? See a list of frequently asked questions (FAQ)

Knitting tension is what determines the final measurements of your work, and is usually measured per 10 x 10 cm. It is provided like so: number of stitches in width x number of rows in height - eg: 19 stitches x 26 rows = 10 x 10 cm.

The knitting tension is very individual; some people knit/crochet loosely while others work tightly. You adjust the knitting tension with the needle size, which is why the suggested needle size is only meant as a guide! You need to adjust this (up or down) to ensure that YOUR knitting tension matches the knitting tension provided in the pattern. If you work with a different knitting tension than provided you will have a different yarn consumption, and your work will have different measurements than what the pattern suggests.

The knitting tension also determines which yarns can replace each other. As long as you achieve the same knitting tension you can replace one yarn with another.

See DROPS lesson: How to measure your tension/gauge

See DROPS video: How to make a gauge tension swatch

The required amount of yarn is provided in grams, eg: 450 g. To calculate how many balls you’ll need you first need to know how many grams are in 1 ball (25g, 50g or 100g). This information is available if you click on the individual yarn quality on our pages. Divide the amount required with the amount of each ball. For example, if each ball is 50g (the most common amount), the calculation will be as follows: 450 / 50 = 9 balls.

The important thing when changing from one yarn to another is that the knitting/crochet tension remains the same. This is so that the measurements of the finished piece will be the same as on the sketch provided. It is easier to achieve the same knitting tension using yarns from the same yarn group. It is also possible to work with multiple strands of a thinner yarn to achieve the knitting tension of a thicker one. Please try our yarn converter. We recommend you to always work a test swatch.

Please NOTE: when changing yarn the garment might have a different look and feel to the garment in the photo, due to individual properties and qualities of each yarn.

See DROPS lesson: Can I use a different yarn than the one mentioned in the pattern?

All our yarns are categorised into yarn groups (from A to F) according to thickness and knitting tension – group A contains the thinnest yarns and group F the thickest. This makes it easier for you to find alternative yarns to our patterns, should you wish to switch yarn. All yarns within the same group have a similar knitting tension and can easily replace each other. However, different yarn qualities have different structures and properties which will give the finished work a unique look and feel.

Click here for an overview of the yarns in each yarn group

At the top of all our patterns you’ll find a link to our yarn calculator, which is a helpful tool should you wish to use a different yarn than suggested. By filling in the yarn quality you wish to replace, the amount (in your size) and number of strands, the calculator will present good alternative yarns with the same knitting tension. Additionally it will tell you how much you’ll require in the new qualities and whether you’ll need to work with multiple strands. Most skeins are 50g (some are 25g or 100g).

If the pattern is worked with multiple colours, every colour will have to be calculated separately. Similarly, if the pattern is worked with several strands of different yarns (for example 1 strand Alpaca and 1 strand Kid-Silk) you will have to find alternatives for each, individually.

Click here to see our yarn calculator

Since different yarns have different qualities and textures we have chosen to keep the original yarn in our patterns. However, you can easily find options among our available qualities by using our yarn calculator, or simply pick a yarn from the same yarn group.

It is possible that some retailers still have discontinued yarns in stock, or that someone has a few skeins at home that they would like to find patterns for.

The yarn calculator will provide both alternative yarn as well as required amount in the new quality.

If you think it's hard to decide what size to make, it can be a good idea to measure a garment you own already and like the size of. Then you can pick the size by comparing those measures with the ones available in the pattern's size chart.

You'll find the size chart at the bottom of the pattern.

See DROPS lesson: How to read size chart

The needle size provided in the pattern serves only as a guide, the important thing is to follow the knitting tension. And since knitting tension is very individual, you will have to adjust the needle size to ensure that YOUR tension is the same as in the pattern – maybe you’ll have to adjust 1, or even 2 needle sizes, up or down to achieve the correct tension. For this, we recommend that you work test swatches.

Should you work with a different knitting tension than the one provided, the measurements of the finished garment might deviate from the measurement sketch.

See DROPS lesson: How to measure your tension/gauge

See DROPS video: How to make a tension/gauge swatch

Working a garment top-down provides more flexibility and room for personal adjustment. For example it is easier to try the garment on while working, as well as making adjustments to length of yoke and shoulder caps.

The instructions are carefully explaining every step, in the correct order. Diagrams are adjusted to the knitting direction and are worked as usual.

The diagram depicts all rows/rounds, and every stitch seen from the right side. It is read from bottom to top, from right to left. 1 square = 1 stitch.

When working back and forth, every other row is worked from the right side and every other row is worked from the wrong side. When working from the wrong side, the diagram will have to be worked reversed: from left to right, knit stitches are purled, purl stitches are knit etc.

When working in the round every round is worked from the right side and the diagram are worked from right to left on all rounds.

See DROPS lesson: How to read knitting diagrams

The diagram depicts all rows/rounds, and every stitch seen from the right side. It is worked from bottom to top, from right to left.

When working back and forth every other row is worked from the right side: from right to left and every other row is worked from the wrong side: from left to right.

When working in the round, every row in the diagram are worked from the right side, from right to left.

When working a circular diagram you start in the middle and work your way outwards, counter clockwise, row by row.

The rows usually start with a given number of chain stitches (equivalent to the height of the following stitch), this will either be depicted in the diagram or explained in the pattern.

See DROPS lesson: How to read crochet diagrams

Instructions for working several diagrams after each other on the same row/round, will often be written like so: “work A.1, A.2, A.3 a total of 0-0-2-3-4 times". This means you work A.1 once, then A.2 is worked once, and A.3 is repeated (in width) the number of times provided for your size – in this case like so: S = 0 times, M = 0 times, L=2 times, XL= 3 times and XXL = 4 times.

The diagrams are worked as usual: begin with the first row in A.1, then work the first row in A.2 etc.

See DROPS lesson: How to read knitting diagrams

See DROPS lesson: How to read crochet diagrams

The total width of the garment (from wrist-to-wrist) will be larger in the larger sizes, despite the actual sleeves being shorter. The larger sizes have longer sleeve caps and wider shoulders, so there will be a good fit in all sizes.

The measurement sketch/schematic drawing provides information regarding the full length of the garment. If it’s a jumper or a jacket the length is measured from the highest point on the shoulder closest to the neckline, and straight down to the bottom of the garment. It is NOT measured from the tip of shoulder. Similarly, the length of yoke is measured from the highest point on the shoulder and down to where yoke is split into body and sleeves.

On a jacket measures are never taken along bands, unless specifically stated. Always measure inside band stitches when measuring the length.

See DROPS lesson: How to read a schematic drawing

Diagrams are often repeated on the round or in height. 1 repeat is the diagram the way it appears in the pattern. If it says to work 5 repeats of A.1 in the round, then you work A.1 a total of 5 times after/next to each other in the round. If it says to work 2 repeats of A.1 vertically/in height you work the entire diagram once, then begin again at the start and work the entire diagram one more time.

Chain stitches are slightly narrower than other stitches and to avoid working the cast-on edge too tight, we simply chain more stitches to begin with. The stitch count will be adjusted on the following row to fit the pattern and measurement sketch.

The rib edge is more elastic and will contract slightly compared to, for example, stocking stitch. By increasing before the rib edge, you avoid a visible difference in width between the rib edge and the rest of the body.

It’s very easy to cast off too tightly, and by making yarn overs while casting off (and simultaneously casting these off) you avoid a too tight cast off edge.

See DROPS video: How to bind off with yarn overs (yo)

To achieve an even increase (or decrease) you can increase on, for example: every 3rd and 4th row alternately, like so: work 2 rows and increase on the 3rd row, work 3 rows and increase on the 4th. Repeat this until the increase is complete.

See DROPS lesson: Increase or decrease 1 st on every 3rd and 4th row alternately

Should you prefer to work in the round instead of back and forth, you may of course adjust the pattern. You’ll need to add steeks mid-front (usually 5 stitches), and follow the instructions. When you would normally turn and work from the wrong side, simply work across the steek and continue in the round. At the end you’ll cut the piece open, pick up stitches to work bands, and cover the cut edges.

See DROPS video: How to knit steeks and cut open

Should you prefer to work back and forth instead of in the round, you may of course adjust the pattern so you work the pieces separately and then assemble them at the end. Divide the stitches for the body in 2, add 1 edge stitch in each side (for sewing) and work the front and back pieces separately.

See DROPS lesson: Can I adapt a pattern for circular needles into straight needles?

Pattern repeats can vary slightly in the different sizes, in order to get the correct proportions. If you’re not working the exact same size as the garment in the photo, yours might deviate slightly. This has been carefully developed and adjusted so that the complete impression of the garment is the same in all sizes.

Make sure to follow instructions and diagrams for your size!

If you have found a pattern you like which is available in women’s size it’s not very difficult to convert it to men’s size. The biggest difference will be the length of sleeves and body. Start working on the women size that you think would fit across the chest. The additional length will be worked right before you cast off for the armhole/sleeve cap. If the pattern is worked top-down you can add the length right after the armhole or before the first decrease on sleeve.

Regarding additional yarn amount, this will depend on how much length you add, but it is better with a skein too many than too few.

All yarns will have excess fibres (from production) that might come off as lint or shedding. Brushed yarns (ie hairier yarns) have more of these loose, excess fibres, causing more shedding.

Shedding also depends on what is worn under or over the garment, and whether this pulls at the yarn fibres. It’s therefore not possible to guarantee that there will be no shedding

Below are some tips on how to get the best result when working with hairier yarns:

1. When the garment is finished (before you wash it) shake it vigorously so the looser hairs come off. NOTE: do NOT use a lint roller, brush or any method that pulls at the yarn.

2. Place the garment in a plastic bag and put it in your freezer - the temperature will cause the fibres to become less attached to each other, and excess fibres will come off easier.

3. Leave in the freezer for a few hours before taking it out and shaking it again.

4. Wash the garment according to the instructions on the yarn label.

Pilling is a natural process that happens to even the most exclusive of fibers. It's a natural sign of wear and tear that is hard to avoid, and that is most visible in high friction areas of your garment like a sweater's arms and cuffs.

You can make your garment look as new by removing the pilling, using a fabric comb or a pill/lint remover.

Still can't find the answer you need? Then scroll down and leave your question so one of our experts can try to help you. This will be done normally within 5 to 10 working days.
In the meantime, you can read the questions and answers that others have left to this pattern or join the DROPS Workshop on Facebook to get help from fellow knitters/crocheters!

You might also like...

Post a comment to pattern DROPS Baby 18-4

We would love to hear what you have to say about this pattern!

If you want to leave a question, please make sure you select the correct category in the form below, to speed up the answering process. Required fields are marked *.

Comments / Questions (43)

country flag Carmen wrote:

Buongiorno, non capisco cosa si intende quando c’è scritto che si deve intrecciare per modellare la scollatura a ogni lato all’inizio di ogni f dal centro davanti: 10-11-13 (14-15) m 1 volta e 1 m 2 volte.

22.01.2024 - 01:20

DROPS Design answered:

Buonasera Carmen, è il punto in cui si modella la scollatura: si devono chiudere ad esempio 10 maglie per lato per la taglia 1-3 mesi, poi 1 maglia per lato e poi ancora 1 maglia per lato. Buon lavoro!

24.01.2024 - 16:48

country flag Wivi-Anne Rooth wrote:

Hej jag har problem när jag ska sy ihop ärmarna, utgår från mitten av avmaskningen(4 maskor på var sida) blir inte som på skissen. Med vänlig hälsning /Wivi

25.05.2023 - 22:37

DROPS Design answered:

Hei Wivi-Anne Husk at målskissen kun er en skisse. Følg beskrivelsen i oppskriften og det skal bli rikitg. mvh DROPS Design

30.05.2023 - 08:46

country flag Daniela wrote:

Bonjour, est-que il y aurait pas par hasard une petite erreur au niveau des diminutions pour les emmanchures. Pour le modèle 1-3 je suis à 110 mailles avant diminutions si je tricote tout comme c'est indiqué " ( 29-29-32 (35-38) m = devant droit, rabattre 8 m pour l'emmanchure, 42-48-54 (60-66) m = dos, rabattre 8 m pour l'emmanchure, 29-29-32 (35-38) m = devant gauche. " Je devrait avoir 116 mailles et pas 110

24.07.2021 - 09:09

DROPS Design answered:

Bonjour Daniela, il fallait effectivement lire "26" mailles pour chaque devant, la correction a été faite, merci pour votre retour et bonne continuation!

26.07.2021 - 08:23

country flag Caroline wrote:

Bonjour, Je ne comprends pas les explications du col "Continuer en côtes 3/3 avec 3 m end (vu sur l'end) et 5 m au point mousse de chaque côté". Cela signifie-t-il que nous devons commencer chaque rang par 3 m end, puis 5 m mousse? Mais que faire sur l'envers? Merci de votre réponse.

18.07.2021 - 09:35

DROPS Design answered:

Bonjour Caroline, pour commencer les cotes, sur l’envers vous tricotez: 5 mailles au point mousse (a l'endroit sur l'endroit et a l'endroit sur l'envers), ensuite repetez *3 mailles endroit, 3 mailles envers* et finissez par 3 mailles endroit et 5 mailles au point mousse. Bon tricot!

18.07.2021 - 21:24

country flag Nathalie wrote:

Bonjour, N’y aurait-il pas une erreur dans les diminutions de l'empiècemement car si l'on fait 1 diminution de chaque côté d'un marqueur soit 8 par rang,il nous reste beaucoup plus de mailles à la fin que spécifié dans les explications . Merci de m'éclairer.

03.05.2021 - 20:20

DROPS Design answered:

Bonjour Nathalie, vous diminuez 8 m pour le raglan mais rabattez également les mailles de l'encolure de chaque côté, autrement dit: 162-178-198 (218-238) - 80-88-96 (104-120) pour le raglan - 24-26-30 (32-34) pour l'encolure = 58-64-72 (82-84) m. Bon tricot!

04.05.2021 - 07:44

country flag Mimmu wrote:

Teen jakkua 12-18kk ja ohjeessa sanotaan kavenna tasavälein 35 silmukkaa, mutta minä en saa kyllä mitenkään tasavälein vaadittua silmukkamäärää. onko olemassa jotain laskukaavaa millä voin laskea miten kavennukset tehdään?

14.07.2019 - 13:44

DROPS Design answered:

Hei, sinun tulee jakaa puikolla oleva silmukkamäärä kavennusten määrän kanssa, eli esim. 157/35 = n. 4,5. Tässä esimerkissä kavennus tehdään vuorotellen joka toisen ja joka kolmannen silmukan jälkeen.

22.01.2020 - 18:13

country flag Anne-Lie wrote:

Stämmer det att bröstmåttet på strl 98-104 blir 79 cm,(158 maskor/20)

19.04.2019 - 09:19

DROPS Design answered:

Hej. Ja det stämmer. Mvh DROPS Design

23.04.2019 - 14:12

country flag Agnès wrote:

Bonjour je voudrais savoir s'il n'y a pas une erreur dans les explications du gilet car une fois toutes les diminutions il me reste beaucoup de mailles, je suis loin des73 mailles. Merci d'avance

31.03.2019 - 17:44

DROPS Design answered:

Bonjour Agnès, pour le col, vous reprenez les mailles en attente et relevez 12 à 18 mailles sur chaque devant = vous avez environ 82 à 120 m, vous diminuez ensuite les mailles de M.1 et de M.2 et répartissez ensuite des diminutions pour qu'il vous reste 73 m (ajustez le nombre de mailles à diminuer sur le nombre de mailles que vous avez sur l'aiguille). Bon tricot!

01.04.2019 - 13:53

country flag Veronika wrote:

Dobrý večer, jsem začátečník.Skončila jsem u pletení sedla, dokončila jsem ujímání a jsem v části 25 cm. Nevím si rady s průkrčníkem a začátkem lemu průkrčníku. Prosím o vysvětlení. Děkuji

15.05.2018 - 19:57

country flag Anja wrote:

Gehe ich recht in der Annahme, daß die beim Halsausschnitt abgeketteten Maschen ("Gleichzeitig nach 23-25-28 (32-35) cm auf beiden Seiten vorne gegen den Hals abk.: 1 x 10-11-13 (14-15) M und danach 2 x 1 M") bei der Halskante ("auf beiden Seiten je 12 bis 18 M. aufnehmen = ca. 82 bis 120 M.") wieder aufgenommen werden?

03.05.2017 - 17:07

DROPS Design answered:

Liebe Anja, bei der Halskante werden 12 bis 18 M (je nach der Größe) in den 1x 10-15M + 2 x 1 M auf beiden Seiten aufgenommen, es waren 58- 84 M übrig nach Rundpasse = 82-120 M insgesamt für die Halskante. Viel Spaß beim stricken!

04.05.2017 - 10:59