DROPS Merino Extra Fine
100% Wool
from 4.55 $ /50g
Get the yarn to make this pattern from 18.20$.

The yarn cost is calculated from the pattern’s smallest size and the yarn’s cheapest product type. Looking for an even better price? You might find it on the DROPS Deals!

DROPS SS24

Miss Mossy

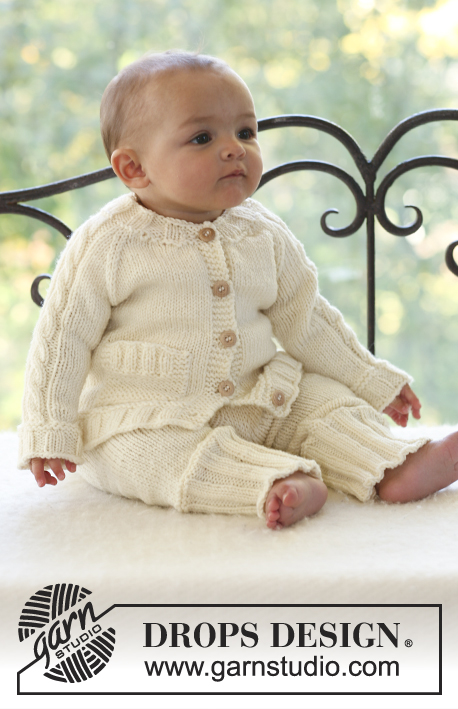
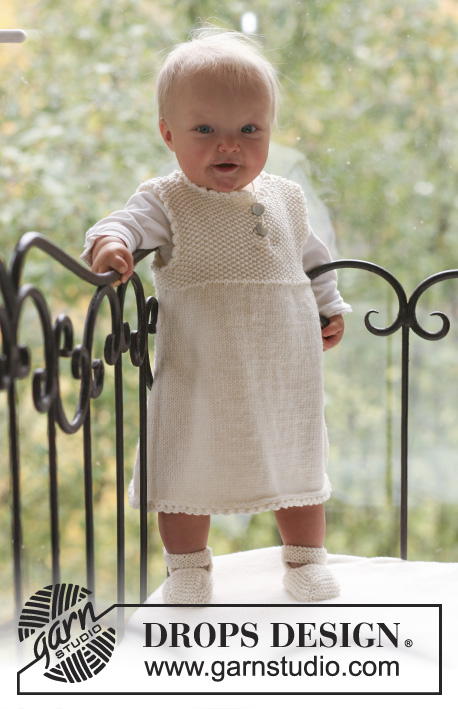
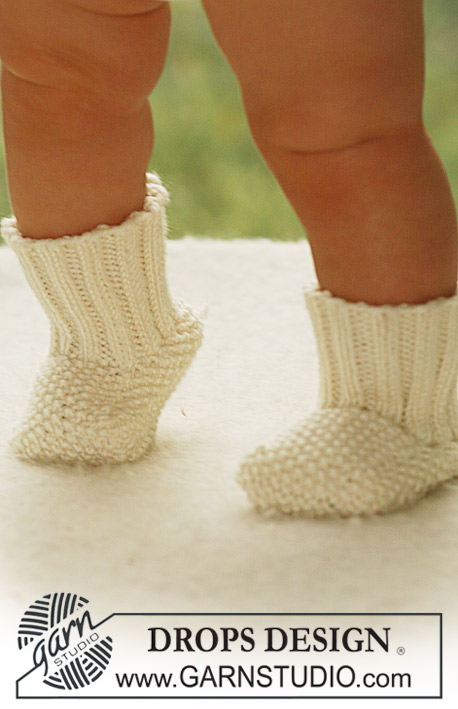
Set of knitted jacket and socks in seed st for baby and children, in DROPS Merino Extra Fine

DROPS Baby 18-10
Size: 1/3 - 6/9 - 12/18 months (2 - 3/4) years
Bust: 48-54-60 (66-72) cm [19"-21¼"-23⅝" (26"-28⅜")]
Full length: 26-28-31 (33-36) cm [10¼"-11"-12¼" (13"-14¼")]

Materials: DROPS MERINO EXTRA FINE from Garnstudio
JACKET:
150-200-200 (250-250) g color no 01, off-white
SOCKS:
50-50-50 (100-100) g color no 01, off-white


JACKET:
DROPS CIRCULAR NEEDLE (60 cm [24"]) size 4.5 mm [US7] – or size needed to get 20 sts x 26 rows in stockinette st = 10 x 10 cm [4" x 4"].
DROPS MOTHER-OF-PEARL BUTTON no 523: 3 pcs.

SOCKS:
DROPS DOUBLE POINTED Needles size 3 mm [US 2or3] – or size needed to get 23 sts x 32 rows in moss st = 10 x 10 cm [4" x 4"].

-------------------------------------------------------

Alternative Yarn – See how to change yarns here
Yarn Groups A to F – Use the same pattern and change the yarn here
Yarn usage using an alternative yarn – Use our yarn converter here

-------------------------------------------------------

DROPS Merino Extra Fine
100% Wool
from 4.55 $ /50g
Get the yarn to make this pattern from 18.20$.

The yarn cost is calculated from the pattern’s smallest size and the yarn’s cheapest product type. Looking for an even better price? You might find it on the DROPS Deals!

Pattern instructions

NOTE: This pattern is written in American English. All measurements in charts are in cm. For conversion from inches to cm - click here. There are different terms for crocheting in American and British English. If this pattern includes crochet, click for "crochet terms" here. For this pattern in British English, please click here.
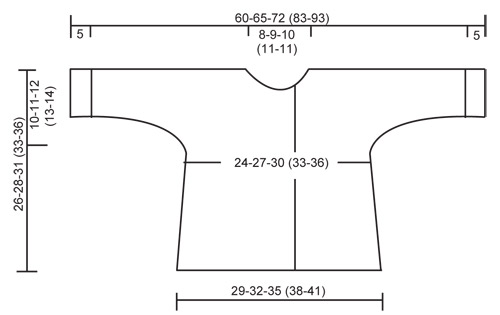
JACKET:

GARTER ST (back and forth on needle): K all rows.

MOSS ST:
Row 1: * K1, P1 *, repeat from *-*.
Row 2: K over P and P over K. Repeat row 2.

BUTTONHOLES:
Make buttonholes on right front band. 1 buttonhole = K tog 2nd and 3rd st from mid front and make 1 YO.
Make buttonholes when piece measures:
SIZE 1/3 MONTHS: 11, 16 and 21 cm [4⅜", 6¼", 8¼"].
SIZE 6/9 MONTHS: 13, 18 and 23 cm [5⅛", 7", 9"].
SIZE 12/18 MONTHS: 16, 21 and 26 cm [6¼", 8¼", 10¼"].
SIZE 2 YEARS: 15, 21 and 27 cm [6", 8¼", 10⅝"].
SIZE 3/4 YEARS: 18, 24 and 30 cm [7", 9½", 11¾"].
----------------------------------------------------------
JACKET: Beg with front pieces, cast on for sleeves, and work back piece from shoulders down.

RIGHT FRONT PIECE: Worked back and forth on circular needle.
Cast on 36-39-42 (45-48) sts (includes 1 edge st at side and 12 front band sts towards mid front) on needle size 4.5 mm [US 7] with Merino Extra Fine. Work 4 rows garter st – SEE ABOVE. Work next row as follows from mid front: 12 front band sts in moss st, 23-26-29 (32-35) stockinette sts and 1 edge st in garter st.
REMEMBER THE KNITTING GAUGE.
When piece measures 5 cm [2"] dec 1 st at the side and repeat the dec on every 2-2½-3 (3-3½) cm [3/4"-⅞"-1⅛" (1⅛"-1¼")] a total of 5 times = 31-34-37 (40-43) sts.
Remember buttonhole on front band – SEE ABOVE. When piece measures 16-17-19 (20-22) cm [6¼"-6¾"-7½" (8"-8¾")] cast on sts for sleeve, at the end of every row towards the side: 4 sts 1-1-2 (1-2) times, 6 sts 1-1-1 (1-1) times, 8 sts 1-1-1 (2-2) times and 17-19-19 (23-26) sts 1 time = 66-71-78 (89-99) sts. Continue in stockinette st with 12 moss sts on front band and 10 moss sts at bottom of sleeve. When piece measures 22-24-27 (28-31) cm [8¾"-9½"-10 4/8" (11"-12¼")] slip the first 9-10-11 (12-12) sts towards mid front on a stitch holder for neck. Bind off to shape the neckline at the beg of every row from neckline: 2 sts 1 time and 1 st 3 times = 52-56-62 (72-82) sts left on shoulder/sleeve. When piece measures 26-28-31 (33-36) cm [10¼"-11"-12¼" (13"-14¼")] insert a marker in piece (= mid shoulder). NOW MEASURE PIECE FROM HERE. Continue for 1 cm [3/8"] and put piece aside.

LEFT FRONT PIECE: Cast on and work like right front piece, but mirrored. Do not make buttonholes!

BACK PIECE: Work sts from left front piece back on needle, cast on 16-18-20 (22-22) new sts (= back neckline) and work sts from right front piece back on needle = 120-130-144 (166-186) sts. Continue in stockinette st with 10 moss sts each side (= sleeve edges). When piece measures 7½-8½-8½ (9½-10) cm [2⅞"-3¼"-3¼" (3¾"-4")] bind off sleeve sts at the beg of every row each side as follows: 17-19-19 (23-26) sts 1 time, 8 sts 1-1-1 (2-2) times, 6 sts 1-1-1 (1-1) time and 4 sts 1-1-2 (1-2) times = 50-56-62 (68-74) sts left on row. Continue in stockinette st with 1 edge st in garter st each side. When piece measures 13-13-14 (16-17) cm [5⅛"-5⅛"-5½" (6¼"-6¾")] inc 1 st each side on every 2-2½-3 (3-3½) cm [3/4"-⅞"-1⅛" (1⅛"-1¼")] a total of 5 times = 60-66-72 (78-84) sts. When piece measures 25-27-30 (32-35) cm [9¾"-10⅝"-11¾" (12½"-13¾")] work 4 rows garter st on all sts and bind off.

NECKLINE: Pick up approx 46 to 66 sts round neckline (incl sts on stitch holder at front) on needle size 4.5 mm [US 7] and work 3 rows garter st back and forth on needle, bind off.

ASSEMBLY: Sew sleeve and side seams inside 1 edge st. Sew on buttons to fit buttonholes. Fold sleeve edges towards RS if needed.
----------------------------------------------------------
SOCKS:
Foot length: 10-11-12 (14-16) cm [4"-4⅜"-4¾" (5½"-6¼")]

SOCK: Worked in the round on double pointed needles.
Cast on 40-44-48-(48-52) sts on double pointed needles size 3 mm [US 2or3] with Merino Extra Fine. K 1 round and continue in rib, K2/P2, for 6-7-7 (8-8) cm [2⅜"-2¾"-2¾" (3⅛"-3⅛")]. K 1 round, AT THE SAME TIME dec 6 sts evenly on round = 34-38-42 (42-46) sts.
Now keep the first 10-10-12 (12-14) sts on needle (= upper foot) and slip the remaining 24-28-30 (30-32) sts on a stitch holder. Work 3-3½-4 (5-6) cm [1⅛"-1¼"-1½" (2"-2⅜")] moss st – SEE ABOVE – on sts on upper foot. Now pick up 7-8-9 (12-14) sts on each side of upper foot and slip sts from stitch holder back on needle = 48-54-60 (66-74) sts. Continue in moss st on all sts for 1½-2-2½ (3-3½) cm [½"-¾"-⅞" (1⅛"-1¼")], and then P 1 round. Bind off all sts except the 10-10-12 (12-14) sts mid front. Work 9-10-11 (13-14) cm [3½"-4"-4⅜" (5⅛"-5½")] moss st on these for sole and bind off. Sew sole to sock, edge to edge to avoid a chunky seam.

Diagram

All measurements in charts are in cm.

diagram measurements
Do you have a question? See a list of frequently asked questions (FAQ)

Knitting tension is what determines the final measurements of your work, and is usually measured per 10 x 10 cm. It is provided like so: number of stitches in width x number of rows in height - eg: 19 stitches x 26 rows = 10 x 10 cm.

The knitting tension is very individual; some people knit/crochet loosely while others work tightly. You adjust the knitting tension with the needle size, which is why the suggested needle size only serve as a guide! You need to adjust this (up or down) to ensure that YOUR knitting tension matches the knitting tension provided in the pattern. If you work with a different knitting tension than provided you will have a different yarn consumption, and your work will have different measurements than what the pattern suggests.

The knitting tension also determines which yarns can replace each other. As long as you achieve the same knitting tension you can replace one yarn with another.

See DROPS lesson: How to measure your tension/gauge

See DROPS video: How to make a gauge tension swatch

The required amount of yarn is provided in grams, eg: 450 g. To calculate how many balls you’ll need you first need to know how many grams are in 1 ball (25g, 50g or 100g). This information is available if you click on the individual yarn quality on our pages. Divide the amount required with the amount of each ball. For example, if each ball is 50g (the most common amount), the calculation will be as follows: 450 / 50 = 9 balls.

The important thing when changing from one yarn to another is that the knitting/crochet tension remains the same. This is so that the measurements of the finished piece will be the same as on the sketch provided. It is easier to achieve the same knitting tension using yarns from the same yarn group. It is also possible to work with multiple strands of a thinner yarn to achieve the knitting tension of a thicker one. Please try our yarn converter. We recommend you to always work a test swatch.

Please NOTE: when changing yarn the garment might have a different look and feel to the garment in the photo, due to individual properties and qualities of each yarn.

See DROPS lesson: Can I use a different yarn than the one mentioned in the pattern?

All our yarns are categorised into yarn groups (from A to F) according to thickness and knitting tension – group A contains the thinnest yarns and group F the thickest. This makes it easier for you to find alternative yarns to our patterns, should you wish to switch yarn. All yarns within the same group have a similar knitting tension and can easily replace each other. However, different yarn qualities have different structures and properties which will give the finished work a unique look and feel.

Click here for an overview of the yarns in each yarn group

At the top of all our patterns you’ll find a link to our yarn converter, which is a helpful tool should you wish to use a different yarn than suggested. By filling in the yarn quality you wish to replace, the amount (in your size) and number of strands, the converter will present good alternative yarns with the same knitting tension. Additionally it will tell you how much you’ll require in the new qualities and whether you’ll need to work with multiple strands. Most skeins are 50g (some are 25g or 100g).

If the pattern is worked with multiple colours, every colour will have to be converted separately. Similarly, if the pattern is worked with several strands of different yarns (for example 1 strand Alpaca and 1 strand Kid-Silk) you will have to find alternatives for each, individually.

Click here to see our yarn converter

Since different yarns have different qualities and textures we have chosen to keep the original yarn in our patterns. However, you can easily find options among our available qualities by using our yarn converter, or simply pick a yarn from the same yarn group.

It is possible that some retailers still have discontinued yarns in stock, or that someone has a few skeins at home that they would like to find patterns for.

The yarn converter will provide both alternative yarn as well as required amount in the new quality.

If you think it's hard to decide what size to make, it can be a good idea to measure a garment you own already and like the size of. Then you can pick the size by comparing those measures with the ones available in the pattern's size chart.

You'll find the size chart at the bottom of the pattern.

See DROPS lesson: How to read size chart

The needle size provided in the pattern serves only as a guide, the important thing is to follow the knitting tension. And since knitting tension is very individual, you will have to adjust the needle size to ensure that YOUR tension is the same as in the pattern – maybe you’ll have to adjust 1, or even 2 needle sizes, up or down to achieve the correct tension. For this, we recommend that you work test swatches.

Should you work with a different knitting tension than the one provided, the measurements of the finished garment might deviate from the measurement sketch.

See DROPS lesson: How to measure your tension/gauge

See DROPS video: How to make a gauge tension swatch

Working a garment top-down provides more flexibility and room for personal adjustment. For example it is easier to try the garment on while working, as well as making adjustments to length of yoke and shoulder caps.

The instructions are carefully explaining every step, in the correct order. Diagrams are adjusted to the knitting direction and are worked as usual.

The diagram depicts all rows/rounds, and every stitch seen from the right side. It is read from bottom to top, from right to left. 1 square = 1 stitch.

When working back and forth, every other row is worked from the right side and every other row is worked from the wrong side. When working from the wrong side, the diagram will have to be worked reversed: from left to right, knit stitches are purled, purl stitches are knit etc.

When working in the round every round is worked from the right side and the diagram are worked from right to left on all rounds.

See DROPS lesson: How to read knitting diagrams

The diagram depicts all rows/rounds, and every stitch seen from the right side. It is worked from bottom to top, from right to left.

When working back and forth every other row is worked from the right side: from right to left and every other row is worked from the wrong side: from left to right.

When working in the round, every row in the diagram are worked from the right side, from right to left.

When working a circular diagram you start in the middle and work your way outwards, counter clockwise, row by row.

The rows usually start with a given number of chain stitches (equivalent to the height of the following stitch), this will either be depicted in the diagram or explained in the pattern.

See DROPS lesson: How to read crochet diagrams

Instructions for working several diagrams after each other on the same row/round, will often be written like so: “work A.1, A.2, A.3 a total of 0-0-2-3-4 times". This means you work A.1 once, then A.2 is worked once, and A.3 is repeated (in width) the number of times provided for your size – in this case like so: S = 0 times, M = 0 times, L=2 times, XL= 3 times and XXL = 4 times.

The diagrams are worked as usual: begin with the first row in A.1, then work the first row in A.2 etc.

See DROPS lesson: How to read knitting diagrams

See DROPS lesson: How to read crochet diagrams

The total width of the garment (from wrist-to-wrist) will be larger in the larger sizes, despite the actual sleeves being shorter. The larger sizes have longer sleeve caps and wider shoulders, so there will be a good fit in all sizes.

The measurement sketch/schematic drawing provides information regarding the full length of the garment. If it’s a jumper or a jacket the length is measured from the highest point on the shoulder (usually closest to the neckline), and straight down to the bottom of the garment. It is NOT measured from the tip of shoulder. Similarly, the length of yoke is measured from the highest point on the shoulder and down to where yoke is split into body and sleeves.

See DROPS lesson: How to read a schematic drawing

Diagrams are often repeated on the round or in height. 1 repeat is the diagram the way it appears in the pattern. If it says to work 5 repeats of A.1 in the round, then you work A.1 a total of 5 times after/next to each other in the round. If it says to work 2 repeats of A.1 vertically/in height you work the entire diagram once, then begin again at the start and work the entire diagram one more time.

Chain stitches are slightly narrower than other stitches and to avoid working the cast-on edge too tight, we simply chain more stitches to begin with. The stitch count will be adjusted on the following row to fit the pattern and measurement sketch.

The rib edge is more elastic and will contract slightly compared to, for example, stocking stitch. By increasing before the rib edge, you avoid a visible difference in width between the rib edge and the rest of the body.

It’s very easy to cast off too tightly, and by making yarn overs while casting off (and simultaneously casting these off) you avoid a too tight cast off edge.

See DROPS video: How to bind off with yarn overs (yo)

To achieve an even increase (or decrease) you can increase on, for example: every 3rd and 4th row alternately, like so: work 2 rows and increase on the 3rd row, work 3 rows and increase on the 4th. Repeat this until the increase is complete.

See DROPS lesson: Increase or decrease 1 st on every 3rd and 4th row alternately

Should you prefer to work in the round instead of back and forth, you may of course adjust the pattern. You’ll need to add steeks mid-front (usually 5 stitches), and follow the instructions. When you would normally turn and work from the wrong side, simply work across the steek and continue in the round. At the end you’ll cut the piece open, pick up stitches to work bands, and cover the cut edges.

See DROPS video: How to knit steeks and cut open

Should you prefer to work back and forth instead of in the round, you may of course adjust the pattern so you work the pieces separately and then assemble them at the end. Divide the stitches for the body in 2, add 1 edge stitch in each side (for sewing) and work the front and back pieces separately.

See DROPS lesson: Can I adapt a pattern for circular needles into straight needles?

Pattern repeats can vary slightly in the different sizes, in order to get the correct proportions. If you’re not working the exact same size as the garment in the photo, yours might deviate slightly. This has been carefully developed and adjusted so that the complete impression of the garment is the same in all sizes.

Make sure to follow instructions and diagrams for your size!

If you have found a pattern you like which is available in women’s size it’s not very difficult to convert it to men’s size. The biggest difference will be the length of sleeves and body. Start working on the women size that you think would fit across the chest. The additional length will be worked right before you cast off for the armhole/sleeve cap. If the pattern is worked top-down you can add the length right after the armhole or before the first decrease on sleeve.

Regarding additional yarn amount, this will depend on how much length you add, but it is better with a skein too many than too few.

All yarns will have excess fibres (from production) that might come off as lint or shedding. Brushed yarns (ie hairier yarns) have more of these loose, excess fibres, causing more shedding.

Shedding also depends on what is worn under or over the garment, and whether this pulls at the yarn fibres. It’s therefore not possible to guarantee that there will be no shedding

Below are some tips on how to get the best result when working with hairier yarns:

1. When the garment is finished (before you wash it) shake it vigorously so the looser hairs come off. NOTE: do NOT use a lint roller, brush or any method that pulls at the yarn.

2. Place the garment in a plastic bag and put it in your freezer - the temperature will cause the fibres to become less attached to each other, and excess fibres will come off easier.

3. Leave in the freezer for a few hours before taking it out and shaking it again.

4. Wash the garment according to the instructions on the yarn label.

Pilling is a natural process that happens to even the most exclusive of fibers. It's a natural sign of wear and tear that is hard to avoid, and that is most visible in high friction areas of your garment like a sweater's arms and cuffs.

You can make your garment look as new by removing the pilling, using a fabric comb or a pill/lint remover.

Still can't find the answer you need? Then scroll down and leave your question so one of our experts can try to help you. This will be done normally within 5 to 10 working days.
In the meantime, you can read the questions and answers that others have left to this pattern or join the DROPS Workshop on Facebook to get help from fellow knitters/crocheters!

You might also like...

Post a comment to pattern DROPS Baby 18-10

We would love to hear what you have to say about this pattern!

If you want to leave a question, please make sure you select the correct category in the form below, to speed up the answering process. Required fields are marked *.

Comments / Questions (89)

country flag Mary wrote:

Why dont you use a print friendly button to your pattern pages so we can save the pattern till later rather than just a print option would be so much easier for users and everyone is doing it nowadays. Would be ideal and cant take to long to add this option. Regards Mary

27.03.2016 - 19:04

DROPS Design answered:

Dear Mary, You always can save them printing them as .PDF - so if you can print as .PDF from your phone, a file will be created, instead of a print, that you can store. Happy knitting!

29.03.2016 - 09:58

country flag Katariin Raska wrote:

Tere. Olen oma kudumiga parema esiosa lõpus. Koon kampunit esimest korda ning võib-olla et seetõttu ei saagi aru, mida antud mustris nimetatakse SM- ks (õla keskkosa). Ning kuidas seda paigaldama peab. Ette tänades.

30.10.2015 - 13:41

DROPS Design answered:

Tere Katariin! SM on lühend silmusemärkijale, millega märgitakse mingit asukohta, antud juhul õla keskkohta. Silmusemärkijana võib kasutada ka lihtsalt teist värvi lõngajuppi, kirjaklambrit jne. Head kudumist!

03.11.2015 - 12:15

Mary Ann wrote:

Do I bind off the stitches of the front band (where the botton holes are on the right front) before I slip stitches onto holder? So then I would actually start slipping off starting at the 12th stitch form the edge. right???

31.05.2015 - 02:03

DROPS Design answered:

Dear Mary Ann, you first put the first 12 sts towards neck on a st holder, then cast off for neck every other row (every row starting from neck) - afterwards you move sts from st holder back on needle and pick up sts around neck to wark neckline. Happy knitting!

01.06.2015 - 09:46

Mary Ann wrote:

Dear Hannah, for the right front piece, you will beg from RS, put the first 9-12 sts from RS on a st holder, then bind off at the beg from every row from RS 2 sts 1 time and 1 st 3 times. For the left front piece, you will bind off for neckline at the beg of every row from WS = always at the beg of row starting from neckline towards the side. Happy knitting!

31.05.2015 - 01:57

Mary Ann wrote:

Right front neck: when you say slip the first stitches to a stitch holder do you mean the ones from the front band? if not do I bind off the 12 band stitches then put the next stitches on the holder? and then start the decreases for neck. A little confused, Mary Ann

30.05.2015 - 22:01

DROPS Design answered:

Dear Mary Ann, you put aside for neck the first 12 sts towards mid front, depending on your size, you will either work some more rows over front band sts (1st, 2nd, 3rd size) or put all front band sts on a st holder (2 larger sizes). Cast off then at the beg of every row starting from mid front: 2 sts 1 time and 1 st 3 times. Happy knitting!

01.06.2015 - 09:41

country flag Susana wrote:

Nas partes da frente quando diz "A 5 cm de altura total, diminuir 1 m/p de cada lado e repetir estas diminuições a cada 2-2,5-3 (3-3,5) cm, num total de 5 vezes = 31-34-37 (40-43) ms/pts." vai dar um total de 10 malhas diminuidas mas o total de malhas apresentado após as diminuições não corresponde, pois dá apenas 5 diminuições

18.10.2014 - 12:57

DROPS Design answered:

Efectivamente, o número de diminuições é 5. Por lapso, diz-se dimonuir 1 m/p de cada lado quando, na realidade, se diminui apenas no lado da costura. Obrigado por nos contactar. Bom tricô!

20.10.2014 - 11:32

country flag Hannah wrote:

Hello‘When piece measures 22-24-27 (28-31) cm slip the first 9-10-11 (12-12) sts towards mid front on a stitch holder for neck. Cast off to shape the neckline at the beg of every row from neckline: 2 sts 1 time and 1 st 3 times = 52-56-62 (72-82) sts left on shoulder/sleeve’ - but cannot work out which stitches to slip and then where the decrease starts and should I be starting on a right side or wrong side row?

28.07.2014 - 14:30

DROPS Design answered:

Dear Hannah, for the right front piece, you will beg from RS, put the first 9-12 sts from RS on a st holder, then bind off at the beg from every row from RS 2 sts 1 time and 1 st 3 times. For the left front piece, you will bind off for neckline at the beg of every row from WS = always at the beg of row starting from neckline towards the side. Happy knitting!

29.07.2014 - 09:16

country flag Fromm Renate wrote:

Beim Halsausschnitt heisst es, 3R. hin und zurück stricken. Welche Maschen soll man stricken?

14.07.2014 - 15:43

DROPS Design answered:

Sie stricken die 46 bis 66 M, die Sie aus dem Halsrand aufgefasst haben, über 3 R re. Die Info, dass diese 3 R re gestrickt werden, wird umgehend ergänzt.

14.07.2014 - 20:43

country flag Eve wrote:

Wenn ich nach der Schultermarkierung 8 1/2cm weiter stricke, ergibt das bei mir kein Perlmuster - Bündchen von 12cm...?

14.04.2014 - 16:56

DROPS Design answered:

Liebe Eve, jetzt habe ich Ihre Frage verstanden. Beachten Sie bitte die Position des Markierungsstrichs in der Schnittzeichnung: die 12 cm beziehen sich nicht auf die Ärmelunterkante/Bündchen sondern auf das Mass am Armausschnitt.

22.04.2014 - 10:24

country flag Eve wrote:

Rückenteil: wenn ich von der neuen Schultermarkierung 81/2 weiter stricke, stimmen die 12cm für das Armbündchen (in der Zeichnung angegeben) nicht. Von wo messe ich und wie breit wird der Armabschluss?? Liebe Grüsse Eve

09.04.2014 - 06:28

DROPS Design answered:

Liebe Eve, könnten Sie Ihre Frage nochmals genauer fomulieren? Was meinen Sie mit 81/2? Die Schnittzeichnung bedeutet: Das Ärmelbundchen ist 5 cm im Perlmuster (10 Maschen am Rand der Arbeit. Der Ärmel ist unten in Grösse 12/18 Monate 2 x 12 cm im Umfang.

14.04.2014 - 08:55