DROPS Merino Extra Fine
100% Wool
from 3.50 £ /50g
Get the yarn to make this pattern from 10.50£.

The yarn cost is calculated from the pattern’s smallest size and the yarn’s cheapest product type. Looking for an even better price? You might find it on the DROPS Deals!

DROPS SS24

Little Acorn

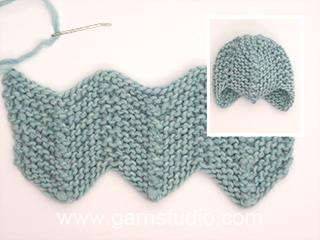
Knitted helmet hat and scarf in garter st with crochet edges, for baby and children in DROPS Merino Extra Fine

DROPS Baby 18-1
Size: 1/3 - 6/9 - 12/18 months (2 - 3/4) years
Head circumference: approx 40/42 - 42/44 - 44/46 (48/50 - 50/52) cm.
Materials: DROPS MERINO EXTRA FINE from Garnstudio
100-100-100 (150-150) g colour no 08, light beige
50 g for all sizes colour no 01, off-white

DROPS POINTED NEEDLES size 4 mm – or size needed to get 21 sts x 42 rows in garter st = 10 x 10 cm.
DROPS CROCHET HOOK size 4 mm – for borders.

-------------------------------------------------------

Alternative Yarn – See how to change yarns here
Yarn Groups A to F – Use the same pattern and change the yarn here
Yarn usage using an alternative yarn – Use our yarn converter here

-------------------------------------------------------

DROPS Merino Extra Fine
100% Wool
from 3.50 £ /50g
Get the yarn to make this pattern from 10.50£.

The yarn cost is calculated from the pattern’s smallest size and the yarn’s cheapest product type. Looking for an even better price? You might find it on the DROPS Deals!

Pattern instructions

NOTE: This pattern is written in British English. All measurements in charts are in cm. For conversion from cm to inches - click here. There are different terms for crocheting in British and American English. If this pattern includes crochet, click for "crochet terms" here. For this pattern in American English, please click here.
BONNET

GARTER ST (back and forth on needle): K all rows.

INCREASING TIP: Make all inc from RS.
Inc 1 st by making 1 YO. Work YO into back of loop on return row to avoid a hole.

DECREASING TIP:
Make all dec from RS.
Dec 1 st on each side of st with marker. Beg 1 st before st with marker, slip 1 st on cable needle behind piece, slip next st as if to K (st with marker), K tog next st and st from cable needle, psso.
------------------------------------------------------------
BONNET:
Worked back and forth on needle in garter st – SEE ABOVE.
Cast on 97-105-109 (113-121) sts on needle size 4 mm with light beige. K 1 row from WS and now insert 7 markers in piece from RS as follows:
M-1 in first st on row
M-2 in st 18-20-21 (22-24)
M-3 in st 35-39-41 (43-47)
M-4 in st 49-53-55 (57-61)
M-5 in st 63-67-69 (71-75)
M-6 in st 80-86-89 (92-98)
M-7 in last st on row
Continue in garter st, AT THE SAME TIME on row 1 begin inc and dec as follows – SEE INCREASING AND DECREASING TIP:
INC 1 st after M-1 on every other row
DEC 1 st on each side of M-2 on every other row
INC 1 st before M-3 on every other row
INC 1 st after M-3 on every 4th row
DEC 1 st on each side of M-4 on every 4th row 5-7-8 (10-11) times and then on every other row to finished measurements (i.e. when dec on every other row no of sts will dec)
INC 1 st before M-5 on every 4th row
INC 1 st after M-5 on every other row
DEC 1 st on each side of M-6 on every other row
INC 1 st before M-7 on every other row.
Continue like this. When piece measures 13-15-16 (18-19) cm (measured from lowest point by M-2 or M-6) work next row as follows from RS:
* K1, K2 tog *, repeat from *-*, AT THE SAME TIME as casting off.

ASSEMBLY:
Back of hat = cast off row, i.e. 2 whole points and 2 half points.
The middle of the 3 whole points on the opposite side of piece = cast on row, sits at middle of forehead.
Sew hat tog, edge to edge along cast off row as follows: Sew first half point to one side of the first whole point. Sew the other side of first whole point to one side of second whole point. Then the other side of second whole point to the last half point. Now sew hat tog mid back – make sure to sew edge to edge to avoid a chunky seam.

CROCHET BORDER:
Beg at bottom of point on one side. Crochet with crochet hook size 4 mm and off-white as follows: 1 dc in point, a string of ch measuring 20-22-24 (26-28) cm, turn piece and work 1 sl st in each ch on return row, finish with 1 sl st in dc in point (= tie string). Continue round the bonnet as follows: * 3 ch, 1 tr in the first of these 3 ch, skip approx 1 cm, 1 dc in next st *, repeat from *-* to point at the other side. Work a tie string as described above and continue round the bonnet as follows: * 3 ch 1 tr in the first of these 3 ch, skip approx 1 cm, 1 dc in next st *, repeat from *-* to the first point and finish with 1 sl st in first dc from beg of round.
------------------------------------------------------------
SCARF:
Worked in garter st back and forth on needle.
Cast on 18-20-22 (24-26) sts on needle size 4 mm with light beige and work garter st back and forth on needle until piece measures approx 8-9-10 (11-12) cm. Now divide the piece in the middle and slip half the sts on a stitch holder = 9-10-11 (12-13) sts left on needle. Continue on these sts for 4-5-5 (6-6) cm (piece measures 12-14-15 (17-18) cm in total). Slip sts on a stitch holder and slip sts from the first stitch holder back on needle. Work garter st back and forth on needle for 4-5-5 (6-6) cm. Now slip all sts back on needle and continue in garter st until piece measures approx 44-47-51 (55-60) cm. Cast off.

CROCHET BORDER:
Crochet a border round scarf with crochet hook size 4 mm and off-white as follows: * 1 dc, 3 ch, 1 tr in the first of these 3 ch, skip approx 1 cm *, repeat from *-* and finish with 1 sl st in first dc from beg of round.


Diagram

symbols = sew a to a
symbols = sew b to b
symbols = sew c to c
symbols = sew d to d
diagram
Do you have a question? See a list of frequently asked questions (FAQ)

Knitting tension is what determines the final measurements of your work, and is usually measured per 10 x 10 cm. It is provided like so: number of stitches in width x number of rows in height - eg: 19 stitches x 26 rows = 10 x 10 cm.

The knitting tension is very individual; some people knit/crochet loosely while others work tightly. You adjust the knitting tension with the needle size, which is why the suggested needle size is only meant as a guide! You need to adjust this (up or down) to ensure that YOUR knitting tension matches the knitting tension provided in the pattern. If you work with a different knitting tension than provided you will have a different yarn consumption, and your work will have different measurements than what the pattern suggests.

The knitting tension also determines which yarns can replace each other. As long as you achieve the same knitting tension you can replace one yarn with another.

See DROPS lesson: How to measure your tension/gauge

See DROPS video: How to make a gauge tension swatch

The required amount of yarn is provided in grams, eg: 450 g. To calculate how many balls you’ll need you first need to know how many grams are in 1 ball (25g, 50g or 100g). This information is available if you click on the individual yarn quality on our pages. Divide the amount required with the amount of each ball. For example, if each ball is 50g (the most common amount), the calculation will be as follows: 450 / 50 = 9 balls.

The important thing when changing from one yarn to another is that the knitting/crochet tension remains the same. This is so that the measurements of the finished piece will be the same as on the sketch provided. It is easier to achieve the same knitting tension using yarns from the same yarn group. It is also possible to work with multiple strands of a thinner yarn to achieve the knitting tension of a thicker one. Please try our yarn converter. We recommend you to always work a test swatch.

Please NOTE: when changing yarn the garment might have a different look and feel to the garment in the photo, due to individual properties and qualities of each yarn.

See DROPS lesson: Can I use a different yarn than the one mentioned in the pattern?

All our yarns are categorised into yarn groups (from A to F) according to thickness and knitting tension – group A contains the thinnest yarns and group F the thickest. This makes it easier for you to find alternative yarns to our patterns, should you wish to switch yarn. All yarns within the same group have a similar knitting tension and can easily replace each other. However, different yarn qualities have different structures and properties which will give the finished work a unique look and feel.

Click here for an overview of the yarns in each yarn group

At the top of all our patterns you’ll find a link to our yarn calculator, which is a helpful tool should you wish to use a different yarn than suggested. By filling in the yarn quality you wish to replace, the amount (in your size) and number of strands, the calculator will present good alternative yarns with the same knitting tension. Additionally it will tell you how much you’ll require in the new qualities and whether you’ll need to work with multiple strands. Most skeins are 50g (some are 25g or 100g).

If the pattern is worked with multiple colours, every colour will have to be calculated separately. Similarly, if the pattern is worked with several strands of different yarns (for example 1 strand Alpaca and 1 strand Kid-Silk) you will have to find alternatives for each, individually.

Click here to see our yarn calculator

Since different yarns have different qualities and textures we have chosen to keep the original yarn in our patterns. However, you can easily find options among our available qualities by using our yarn calculator, or simply pick a yarn from the same yarn group.

It is possible that some retailers still have discontinued yarns in stock, or that someone has a few skeins at home that they would like to find patterns for.

The yarn calculator will provide both alternative yarn as well as required amount in the new quality.

If you think it's hard to decide what size to make, it can be a good idea to measure a garment you own already and like the size of. Then you can pick the size by comparing those measures with the ones available in the pattern's size chart.

You'll find the size chart at the bottom of the pattern.

See DROPS lesson: How to read size chart

The needle size provided in the pattern serves only as a guide, the important thing is to follow the knitting tension. And since knitting tension is very individual, you will have to adjust the needle size to ensure that YOUR tension is the same as in the pattern – maybe you’ll have to adjust 1, or even 2 needle sizes, up or down to achieve the correct tension. For this, we recommend that you work test swatches.

Should you work with a different knitting tension than the one provided, the measurements of the finished garment might deviate from the measurement sketch.

See DROPS lesson: How to measure your tension/gauge

See DROPS video: How to make a tension/gauge swatch

Working a garment top-down provides more flexibility and room for personal adjustment. For example it is easier to try the garment on while working, as well as making adjustments to length of yoke and shoulder caps.

The instructions are carefully explaining every step, in the correct order. Diagrams are adjusted to the knitting direction and are worked as usual.

The diagram depicts all rows/rounds, and every stitch seen from the right side. It is read from bottom to top, from right to left. 1 square = 1 stitch.

When working back and forth, every other row is worked from the right side and every other row is worked from the wrong side. When working from the wrong side, the diagram will have to be worked reversed: from left to right, knit stitches are purled, purl stitches are knit etc.

When working in the round every round is worked from the right side and the diagram are worked from right to left on all rounds.

See DROPS lesson: How to read knitting diagrams

The diagram depicts all rows/rounds, and every stitch seen from the right side. It is worked from bottom to top, from right to left.

When working back and forth every other row is worked from the right side: from right to left and every other row is worked from the wrong side: from left to right.

When working in the round, every row in the diagram are worked from the right side, from right to left.

When working a circular diagram you start in the middle and work your way outwards, counter clockwise, row by row.

The rows usually start with a given number of chain stitches (equivalent to the height of the following stitch), this will either be depicted in the diagram or explained in the pattern.

See DROPS lesson: How to read crochet diagrams

Instructions for working several diagrams after each other on the same row/round, will often be written like so: “work A.1, A.2, A.3 a total of 0-0-2-3-4 times". This means you work A.1 once, then A.2 is worked once, and A.3 is repeated (in width) the number of times provided for your size – in this case like so: S = 0 times, M = 0 times, L=2 times, XL= 3 times and XXL = 4 times.

The diagrams are worked as usual: begin with the first row in A.1, then work the first row in A.2 etc.

See DROPS lesson: How to read knitting diagrams

See DROPS lesson: How to read crochet diagrams

The total width of the garment (from wrist-to-wrist) will be larger in the larger sizes, despite the actual sleeves being shorter. The larger sizes have longer sleeve caps and wider shoulders, so there will be a good fit in all sizes.

The measurement sketch/schematic drawing provides information regarding the full length of the garment. If it’s a jumper or a jacket the length is measured from the highest point on the shoulder closest to the neckline, and straight down to the bottom of the garment. It is NOT measured from the tip of shoulder. Similarly, the length of yoke is measured from the highest point on the shoulder and down to where yoke is split into body and sleeves.

On a jacket measures are never taken along bands, unless specifically stated. Always measure inside band stitches when measuring the length.

See DROPS lesson: How to read a schematic drawing

Diagrams are often repeated on the round or in height. 1 repeat is the diagram the way it appears in the pattern. If it says to work 5 repeats of A.1 in the round, then you work A.1 a total of 5 times after/next to each other in the round. If it says to work 2 repeats of A.1 vertically/in height you work the entire diagram once, then begin again at the start and work the entire diagram one more time.

Chain stitches are slightly narrower than other stitches and to avoid working the cast-on edge too tight, we simply chain more stitches to begin with. The stitch count will be adjusted on the following row to fit the pattern and measurement sketch.

The rib edge is more elastic and will contract slightly compared to, for example, stocking stitch. By increasing before the rib edge, you avoid a visible difference in width between the rib edge and the rest of the body.

It’s very easy to cast off too tightly, and by making yarn overs while casting off (and simultaneously casting these off) you avoid a too tight cast off edge.

See DROPS video: How to bind off with yarn overs (yo)

To achieve an even increase (or decrease) you can increase on, for example: every 3rd and 4th row alternately, like so: work 2 rows and increase on the 3rd row, work 3 rows and increase on the 4th. Repeat this until the increase is complete.

See DROPS lesson: Increase or decrease 1 st on every 3rd and 4th row alternately

Should you prefer to work in the round instead of back and forth, you may of course adjust the pattern. You’ll need to add steeks mid-front (usually 5 stitches), and follow the instructions. When you would normally turn and work from the wrong side, simply work across the steek and continue in the round. At the end you’ll cut the piece open, pick up stitches to work bands, and cover the cut edges.

See DROPS video: How to knit steeks and cut open

Should you prefer to work back and forth instead of in the round, you may of course adjust the pattern so you work the pieces separately and then assemble them at the end. Divide the stitches for the body in 2, add 1 edge stitch in each side (for sewing) and work the front and back pieces separately.

See DROPS lesson: Can I adapt a pattern for circular needles into straight needles?

Pattern repeats can vary slightly in the different sizes, in order to get the correct proportions. If you’re not working the exact same size as the garment in the photo, yours might deviate slightly. This has been carefully developed and adjusted so that the complete impression of the garment is the same in all sizes.

Make sure to follow instructions and diagrams for your size!

If you have found a pattern you like which is available in women’s size it’s not very difficult to convert it to men’s size. The biggest difference will be the length of sleeves and body. Start working on the women size that you think would fit across the chest. The additional length will be worked right before you cast off for the armhole/sleeve cap. If the pattern is worked top-down you can add the length right after the armhole or before the first decrease on sleeve.

Regarding additional yarn amount, this will depend on how much length you add, but it is better with a skein too many than too few.

All yarns will have excess fibres (from production) that might come off as lint or shedding. Brushed yarns (ie hairier yarns) have more of these loose, excess fibres, causing more shedding.

Shedding also depends on what is worn under or over the garment, and whether this pulls at the yarn fibres. It’s therefore not possible to guarantee that there will be no shedding

Below are some tips on how to get the best result when working with hairier yarns:

1. When the garment is finished (before you wash it) shake it vigorously so the looser hairs come off. NOTE: do NOT use a lint roller, brush or any method that pulls at the yarn.

2. Place the garment in a plastic bag and put it in your freezer - the temperature will cause the fibres to become less attached to each other, and excess fibres will come off easier.

3. Leave in the freezer for a few hours before taking it out and shaking it again.

4. Wash the garment according to the instructions on the yarn label.

Pilling is a natural process that happens to even the most exclusive of fibers. It's a natural sign of wear and tear that is hard to avoid, and that is most visible in high friction areas of your garment like a sweater's arms and cuffs.

You can make your garment look as new by removing the pilling, using a fabric comb or a pill/lint remover.

Still can't find the answer you need? Then scroll down and leave your question so one of our experts can try to help you. This will be done normally within 5 to 10 working days.
In the meantime, you can read the questions and answers that others have left to this pattern or join the DROPS Workshop on Facebook to get help from fellow knitters/crocheters!

You might also like...

Post a comment to pattern DROPS Baby 18-1

We would love to hear what you have to say about this pattern!

If you want to leave a question, please make sure you select the correct category in the form below, to speed up the answering process. Required fields are marked *.

Comments / Questions (145)

country flag Megan Demitt wrote:

So when the pattern says to work every 4th row is that every 4th right side row or every 4th row?

15.11.2013 - 17:52

DROPS Design answered:

Dear Megan, it should be every 4th row, ie every 2nd row from RS (and every 2nd row is every row from RS). Happy knitting!

15.11.2013 - 18:41

country flag Gritt wrote:

Bei jeder 4. R. 5 Mal und danach bei jeder 2. R. auf beiden Seiten des 4. Markierungsfadens 1 M. abn. Wenn ich so arbeite, wird die Maschenzahl immer geringer, oder muß ich dann Bei jeder 2. R. vor dem 5. Markierungsfaden 1 M. aufnehmen.

07.11.2013 - 10:13

DROPS Design answered:

Liebe Gritt, die Maschenzahl bleibt gleich, bis zu der Stelle, an der Sie beginnen an der 4. Markierung in jeder 2. R anzunehmen - dann verringert sich die Maschenzahl.

08.11.2013 - 08:40

Manon wrote:

Bonjour Je comprend pas l'écharpe à la fin on reprend toute les maille ensemble et on le tricote ensemble le bout es fermer ? Merci votre cité es super je prend tout mes modèle ses vraiment super

12.10.2013 - 15:31

country flag Ellen Jensen wrote:

Kan man hækle denne hue?? Hvis ja- Hvor kan jeg finde opskriften på den??

04.10.2013 - 22:14

DROPS Design answered:

Hej Ellen. Desvaerre har vi ikke en haeklet version af denne hue.

08.10.2013 - 13:55

country flag Petra wrote:

Hallo, ich habe eine Frage zu den Aufnahmen an den Markierungsfäden. Wenn vor und nach dem Markierungsfaden 1 M. aufgenommen wird, bleibt die markierte M. in der Mitte frei? Vielen Dank für Ihre Hilfe.

19.09.2013 - 21:38

DROPS Design answered:

Liebe Petra, die markierte Masche wird gestrickt.

20.09.2013 - 14:57

country flag Anette wrote:

Jeg forstår ikke slutten av oppskriften. *1 r, 2 r sammen* er greit, men hvordan felle av samtidig?

31.08.2013 - 21:57

DROPS Design answered:

hej Anette. Du skal felle av samtidig. Du strikker altsaa 1 r, 2 r sammen - og derefter hiver du den förste 1 r over de 2 r sammen, da 1 r, hiv den förste m over, 2 r sammen osv. Se her:

03.09.2013 - 15:06

country flag Cricri wrote:

Comment faire dans le bonnet augmenter apres 3ème marqueur ts ls 2 rngs et ts ls 4 rngs.Meme remarque pour le 5ème marqueur. Je ne comprends ps.Merci de m'expliquer

10.06.2013 - 18:04

DROPS Design answered:

Bonjour Cricri, au 3ème marqueur, on augmente avant le marqueur tous les 2 rangs et après le marqueur tous les 4 rangs. Au 5ème marqueur, on augmente 1 m avant le marqueur tous les 4 rangs et après le marqueur tous les 2 rangs. Pour faire les augm, cf vidéo. Bon tricot!

11.06.2013 - 08:50

country flag Adelinde Graf wrote:

Betr.: Mütze Es ist angegeben "Bei jeder 4. Reihe 3 x und danach bei jeder 2. Reihe auf beiden Seiten des 4. Markierungsfadens 1 M. abnehmen. Somit würden, wenn die angegebenen 3 x 1 M abnehmen beendet ist, in jeder 2. Reihe am Ende 2 Maschen fehlen. Ist das eine gewollte Abnahme oder ein Fehler? Bitte um schnelle Rückantwort, damit ich weiterstricken kann. Danke. Mit freundlichen Grüssen Adelinde Graf

07.04.2013 - 23:21

DROPS Design answered:

Liebe Adeline, bitte achten Sie darauf, dass Sie ALLE Auf- und Abnahmen zum richtigen Zeitpunkt stricken. In unserem Instruktionsvideo können Sie die Form der noch nicht zusammengenähten Mütze erkennen.

09.04.2013 - 19:45

country flag Nicole wrote:

Danke für die Antwort! Noch eine Sache: Bei der Abnahme, wie hebe ich die Masche ab, wie zum li. o. re. stricken?

20.03.2013 - 14:29

DROPS Design answered:

Liebe Nicole, wenn nichts anderes erwähnt ist heben Sie die Masche re ab.

27.03.2013 - 17:21

country flag Nicole wrote:

A)Ich komme mit der Formulierung "eine Runde rechts auf links stricken" nicht zurecht. Heißt das, ich stricke erst eine Reihe li und dann die nächste wieder re.? b)Nach der Angabe, wo die Mark.fäden sein sollen, heißt es: "Gleichz. bei der 1. Runde mit Auf-u. Abn. anfangen". Die Abnahmeangaben beginnen aber doch erst ab der 2. Runde, oder? Danke schon mal!

13.03.2013 - 15:35

DROPS Design answered:

Die erste Formulierung bedeutet: 1 Rückreihe rechts stricken. Die Formulierung rechts auf links ist tatsächlich etwas missverständlich, wir werden es in dieser Anleitung korrigieren. In den neueren Anleitungen ist es anders formuliert. Und: die 1. Reihe zählt als Reihe 1 in der Anleitung, es stimmt, dass Sie in R 2 beginnen.

14.03.2013 - 14:10