
Popular categories
Looking for a yarn?


|
|
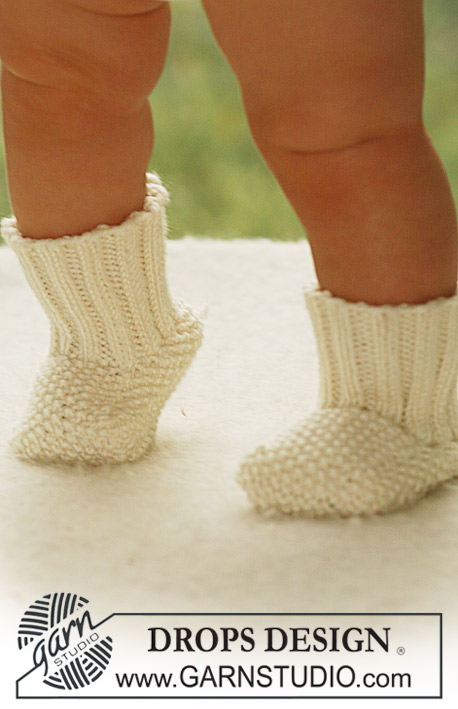
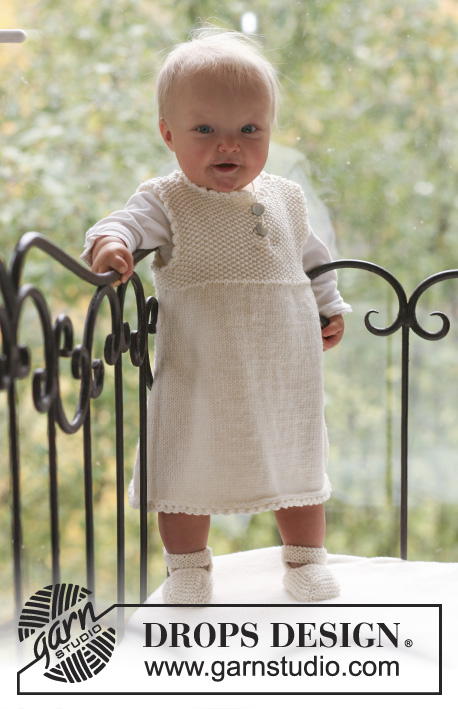
Baby Harriet |
|
 |
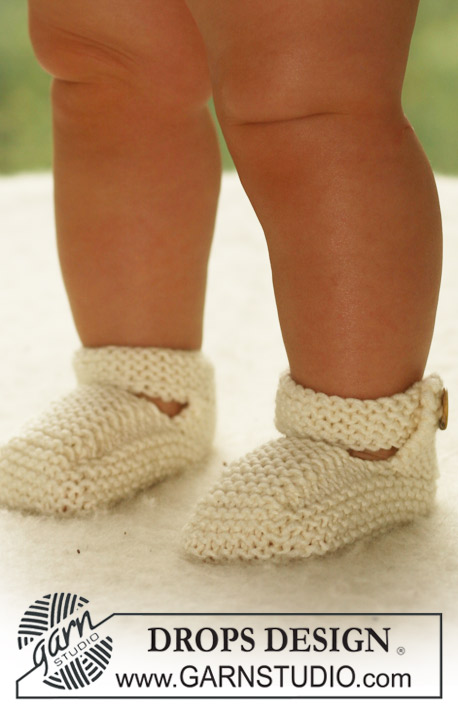 |
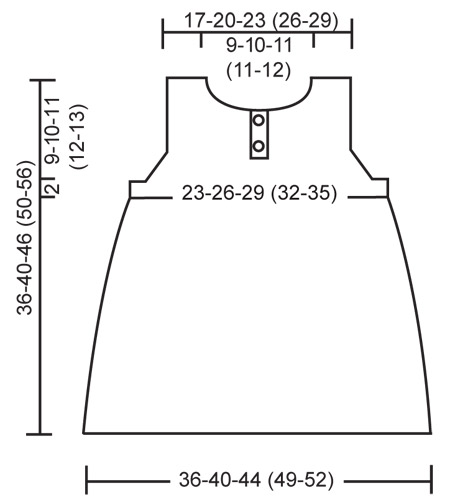
Set of knitted booties and dress with yoke in moss st for baby and children, in DROPS Merino Extra Fine
DROPS Baby 18-9 |
|
|
DRESS DECREASING TIP: Dec as follows before marker: K2 tog. Dec as follows after marker: Slip 1 st as if to K, K1, psso. MOSS ST: Row 1: * K1, P1 *, repeat from *-*. Row 2: K over P and P over K. Repeat row 2. BUTTONHOLES: Make buttonholes on right front piece. 1 buttonhole = K tog 2nd and 3rd st from mid front and make 1 YO. Make buttonholes when piece measures 29-32-37 (40-45) cm and 32-36-41 (45-50) cm. ---------------------------------------------------------- DRESS: Worked in the round on circular needle. Cast on 144-160-176 (196-208) sts on circular needle size 4.5 mm with Merino Extra Fine. Insert 1 marker each side (= 72-80-88 (98-104) sts between markers on front and back piece). K 1 round, P 1 round and continue in stocking st. REMEMBER THE KNITTING TENSION! When piece measures 5 cm dec 1 st on each side of both markers – SEE DECREASING TIP – and repeat the dec on every 5-6-7 (8-9) round a total of 10 times = 104-120-136 (156-168) sts. When piece measures 25-28-33 (36-41) cm dec 12-16-20 (28-28) sts evenly on round (dec an equal amount of sts on front and back piece) = 92-104-116 (128-140) sts. P 1 round and now continue in moss st – SEE ABOVE. When piece measures 27-30-35 (38-43) cm cast off 6 sts each side (= 3 sts on each side of both markers), and complete front and back pieces separately. BACK PIECE: = 40-46-52 (58-64) sts. Continue in moss st, AT THE SAME TIME cast off to shape the armhole each side at the beg of every row: 1 st 3 times = 34-40-46 (52-58) sts. When piece measures 34-38-44 (48-54) cm cast off the middle 16-18-20 (20-22) sts for neck and complete each side separately. Cast off 1 st on neckline on next row = 8-10-12 (15-17) sts left on shoulder. Cast off when piece measures 36-40-46 (50-56) cm. FRONT PIECE: = 40-46-52 (58-64) sts. Insert a marker between the 2 middle sts. Continue in moss st and cast off for armholes each side as described for back piece. AT THE SAME TIME when piece measures 28-31-36 (39-44) cm divide piece in two from RS as follows: Slip sts from the side and up to 2 sts before marker mid front on a stitch holder, and continue on remaining sts for right front piece. RIGHT FRONT PIECE: = sts on left side of piece as seen from RS + 2 sts to the right of marker mid front. Continue in moss st and continue dec for armhole. When dec for armhole are complete there are 19-22-25 (28-31) sts on row. When piece measures 29-32-37 (40-45) cm make buttonhole – SEE ABOVE. When piece measures 33-37-42 (46-51) cm cast off to shape the neckline at the beg of every row from mid front as follows: 5-6-7 (7-8) sts 1 time, 2 sts 2 times and 1 st 2 times = 8-10-12 (15-17) sts left on shoulder. Cast off when piece measures 36-40-46 (50-56) cm. LEFT FRONT PIECE: Slip sts from stitch holder back on needle and pick up 4 sts on the back of the first 4 sts towards mid front on right front piece. Continue as described for right front piece, but without the buttonholes. ASSEMBLY: Sew shoulder seams and sew on buttons to fit buttonholes. CROCHET BORDER: Crochet a border round neckline, armholes and along bottom edge with crochet hook size 3.5 mm as follows: * 1 dc, 3 ch, 1 tr in the first of these 3 ch, skip 1 cm *, repeat from *-*, and finish with 1 sl st in first dc from beg of round. ---------------------------------------------------------- BOOTIES: Foot length: 10-11-12 (14-16) cm. GARTER ST (back and forth on needle): K all rows. GARTER ST (in the round): K 1 round, P 1 round. ---------------------------------------------------------- RIGHT BOOTIE: Worked in garter st. Beg with the sole as follows: Cast on 14-17-19 (23-27) sts on double pointed needles size 4 mm with Merino Extra Fine and work garter st back and forth on needle – SEE ABOVE – for 4-4-4½ (5-5) cm. Now pick up sts round the sole as follows: 6-8-9 (10-11) sts along each short side and 14-17-19 (23-27) sts along cast on row = 40-50-56 (66-76) sts. Round begins at the beg of cast on row. Work garter st in the round – SEE ABOVE – for 2-2-2 (3-3) cm. Work next round as follows: Cast off the first 10-12-13 (15-16) sts, work the next 14-18-21 (26-33) sts and then slip them on a stitch holder (= heel), cast off the next 10-12-13 (15-16) sts and keep the last 6-8-9 (10-11) sts on needle (= upper foot). Work garter st back and forth on needle for 4½-5-5½ (6-6½) cm, and then cast off. Slip sts from stitch holder back on needle = 14-18-21 (26-33) sts. Work 2 cm garter st back and forth on needle. At the end of next row from RS cast on 14 new sts for strap = 28-32-35 (40-47) sts. Work garter st on all sts, AT THE SAME TIME after 1 cm make 1 buttonhole at the end of strap as follows: K tog 3rd and 4th st from edge and make 1 YO. Continue in garter st until strap measures 2 cm and cast off. ASSEMBLY: Sew the upper piece to bootie both sides, edge to edge with small, neat sts – leave an opening measuring approx ½-½-½ (1-1) cm between upper piece and edge at the back. Sew on button to fit buttonhole on strap. LEFT BOOTIE: Like right bootie, but when casting on new sts for strap, cast on at the end of row from WS in order to have the strap at the opposite side . |
|
|
|
|
Have you made this or any other of our designs? Tag your pictures in social media with #dropsdesign so we can see them! Do you need help with this pattern?You'll find tutorial videos, a Comments/Questions area and more by visiting the pattern on garnstudio.com. © 1982-2024 DROPS Design A/S. We reserve all rights. This document, including all its sub-sections, has copyrights. Read more about what you can do with our patterns at the bottom of each pattern on our site. |
|


With over 40 years in knitting and crochet design, DROPS Design offers one of the most extensive collections of free patterns on the internet - translated to 17 languages. As of today we count 304 catalogues and 11422 patterns - 11422 of which are translated into English (UK/cm).
We work hard to bring you the best knitting and crochet have to offer, inspiration and advice as well as great quality yarns at incredible prices! Would you like to use our patterns for other than personal use? You can read what you are allowed to do in the Copyright text at the bottom of all our patterns. Happy crafting!
Comments / Questions (63)
Efter at have hæklet kanterne, ruller bunden af kjolen stadig en gang. Hvad kan jeg gøre ved det? Mvh. Laura
30.09.2018 - 17:37DROPS Design answered:
Hej Laura, prøv at stryge kanten forsigtigt, med et fugtigt viskestykke imellem. Held og lykke!
01.10.2018 - 14:59Vielen Dank! Dann habe ich noch eine Frage zum Vorderteil links: was bedeutet hinter dem rechten Vorderteil 4 Maschen aufnehmen?
21.12.2017 - 11:38DROPS Design answered:
Liebe Maria, dieses Video zeigt, wie man diese Maschen aufnehmen wird (die Maschenanzahl wie in der Anleitung folgen). Viel Spaß beim stricken!
21.12.2017 - 16:59Ich stricke für 12 bis 18 Monate, beim Rückenteil: nach abketten für das armloch sind 46 Maschen übrig, dann seht, die mittleren 20 abketten, dann eine gegen den Hals=12 Maschen, das ist dann pro Seite, oder? Vielen Dank!
21.12.2017 - 09:30DROPS Design answered:
Liebe Maria, ja genau, es sind 12 M übrig für jeden Schulter. Viel Spaß beim stricken!
21.12.2017 - 11:35Hej! Jag stickar hö framstycke och undrar vad som är "mitt fram"? Är det markören eller är det början av stycket? Mvh, Emilie
05.12.2017 - 21:42DROPS Design answered:
Hej Emilie, ena sidan är mot ärmhålen och den andra är mot mitt fram, här stickar du även knapphål. Lycka till
06.12.2017 - 13:59Hej! Var sätter jag markörerna i arbetet? Är en markör direkt i början av varvet eller efter en fjärdedel? Alltså - hur många maskor ska jag sticka på varvet innan jag sätter första markören? Tacksam för hjälp! :)
29.10.2017 - 21:42DROPS Design answered:
Hej, den första markören sätter du innan den första maskan i början på varvet.
30.10.2017 - 17:10Noch eine Frage: ich habe 176 Maschen, dann soll man alle 7 Reihen je eine, also insgesamt zwei Maschen, abnehmen und das 10 Mal (2*10= 20), das wären dann 156 Maschen, in der Anleitung steht, es bleiben 136 übrig? Danke!
25.10.2017 - 12:06DROPS Design answered:
Liebe Maria, es werden insgesamt 4 M abgenommen, dh 2 M auf beiden Seiten beiden Markierungen: 176 M - (4 M x 10 ) = 136 M übrig. Viel Spaß beim stricken!
25.10.2017 - 12:31Ich stricken für einjährige. Wenn steht, jede 7 te Reihe soll sie Abnahme wiederholt werden, zählt man dann die Reihe mit der Ersten Abnahme mit? Danke!
24.10.2017 - 19:24DROPS Design answered:
Liebe Frau Gold-Tajalli, nach der 1. Reihe mit Abnahmen, stricken Sie 6 Reihen und bei der nächsten Reihe (= 7. Reihe), nehmen Sie ab. Viel Spaß beim stricken!
25.10.2017 - 08:38Décidément, lorsque je tricote un modèle Drops Design, ce n'est jamais simple...bon, les modèles sont beaux et gratuits...faut pas se plaindre...je tricote ce modèle en taille 12-18 mois et dès les 1ères diminutions, il devrait y avoir 40 mailles en moins pour les 4 marqueurs. Il y a une erreur après les 10 diminutions, il devrait rester 136 mailles pour la taille 12-18 mois et non pas 125 mailles tel qu'indiqué.
27.04.2017 - 07:50DROPS Design answered:
Bonjour Mme Beaumier, il y avait une faute de frappe qui a été désormais corrigée, merci. Bon tricot!
27.04.2017 - 09:58Hallo, ich bin schon ziemlich weit mit dem Kleid und es rollt sich der Rand weit hoch, also nicht nur einmal, sonder mehrere Lagen. Um Abhilfe zu schaffen, hab ich schon mal die Häkelkante gehäkelt, aber es rollt sich immer noch ein, zwar nicht so viel, aber eben immer noch. Jetzt hab ich Angst, dass es nach der Fertigstellung immer noch so ist.Wie kann ich dem abhelfen. Liebe Grüße Andrea
19.10.2015 - 10:27DROPS Design answered:
Sie können das Kleid nach der Fertigstellung auf eine flache Unterlage legen unter feuchten Tüchern trocknen lassen oder das Kleid auf einer geeigneten Unterlage mit Stecknadeln feststecken, mit einer Sprühflasche anfeuchten und dann trocknen lassen, bevor Sie die Stecknadeln entfernen, damit sollte Abhilfe geschaffen sein. Außerdem wird sich das Kleid beim Tragen auch noch etwas aushängen.
22.10.2015 - 21:24Vorrei fare questo vestito con la lana baby merino, più sottile rispetto alla merino extra fine. A me serve di farlo in una taglia 1-3 mesi. Come mi devo regolare con il numero di maglie da avviare? Grazie
19.09.2015 - 15:29DROPS Design answered:
Buongiorno Sarah. Per lavorare con un filato di uno spessore diverso da quello indicato, deve preparare un campione, lavarlo, quando è asciutto misurare quante m ci sono in 10 cm e ricalcolare le m in base a questa misura. P.es: se nel suo campione ha 24 m in 10 cm (e non 20 in 10 cm), dovrà avviare circa 172 m invece di 144 (24x144/20 = 144). Buon lavoro!
20.09.2015 - 12:28