DROPS Merino Extra Fine
100% Wool
from 4.55 $ /50g
Get the yarn to make this pattern from 22.75$.

The yarn cost is calculated from the pattern’s smallest size and the yarn’s cheapest product type. Looking for an even better price? You might find it on the DROPS Deals!

DROPS SS24

Cable Princess

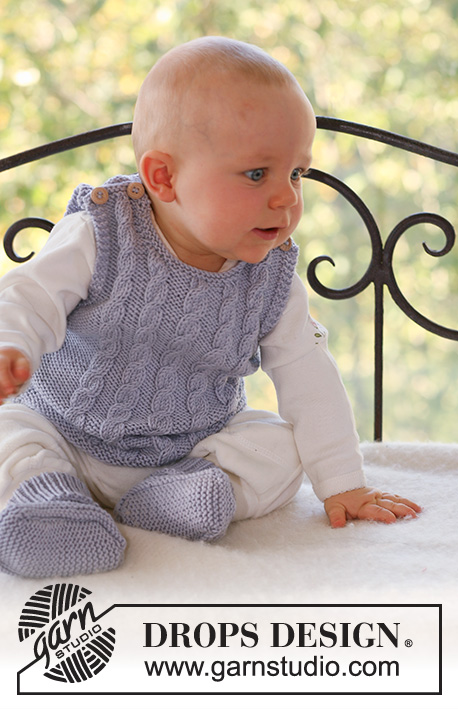
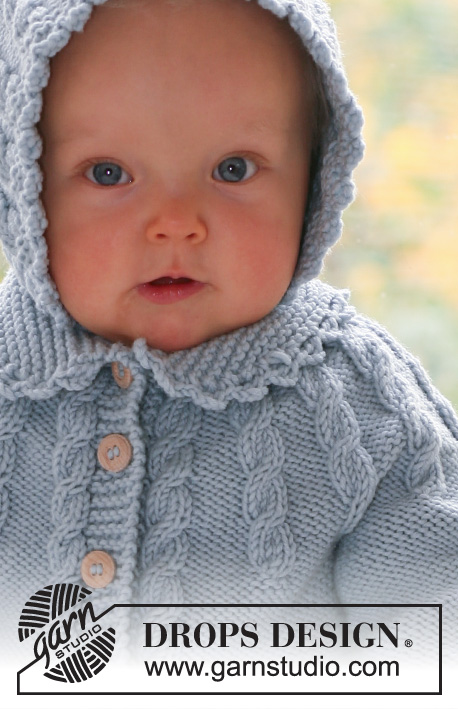
Set of knitted jacket and bonnet with cables for baby and children in DROPS Merino Extra Fine

DROPS Baby 17-1
JACKET:
Size: 1/3 - 6/9 - 12/18 months (2- 3/4) years
Bust: 50-56-62 (66-74) cm [19 ¾"-22"-24⅜" (26"-29⅛")]
Full length: 29-32-36 (40-44) cm [11⅜"-12½"-14¼" (15¾"-17¼")]

Materials: DROPS MERINO EXTRA FINE from Garnstudio
200-200-250 (250-300) g color no 15, light gray/green

DROPS DOUBLE POINTED NEEDLES AND CIRCULAR NEEDLE (60 cm [24"]) size 4 mm [US 6] – or size needed to get 21 sts x 28 rows in stockinette st = 10 x 10 cm [4" x 4"].
DROPS CROCHET Hook size 4 mm [G/6].
DROPS WOODEN BUTTONS no 503: 6 pcs.
______________________________________________________

BONNET:
Size: 1/3- 6/9- 12/18 months (2- 3/4) years
Head circumference: 42–44–46 (48– 50) cm [16½"-17¼"-18" (19"-19¾")]
Materials: DROPS MERINO EXTRA FINE from Garnstudio
50-50-100 (100-100) g color no 15, light gray/green

DROPS CIRCULAR NEEDLE (60 cm [24"]) size 4 mm [US 6] – or size needed to get 21 sts x 28 rows in stockinette st = 10 x 10 cm [4" x 4"].
DROPS CROCHET Hook size 4 mm [G/6]

-------------------------------------------------------

Alternative Yarn – See how to change yarns here
Yarn Groups A to F – Use the same pattern and change the yarn here
Yarn usage using an alternative yarn – Use our yarn converter here

-------------------------------------------------------

DROPS Merino Extra Fine
100% Wool
from 4.55 $ /50g
Get the yarn to make this pattern from 22.75$.

The yarn cost is calculated from the pattern’s smallest size and the yarn’s cheapest product type. Looking for an even better price? You might find it on the DROPS Deals!

Pattern instructions

NOTE: This pattern is written in American English. All measurements in charts are in cm. For conversion from inches to cm - click here. There are different terms for crocheting in American and British English. If this pattern includes crochet, click for "crochet terms" here. For this pattern in British English, please click here.
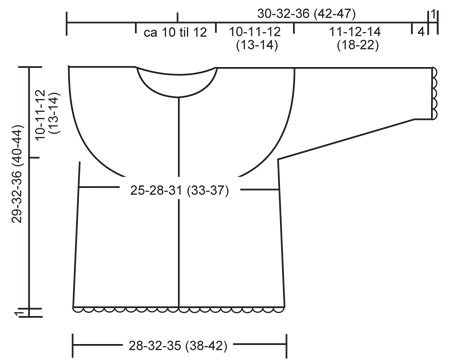
PATTERN:
See diagram M.1 – the diagram shows pattern from the RS.

GARTER ST (back and forth on needle): K all rows.

GARTER ST (in the round): K 1 round, P 1 round.

BUTTONHOLES:
Make buttonholes on right front band. 1 buttonhole = K tog 2nd and 3rd st from mid front and make 1 YO.
Make buttonholes when piece measures:
SIZE 1/3 months: 4, 8, 13, 17, 22 and 26 cm [1½", 3⅛", 5⅛", 6¾", 8¾", 10¼"]
SIZE 6/9 months: 4, 9, 14, 19, 24 and 29 cm [1½", 3½", 5½", 7½", 9½", 11⅜"]
SIZE 12/18 months: 4, 10, 16, 22, 28 and 33 cm [1½", 4", 6¼", 8¾", 11", 13"]
SIZE 2 years: 5, 11, 18, 24, 31 and 37 cm [2", 4⅜", 7", 9½", 12¼", 14½"]
SIZE 3/4 years: 5, 12, 19, 26, 33 and 40 cm [2", 4¾", 7½", 10¼", 13" 15¾"]

DECREASING TIP (applies to jacket): Make all dec from RS.
Dec 1 st to the left and to the right alternately of all cables by P2 tog, i.e. the first dec is made to the left and the next dec is made to the right of all cables, etc.
Decrease only on the inside of the outermost cable towards the band in each side.

CROCHET PICOT BORDER: With crochet hook size 4 mm [G/6]: 1 sc in first st, * 4 ch, 1 dc in the first of these ch (= 1 picot), skip 1 cm [3/8"], 1 sc in next st *, repeat from *-*.
----------------------------------------------------------
----------------------------------------------------------
JACKET

BODY PIECE: Worked back and forth on circular needle from mid front.
Cast on 128-144-158 (170-186) sts (includes 5 front band sts each side towards mid front) on circular needle size 4 mm [US 6] with Merino Extra Fine. Work 4 rows garter st (first row = RS) – SEE ABOVE.
Work next row as follows from RS: 5 front band sts in garter st, P1, K2 in each of the next 2 sts (i.e. 2 sts inc to 4), P across the row until 8 sts remain, K2 in each of the next 2 sts, P1 and 5 front band sts in garter st = 132-148-162 (174-190) sts.
Insert 1 marker 36-40-44 (47-51) sts in from each side (= 60-68-74 (80-88) sts between markers on back piece).
Work next row as follows from WS: 5 garter sts, K1, M.1, K across the row until 10 sts remain, M.1, K1, 5 garter sts.
Work next row as follows from RS: 5 garter sts, P1, M.1, P across the row until 10 sts remain, M.1, P1, 5 garter sts.
Continue in pattern like this (i.e. front band sts in garter st, 1 st in reverse stockinette st inside front bands, 1 cable (= M.1) each side and remaining sts in reverse stockinette st).
REMEMBER THE KNITTING GAUGE!
AT THE SAME TIME when piece measures 4 cm [1½"] dec 1 st on each side of both markers by P2 tog. Repeat the dec on every 4 cm [1½"] a total of 4-4-4 (5-5) times = 116-132-146 (154-170) sts. AT THE SAME TIME when piece measures 4-4-4 (5-5) cm [1½"-1½"-1½" (2"-2")] make buttonhole on right front band – SEE ABOVE.
When piece measures approx 19-21-24 (27-30) cm [7½"-8¼"-9½" (10⅝"-11¾")] – adjust so that next row is from WS – bind off 6 sts each side for armhole (= 3 sts on each side of both markers) = 104-120-134 (142-158) sts left on row. Put piece aside and knit the sleeves.

SLEEVE: Worked in the round on double pointed needles.
Cast on 28-30-32 (34-38) sts on double pointed needles size 4 mm [US 6] with Merino Extra Fine. Work 4 rounds garter st – SEE ABOVE. Continue in reverse stockinette st, and insert a marker at beg of round = mid under arm. When piece measures 4 cm [1½"] inc 1 st on each side of marker and repeat the inc on every 6-5-6 (6-8) round a total of 5-6-7 (8-8) times = 38-42-46 (50-54) sts. When piece measures 14-15-18 (22-26) cm [5½"-6"-7" (8¾"-10¼")] bind off 6 sts mid under arm = 32-36-40 (44-48) sts.
Put piece aside and knit the other sleeve.

YOKE: Slip sleeves on the same circular needle as body piece where bound off for armhole = 168-192-214 (230-254) sts. Work 1 row from RS with front bands and cables as before and remaining sts in reverse stockinette st, AT THE SAME TIME dec 0-4-6 (2-6) sts evenly (do not dec on front bands and cables) = 168-188-208 (228-248) sts.
Work next row as follows from WS: 5 garter sts, K1, M.1, * K8, P2 in each of the next 2 sts (i.e. 2 sts inc to 4) *, repeat from *-* until 18 sts remain, K8, M.1, K1 and 5 garter sts = 196-220-244 (268-292) sts.
Work next row as follows from RS: 5 garter sts, P1, M.1, * P8, M.1 *, repeat from *-* 15-17-19 (21-23) times, P1 and 5 garter sts. Continue in pattern like this, AT THE SAME TIME on next row from RS start dec to shape the round yoke – SEE DECREASING TIP.
Continue to dec on every 8th row: 0-0-1 (2-3) more times, on every 6th row: 1-2-2 (1-1) times in total and then on every 4th row: 4-3-2 (2-1) times in total (there are now 2 purled stitches between every cable). AT THE SAME TIME when yoke measures 8-9-10 (11-12) cm [3⅛"-3½"-4" (4⅜"-4¾")] slip 8 sts each side towards mid front on stitch holders for neck.
Bind off to shape the neckline each side at the beg of every row from mid front: 1 st 2 times each side.
When yoke measures 10-11-12 (13-14) cm [4"-4⅜"-4¾" (5⅛"-5½")] dec all P2 between cables to P1 and K tog the 4 sts on each cable 2 by 2 = approx 43-49-55 (61-67) sts left on row.

COLLAR: Pick up 10 sts on each side of neckline mid front (incl sts on stitch holders). K 1 row from WS, AT THE SAME TIME adjust no of sts evenly to 50-54-58 (62-66). Work garter st back and forth on needle until collar measures 3-3-4 (4-5) cm [1⅛"-1⅛"-1½" (1½"-2")]. Now bind off 1 st each side a total of 4 times and then bind off remaining sts. Collar measures approx 5-5-6 (6-7) cm [2"-2"-2⅜" (2⅜"-2¾")].

ASSEMBLY: Sew openings under arms.
Crochet a picot border – SEE ABOVE – round collar, round sleeve edges and along bottom edge of jacket. Sew on buttons.
----------------------------------------------------------
BONNET:

Worked back and forth on circular needle.
LOOSELY cast on 64-70-76 (82-88) sts on circular needle size 4 mm [US 6] with Merino extra fine. Work 4 rows garter st – SEE ABOVE. Work next row as follows from RS: 1 garter st, * K2 in each of the next 2 sts, P4 *, repeat from *-* until 3 sts remain, K2 in each of the next 2 sts, 1 garter st = 86-94-102 (110-118) sts. Continue as follows from WS: 1 garter st, * M.1, K 4 *, repeat from *-* until 5 sts remain, M.1 (= 4 sts) and 1 garter st.
Work next row as follows from RS: 1 garter st, * M.1, P 4 *, repeat from *-* until 5 sts remain, M.1 (= 4 sts), 1 garter st.
Continue in pattern like this until piece measures approx 10-11-12 (13-14) cm [4"-4⅜"-4¾" (5⅛"-5½")] – adjust so that next row is from RS – and now K tog the 4 sts on each cable 2 by 2 = 64-70-76 (82-88) sts. On next row from WS bind off the first 23-25-27 (29-31) sts, work remaining sts on row. On next row from RS bind off the first 23-25-27 (29-31) sts = 18-20-22 (24-26) sts left on row (= back piece).
Work garter st back and forth on these sts for 11-12-13 (14-15) cm [4⅜"-4¾"-5⅛" (5½"-6")], bind off.

ASSEMBLY: Sew the sides on the piece mid back to side pieces, sew edge to edge to avoid a chunky seam.
Pick up approx 60 to 84 sts (divisible by 4) along bottom edge of bonnet on circular needle size 4 mm [US 6], K 1 row from WS and K 1 row from RS. Work next row as follows from WS: K2, * P2 tog, 1 YO *, repeat from *-* and K2 (= eyelet row).
K 2 rows on all sts and bind off.
Crochet a ch-string measuring approx 70 cm [27½"] with crochet hook size 4 mm [G/6] and thread string through eyelet row.
Crochet a picot border – SEE ABOVE – round the front opening of bonnet.

This pattern has been corrected.

Updated online: 12.12.2008
Sentence with markers moved down a bit.
BODY PIECE: Worked back and forth on circular needle from mid front.
Cast on 128-144-158 (170-186) sts (includes 5 front band sts each side towards mid front) on circular needle size 4 mm [US 6] with Merino Extra Fine. Work 4 rows garter st (first row = RS) – SEE ABOVE.
Work next row as follows from RS: 5 front band sts in garter st, P1, K2 in each of the next 2 sts (i.e. 2 sts inc to 4), P across the row until 8 sts remain, K2 in each of the next 2 sts, P1 and 5 front band sts in garter st = 132-148-162 (174-190) sts.
Insert 1 marker 36-40-44 (47-51) sts in from each side (= 60-68-74 (80-88) sts between markers on back piece).
Updated online: 26.02.2018
Correction under YOKE:... Cast off to shape the neckline each side at the beg of every row from mid front: 1 st 2 times. When yoke measures 10-11-12 (13-14) cm dec all P3 between cables to P2 and K tog the 4 sts on each cable 2 by 2 = approx 43-49-55 (61-67) sts left on row...
Updated online: 23.03.2021
DECREASING TIP (applies to jacket): ... Decrease only on the inside of the outermost cable towards the band in each side. YOKE: ... Continue in pattern like this, AT THE SAME TIME on next row from RS start dec to shape the round yoke – SEE DECREASING TIP. Continue to dec on every 8th row: 0-0-1 (2-3) more times, on every 6th row: 1-2-2 (1-1) times in total and then on every 4th row: 4-3-2 (2-1) times in total (there are now 2 purled stitches between every cable). AT THE SAME TIME when yoke measures 8-9-10 (11-12) cm = 3 1/8"-3 1/2"-4" (4 3/8"-4 3/4") slip 8 sts each side towards mid front on stitch holders for neck. Bind off to shape the neckline each side at the beg of every row from mid front: 1 st 2 times. When yoke measures 10-11-12 (13-14) cm = 4"-4 3/8"-4 3/4" (5 1/8"-5 1/2") dec all P2 between cables to P1 and K tog the 4 sts on each cable 2 by 2 = approx 43-49-55 (61-67) sts left on row.

Diagram

All measurements in charts are in cm.

symbols = K from RS, P from WS
symbols = slip 2 sts on cable needle in front of piece, K2, K2 from cable needle
diagram
diagram
Do you have a question? See a list of frequently asked questions (FAQ)

Knitting tension is what determines the final measurements of your work, and is usually measured per 10 x 10 cm. It is provided like so: number of stitches in width x number of rows in height - eg: 19 stitches x 26 rows = 10 x 10 cm.

The knitting tension is very individual; some people knit/crochet loosely while others work tightly. You adjust the knitting tension with the needle size, which is why the suggested needle size only serve as a guide! You need to adjust this (up or down) to ensure that YOUR knitting tension matches the knitting tension provided in the pattern. If you work with a different knitting tension than provided you will have a different yarn consumption, and your work will have different measurements than what the pattern suggests.

The knitting tension also determines which yarns can replace each other. As long as you achieve the same knitting tension you can replace one yarn with another.

See DROPS lesson: How to measure your tension/gauge

See DROPS video: How to make a gauge tension swatch

The required amount of yarn is provided in grams, eg: 450 g. To calculate how many balls you’ll need you first need to know how many grams are in 1 ball (25g, 50g or 100g). This information is available if you click on the individual yarn quality on our pages. Divide the amount required with the amount of each ball. For example, if each ball is 50g (the most common amount), the calculation will be as follows: 450 / 50 = 9 balls.

The important thing when changing from one yarn to another is that the knitting/crochet tension remains the same. This is so that the measurements of the finished piece will be the same as on the sketch provided. It is easier to achieve the same knitting tension using yarns from the same yarn group. It is also possible to work with multiple strands of a thinner yarn to achieve the knitting tension of a thicker one. Please try our yarn converter. We recommend you to always work a test swatch.

Please NOTE: when changing yarn the garment might have a different look and feel to the garment in the photo, due to individual properties and qualities of each yarn.

See DROPS lesson: Can I use a different yarn than the one mentioned in the pattern?

All our yarns are categorised into yarn groups (from A to F) according to thickness and knitting tension – group A contains the thinnest yarns and group F the thickest. This makes it easier for you to find alternative yarns to our patterns, should you wish to switch yarn. All yarns within the same group have a similar knitting tension and can easily replace each other. However, different yarn qualities have different structures and properties which will give the finished work a unique look and feel.

Click here for an overview of the yarns in each yarn group

At the top of all our patterns you’ll find a link to our yarn converter, which is a helpful tool should you wish to use a different yarn than suggested. By filling in the yarn quality you wish to replace, the amount (in your size) and number of strands, the converter will present good alternative yarns with the same knitting tension. Additionally it will tell you how much you’ll require in the new qualities and whether you’ll need to work with multiple strands. Most skeins are 50g (some are 25g or 100g).

If the pattern is worked with multiple colours, every colour will have to be converted separately. Similarly, if the pattern is worked with several strands of different yarns (for example 1 strand Alpaca and 1 strand Kid-Silk) you will have to find alternatives for each, individually.

Click here to see our yarn converter

Since different yarns have different qualities and textures we have chosen to keep the original yarn in our patterns. However, you can easily find options among our available qualities by using our yarn converter, or simply pick a yarn from the same yarn group.

It is possible that some retailers still have discontinued yarns in stock, or that someone has a few skeins at home that they would like to find patterns for.

The yarn converter will provide both alternative yarn as well as required amount in the new quality.

If you think it's hard to decide what size to make, it can be a good idea to measure a garment you own already and like the size of. Then you can pick the size by comparing those measures with the ones available in the pattern's size chart.

You'll find the size chart at the bottom of the pattern.

See DROPS lesson: How to read size chart

The needle size provided in the pattern serves only as a guide, the important thing is to follow the knitting tension. And since knitting tension is very individual, you will have to adjust the needle size to ensure that YOUR tension is the same as in the pattern – maybe you’ll have to adjust 1, or even 2 needle sizes, up or down to achieve the correct tension. For this, we recommend that you work test swatches.

Should you work with a different knitting tension than the one provided, the measurements of the finished garment might deviate from the measurement sketch.

See DROPS lesson: How to measure your tension/gauge

See DROPS video: How to make a gauge tension swatch

Working a garment top-down provides more flexibility and room for personal adjustment. For example it is easier to try the garment on while working, as well as making adjustments to length of yoke and shoulder caps.

The instructions are carefully explaining every step, in the correct order. Diagrams are adjusted to the knitting direction and are worked as usual.

The diagram depicts all rows/rounds, and every stitch seen from the right side. It is read from bottom to top, from right to left. 1 square = 1 stitch.

When working back and forth, every other row is worked from the right side and every other row is worked from the wrong side. When working from the wrong side, the diagram will have to be worked reversed: from left to right, knit stitches are purled, purl stitches are knit etc.

When working in the round every round is worked from the right side and the diagram are worked from right to left on all rounds.

See DROPS lesson: How to read knitting diagrams

The diagram depicts all rows/rounds, and every stitch seen from the right side. It is worked from bottom to top, from right to left.

When working back and forth every other row is worked from the right side: from right to left and every other row is worked from the wrong side: from left to right.

When working in the round, every row in the diagram are worked from the right side, from right to left.

When working a circular diagram you start in the middle and work your way outwards, counter clockwise, row by row.

The rows usually start with a given number of chain stitches (equivalent to the height of the following stitch), this will either be depicted in the diagram or explained in the pattern.

See DROPS lesson: How to read crochet diagrams

Instructions for working several diagrams after each other on the same row/round, will often be written like so: “work A.1, A.2, A.3 a total of 0-0-2-3-4 times". This means you work A.1 once, then A.2 is worked once, and A.3 is repeated (in width) the number of times provided for your size – in this case like so: S = 0 times, M = 0 times, L=2 times, XL= 3 times and XXL = 4 times.

The diagrams are worked as usual: begin with the first row in A.1, then work the first row in A.2 etc.

See DROPS lesson: How to read knitting diagrams

See DROPS lesson: How to read crochet diagrams

The total width of the garment (from wrist-to-wrist) will be larger in the larger sizes, despite the actual sleeves being shorter. The larger sizes have longer sleeve caps and wider shoulders, so there will be a good fit in all sizes.

The measurement sketch/schematic drawing provides information regarding the full length of the garment. If it’s a jumper or a jacket the length is measured from the highest point on the shoulder (usually closest to the neckline), and straight down to the bottom of the garment. It is NOT measured from the tip of shoulder. Similarly, the length of yoke is measured from the highest point on the shoulder and down to where yoke is split into body and sleeves.

See DROPS lesson: How to read a schematic drawing

Diagrams are often repeated on the round or in height. 1 repeat is the diagram the way it appears in the pattern. If it says to work 5 repeats of A.1 in the round, then you work A.1 a total of 5 times after/next to each other in the round. If it says to work 2 repeats of A.1 vertically/in height you work the entire diagram once, then begin again at the start and work the entire diagram one more time.

Chain stitches are slightly narrower than other stitches and to avoid working the cast-on edge too tight, we simply chain more stitches to begin with. The stitch count will be adjusted on the following row to fit the pattern and measurement sketch.

The rib edge is more elastic and will contract slightly compared to, for example, stocking stitch. By increasing before the rib edge, you avoid a visible difference in width between the rib edge and the rest of the body.

It’s very easy to cast off too tightly, and by making yarn overs while casting off (and simultaneously casting these off) you avoid a too tight cast off edge.

See DROPS video: How to bind off with yarn overs (yo)

To achieve an even increase (or decrease) you can increase on, for example: every 3rd and 4th row alternately, like so: work 2 rows and increase on the 3rd row, work 3 rows and increase on the 4th. Repeat this until the increase is complete.

See DROPS lesson: Increase or decrease 1 st on every 3rd and 4th row alternately

Should you prefer to work in the round instead of back and forth, you may of course adjust the pattern. You’ll need to add steeks mid-front (usually 5 stitches), and follow the instructions. When you would normally turn and work from the wrong side, simply work across the steek and continue in the round. At the end you’ll cut the piece open, pick up stitches to work bands, and cover the cut edges.

See DROPS video: How to knit steeks and cut open

Should you prefer to work back and forth instead of in the round, you may of course adjust the pattern so you work the pieces separately and then assemble them at the end. Divide the stitches for the body in 2, add 1 edge stitch in each side (for sewing) and work the front and back pieces separately.

See DROPS lesson: Can I adapt a pattern for circular needles into straight needles?

Pattern repeats can vary slightly in the different sizes, in order to get the correct proportions. If you’re not working the exact same size as the garment in the photo, yours might deviate slightly. This has been carefully developed and adjusted so that the complete impression of the garment is the same in all sizes.

Make sure to follow instructions and diagrams for your size!

If you have found a pattern you like which is available in women’s size it’s not very difficult to convert it to men’s size. The biggest difference will be the length of sleeves and body. Start working on the women size that you think would fit across the chest. The additional length will be worked right before you cast off for the armhole/sleeve cap. If the pattern is worked top-down you can add the length right after the armhole or before the first decrease on sleeve.

Regarding additional yarn amount, this will depend on how much length you add, but it is better with a skein too many than too few.

All yarns will have excess fibres (from production) that might come off as lint or shedding. Brushed yarns (ie hairier yarns) have more of these loose, excess fibres, causing more shedding.

Shedding also depends on what is worn under or over the garment, and whether this pulls at the yarn fibres. It’s therefore not possible to guarantee that there will be no shedding

Below are some tips on how to get the best result when working with hairier yarns:

1. When the garment is finished (before you wash it) shake it vigorously so the looser hairs come off. NOTE: do NOT use a lint roller, brush or any method that pulls at the yarn.

2. Place the garment in a plastic bag and put it in your freezer - the temperature will cause the fibres to become less attached to each other, and excess fibres will come off easier.

3. Leave in the freezer for a few hours before taking it out and shaking it again.

4. Wash the garment according to the instructions on the yarn label.

Pilling is a natural process that happens to even the most exclusive of fibers. It's a natural sign of wear and tear that is hard to avoid, and that is most visible in high friction areas of your garment like a sweater's arms and cuffs.

You can make your garment look as new by removing the pilling, using a fabric comb or a pill/lint remover.

Still can't find the answer you need? Then scroll down and leave your question so one of our experts can try to help you. This will be done normally within 5 to 10 working days.
In the meantime, you can read the questions and answers that others have left to this pattern or join the DROPS Workshop on Facebook to get help from fellow knitters/crocheters!

You might also like...

Post a comment to pattern DROPS Baby 17-1

We would love to hear what you have to say about this pattern!

If you want to leave a question, please make sure you select the correct category in the form below, to speed up the answering process. Required fields are marked *.

Comments / Questions (197)

country flag Mary wrote:

Is there another version of the instructions for the yoke? maybe some diagrams? i have read and reread the instruction and have knitted to the point of binding off for the neckline. I am so confused, and reading the comments and questions of other readers i am not alone. Please help. i think i may be ripping my garment apart.

15.05.2018 - 00:27

DROPS Design answered:

Dear Mary, you will slip the first 8 sts at the beg of next 2 rows on a st holder for neck (work these sts first and slip them on a st holder to avoid cutting the yarn), then continue binding off at the beg of every row on each side (= both from RS and WS): 1 st 2 times. Do not forget to continue the decrease as before. Happy knitting!

15.05.2018 - 08:48

country flag Rt wrote:

Strikker jakka og er kommet til fellinga på slutten der en setter masker på tråd. Står en skal strikke de to vrange mellom flettene sammen til en vrang. Men jeg har tre masker igjen. Var jo i utgangspunktet 8 masker mellom flettene og når en feller 5 ganger er det 3 masker igjen?

04.02.2018 - 20:25

DROPS Design answered:

Hei Rt. Det er nå lagt til en rettelse under bærestykket, (oppdatert 26.02.2018). mvh Drops design

02.03.2018 - 07:31

country flag Britta wrote:

Die angegebenen 200g Wolle für Größe 62/68 haben bei mir nicht ausgereicht. Ich habe 250g benötigt.

05.11.2017 - 12:54

country flag Britta wrote:

Beim Kragen soll man 10M. Inkl. Maschen auf dem Hilfsfaden aufnehmen. Steht der Kragen dann 2Maschen über der Blende über?

05.11.2017 - 12:49

DROPS Design answered:

Liebe Britta, diese 10 M sind die 8 stillgelten Maschen + 2 M (diese werden am Halsausschnitt aufgefassen, wo Sie 1 M 2 x abgekettet haben). Viel Spaß beim stricken!

06.11.2017 - 09:44

country flag Kerry Roberts wrote:

I have fitted as far as the yoke and added the sleeves, but the instructions which follow do not seem complete. There are no further instructions for what to do after it says AT THE SAME TIME

20.03.2017 - 21:47

DROPS Design answered:

Dear Mrs Roberts, Work first 1 row from RS over all sts on body and sleeves while at the same time decrease 0-4-6 (2-6) sts evenly (do not dec on front bands nor on cables). Then work next row from WS as explained (inc for cables worked on next row), then work 1st row with cables from RS. Work 1 row from WS then on next row from RS start to dec as explained under DECREASING TIP (see at the beg of the pattern) on every 8th row: 0-0-1 (2-3) times, on every 6th row: 1-2-2 (1-1) times and then on every 4th row: 4-3-2 (2-1) times - and do not forget to work neck at the same time. Happy knitting!

21.03.2017 - 09:10

country flag Knuddl wrote:

Ich verstehe den letzten Teil nicht. Man legt jeweils die ersten 8 Maschen auf einen Hilfsfaden, aber das ist dann ja mitten im Zopf? Heißt das man strickt diese Maschen dann nicht mehr für die restlichen Zentimeter und nimmt sie dann erst wieder auf für den Kragen? Und wo soll abgekettet werden? Dann hinter den Maschen, die auf dem Hilfsaden liegen? Wäre sehr dankbar für Hilfe, ich bin fast fertig und es ist so kalt, meine Tochter (3Monate) könnte die Jacke wirklich gut gebrauchen!

14.12.2016 - 19:46

DROPS Design answered:

Liebe Frau Knuddl, diese Maschen sind zuerst stillgelegt, dann nimmt man für den Hals ab. Wenn mann den Kragen später arbeitet werden diese Maschen aufgenommen (siehe KRAGEN). Viel Spaß beim stricken!

15.12.2016 - 09:24

country flag Isabel wrote:

Na touca depois (para 3meses) refere que depois de 10cm numa carreira pelo avesso tricotar as malhas da trança duas a duas e depois diz na carreira seguinte pelo avesso rematar as primeiras 23 malhas. Não consigo fazer duas carreiras avesso seguidas. A seguir a carreira do avesso em que tricotei as malhas das tranças duas a duas como faço a carreira seguinte que é pelo direito?

03.12.2016 - 20:40

DROPS Design answered:

Bom dia, Efectivamente, tem razão. Vamos reportar ao departamento de estilismo para que verifiquem e façam as correcções necessárias. Obrigado em nome da DROPS

06.12.2016 - 11:41

Adela wrote:

Espero tu respuesta.Un abrazo.Gracias

06.10.2016 - 16:11

DROPS Design answered:

Ver la respuesta abajo.

09.10.2016 - 11:28

Adela wrote:

Manga: en la línea de cambio de c/agj. de dos puntas, me resulta un jersey revés mas flojo a pesar que tiro bastante del hilo.Hay otra técnica mas prolija? Un abrazo Adela

30.09.2016 - 16:30

DROPS Design answered:

Hola Adela. Se puede trabajar con ag circular corta o dos ag circulares. Puedes consultar este video:

09.10.2016 - 11:27

Adela wrote:

Te doy una idea: traducidas a todos los idiomas las respuestas ,uno podría resolver la propia duda, en bastantes casos, y molestarte menos.Sos muy amable Gracias,Adela

24.09.2016 - 12:57