
Popular categories
Looking for a yarn?


|
|
Cuddly Friend |
|
 |
 |
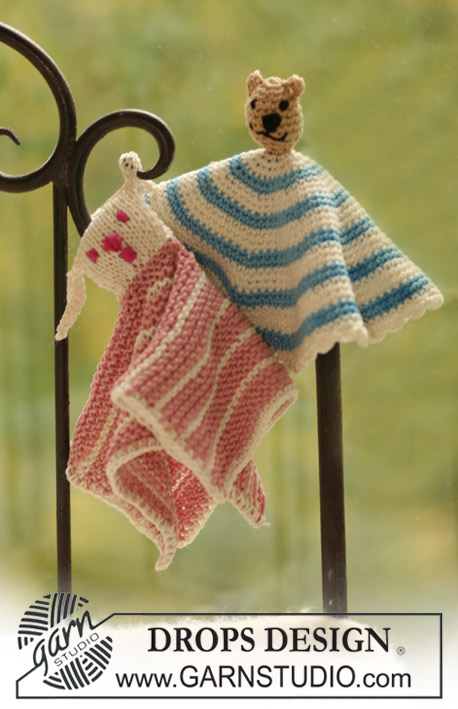
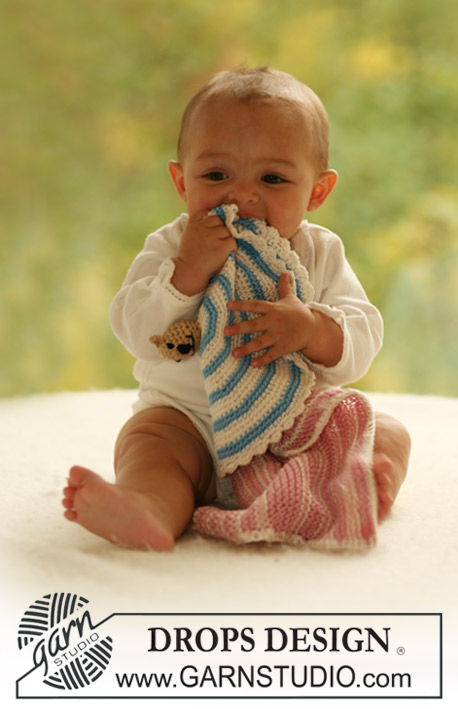
Knitted and crochet baby snuggle blanket with animal motifs in DROPS Muskat
DROPS Baby 17-26 |
|
|
KNITTED BLANKET: GARTER ST (back and forth on needle): K all rows. STRIPES: * 6 rows light pink, 2 rows off-white *, repeat from *-*. ------------------------------------------------------------ BLANKET: Cast on 46 sts on needle size 4.5 mm [US 7] with light pink. Work garter st back and forth on needle in stripes – SEE ABOVE. When piece measures approx 11 cm [4½"] – adjust to after 6 rows light pink – slip 19 sts each side on a stitch holder = 8 sts left on needle. Change to off-white and continue with head in stockinette st as follows: Work 4 cm [1½"] and then work next row as follows: work 8 sts, cast on 8 new sts at the end of row, turn piece, work 16 sts and cast on 8 new sts at the end of row = 24 sts. Work 1 row on all sts. Now bind off 8 sts at the beg of row, work remaining sts on row, bind off 8 sts at the beg of next row, work remaining 8 sts on row. Work 4 cm [1½"] on these 8 sts and now slip the 19 sts from stitch holders each side back on needle = 46 sts. Change to light pink and continue in garter st and stripes until piece measures approx 22 cm [8¾"] (measured at the side, without the head) – adjust to after 6 rows light pink. Bind off. ASSEMBLY: Fold blanket double in the middle. Fill head with stuffing and sew tog at the sides. Embroider eyes, nose and mouth with cerise. CROCHET BORDER: Crochet a row of sc all the way round blanket with crochet hook size 4 mm [G/6] and off-white. ---------------------------------------------------------- ---------------------------------------------------------- CROCHET BLANKET CROCHET INFO: Replace first sc at beg of each round with 1 ch and finish each round with 1 sl st in first sc from beg of round. CROCHET TIP: Crochet 2 sc tog as follows: pull thread through first st, pull thread through next st, make 1 YO and pull thread through all 3 sts on hook. ---------------------------------------------------------- HEAD: Crochet 4 ch with beige and form a ring with a sl st. SEE CROCHET INFO! Round 1: 6 sc in ring. Round 2: 2 sc in each sc = 12 sc. Round 3: 1 sc in each sc = 12 sc. Round 4: * 1 sc in first sc, 2 sc in next sc *, repeat from *-* = 18 sc. Round 5 to 8: 1 sc in each sc = 18 sc. Round 9: * 1 sc in first sc, crochet 2 sc tog – SEE ABOVE *, repeat from *-* = 12 sc Round 10: 1 sc in each sc = 12 sc. Round 11: Crochet 2 sc tog all the way round = 6 sc. Round 12: 1 sc in each sc = 6 sc. Head is now finished. Change to off-white and continue as follows: Round 13: 2 sc in each sc = 12 sc Round 14: * 1 sc in first sc, 2 sc in each of the next 2 sc *, repeat from *-* = 20 sc. Round 15: * 1 sc in first sc, 2 sc in next sc *, repeat from *-* = 30 sc. Round 16: change to light blue, 1 sc in each sc = 30 sc. Round 17: * 1 sc in each of the first 2 sc, 2 sc in next sc *, repeat from *-* = 40 sc. Round 18: Change to off-white, 1 sc in each sc = 40 sc. Round 19: * 1 sc in each of the first 3 sc, 2 sc in next sc *, repeat from *-* = 50 sc. Round 20: 1 sc in each sc = 50 sc. Continue inc like this, i.e. 1 round with inc with 1 more st between each inc, and 1 round without inc. AT THE SAME TIME work stripes as follows: 2 rounds light blue, 3 rounds off-white. Continue until there are 140 sc on round – the last 2 rounds are light blue. Change to off-white and work 1 round with 1 sc in each sc. Work last round as follows: * 1 sc, 4 ch, 1 dc in the first ch, skip 2 sc *, repeat from *-* and finish with skipping 1 sc and 1 sl st in first sc from beg of round. ASSEMBLY: Fill head with stuffing, tie a beige thread round neck and fasten securely. Crochet ears as follows: 1 sl st in sc from round 2, 4 ch, 1 dc in 2nd ch from hook, 1 dc in 3rd ch and 1 sl st in sc from round 1. Repeat on the other side of head. Embroider eyes, nose and mouth with black thread. |
|
|
Have you made this or any other of our designs? Tag your pictures in social media with #dropsdesign so we can see them! Do you need help with this pattern?You'll find tutorial videos, a Comments/Questions area and more by visiting the pattern on garnstudio.com. © 1982-2024 DROPS Design A/S. We reserve all rights. This document, including all its sub-sections, has copyrights. Read more about what you can do with our patterns at the bottom of each pattern on our site. |
|


With over 40 years in knitting and crochet design, DROPS Design offers one of the most extensive collections of free patterns on the internet - translated to 17 languages. As of today we count 304 catalogs and 11422 patterns - 11417 of which are translated into English (US/in).
We work hard to bring you the best knitting and crochet have to offer, inspiration and advice as well as great quality yarns at incredible prices! Would you like to use our patterns for other than personal use? You can read what you are allowed to do in the Copyright text at the bottom of all our patterns. Happy crafting!
Comments / Questions (15)
Hej, jeg syns min kant bliver meget løs og ikke særlig pæn.... Ligner ihvertfald ikke den på billedet?!
11.11.2013 - 05:53DROPS Design answered:
Prøv at tage en lidt mindre hæklenål.
12.11.2013 - 09:46Tour 13 : 2 ms dans chaque ms = 12 ms Tour 14 : *1 ms dans la m suiv, 2 ms dans la m suiv * répéter de *à * = 20 ms Comment arriver à 20 ms ? moi je tombe à 18
15.06.2013 - 15:40DROPS Design answered:
Bonjour Nath, effectivement, le rang 14 contenait une erreur, il faut faire *1 ms dans la m suiv, 2 ms dans les 2 ms suiv*, les modifications ont été faites. Bon crochet!
15.06.2013 - 18:04In dit patroon heb ik een foutje gevonden. Waarschijnlijk is het al bekend, maar je weet het nooit. Er staat in het haakpatroon: 'Ga verder met naturel als volgt: Toer 13: 2 v in iedere v = 12 v Toer 14: * 1 v in de eerste v, 2 v in de volgende twee v *, herhaal van *-* = 20 v. Dit zijn geen 20v, maar 18v. De toeren daarna kloppen dan dus ook niet qua aantallen. Dat wilde ik even laten weten. Met vriendelijke groet, Erika
27.09.2012 - 14:21DROPS Design answered:
Hoi Erika. Ik heb het net nagekeken en gerekend. Ik kom uit op 20 v na toer 14. Je maakt 5 v per 3 v. Dit herhaal je 4 keer op de toer en 5 x 4 is 20.
02.10.2012 - 16:20Hej Drops Jeg er heller ikke helt med på hvordan man hækler ørene.. ? :) Mvh
13.04.2012 - 12:36DROPS Design answered:
Øre: 1 kædem i fm fra 2. omg, 4 lm, 1 st i 2.lm fra nålen, 1 st i 3.lm og 1 kædem i fm fra 1.omg. Gentag på den anden side.
17.04.2012 - 11:51Hoi Loes. Er was een foutje in het patroon. Toer 14 moet zijn: * 1 v in de eerste v, 2 v in de volgende twee v *. Dan komt het goed. Bedankt voor je reactie en veel haakplezier verder.
30.05.2011 - 13:48In toer 4 van het hoofd ga je van 12 vasten naar 18 vasten door 1 vaste in de eerste vaste te haken en 2 vasten in de volgende vaste. Nu moet je in toer 14 van 12 vasten naar 20 vasten door 1 vaste in de eerste vaste te haken en 2 vasten in de volgende vaste. Als ik het goed begrijp is dit hetzelfde als in toer 4, maar dan kom ik maar tot 18 vasten ipv 20 vasten? Heb ik dit goed begrepen? Zo niet, zou u het dan kunnen uitleggen?
30.05.2011 - 13:47Tusen takk for kjempe raskt svar.
27.04.2009 - 13:15Ørene hekles som følger: 1 kjedem i fm fra 2. omg, 4 lm, 1 st i 2. lm fra nålen, 1 st i 3. lm og 1 kjedem i fm fra 1. omg. Gjenta på den andre siden.
27.04.2009 - 12:28Hei. Jeg forstår ikke hvordan jeg skal hekle ørene. Håper på rask tilbakemelding :)
27.04.2009 - 12:13Hur gör man öron?
17.11.2008 - 09:55