
Popular categories
Looking for a yarn?


|
|
Summer Fruit |
|
 |
 |
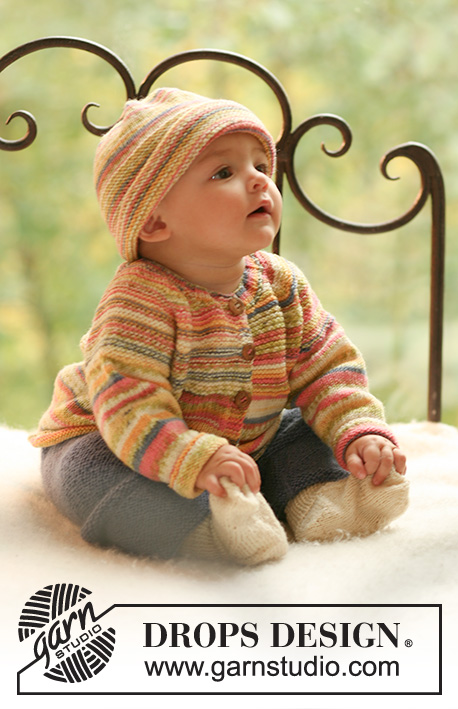
Set of knitted jacket and hat in DROPS Fabel plus pants and socks in DROPS Alpaca for baby and children
DROPS Baby 17-23 |
|
|
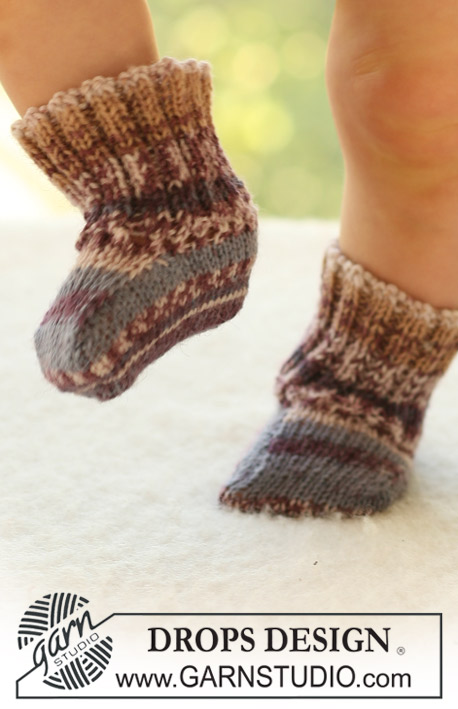
GARTER ST (back and forth on needle): K all rows. GARTER ST (in the round): K 1 round, P 1 round. ---------------------------------------------------------- ---------------------------------------------------------- JACKET: BUTTONHOLES: Make buttonholes on right front band. 1 buttonhole = K tog 2nd and 3rd st from mid front and make 1 YO. Make buttonholes when piece measures: SIZE 1/3 MONTHS: 3, 8, 13 and 18 cm. SIZE 6/9 MONTHS: 3, 9, 14 and 20 cm. SIZE 12/18 MONTHS: 4, 10, 16 and 22 cm. SIZE 2 YEARS: 4, 10, 16, 21 and 27 cm. SIZE 3/4 YEARS: 5, 11, 17, 23 and 29 cm. NOTE: the last buttonhole is made on neckline. DECREASING TIP (applies to raglan): Make all dec from RS. Dec as follows in each transition between sleeve and body piece - beg 3 sts before marker: K2 tog, K2 (marker sits between these 2 sts), slip 1 st as if to K, K1, psso. ---------------------------------------------------------- JACKET: BODY PIECE: Worked back and forth on circular needle from mid front. Cast on 130-144-160 (176-192) sts (includes 5 front band sts each side towards mid front) on circular needle size 2.5 mm with Fabel. Work 4 rows garter st – SEE ABOVE. Continue in stocking st with 5 garter sts each side on front bands. REMEMBER THE KNITTING TENSION! When piece measures 3-3-4 (4-5) cm make buttonhole on right front band – SEE ABOVE! When piece measures 16-17-20 (23-25) cm work 3 rows garter st on all sts (first row = WS). Work next row as follows from RS: 31-34-38 (41-45) sts = right front piece, cast off 8-8-8 (10-10) sts for armhole, 52-60-68 (74-82) sts = back piece, cast off 8-8-8 (10-10) sts for armhole, 31-34-38 (41-45) sts = left front piece. Put piece aside and knit the sleeves. SLEEVE: Worked in the round on double pointed needles. Cast on 38-40-42 (44-44) sts on double pointed needles size 2.5 mm with Fabel. Work 4 rounds garter st – SEE ABOVE –and continue in stocking st. Insert 1 marker at beg of round = mid under sleeve. When piece measures 5 cm inc 1 st on each side of marker on every 10-8-6 (8-7) round a total of 4-6-8 (9-12) times = 46-52-58 (62-68) sts. When piece measures approx 16-18-20 (25-29) cm P 1 round, K 1 round, P 1 round and K 1 round, AT THE SAME TIME on last round cast off 8-8-8 (10-10) sts mid under sleeve (= 4-4-4 (5-5) sts on each side of marker) = 38-44-50 (52-58) sts left on round. Put piece aside and knit the other sleeve. YOKE: Slip sleeves in on the same circular needle as body piece where cast off for armholes = 190-216-244 (260-288) sts. Insert a marker in all transitions between sleeves and body piece (= 4 markers). NOW READ ALL OF THE FOLLOWING BEFORE CONTINUING! RAGLAN: K 1 row from WS and then continue in garter st on all sts. Now dec for raglan as follows: Row 1 (= RS): 1 st on each side of all markers (= 8 dec) – SEE DECREASING TIP! Repeat the dec on every 4th row a total of 9-10-9 (9-9) times and then dec on every other row 3-4-8 (8-11) times. NECKLINE: AT THE SAME TIME when piece measures 23-25-27 (32-35) cm slip the first 8-10-10 (13-13) sts on next row on a stitch holder for neck, work remaining st on row and then slip the first 8-10-10 (13-13) sts on next row on a stitch holder for neck. Cast off to shape the neckline each side at the beg of every row from mid front: 2 sts 2 times and 1 st 2 times. After all dec for raglan and neckline are complete there are 66-72-76 (86-90) sts left on row and piece measures approx 27-29-33 (37-40) cm. ASSEMBLY: Pick up approx 15 to 20 sts on neckline each side on front piece (incl sts on stitch holders) = approx 96 to 130 sts on row. K 1 row from WS, AT THE SAME TIME adjust no of sts evenly to 79-79-85 (91-97) sts (do not dec on front bands). Work next row as follows from RS: 5 garter sts on front band, * K3, P3 *, repeat from *-*, and finish with K3 and 5 garter sts on front band. Continue in rib like this, AT THE SAME TIME on next row from RS make 1 buttonhole in line with the others on front band. When neck measures 2-2½-2½ (3-3) cm cast off in rib. Sew openings under arms. Sew on buttons. ---------------------------------------------------------- HAT: Worked in the round on circular needle and double pointed needles. Cast on 98-105-112 (119-126) sts on circular needle size 2.5 mm with Fabel. Work garter st – SEE ABOVE – until piece measures 10-10-10 (12-12) cm and now continue in stocking st. REMEMBER THE KNITTING TENSION! AT THE SAME TIME when piece measures 15-16-17 (19-20) cm dec 14-15-16 (17-18) sts evenly by K tog every 6th and 7th st on round = 84-90-96 (102-108) sts. Work 3 rounds stocking st, and repeat the dec on next round with 1 less st between each dec (i.e. K tog every 5th and 6th st). Repeat the dec on every other round another 4 times with 1 less st between each dec = 14-15-16 (17-18) sts. Change to double pointed needles when sts no longer fit circular needle. Cut the thread, pull through remaining sts and fasten. Fold the bottom 5-5-5 (6-6) cm double towards RS and fasten. Hat now measures 14-15-16 (17-18) cm. ---------------------------------------------------------- PANTS: Worked in garter st back and forth on needle, in 2 pieces. RIGHT LEG: Cast on 52-60-64 (70-74) sts (includes 1 edge st each side) on needle size 2.5 mm with Alpaca. Work garter st – SEE ABOVE. When piece measures 8 cm inc 1 st each side and repeat the inc on every 1.5-2-2.5 (3-4) cm a total of 8 times = 68-76-80 (86-90) sts. When piece measures 22-25-28 (33-38) cm cast off 2 sts at the beg of next row from RS, work remaining sts on row and cast off 2 sts at the beg of next row from WS, work remaining sts on row = 64-72-76 (82-86) sts. Now cast off 1 st at the beg of every row from RS (i.e at one side of piece = towards mid front) a total of 2-6-6 (10-12) times = 62-66-70 (72-74) sts. Continue in garter st until piece measures 40-46-50 (56-62) cm. Now work 2 cm stocking st on all sts and cast off. LEFT LEG: Cast on and work like right leg, but mirrored. ASSEMBLY: Sew seams on the inside of legs inside 1 edge st. NOTE: sew the bottom 4-5 cm with seam on the outside so that seam doesn’t show when edge is folded towards RS. Sew pants tog from mid front to mid back inside 1 edge st. Fold the 2 cm stocking st at waist double towards WS and fasten, leave an opening for the elastic. Thread through the elastic. Fold edges at bottom of legs towards RS. ---------------------------------------------------------- SOCKS: HEEL DECREASES: Row 1 (= RS): Work row until 6-6-6 (6-7) sts remain, slip next st as if to K, K1, psso, turn piece, Row 2 (= WS): Work row until 6-6-6 (6-7) sts remain, slip next st as if to P, P1, psso, turn piece, Row 3 ( = RS): Work row until 5-5-5 (5-6) sts remain, slip next st as if to K, K1, psso, turn piece, Row 4 (= WS): Work row until 5-5-5 (5-6) sts remain, slip next st as if to P, P1, psso, turn piece. Continue dec like this with 1 less st between each dec until there are 8-8-10 (10-10) sts on row. DECREASING TIP: Dec as follows before marker: K2 tog. Dec as follows after marker: slip 1 st as if to K, K1, psso. SOCK: Worked in the round on double pointed needles. Cast on 44-44-48 (48-52) sts on double pointed needles size 2.5 mm with Alpaca. Work 4-5-5 (6-6) cm rib, K1/P1, and then K 1 round, AT THE SAME TIME dec 4 sts evenly = 40-40-44 (44-48) sts. Now keep the first 18-18-20 (20-22) sts on needle for heel and slip the remaining 22-22-24 (24-26) sts on a stitch holder = upper foot. Work 3-3½-4 (4-4½) cm stocking st on heel sts. Insert a marker in piece and now dec for heel – SEE ABOVE. After heel dec pick up 8-9-10 (11-12) sts on either side of heel and slip sts from stitch holder back on needles = 46-48-54 (56-60) sts. Insert a marker either side of the 22-22-24 (24-26) sts on upper foot and continue in stocking st on all sts, AT THE SAME TIME dec 1 st on each side of the 22-22-24 (24-26) sts on upper foot – SEE DECREASING TIP. Repeat the dec on every other round a total of 7-6-9 (8-8) times = 32-36-36 (40-44) sts. Continue until piece measures 7-8-9 (10½-12½) cm from marker on heel (approx 3-3-3 (3½-3½) cm remain). Now insert a marker each side with 16-18-18 (20-22) sts on upper foot and 16-18-18 (20-22) sts under foot. Continue in stocking st, AT THE SAME TIME dec 1 st on each side of both markers – SEE DECREASING TIP - on every other round 4 times and then on every round 2-3-3 (4-5) times = 8 sts left. Cut the thread, pull through remaining sts and fasten. Sock measures approx 10-11-12 (14-16) cm. |
|

|
|

|
|
|
Have you made this or any other of our designs? Tag your pictures in social media with #dropsdesign so we can see them! Do you need help with this pattern?You'll find tutorial videos, a Comments/Questions area and more by visiting the pattern on garnstudio.com. © 1982-2024 DROPS Design A/S. We reserve all rights. This document, including all its sub-sections, has copyrights. Read more about what you can do with our patterns at the bottom of each pattern on our site. |
|


With over 40 years in knitting and crochet design, DROPS Design offers one of the most extensive collections of free patterns on the internet - translated to 17 languages. As of today we count 304 catalogues and 11422 patterns - 11422 of which are translated into English (UK/cm).
We work hard to bring you the best knitting and crochet have to offer, inspiration and advice as well as great quality yarns at incredible prices! Would you like to use our patterns for other than personal use? You can read what you are allowed to do in the Copyright text at the bottom of all our patterns. Happy crafting!
Comments / Questions (78)
Ich habe angefangen, das Jäckchen zu stricken, aber ich werde es wieder aufribbeln müssen... genau nach Anleitung klappt das Bündchen auf der gesamten Länge derart um, dass ich das Gefühl habe eine Wurst zu stricken statt einer Jacke. Gibt es eine Idee für Abhilfe? - Dämpfen funktioniert nicht, hab ich bereits versucht, ich weiß sonst keinen Rat.
03.02.2020 - 21:49DROPS Design answered:
Liebe Suzy, versuchen Sie, 1 Krausrippe mehr zu stricken, wenn das Bündchen zu stark umklappt. Außerdem kann es auch helfen, wenn die letzte Reihe der Krausrippen nicht zu fest gestrickt wird. Ansonsten müsste Anfeuchten und liegend trocknen lassen, ggf. unter einem Handtuch, eigentlich auch helfen. Gutes Gelingen!
06.02.2020 - 19:13If I do everything according the description with the proper gauge, I end up with 121 rows in total (before assembly). that is not 33 cm, that is 35.5 cm. For 33 cm I would have to end up with 113 rows, but then the pattern does not match.
16.11.2019 - 22:31DROPS Design answered:
Dear Rebecca, the bottom part of the jacket is worked in stocking stitch (with the bottom edge in garter stitch) and yoke is entirely worked in garter stitch, gauge is here given only in stocking stitch, while you will need more rows in garter stitch than in stocking stitch for same height. Make sure your tension is correct in both width and height in stocking stitch, and keep same tension so that you should get correct measurements as shown in chart. Happy knitting!
18.11.2019 - 09:58Bonsoir, Je souhaite faire la veste jaune en laine fabel 903. Il est indiquer de tricoter en jersey. Or, sur la photo on voit du point mousse. Est ce un jersey envers ? Avant de commander la laine, j’attends votre réponse. Cordialement.
03.11.2019 - 23:26DROPS Design answered:
Bonjour Vitaline, la veste se tricote de bas en haut, d'abord en jersey, puis l'empiècement va se tricoter au point mousse, comme on le voit sur la photo. Bon tricot!
05.11.2019 - 08:09Thank you for your reply to my question about yoke increases - that's really helpful. I still think your instructions for the garter stitch on the bottom of the jacket are confusing. You say to knit 4 rows of garter stitch (on the sleeves you say 4 rounds), but the photograph seems to indicate there are 4 ridges. I wonder if there's some confusion around rows/rounds/ridges in the English translation?
14.10.2019 - 10:23DROPS Design answered:
Dear Mrs Cochrane, English pattern is matching the original pattern, where you work 2 riller which means 2 ridges, and you have to work 4 rounds (K 1 round, P 1 round and repeat these 2 rounds)/4 rows (= K 4 rows) to get these 2 ridges. Happy knitting!
14.10.2019 - 10:48In the English pattern for the jacket, you have referred to knitting 4 'rows' of garter stitch when you mean 'ridges'. Could you correct this? But my real question is for the yoke after joining in the sleeves. You say to decrease on every 4th row. But since this is in garter stitch, do you mean every 4th ridge? Thank you :)
11.10.2019 - 22:32DROPS Design answered:
Dear Mrs Cochrane, English pattern is here right, you knit 4 rows garter stitch to get 2 ridges. For the yoke you first decrease every 4th row = every 2nd ridge then every 2 rows = every row from RS. Happy knitting!
14.10.2019 - 09:02Hallo, Ich habe die Jacke in Größe 6/9 gestrickt und bin bei der Rundpasse, die Restmaschen nach allen Abnahmen stimmen nicht. bei 216 Maschen absolut und 112 Abnahmen für den Raglan, sowie 40 Maschen auf den Hilfsfaden, 12 Abnahmen für den Hals bleiben 52 Maschen übrig und nicht 72!!!
13.08.2019 - 18:34DROPS Design answered:
Liebe Karina, für den Raglan werden ja 112 M abgenommen, dann für den Halsaussschnitt werden auf beiden Seiten 10 (stillgelegt) + 4 + 2 (abgekettet) = 16 M x 2 Seiten = 32 M. Dann haben Sie: 216-112-32= 72 M. Viel Spaß beim stricken!
14.08.2019 - 07:50I would like to advise you that, compared to those given on the diagram, the measurements given in the written instructions for the sleeves are wrong. Having worked the sleeves according to the written instructions, the sleeves are much too long. I hope you can correct this.
25.06.2019 - 21:14DROPS Design answered:
Dear Mrs Davidson, measurements on sleeve are the same as in the written pattern, the sleeve before yoke should measure: 12-14-16 (21-25) + 5 cm = 17-19-21 (26-30) cm. In the written pattern, you start working 2 ridges when sleeve measures 16-18-20 (25-29) cm + approx. 1 cm (= ridge) = 17-19-21 (26-30) cm. Happy knitting!
26.06.2019 - 06:52Bonjour. Je viens de recevoir la laine pour faire ce modèle en 2 ans pour un petit garçon. J’ai un problème d’echantillon. En tricotant en 3 je n’arrive qu’à 8cm pour 26m. Si je tricote avec plus gros ça devient laid, trop lâche. Que doit je faire? Pensez vous que si je fais la taille 3/4 ans je vais retomber sur une taille 2 ans. Merci.
17.06.2019 - 13:04DROPS Design answered:
Bonjour Mme Hourdebaigt, 26 mailles est un nombre de mailles classique pour Fabel, essayez de bloquer votre échantillon pour vérifier ses mesures, si vous n'arrivez toujours pas à 10 x 10 cm, il vous faudra utiliser des aiguilles plus grosses. Vous trouverez ici plus d'infos sur l'échantillon. Bon tricot!
17.06.2019 - 15:49Jeg er ved at strikke jakken. Er kommet til halslukning: forstår ikke, at jeg skal sætte de 8 første masker på pinden på en tråd? De kan jo ikke strikkes hvis jeg sætter dem på en tråd?
02.10.2018 - 16:57DROPS Design answered:
Hei Dorthe. Det stemmer, halskanten er det siste du strikker. Du setter 8 masker i hver side (= 16 masker rett foran) på en tråd til hals, så strikker du ferdig skuldrene. Tilslutt setter du maskene på en tråd tilbake på pinnen og plukker opp masker på hver side. Så strikker du halskanten som forklart under "montering". God fornøyelse.
03.10.2018 - 14:29Door de keuze van een ribbelboordje krult het vestje steeds om. Ik denk dat ik de boord eraf haal en vervang door boordsteek. Jammer!
28.07.2018 - 22:06