
Popular categories
Looking for a yarn?


|
|
Hazelnut |
|
 |
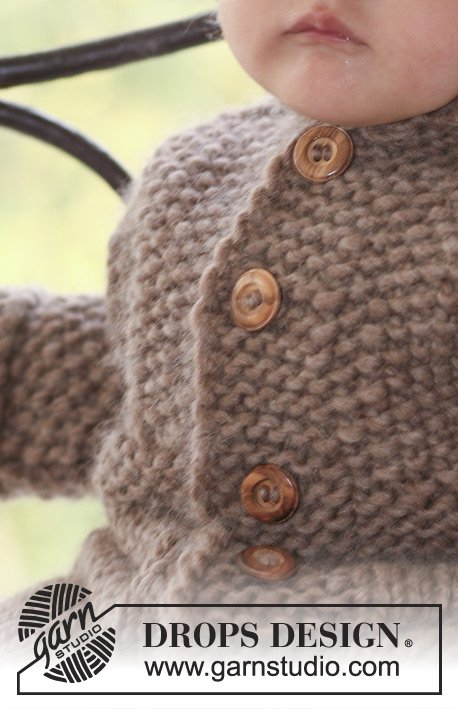 |
Knitted bunting bag in DROPS Snow, DROPS Wish or DROPS Andes
DROPS Baby 18-2 |
|
|
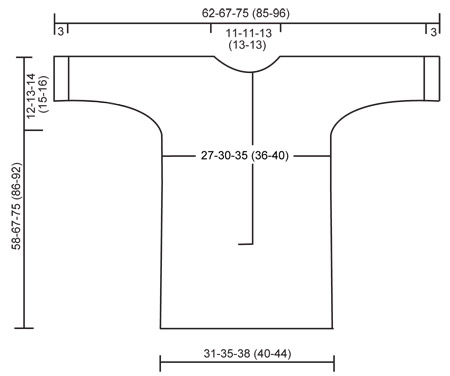
GARTER ST (back and forth on needle): K all rows. MOSS ST: Row 1: * K1, P1 *, repeat from *-*. Row 2: K over P and P over K. Repeat row 2. INCREASING TIP: Inc by making 1 YO. Work YO into back of loop on return row to avoid a hole BUTTONHOLES: Make buttonholes on right front piece. 1 buttonhole = cast off 3rd st from mid front and cast on 1 new st on return row. Cast off for buttonholes when piece measures: SIZE 1/3 months: 1, 7, 13, 19 and 25 cm SIZE 6/9 months: 1, 8, 15, 22 and 29 cm SIZE 12/18 months: 1, 7, 14, 21, 28 and 35 cm SIZE 2 years: 1, 8, 16, 24, 32 and 40 cm SIZE 3/4 years: 1, 10, 19, 28, 37 and 46 cm -------------------------------------------------------- HOLE FOR SEAT BELT IN CAR SEAT: You can make a hole on front and back piece for car seat belt. Make the first hole when back piece measures approx 16-20-23 (28-33) cm (or required measurements) by casting off the middle 4 sts on needle. On next row cast on 4 new sts over cast off sts and continue as before. Repeat on front piece when piece measure from shoulder 42-47-52 (58-59) cm. -------------------------------------------------------- KNITTING TIPS: For a nice edge along hood, front edges and sleeve edges, slip 1st st on every row starting from the edge instead of knitting it. -------------------------------------------------------- BUNTING BAG: Worked in one piece, beg at the bottom of back piece, cast on for sleeves, cast off for neck and finish at the bottom of front piece. To fit in all sts work piece back and forth on circular needle. BACK PIECE: Cast on 36-40-44 (46-50) sts (includes 1 edge st each side) on needle size 8 mm with Snow, Wish or Andes. Work 6 rows garter st – SEE ABOVE! Continue in stocking st until piece measures 37-45-52 (62-67) cm – AT THE SAME TIME dec 4 sts evenly on the last row = 32-36-40 (42-46) sts. REMEMBER THE KNITTING GAUGE! Work 6 rows garter st on all sts and now continue in moss st – SEE ABOVE. When piece measures 46-54-61 (71-76) cm cast on new sts each side for sleeves at the end of every row: 4 sts 1 time, 5 sts 1-1-1 (2-2) times and 9-10-12 (12-16) sts 1 time = 68-74-82 (94-106) sts. Incorporate inc sts in moss st as you go along. NOTE! After the last inc work 3 sts each side (= sleeve edges) in garter st. When piece measures 54-63-71 (82-88) cm continue as follows: 3 garter sts, 19-22-25 (31-37) moss st, 24-24-26 (26-26) garter sts (= mid back), 19-22-25 (31-37) moss sts, 3 garter sts. After 6 rows garter st mid back cast off the middle 12-12-14 (14-14) sts for neck and complete each side separately. Slip sts on the right side on a stitch holder. LEFT FRONT PIECE: = 28-31-34 (40-46) sts. Continue in moss st with 6 garter sts towards neckline and 3 garter sts towards sleeve edge. When piece measures 58-67-75 (86-92) cm insert a marker = mid shoulder – NOW MEASURE PIECE FROM HERE! Continue as before. When piece measures 1-1-2 (2-2) cm inc 1 st towards neckline inside 6 garter sts on next row from RS – SEE INCREASING TIP. Work return row and repeat the inc on next row from RS. Work return row and now cast on 7-7-8 (8-8) new sts at the end of row towards mid front = 37-40-44 (50-56) sts. Work 2 rows garter st on the 6-7-8 (8-8) new sts, work remaining sts as before. Continue in moss st with 6 garter sts towards mid front (= front band) and 3 garter sts at sleeve edge as before. When piece measures 9-10-11 (11-12) cm cast off sleeve sts at the side at beg of row as follows: 9-10-12 (12-16) sts 1 time, 5 sts 1-1-1 (2-2) times and 4 sts 1 time = 19-21-23 (24-26) sts. Continue in moss sts with 6 garter sts on front band until piece measures approx 18-19-20 (21-22) cm (fold piece by marker on shoulder to make sure there is an equal amount of moss st rows on front and back piece). Work 6 rows garter st on all sts and continue in stocking st with 6 garter sts on front band. AT THE SAME TIME on first row inc 2 sts evenly (do not inc on front band) = 21-23-25 (26-28) sts. When piece measures approx 35-41-46 (52-56) cm slip sts on a stitch holder – adjust so that next row is from RS. RIGHT FRONT PIECE: Slip sts from stitch holder on shoulder back on needle = 28-31-34 (40-46) sts, and work like left front piece, but mirrored. AT THE SAME TIME cast off for buttonholes on front band – SEE ABOVE. When piece measures 35-41-46 (52-56) cm – adjust to left front piece – slip sts from left front piece in on the same needle = 42-46-50 (52-56) sts. On next row (= RS) work front band sts tog as follows: Work stocking st on the first 15-17-19 (20-22) sts, slip 6 front band sts from right front piece on cable needle in front of piece, * work tog 1 st from cable needle and 1 st from left front band *, repeat from *-* 6 times = 6 dec sts. Work remaining sts on row in stocking st = 36-40-44 (46-50) sts. Continue in stocking st on all sts. When piece measures approx 55-64-72 (83-89) cm (fold piece double by marker on shoulder to measure front piece to back piece) work 6 rows garter st on all sts and cast off loosely. ASSEMBLY: Fold piece double by shoulder and sew under arm and side seams inside 1 edge st. Sew cast on row to cast off row at bottom of bag, sew in outer loops of sts to avoid a chunky seam. HOOD: Pick up 37-39-41 (45-47) sts on needle size 8 mm round neckline from RS (beg mid front). Work moss back and forth on needle. When hood measures 18-20-22 (24-26) cm work 2 rows garter st on all sts and cast off loosely. Sew hood tog at the top. Sew on buttons. |
|
|
|
|
Have you made this or any other of our designs? Tag your pictures in social media with #dropsdesign so we can see them! Do you need help with this pattern?You'll find tutorial videos, a Comments/Questions area and more by visiting the pattern on garnstudio.com. © 1982-2024 DROPS Design A/S. We reserve all rights. This document, including all its sub-sections, has copyrights. Read more about what you can do with our patterns at the bottom of each pattern on our site. |
|


With over 40 years in knitting and crochet design, DROPS Design offers one of the most extensive collections of free patterns on the internet - translated to 17 languages. As of today we count 304 catalogues and 11422 patterns - 11422 of which are translated into English (UK/cm).
We work hard to bring you the best knitting and crochet have to offer, inspiration and advice as well as great quality yarns at incredible prices! Would you like to use our patterns for other than personal use? You can read what you are allowed to do in the Copyright text at the bottom of all our patterns. Happy crafting!
Comments / Questions (90)
Hej er ved at strikke kørepose med perlestrik og synes det har været rimeligt nem, men nu er der lige et spørgsmål ang venstre side, jeg skal slå 7 masker op mod midt foran, er det rigtigt forstået af mig, hvis jeg slår dem op ind til halsen og derefter strikker retstrik over de nye masker + de to der er taget ud og de seks der var der i forvejen? Håber mit spørsmål er til at forstå. Vh Søs Jørgensne
21.11.2017 - 12:48DROPS Design answered:
Hej Søs, ja det stemmer, de 7 nye masker er dem som danner forkanten på forstykket og 6 af dem strikkes i retstrik mod midt foran. God fornøjelse!
05.12.2017 - 15:01Hei! Jeg forstår ikke hvor jeg skal øke de 7 maskene på venstre sidestykke. Står i slutten av pinnen. Med de 3 erme maskene?
08.08.2017 - 23:13DROPS Design answered:
Hei Miriam. I 7 nye maskene skal legges opp på slutten av pinnen mot midt foran (de nye maskene er stolpen mot midt foran). Deretter fortsettes det med perlestrikk med 6 m rille mot midt foran (= stolpe). De 3 erm maskene er på motsatt side. God Fornøyelse!
09.08.2017 - 10:40Hvor skal jeg begynne å ta opp masker til hetta,og hvor skal jeg avslutte?ISkal jeg begynne i starten av rillestrikket og avslutte før rillestrikket i andre enden?
07.08.2017 - 20:11DROPS Design answered:
Hei Ralo. Du starter midt foran med å strikke opp masker i ytterste ledd av ytterste maske fra retten, og su strikker opp masker rundt hele halsen. God Fornøyelse!
08.08.2017 - 14:04Hvor skal jeg starte og hvor skal jeg avslutte med å ta opp masker til hetten?Skal jeg starte i begynnelsen av rillestrikket og avslutte før rillestrikket?
07.08.2017 - 20:06DROPS Design answered:
Hei Rannveig. Du starter i begynnelsen av rillen (midt foran) og avslutter i siste maske i rillestrikk på andre siden. God Fornøyelse!
15.08.2017 - 09:31Erica Inman wrote:
Should this pattern not read to slip the stitches from right hand needle (not the left) when joining the fronts together and overlapping the front bands? It does not make any sense that you would slip all 42 stitches onto the right hand needle!!
03.07.2017 - 02:08DROPS Design answered:
Dear Mrs Inman, at the end of back piece, keep the last 28-46 sts (see size) on row seen from RS on the nedle and slip the 28-46 sts at the beg of row from RS on a thread/st holder for right shoulder. You will first work the sts on left shoulder (the sts after the cast off sts for neck). Happy knitting!
03.07.2017 - 10:05Witam, mam pytanie dotyczące nabierania oczek na rękawy (tył): rozumiem, że należy najpierw nabrać oczka z jednej strony druta (wg filmu "Cast on new sts at side of work", przerobić ten rządek, a potem dodać tak samo oczka z drugiej strony druta na drugi rękaw? Z góry dziękuję za odpowiedź i pozdrawiam :)
14.03.2017 - 10:23DROPS Design answered:
Witaj Joanno! Jest dokładnie tak jak piszesz. Powodzenia!
15.03.2017 - 14:27BACK PIECE.......– AT THE SAME TIME dec 4 sts evenly on the last row = 32-36-40 (42-46) sts. When piece measures 46-54-61 (71-76) cm [18”-21 ¼”-24” (28”-30”)] cast on new sts each side for sleeves at the end of every row: 4 sts 1 time, 5 sts 1-1-1 (2-2) times and 9-10-12 (12-16) sts 1 time = 68-74-82 (94-106) sts. - I'm making the smallest size and I don't have 68 sts, only 64. I think you forgot that we had to decrease 4 stitches after knitting the 6 rows garter st.
07.02.2017 - 06:29DROPS Design answered:
Dear Mrs Smith, number of sts is correct, there are 32 sts before sleeves, then inc 4 sts + 5 sts + 9 sts for sleeve = 18 sts for each sleeve. 32+ 18+18 = 68 sts. Happy knitting!
07.02.2017 - 09:23Witam :), w opisie tyłu czytam "W TYM SAMYM CZASIE w ost. rzędzie równomiernie zamknąć 4 o. " - co oznacza to "równomierne" zamknięcie 4 oczek - czy chodzi o to, aby zamknąć co 10. oczko, czy po dwa z każdego końca? I o jakie zamykanie chodzi? Raczej nie takie, jak przy kończeniu robótki, ale o przerobienie dwóch oczek razem, aby uzyskać nieco węższą robótkę?
30.01.2017 - 10:11DROPS Design answered:
Witaj Joanno! Zamykamy oczka co np. 10 o. (to zależy który rozmiar wykonujesz). Jak równomiernie zamykać/dodawać oczka znajdziesz TUTAJ. POWODZENIA!
30.01.2017 - 17:35Jeg har et spørgsmål omkring knaphuller. (Det er første gang jeg skal strikke knaphuller) Jeg forstår ikke, hvordan jeg skal blive ved med at have samme antal masker hele vejen på højre forstykke. Hvis jeg lukker 3 masker og kun slår en ny op, så bliver der jo 2 masker mindre, hver gang jeg laver et knaphul og forkanten bliver mindre og mindre. Har jeg misforstået noget?
26.01.2017 - 14:43DROPS Design answered:
Hej Tanja. Du skal kun lukke af for den 3e maske - ikke 3 masker = 1 maske lukket af. Saa stemmer det ogsaa med at du kun skal slaa 1 m op over
26.01.2017 - 16:55Mitä tarkoittaa vasemman etukappaleen ohje "Kun työn pituus on 1-1-2 (2-2) cm, lisää seuraavan oikean puolen krs:n 6 ainaoikeinneulotun s:n sisäpuolelle 1 s."? Mihin kohtaan silmukat siis lisätään?
25.08.2016 - 11:19DROPS Design answered:
Silmukat lisätään pääntien reunan reunimmaisten 6 s:n sisäpuolelle.
30.08.2016 - 14:08