DROPS Alpaca
DROPS Alpaca
100% Alpaca
from 3.40 £ /50g
Get the yarn to make this pattern from 37.40£.

The yarn cost is calculated from the pattern’s smallest size and the yarn’s cheapest product type. Looking for an even better price? You might find it on the DROPS Deals!

DROPS SS24

Winter Butterflies

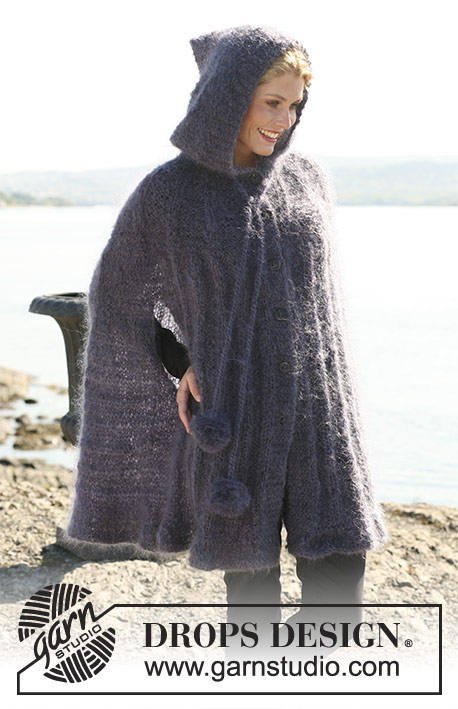
Knitted DROPS jumper or jacket in 2 threads ”Alpaca” with round yoke in multi coloured pattern. Long or short sleeves. Size S - XXXL.

DROPS 108-20
Size: S - M - L - XL - XXL - XXXL
Materials: DROPS Alpaca
50 g for all sizes colour no 501, light grey
50 g for all sizes colour no 517, grey
50 g for all sizes colour no 100, off-white
Long sleeve:
400-450-500-550-600-650 g colour no 506, dark grey
Short sleeve:
300-350-400-400-450-500 g colour no 506, dark grey

DROPS double pointed and circular needle (40 and 80 cm) size 5 mm – or size needed to get 17 sts x 22 rows in stocking st with 2 threads Alpaca = 10 x 10 cm.
DROPS double pointed and circular needle (40 and 80 cm) size 4 mm
– for rib.
DROPS silver button, no 534:
8-8-8-8-9-9 pcs. Only applies to jacket.

-------------------------------------------------------

Alternative Yarn – See how to change yarns here
Yarn Groups A to F – Use the same pattern and change the yarn here
Yarn usage using an alternative yarn – Use our yarn converter here

-------------------------------------------------------

DROPS Alpaca
DROPS Alpaca
100% Alpaca
from 3.40 £ /50g
Get the yarn to make this pattern from 37.40£.

The yarn cost is calculated from the pattern’s smallest size and the yarn’s cheapest product type. Looking for an even better price? You might find it on the DROPS Deals!

Pattern instructions

NOTE: This pattern is written in British English. All measurements in charts are in cm. For conversion from cm to inches - click here. There are different terms for crocheting in British and American English. If this pattern includes crochet, click for "crochet terms" here. For this pattern in American English, please click here.
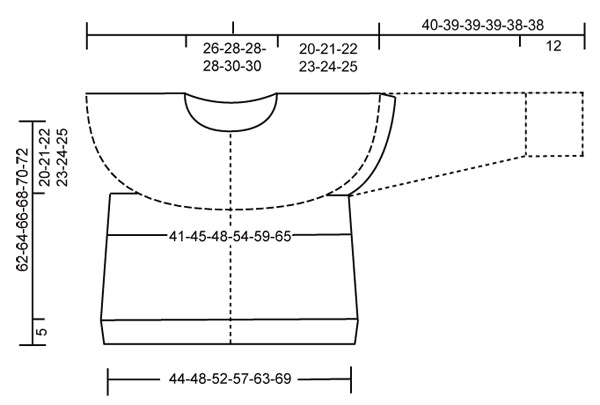
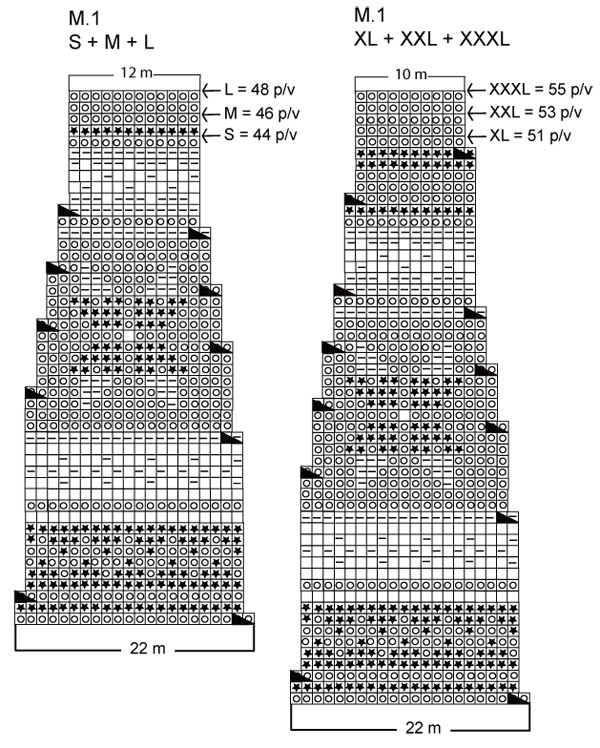
Garter st, back and forth on needle: K all rows.
Pattern: See diagram M.1. See diagram for your size. Diagram shows the pattern from the RS and the entire pattern is worked in stocking st.

Jumper: Worked in the round on circular needle. Cast on 208-228-248-268-296-324 sts on circular needle size 4 mm with 2 threads dark grey Alpaca. K 1 round and continue in rib, K2/P2. When rib measures 5 cm change to needle size 5 mm, K 1 round, at the same time dec 58-64-72-74-82-90 sts evenly = 150-164-176-194-214-234 sts. Insert 1 Marking Thread (MT) at beg of round and 1 MT after 75-82-88-97-107-117 sts (= the sides). Continue in stocking st. Remember the knitting tension! When piece measures 12 cm dec 1 st on each side of both MT (= 4 dec) = 146-160-172-190-210-230 sts. Repeat the dec when piece measures 24 cm and 36 cm = 138-152-164-182-202-222 sts. Continue in stocking st until piece measures 42-43-44-45-46-47 cm. Now cast off 10 sts each side (= 5 sts on each side of both MT) for armhole = 118-132-144-162-182-202 sts. Put piece aside and knit short or long sleeves.
Short sleeve: Worked in the round on double pointed needles. Cast on 76-80-84-84-88-92 sts on double pointed needles size 4 mm with 2 threads dark grey Alpaca. K 1 round and continue in rib, K2/P2. When rib measures 3-3-3-4-4-4 cm change to needle size 5 mm and continue in stocking st, at the same time dec 16-18-18-16-16-18 sts evenly on first round = 60-62-66-68-72-74 sts. Insert a MT at beg of round = mid under arm. Continue in stocking st. When piece measures 6-7-7-7-8-8 cm cast off 5 sts on each side of MT = 50-52-56-58-62-64 sts. Put piece aside and knit the other sleeve.
Long sleeve: Worked in the round on double pointed needles. Cast on 56-56-60-60-64-64 sts on double pointed needles size 4 mm with 2 threads dark grey Alpaca. K 1 round and continue in rib, K2/P2. When rib measures 12 cm change to needle size 5 mm and continue in stocking st, at the same time dec 16-14-18-16-20-18 sts evenly on first round = 40-42-42-44-44-46 sts. Insert a MT at beg of round = mid under arm. Continue in stocking st. When piece measures 14 cm inc 1 st on each side of MT on every 2.5-2.5-2-2-1.5-1.5 cm a total of 10-10-12-12-14-14 times = 60-62-66-68-72-74 sts. When piece measures 40-39-39-39-38-38 cm (less for the larger sizes because of longer sleeve cap and wider shoulder) cast off 5 sts on each side of MT = 50-52-56-58-62-64 sts. Put piece aside and knit the other sleeve.
Yoke: Slip sleeves in on the same circular needle as body piece where cast off for armholes = 218-236-256-278-306-330 sts. K 1 round with 2 threads dark grey, at the same time dec 20-16-14-14-20-22 sts evenly = 198-220-242-264-286-308 sts. Now continue in M.1 with dec (see diagram for your size).
After 1 vertical repeat of M.1 there are 108-120-132-120-130-140 sts on round.
Neck: K 1 round, at the same dec 12-18-30-18-22-32 sts evenly = 96-102-102-102-108-108 sts. P 1 round. Change to needle size 4 mm and K 1 round, at the same time inc 20-18-18-18-20-20 sts evenly = 116-120-120-120-128-128 sts. Continue in rib, K2/P2. When rib measures approx 3 cm cast off loosely in rib.

Jacket: Worked back and forth on circular needle from mid front. Work like jumper, but cast on 1 edge st each side towards mid front (i.e. add 2 sts to all st numbers throughout pattern). Additionally cast on 2 extra sts for rib, so that rib beg and ends with K2 towards mid front. Dec these 2 sts with the others when changing needle size. Work stocking st back and forth on needle from mid front, i.e. insert MT after 38-42-45-49-54-59 sts and after 114-124-133-147-162-177 sts. After 1 vertical repeat of M.1 cast off 1 edge st each side and slip remaining sts on a stitch holder.
Front bands: Now work front bands as follows: Pick up 150-154-158-162-166-170 sts from the RS inside 1 edge st with 2 threads dark grey on needle size 4 mm along left front piece (up to sts on stitch holder). P 1 row from WS and continue as follows from RS: 2 garter sts, * K2, P2 *, repeat from *-* until 4 sts remain, K2, 2 garter sts. Continue like this until front band measures approx 3 cm and cast off loosely in rib.
Repeat along right front band, but after 1.5 cm make buttonholes as follows from WS (= from neckline): Work 10 sts rib as before, cast off 2 sts, * work 18 sts rib as before, cast off 2 sts *, repeat from *-* a total of 6-6-6-6-7-7 times, work remaining 18-22-26-30-14-18 sts in rib as before. On return row cast on 2 new sts over cast off sts. When rib measures approx 3 cm cast off loosely in rib.
Neck: When front bands are completed pick up 7 sts on front band each side, slip sts from stitch holder back on needle and continue for neck as described for jumper with dec and inc, back and forth on needle with 2 garter sts each side (total no of sts is +14 = sts picked up on front bands ).
Note! When rib measures approx 1.5 cm cast off for buttonhole on right front band by casting off the 5th and 6th st from mid front (i.e. 2 P sts). Cast on 2 new sts on return row. Cast of loosely in rib when rib measures 3 cm.
Assembly: Sew openings under arms. Sew buttons on left front piece of jacket.

Diagram

symbols = off-white
symbols = dark grey
symbols = light grey
symbols = grey
symbols = K2 tog
diagram
diagram

Each of our patterns has specific tutorial videos to help you.

Do you have a question? See a list of frequently asked questions (FAQ)

Knitting tension is what determines the final measurements of your work, and is usually measured per 10 x 10 cm. It is provided like so: number of stitches in width x number of rows in height - eg: 19 stitches x 26 rows = 10 x 10 cm.

The knitting tension is very individual; some people knit/crochet loosely while others work tightly. You adjust the knitting tension with the needle size, which is why the suggested needle size is only meant as a guide! You need to adjust this (up or down) to ensure that YOUR knitting tension matches the knitting tension provided in the pattern. If you work with a different knitting tension than provided you will have a different yarn consumption, and your work will have different measurements than what the pattern suggests.

The knitting tension also determines which yarns can replace each other. As long as you achieve the same knitting tension you can replace one yarn with another.

See DROPS lesson: How to measure your tension/gauge

See DROPS video: How to make a gauge tension swatch

The required amount of yarn is provided in grams, eg: 450 g. To calculate how many balls you’ll need you first need to know how many grams are in 1 ball (25g, 50g or 100g). This information is available if you click on the individual yarn quality on our pages. Divide the amount required with the amount of each ball. For example, if each ball is 50g (the most common amount), the calculation will be as follows: 450 / 50 = 9 balls.

The important thing when changing from one yarn to another is that the knitting/crochet tension remains the same. This is so that the measurements of the finished piece will be the same as on the sketch provided. It is easier to achieve the same knitting tension using yarns from the same yarn group. It is also possible to work with multiple strands of a thinner yarn to achieve the knitting tension of a thicker one. Please try our yarn converter. We recommend you to always work a test swatch.

Please NOTE: when changing yarn the garment might have a different look and feel to the garment in the photo, due to individual properties and qualities of each yarn.

See DROPS lesson: Can I use a different yarn than the one mentioned in the pattern?

All our yarns are categorised into yarn groups (from A to F) according to thickness and knitting tension – group A contains the thinnest yarns and group F the thickest. This makes it easier for you to find alternative yarns to our patterns, should you wish to switch yarn. All yarns within the same group have a similar knitting tension and can easily replace each other. However, different yarn qualities have different structures and properties which will give the finished work a unique look and feel.

Click here for an overview of the yarns in each yarn group

At the top of all our patterns you’ll find a link to our yarn calculator, which is a helpful tool should you wish to use a different yarn than suggested. By filling in the yarn quality you wish to replace, the amount (in your size) and number of strands, the calculator will present good alternative yarns with the same knitting tension. Additionally it will tell you how much you’ll require in the new qualities and whether you’ll need to work with multiple strands. Most skeins are 50g (some are 25g or 100g).

If the pattern is worked with multiple colours, every colour will have to be calculated separately. Similarly, if the pattern is worked with several strands of different yarns (for example 1 strand Alpaca and 1 strand Kid-Silk) you will have to find alternatives for each, individually.

Click here to see our yarn calculator

Since different yarns have different qualities and textures we have chosen to keep the original yarn in our patterns. However, you can easily find options among our available qualities by using our yarn calculator, or simply pick a yarn from the same yarn group.

It is possible that some retailers still have discontinued yarns in stock, or that someone has a few skeins at home that they would like to find patterns for.

The yarn calculator will provide both alternative yarn as well as required amount in the new quality.

If you think it's hard to decide what size to make, it can be a good idea to measure a garment you own already and like the size of. Then you can pick the size by comparing those measures with the ones available in the pattern's size chart.

You'll find the size chart at the bottom of the pattern.

See DROPS lesson: How to read size chart

The needle size provided in the pattern serves only as a guide, the important thing is to follow the knitting tension. And since knitting tension is very individual, you will have to adjust the needle size to ensure that YOUR tension is the same as in the pattern – maybe you’ll have to adjust 1, or even 2 needle sizes, up or down to achieve the correct tension. For this, we recommend that you work test swatches.

Should you work with a different knitting tension than the one provided, the measurements of the finished garment might deviate from the measurement sketch.

See DROPS lesson: How to measure your tension/gauge

See DROPS video: How to make a tension/gauge swatch

Working a garment top-down provides more flexibility and room for personal adjustment. For example it is easier to try the garment on while working, as well as making adjustments to length of yoke and shoulder caps.

The instructions are carefully explaining every step, in the correct order. Diagrams are adjusted to the knitting direction and are worked as usual.

The diagram depicts all rows/rounds, and every stitch seen from the right side. It is read from bottom to top, from right to left. 1 square = 1 stitch.

When working back and forth, every other row is worked from the right side and every other row is worked from the wrong side. When working from the wrong side, the diagram will have to be worked reversed: from left to right, knit stitches are purled, purl stitches are knit etc.

When working in the round every round is worked from the right side and the diagram are worked from right to left on all rounds.

See DROPS lesson: How to read knitting diagrams

The diagram depicts all rows/rounds, and every stitch seen from the right side. It is worked from bottom to top, from right to left.

When working back and forth every other row is worked from the right side: from right to left and every other row is worked from the wrong side: from left to right.

When working in the round, every row in the diagram are worked from the right side, from right to left.

When working a circular diagram you start in the middle and work your way outwards, counter clockwise, row by row.

The rows usually start with a given number of chain stitches (equivalent to the height of the following stitch), this will either be depicted in the diagram or explained in the pattern.

See DROPS lesson: How to read crochet diagrams

Instructions for working several diagrams after each other on the same row/round, will often be written like so: “work A.1, A.2, A.3 a total of 0-0-2-3-4 times". This means you work A.1 once, then A.2 is worked once, and A.3 is repeated (in width) the number of times provided for your size – in this case like so: S = 0 times, M = 0 times, L=2 times, XL= 3 times and XXL = 4 times.

The diagrams are worked as usual: begin with the first row in A.1, then work the first row in A.2 etc.

See DROPS lesson: How to read knitting diagrams

See DROPS lesson: How to read crochet diagrams

The total width of the garment (from wrist-to-wrist) will be larger in the larger sizes, despite the actual sleeves being shorter. The larger sizes have longer sleeve caps and wider shoulders, so there will be a good fit in all sizes.

The measurement sketch/schematic drawing provides information regarding the full length of the garment. If it’s a jumper or a jacket the length is measured from the highest point on the shoulder closest to the neckline, and straight down to the bottom of the garment. It is NOT measured from the tip of shoulder. Similarly, the length of yoke is measured from the highest point on the shoulder and down to where yoke is split into body and sleeves.

On a jacket measures are never taken along bands, unless specifically stated. Always measure inside band stitches when measuring the length.

See DROPS lesson: How to read a schematic drawing

Diagrams are often repeated on the round or in height. 1 repeat is the diagram the way it appears in the pattern. If it says to work 5 repeats of A.1 in the round, then you work A.1 a total of 5 times after/next to each other in the round. If it says to work 2 repeats of A.1 vertically/in height you work the entire diagram once, then begin again at the start and work the entire diagram one more time.

Chain stitches are slightly narrower than other stitches and to avoid working the cast-on edge too tight, we simply chain more stitches to begin with. The stitch count will be adjusted on the following row to fit the pattern and measurement sketch.

The rib edge is more elastic and will contract slightly compared to, for example, stocking stitch. By increasing before the rib edge, you avoid a visible difference in width between the rib edge and the rest of the body.

It’s very easy to cast off too tightly, and by making yarn overs while casting off (and simultaneously casting these off) you avoid a too tight cast off edge.

See DROPS video: How to bind off with yarn overs (yo)

To achieve an even increase (or decrease) you can increase on, for example: every 3rd and 4th row alternately, like so: work 2 rows and increase on the 3rd row, work 3 rows and increase on the 4th. Repeat this until the increase is complete.

See DROPS lesson: Increase or decrease 1 st on every 3rd and 4th row alternately

Should you prefer to work in the round instead of back and forth, you may of course adjust the pattern. You’ll need to add steeks mid-front (usually 5 stitches), and follow the instructions. When you would normally turn and work from the wrong side, simply work across the steek and continue in the round. At the end you’ll cut the piece open, pick up stitches to work bands, and cover the cut edges.

See DROPS video: How to knit steeks and cut open

Should you prefer to work back and forth instead of in the round, you may of course adjust the pattern so you work the pieces separately and then assemble them at the end. Divide the stitches for the body in 2, add 1 edge stitch in each side (for sewing) and work the front and back pieces separately.

See DROPS lesson: Can I adapt a pattern for circular needles into straight needles?

Pattern repeats can vary slightly in the different sizes, in order to get the correct proportions. If you’re not working the exact same size as the garment in the photo, yours might deviate slightly. This has been carefully developed and adjusted so that the complete impression of the garment is the same in all sizes.

Make sure to follow instructions and diagrams for your size!

If you have found a pattern you like which is available in women’s size it’s not very difficult to convert it to men’s size. The biggest difference will be the length of sleeves and body. Start working on the women size that you think would fit across the chest. The additional length will be worked right before you cast off for the armhole/sleeve cap. If the pattern is worked top-down you can add the length right after the armhole or before the first decrease on sleeve.

Regarding additional yarn amount, this will depend on how much length you add, but it is better with a skein too many than too few.

All yarns will have excess fibres (from production) that might come off as lint or shedding. Brushed yarns (ie hairier yarns) have more of these loose, excess fibres, causing more shedding.

Shedding also depends on what is worn under or over the garment, and whether this pulls at the yarn fibres. It’s therefore not possible to guarantee that there will be no shedding

Below are some tips on how to get the best result when working with hairier yarns:

1. When the garment is finished (before you wash it) shake it vigorously so the looser hairs come off. NOTE: do NOT use a lint roller, brush or any method that pulls at the yarn.

2. Place the garment in a plastic bag and put it in your freezer - the temperature will cause the fibres to become less attached to each other, and excess fibres will come off easier.

3. Leave in the freezer for a few hours before taking it out and shaking it again.

4. Wash the garment according to the instructions on the yarn label.

Pilling is a natural process that happens to even the most exclusive of fibers. It's a natural sign of wear and tear that is hard to avoid, and that is most visible in high friction areas of your garment like a sweater's arms and cuffs.

You can make your garment look as new by removing the pilling, using a fabric comb or a pill/lint remover.

Still can't find the answer you need? Then scroll down and leave your question so one of our experts can try to help you. This will be done normally within 5 to 10 working days.
In the meantime, you can read the questions and answers that others have left to this pattern or join the DROPS Workshop on Facebook to get help from fellow knitters/crocheters!

You might also like...

Post a comment to pattern DROPS 108-20

We would love to hear what you have to say about this pattern!

If you want to leave a question, please make sure you select the correct category in the form below, to speed up the answering process. Required fields are marked *.

Comments / Questions (41)

country flag Andréa wrote:

I really enjoyed this pattern. I made it for my sister for Christmas. She loves butterflies. Although it looks gold I used off white. I used navy, off white, white and light blue.Tried to post pic but it wouldn't let me.

15.08.2022 - 18:51

country flag Linda wrote:

As I have posted here twice before about some errors in the pattern, I thought I would follow up about my attempts. The issue with the pattern seems that the last part of the M1 pattern for S-size comes without further reducing the number of stitches. I ended the pattern immediately after the last reduction, and now my sweater is fine. The pattern changed, but still looks nice. Someone with more experience may be able to fix the last part of the pattern as well.

03.03.2018 - 20:49

Linda wrote:

Reaction on my comment of 29.12.2017 and your reaction on 2.1.2018. Thank you for your answer., but I hope you can have a closer look. Looking at the other comments I seem not to be the only one with this long neck issue. Another sweater I knitted from your site with the same type of wool fit me exactly, so I don't think I have knitted it too loosely. I bought the wool from internet, I do not expect support from them as they are just selling wool from various suppliers.

05.01.2018 - 23:38

Linda wrote:

I love this pattern and I knitted it in size S. Somehow the neck is coming much taller than it should be. I am sure I knitted the pattern in the right way. It looks like the M1 decoration is too large for this size. Can you update me with the corrections so that I can finish my sweater in the same beautiful way as it looks on the photo? Thank you in advance!

29.12.2017 - 22:09

DROPS Design answered:

Dear Linda, if your tension is correct in width and height, you should get the same measurements as in chart. For any further individual assistance, you are welcome to contact the store where you bought your yarn. Happy knitting!

02.01.2018 - 10:18

country flag Mary Shanahan wrote:

Has anyone knit this? I can only understand English ( or Irish) so I cannot read most of the comments that are posted. Be grateful for any english language feedback!

31.05.2015 - 20:12

DROPS Design answered:

Dear Mrs Shanahan, if you have any question to this pattern, you are welcome to ask here or to contact your DROPS store for any personnal assistance. Happy knitting!

01.06.2015 - 10:43

country flag Andrea wrote:

Hallo warum soll der Anschlag mit 2 Fäden gemacht werde? Und wie funktioniert das?

31.10.2014 - 23:28

DROPS Design answered:

Liebe Andrea, Sie stricken den gesamten Pulli mit 2 Fäden, d.h. Sie nehmen die Alpaca doppelt. Statt mit einem Knäuel stricken Sie also mit 2 Knäueln gleichzeitig, d.h. doppelfädig. Auf diese Weise wird die Wolle doppelt so dick. Beachten Sie, dass Sie die Maschenprobe auch mit doppeltem Faden machen.

01.11.2014 - 10:24

country flag Camilla Johansson wrote:

Mycket fin tröja, dock tycker jag armarna är på tok för korta enligt mönstret. Även när man gör långa ärmar. Fick ta upp och sticka ärmarna 10 cm längre än mönstret. Då blev de bra.

23.12.2012 - 19:11

country flag Nanna wrote:

Garnet er købt, glæder mig til at komme igang. Har valgt at skifte farverne ud. Mørkegrå - gammelrosa, natur - guldstøvet, mellemgrå - mellem rosa og lysegrå - lys rosa. Korte ærmer og som jakke. Glæder mig til at se resultatet.

11.12.2012 - 20:29

country flag Nanna wrote:

Hvordan strikker man med 2 tråde? Jeg kan kun finde en video med strik med/i to tråde, kun en med forskellige farver. Det ville være rart med en sådan video. Alle de andre videoer er super gode og lærerige, og jeg har lært rigtig meget af dem - tak :-)

11.12.2012 - 20:21

DROPS Design answered:

Du holder bare de 2 tråde samlet over pegefingeren - nøjagtig som når du strikker med 1 tråd. God fornøjelse!

13.12.2012 - 09:24

country flag Tutta wrote:

Når jeg skriver ut mønsteret blir M1 kuttet rett under stjernen.

16.01.2011 - 20:30