DROPS Silke-Tweed
DROPS Silke-Tweed
52% Silk, 48% Wool
Discontinued
find alternatives
DROPS Alpaca
DROPS Alpaca
100% Alpaca
from 3.40 £ /50g
DROPS Vivaldi
DROPS Vivaldi
56% Mohair, 30% Polyamide, 14% Wool
Discontinued
find alternatives
DROPS SS24

DROPS 109-45

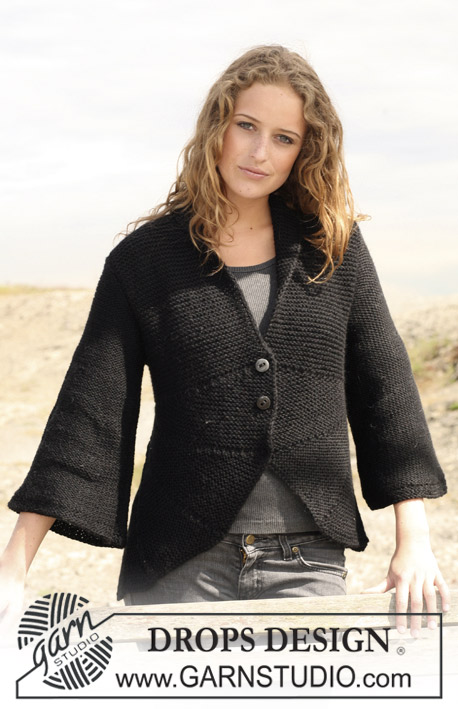
Crochet DROPS jacket with collar and pleats in ”Silke-Tweed” and ”Alpaca” and crochet border in ”Vivaldi”. Size S - XXXL.

DROPS 109-45
Size: S - M - L - XL - XXL - XXXL
Materials: DROPS Silke-Tweed
350-400-450-450-500-550 g colour no 08, beige
and use: DROPS Alpaca from Garnstudio
350-400-450-450-500-550 g colour no 618, light beige
and use: DROPS Vivaldi from Garnstudio
50 g for all sizes colour no 13, beige

DROPS Crochet hook size 5 mm – or size needed to get width of 12 dc/dtr and approx 4 pattern rows (1 pattern row = 1 row dc + 1 row dtr) = 10 x 10 cm with 1 thread Silke-Tweed and 1 thread Alpaca.
DROPS buffalo horn button, no 537: 3 pcs.

-------------------------------------------------------

Alternative Yarn – See how to change yarns here
Yarn Groups A to F – Use the same pattern and change the yarn here
Yarn usage using an alternative yarn – Use our yarn converter here

-------------------------------------------------------

DROPS Silke-Tweed
DROPS Silke-Tweed
52% Silk, 48% Wool
Discontinued
find alternatives
DROPS Alpaca
DROPS Alpaca
100% Alpaca
from 3.40 £ /50g
DROPS Vivaldi
DROPS Vivaldi
56% Mohair, 30% Polyamide, 14% Wool
Discontinued
find alternatives

Pattern instructions

NOTE: This pattern is written in British English. All measurements in charts are in cm. For conversion from cm to inches - click here. There are different terms for crocheting in British and American English. If this pattern includes crochet, click for "crochet terms" here. For this pattern in American English, please click here.
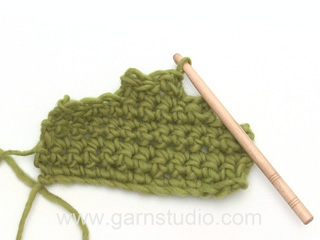
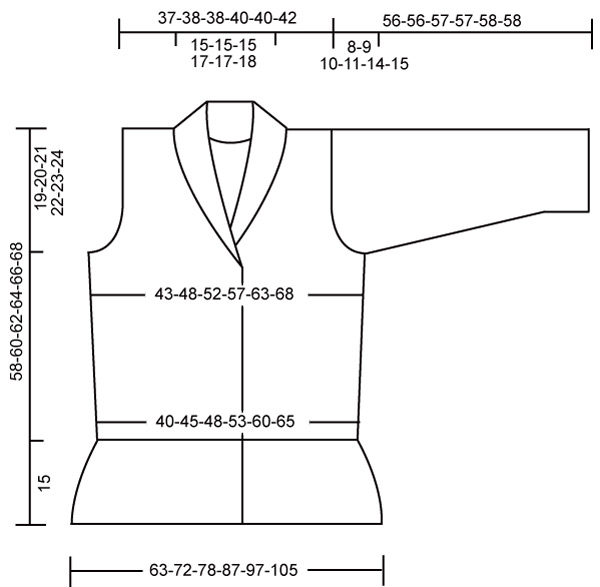
Crochet info: Replace first dc on every row with dc with 1 ch and first dtr on every row with dtr with 4 ch.
Finish every row with dc with 1 dc in 4th ch from beg of previous row and every row with dtr with 1 dtr in first ch from beg of previous row.
Pattern: * 1 row dc, 1 row dtr *, repeat from *-* - Note: crochet in each dc/dtr from previous row and not in between them.
Front band: Work front band as follows from mid front:
On rows with dtr: 4 dtr, 1 ch, 1 dtr.
On rows with dc: 6 dc.
Pleats: Work pleats as follows:
Pleat to the left: Fold the 4 skipped dtr to the left behind piece. Work dc on row to pleat, now work 2 dc through all 3 layers.
Pleat to the right: Fold the 4 skipped dtr to the right behind piece. Work dc on row to 2 dtr before pleat, now work 2 dc through all 3 layers.
Increasing tip: Inc 1 dc/dtr at side by working 1 extra dc/dtr in second but last dc.
Decreasing tip: Note: Only dec on rows with dtr.
Dec as follows at beg of row: Replace 1 dtr with 1 sl st.
Dec as follows at the end of row: Turn piece when no of dtr to be dec remain and work return row.


Jacket: Worked back and forth from mid front. See Crochet info! Crochet 208-233-253-278-308-333 ch (includes 4 ch to turn with) on crochet hook size 5 mm with 1 thread Silke-Tweed and 1 thread Alpaca (= 2 threads).
Work first row as follows: Work 1 dtr in 5th ch from hook, and continue as follows: * skip 1 ch, 1 dtr in each of the next 4 ch *, repeat from *-*, but in the last repeat skip 1 ch and work 1 dtr in each of the last 2 ch = 164-184-200-220-244-264 dtr.
Turn piece and continue in Pattern - see above – with 6 dtr/dc on front bands each side – see above. Remember the crochet tension! When piece measures approx 15 cm – adjust so that next row is a row with dc – continue as follows: 6 dc (front band), 9-9-7-7-9-9 dc, skip 4 dtr, * 6 dc, skip 4 dtr *, repeat from *-* a total of 13-15-17-19-21-23 times, finish with 9-9-7-7-9-9 dc and 6 dc (front band).
Work next row as follows – with dc: 6 dc (front band), 9-9-7-7-9-9 dc, * Pleat to the left (= 2 dc) – see explanation above - 4 dc *, repeat from *-* a total of 6-7-8-9-10-11 times, work Pleat to the left and finish with 2 dc , continue with * Pleat to the right (= 2 dc) – see explanation above - 4 dc *, repeat from *-* a total of 6-7-8-9-10-11 times, finish with Pleat to the right, 9-9-7-7-9-9 dc and 6 dc (front band) = 108-120-128-140-156-168 dc. Now work 3 rows with dc in all sts. Divide the piece and complete each piece separately.
Right front piece: Work dc in the first 30-33-35-38-42-45 dc on row, turn piece and work dc on return row. Now continue in Pattern and front band as before. When piece measures 20 cm inc 1 dtr/dc at side – see Increasing tip. Repeat the inc when piece measures 35 cm = 32-35-37-40-44-47 dtr/dc. When piece measures approx 39-40-41-42-43-44 cm dec for armhole at side at the end of every row with dtr – see Decreasing tip: 3 dtr 1 time, 2 dtr 0-1-2-2-3-4 times and 1 dtr 1-1-1-3-5-5 times = 28-29-29-30-30-31 dtr. When piece measures approx 58-60-62-64-66-68 cm – adjust so that the last row is a row with dtr – do not work the outermost 13-14-14-14-14-14 dtr at side (= shoulder) = 15-15-15-16-16-17 dtr on collar. Continue in Pattern and front band as before. When collar measures 9-9-9-10-10-11 cm from shoulder, cut the thread.
Left front piece: Like right front piece, but mirrored. Beg with dc from the side on the last 30-33-35-38-42-45 dc on row.
Back piece: Work dc on the remaining 48-54-58-64-72-78 dc. Turn piece and work 1 more row with dc. Now continue in Pattern. When piece measures 18 and 23 cm (different measurements to front pieces in order not to create a notch) inc each side as described for front piece = 52-58-62-68-76-82 dtr/dc. When piece measures approx 39-40-41-42-43-44 cm dec for armhole each side as described for front piece = 44-46-46-48-48-50 dtr/dc. When piece measures approx 55-57-59-61-63-65 cm (only 1 row with dc + 1 row with dtr left, adjust to front piece) work 1 row dc on 13-14-14-14-14-14 dtr each side only (do not work the middle 18-18-18-20-20-22 dtr = neckline). Work 1 row with dtr and cut the thread, piece measures approx 58-60-62-64-66-68 cm.
Sleeve: Crochet 38-38-40-40-43-45 ch (includes 4 ch to turn with) with crochet hook size 5 mm and 1 thread Silke-Tweed and 1 thread Alpaca (= 2 threads).
Work first row as follows: 1 dtr in 5th ch from hook, * skip 1 ch, 1 dtr in each of the next 4 ch *, repeat from *-*. Note: for size S, M and XXL finish row with 1 dtr in each of the last 2 ch (instead of the last 4 ch) = 28-28-30-30-32-34 dtr. Turn piece. Continue in Pattern as described for body piece. When piece measures 10 cm inc 1 dc/dtr each side by working 1 extra dc/dtr in the last but one dc/dtr each side on every 7-5-5-3.5-3.5-3 cm a total of 6-8-8-10-10-11 times = 40-44-46-50-52-56 dc/dtr. When piece measures 48-47-47-46-44-43 cm – less for the larger sizes because of longer sleeve cap and wider shoulder - dec for sleeve cap each side on every row with dtr – see Decreasing tip: 5 dtr 2 times, then 2 dtr each side until piece measures approx 56-56-57-57-58-58 cm, cut the thread.
Assembly: Sew shoulder seams, edge to edge with neat sts. Set in sleeves. Sew sleeve and side seam, edge to edge with neat sts. Sew collar tog mid back and sew to neckline.
Border: Crochet a border round the entire opening and round sleeve edges on crochet hook size 5 mm with 1 thread Vivaldi as follows: *1 dc, 1 ch, skip approx 0.5 cm *, repeat from *-* and finish with 1 sl st in first dc from beg of round. Sew on buttons to left front piece, the lower button approx 20 cm from bottom edge, and the rest with approx 6-7 cm between each. Button buttons in crochet border.


This pattern has been corrected.

Updated online: 02.07.2008
Jacket: Worked back and forth from mid front. See Crochet info! Crochet 208-233-253-278-308-333 ch (includes 4 ch to turn with) on crochet hook size 5 mm with 1 thread Silke-Tweed and 1 thread Alpaca (= 2 threads).
Work first row as follows: Work 1 dtr in 5th ch from hook, and continue as follows: * skip 1 ch, 1 dtr in each of the next 4 ch *, repeat from *-*, but in the last repeat skip 1 ch and work 1 dtr in each of the last 2 ch

Diagram

diagram measurements
Do you have a question? See a list of frequently asked questions (FAQ)

Knitting tension is what determines the final measurements of your work, and is usually measured per 10 x 10 cm. It is provided like so: number of stitches in width x number of rows in height - eg: 19 stitches x 26 rows = 10 x 10 cm.

The knitting tension is very individual; some people knit/crochet loosely while others work tightly. You adjust the knitting tension with the needle size, which is why the suggested needle size is only meant as a guide! You need to adjust this (up or down) to ensure that YOUR knitting tension matches the knitting tension provided in the pattern. If you work with a different knitting tension than provided you will have a different yarn consumption, and your work will have different measurements than what the pattern suggests.

The knitting tension also determines which yarns can replace each other. As long as you achieve the same knitting tension you can replace one yarn with another.

See DROPS lesson: How to measure your tension/gauge

See DROPS video: How to make a gauge tension swatch

The required amount of yarn is provided in grams, eg: 450 g. To calculate how many balls you’ll need you first need to know how many grams are in 1 ball (25g, 50g or 100g). This information is available if you click on the individual yarn quality on our pages. Divide the amount required with the amount of each ball. For example, if each ball is 50g (the most common amount), the calculation will be as follows: 450 / 50 = 9 balls.

The important thing when changing from one yarn to another is that the knitting/crochet tension remains the same. This is so that the measurements of the finished piece will be the same as on the sketch provided. It is easier to achieve the same knitting tension using yarns from the same yarn group. It is also possible to work with multiple strands of a thinner yarn to achieve the knitting tension of a thicker one. Please try our yarn converter. We recommend you to always work a test swatch.

Please NOTE: when changing yarn the garment might have a different look and feel to the garment in the photo, due to individual properties and qualities of each yarn.

See DROPS lesson: Can I use a different yarn than the one mentioned in the pattern?

All our yarns are categorised into yarn groups (from A to F) according to thickness and knitting tension – group A contains the thinnest yarns and group F the thickest. This makes it easier for you to find alternative yarns to our patterns, should you wish to switch yarn. All yarns within the same group have a similar knitting tension and can easily replace each other. However, different yarn qualities have different structures and properties which will give the finished work a unique look and feel.

Click here for an overview of the yarns in each yarn group

At the top of all our patterns you’ll find a link to our yarn calculator, which is a helpful tool should you wish to use a different yarn than suggested. By filling in the yarn quality you wish to replace, the amount (in your size) and number of strands, the calculator will present good alternative yarns with the same knitting tension. Additionally it will tell you how much you’ll require in the new qualities and whether you’ll need to work with multiple strands. Most skeins are 50g (some are 25g or 100g).

If the pattern is worked with multiple colours, every colour will have to be calculated separately. Similarly, if the pattern is worked with several strands of different yarns (for example 1 strand Alpaca and 1 strand Kid-Silk) you will have to find alternatives for each, individually.

Click here to see our yarn calculator

Since different yarns have different qualities and textures we have chosen to keep the original yarn in our patterns. However, you can easily find options among our available qualities by using our yarn calculator, or simply pick a yarn from the same yarn group.

It is possible that some retailers still have discontinued yarns in stock, or that someone has a few skeins at home that they would like to find patterns for.

The yarn calculator will provide both alternative yarn as well as required amount in the new quality.

If you think it's hard to decide what size to make, it can be a good idea to measure a garment you own already and like the size of. Then you can pick the size by comparing those measures with the ones available in the pattern's size chart.

You'll find the size chart at the bottom of the pattern.

See DROPS lesson: How to read size chart

The needle size provided in the pattern serves only as a guide, the important thing is to follow the knitting tension. And since knitting tension is very individual, you will have to adjust the needle size to ensure that YOUR tension is the same as in the pattern – maybe you’ll have to adjust 1, or even 2 needle sizes, up or down to achieve the correct tension. For this, we recommend that you work test swatches.

Should you work with a different knitting tension than the one provided, the measurements of the finished garment might deviate from the measurement sketch.

See DROPS lesson: How to measure your tension/gauge

See DROPS video: How to make a tension/gauge swatch

Working a garment top-down provides more flexibility and room for personal adjustment. For example it is easier to try the garment on while working, as well as making adjustments to length of yoke and shoulder caps.

The instructions are carefully explaining every step, in the correct order. Diagrams are adjusted to the knitting direction and are worked as usual.

The diagram depicts all rows/rounds, and every stitch seen from the right side. It is read from bottom to top, from right to left. 1 square = 1 stitch.

When working back and forth, every other row is worked from the right side and every other row is worked from the wrong side. When working from the wrong side, the diagram will have to be worked reversed: from left to right, knit stitches are purled, purl stitches are knit etc.

When working in the round every round is worked from the right side and the diagram are worked from right to left on all rounds.

See DROPS lesson: How to read knitting diagrams

The diagram depicts all rows/rounds, and every stitch seen from the right side. It is worked from bottom to top, from right to left.

When working back and forth every other row is worked from the right side: from right to left and every other row is worked from the wrong side: from left to right.

When working in the round, every row in the diagram are worked from the right side, from right to left.

When working a circular diagram you start in the middle and work your way outwards, counter clockwise, row by row.

The rows usually start with a given number of chain stitches (equivalent to the height of the following stitch), this will either be depicted in the diagram or explained in the pattern.

See DROPS lesson: How to read crochet diagrams

Instructions for working several diagrams after each other on the same row/round, will often be written like so: “work A.1, A.2, A.3 a total of 0-0-2-3-4 times". This means you work A.1 once, then A.2 is worked once, and A.3 is repeated (in width) the number of times provided for your size – in this case like so: S = 0 times, M = 0 times, L=2 times, XL= 3 times and XXL = 4 times.

The diagrams are worked as usual: begin with the first row in A.1, then work the first row in A.2 etc.

See DROPS lesson: How to read knitting diagrams

See DROPS lesson: How to read crochet diagrams

The total width of the garment (from wrist-to-wrist) will be larger in the larger sizes, despite the actual sleeves being shorter. The larger sizes have longer sleeve caps and wider shoulders, so there will be a good fit in all sizes.

The measurement sketch/schematic drawing provides information regarding the full length of the garment. If it’s a jumper or a jacket the length is measured from the highest point on the shoulder closest to the neckline, and straight down to the bottom of the garment. It is NOT measured from the tip of shoulder. Similarly, the length of yoke is measured from the highest point on the shoulder and down to where yoke is split into body and sleeves.

On a jacket measures are never taken along bands, unless specifically stated. Always measure inside band stitches when measuring the length.

See DROPS lesson: How to read a schematic drawing

Diagrams are often repeated on the round or in height. 1 repeat is the diagram the way it appears in the pattern. If it says to work 5 repeats of A.1 in the round, then you work A.1 a total of 5 times after/next to each other in the round. If it says to work 2 repeats of A.1 vertically/in height you work the entire diagram once, then begin again at the start and work the entire diagram one more time.

Chain stitches are slightly narrower than other stitches and to avoid working the cast-on edge too tight, we simply chain more stitches to begin with. The stitch count will be adjusted on the following row to fit the pattern and measurement sketch.

The rib edge is more elastic and will contract slightly compared to, for example, stocking stitch. By increasing before the rib edge, you avoid a visible difference in width between the rib edge and the rest of the body.

It’s very easy to cast off too tightly, and by making yarn overs while casting off (and simultaneously casting these off) you avoid a too tight cast off edge.

See DROPS video: How to bind off with yarn overs (yo)

To achieve an even increase (or decrease) you can increase on, for example: every 3rd and 4th row alternately, like so: work 2 rows and increase on the 3rd row, work 3 rows and increase on the 4th. Repeat this until the increase is complete.

See DROPS lesson: Increase or decrease 1 st on every 3rd and 4th row alternately

Should you prefer to work in the round instead of back and forth, you may of course adjust the pattern. You’ll need to add steeks mid-front (usually 5 stitches), and follow the instructions. When you would normally turn and work from the wrong side, simply work across the steek and continue in the round. At the end you’ll cut the piece open, pick up stitches to work bands, and cover the cut edges.

See DROPS video: How to knit steeks and cut open

Should you prefer to work back and forth instead of in the round, you may of course adjust the pattern so you work the pieces separately and then assemble them at the end. Divide the stitches for the body in 2, add 1 edge stitch in each side (for sewing) and work the front and back pieces separately.

See DROPS lesson: Can I adapt a pattern for circular needles into straight needles?

Pattern repeats can vary slightly in the different sizes, in order to get the correct proportions. If you’re not working the exact same size as the garment in the photo, yours might deviate slightly. This has been carefully developed and adjusted so that the complete impression of the garment is the same in all sizes.

Make sure to follow instructions and diagrams for your size!

If you have found a pattern you like which is available in women’s size it’s not very difficult to convert it to men’s size. The biggest difference will be the length of sleeves and body. Start working on the women size that you think would fit across the chest. The additional length will be worked right before you cast off for the armhole/sleeve cap. If the pattern is worked top-down you can add the length right after the armhole or before the first decrease on sleeve.

Regarding additional yarn amount, this will depend on how much length you add, but it is better with a skein too many than too few.

All yarns will have excess fibres (from production) that might come off as lint or shedding. Brushed yarns (ie hairier yarns) have more of these loose, excess fibres, causing more shedding.

Shedding also depends on what is worn under or over the garment, and whether this pulls at the yarn fibres. It’s therefore not possible to guarantee that there will be no shedding

Below are some tips on how to get the best result when working with hairier yarns:

1. When the garment is finished (before you wash it) shake it vigorously so the looser hairs come off. NOTE: do NOT use a lint roller, brush or any method that pulls at the yarn.

2. Place the garment in a plastic bag and put it in your freezer - the temperature will cause the fibres to become less attached to each other, and excess fibres will come off easier.

3. Leave in the freezer for a few hours before taking it out and shaking it again.

4. Wash the garment according to the instructions on the yarn label.

Pilling is a natural process that happens to even the most exclusive of fibers. It's a natural sign of wear and tear that is hard to avoid, and that is most visible in high friction areas of your garment like a sweater's arms and cuffs.

You can make your garment look as new by removing the pilling, using a fabric comb or a pill/lint remover.

Still can't find the answer you need? Then scroll down and leave your question so one of our experts can try to help you. This will be done normally within 5 to 10 working days.
In the meantime, you can read the questions and answers that others have left to this pattern or join the DROPS Workshop on Facebook to get help from fellow knitters/crocheters!

You might also like...

Post a comment to pattern DROPS 109-45

We would love to hear what you have to say about this pattern!

If you want to leave a question, please make sure you select the correct category in the form below, to speed up the answering process. Required fields are marked *.

Comments / Questions (61)

country flag Deb wrote:

This one is definitely on my to-do list! I too am happy to see you designing stylish crochet patterns, please keep 'em coming!

08.08.2008 - 02:49

country flag Linda Moore wrote:

Really like this one with a bit of fittedness.

03.08.2008 - 23:11

country flag Sarah Conrad wrote:

Superflot! Glæder mig til at lave den!

14.07.2008 - 21:58

country flag Lisbeth Halvorsen wrote:

Flott design,spennende strikk.gleder meg

07.07.2008 - 22:18

country flag Vickie wrote:

I love this design. My daughter will surely have one for this winter.

03.07.2008 - 16:37

country flag Helena wrote:

Ihana malli! Odotan innokkaasti ohjetta jotta pääsen toteuttamaan!

02.07.2008 - 14:33

Sevim wrote:

Heel mooie om te maken en dragen ik heel veel patronen van jullie gehakt en breit helaas woon ik in turkije kan geen wol van jullie bestelen

28.06.2008 - 16:34

May wrote:

Love it and when will it release.

26.06.2008 - 06:28

country flag Emma wrote:

Ich will die auch häkeln, super schön

25.06.2008 - 13:59

country flag Hilde wrote:

Meget elegang jakke, men er den heklet tro :-( .......

23.06.2008 - 07:13