
Popular categories
Looking for a yarn?


|
||||||||||
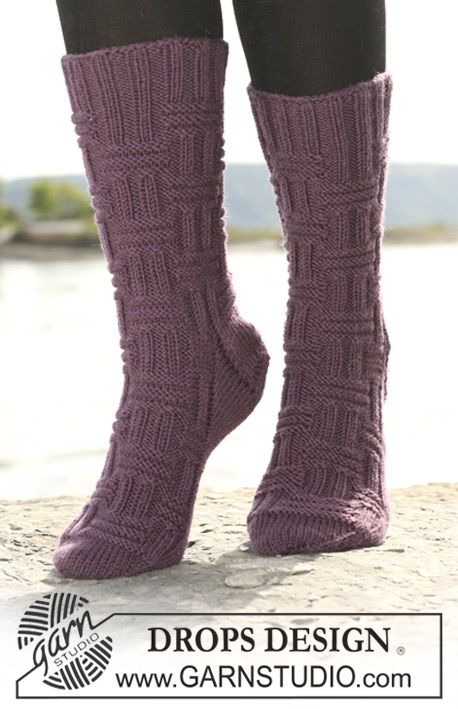
Clay Cables |
||||||||||
|
|
||||||||||
DROPS socks in 2 threads ”Alpaca” with cables.
DROPS 108-37 |
||||||||||
|
Pattern: See diagram M.1 and M.2. Diagram shows 1 horizontal repeat of. NB! If working M.1 without cable needle: Work 3 sts but let them stay on needle, work 2 sts but let them stay on needle, work 1 st and slip all 3 sts off needle. Heel decreases: Row 1 (= RS): Work row until 5-6-7 sts remain, slip 1 st as if to K, K1, psso. Turn piece. Row 2 (= WS): Work row until 5-6-7 sts remain, slip 1 st as if to P, P1, psso. Turn piece. Row 3 (= RS): Work row until 4-5-6 sts remain, slip 1 st as if to K, K1, psso. Turn piece. Row 4 (= WS): Work row until 4-5-6 sts remain slip 1 st as if to P, P1, psso. Turn piece. Continue dec like this with 1 less st before each dec until there are 10-10-12 sts on row. Sock: Worked in the round in double pointed needles. Cast on 48-48-60 sts on double pointed needles size 4 mm with 2 threads Alpaca. K 2 rounds and continue in rib, K3/ P3, until piece measures 6 cm. Remember the knitting tension! Continue as follows: Size 35/37 and 38/40: M.1, P3, M.1, P9 (= mid back), * M.1, P3 *, repeat from *-* 3 times, M.2 (inc 1 st in each of the K3 from rib so that 6 sts in M.2 sits under K3 m from rib), P3, M.1, P3. Size 41/43: * M.1, P3 *, repeat from *-* 2 times, M.1, P9 (= mid back), * M.1, P3 *, repeat from *-* 4 times, M.2 (inc 1 st in each of the K3 from rib so that 6 sts in M.2 sits under K3 m from rib), P3, M.1, P3. All sizes: There are now 51-51-63 sts on needles. Continue as above, at the same time when piece measures 8 cm dec 1 st on the 9 P sts mid back as follows: P2 tog in the middle of P-section on every 3 cm a total of 6 times, the P9 are now P3 = 45-45-57 sts in total. Continue until piece measures 26-27-28 cm. Now keep the first 21-21-33 sts on needle for heel and slip the last 24 sts on a stitch holder (= mid upper foot). Work 5-5.5-6 cm stocking st back and forth on heel sts, at the same time dec 3-1-9 sts evenly on first row = 18-20-24 sts. Insert a Marking Thread (MT) in heel – now measure piece from here! Dec for heel – see Heel decreases. After heel dec pick up 10-11-12 sts on bot sides of heel and slip the 24 sts back on needle = 54-56-60 sts. Continue in pattern as before on the 24 sts on upper foot and stocking st on remaining sts, at the same time dec each side as follows: K tog the last 2 sts before the 24 sts on upper foot into back of loop and K tog the first 2 sts after the 24 sts on upper foot. Dec like this on every other round a total of 9-8-8 times = 36-40-44 sts. When piece measures 18-20-22 cm from MT on heel (= 4-4-5 cm left) insert 1 MT each side with 18-20-22 sts on upper foot and 18-20-22 sts under foot. Now continue in stocking st on all sts, at the same time dec for toes on both sides of each MT as follows: Work round until 3 sts before MT, K2 tog, K2 (MT sits between these 2 sts), K2 tog into back of loop. Dec like this on every other round a total of 4-3-5 times and then on every round 2-4-3 times = 12 sts left. On next round K all sts tog 2 by 2. Cut the thread, pull through remaining sts and fasten. |
||||||||||
Diagram explanations |
||||||||||
|
||||||||||

|
||||||||||
|
Have you made this or any other of our designs? Tag your pictures in social media with #dropsdesign so we can see them! Do you need help with this pattern?You'll find tutorial videos, a Comments/Questions area and more by visiting the pattern on garnstudio.com. © 1982-2024 DROPS Design A/S. We reserve all rights. This document, including all its sub-sections, has copyrights. Read more about what you can do with our patterns at the bottom of each pattern on our site. |
||||||||||


With over 40 years in knitting and crochet design, DROPS Design offers one of the most extensive collections of free patterns on the internet - translated to 17 languages. As of today we count 304 catalogues and 11422 patterns - 11422 of which are translated into English (UK/cm).
We work hard to bring you the best knitting and crochet have to offer, inspiration and advice as well as great quality yarns at incredible prices! Would you like to use our patterns for other than personal use? You can read what you are allowed to do in the Copyright text at the bottom of all our patterns. Happy crafting!
Comments / Questions (17)
Hello! I love these stockings but cannot figure out the stitch count on the first row under the rib. M1 (3 stitches) + P3 (3 st) + M1 (3 st) + P9 (9 st) + [M1,P3] 3 times (18 st) + M2 (9 st) + P3 (3 st) + M1 (3 st) + P3 (3 st) = 54 st? What I am missing? I think the next row should have 51 st and not 54. Help!
21.01.2018 - 15:52DROPS Design answered:
Dear Melissa, when working M2 on first row you increase 3 sts: (inc 1 st in each of the K3 from rib so that 6 sts in M.2 sits under K3 m from rib), there were 48 sts + 3 sts inc = 51 sts. Happy knitting!
22.01.2018 - 10:08Merci pour votre aide mes bas sont magnifique ! Par contre je crois qu'il y a une erreur ici: diminuer de chaque côté ainsi : tricoter les 2 dernières m avant les 24 m du dessus du pied ensemble torse à l'end, et les 2 premières mailles *avant*( il me semble que c'est plutôt après) les 24 m du dessus du pied ensemble à l'end.
15.12.2017 - 18:18DROPS Design answered:
Bonjour Nathalie et merci pour votre retour, la correction a été faite. Bon tricot!
18.12.2017 - 09:15Aussi j'aimerais savoir si les diminutions se font à 8 cm de hauteur totale ou bien à partir des torsades, merci beaucoup pour vos réponses
12.12.2017 - 21:11DROPS Design answered:
Bonjour Nathalie, on mesure les 8 cm depuis le rang de montage = hauteur totale. Bon tricot!
13.12.2017 - 10:26Bonjour, donc si je comprends bien on doit faire les 3 augmentations sur le dernier rang de côtes 3/3 avant de commencer le rang avec les torsades M1 et M2 ? Ou bien on fait les augmentations et M2 se situe après ces 6 mailles?
12.12.2017 - 20:12DROPS Design answered:
Bonjour Nathalie, ces augmentations se font au 1er rang de M.1 et M.2, après les côtes. Quand vous devez tricoter M.2 sur 6 mailles, doublez chacune des 3 mailles suivantes pour les augmenter à 6 mailles. Bon tricot!
13.12.2017 - 10:18Bonjour , je ne comprends pas très bien le rang avec les augmentations (où précisément on fait les augmentations) pour bien arriver avec la torsade M2, Merci
11.12.2017 - 20:39DROPS Design answered:
Bonjour Nathalie, M.2 va se tricoter au-dessus d'une section 3 m end des côtes, pour avoir 6 mailles à ce niveau, on doit augmenter 3 m, vous pouvez tricoter 3 fois chacune de ces 3 m endroit, ou bien faire 1 jeté avant ou après chacune de ces 3 m pour que vous ayez bien 6 m au 1er rang de M2. Bon tricot!
12.12.2017 - 08:06Hei; Jeg skal strikke lester for første gang og synes disse var helt nydelig. Men jeg får ikke maskeantallet til å stemme når jeg leser oppskriften? Dersom man skal legge opp 48 masker så går ikke mønstret opp etter vrangborden. Da må man begynne på m2 før man er ferdig med første runde med m1 og det kan da ikke være rett? Eller? Med hilsen Stina
03.01.2015 - 01:42DROPS Design answered:
Du bruger de 48 m således: M.1, 3 vr, M.1, 9 vr (= midt bak), * M.1, 3 vr *, gjenta fra *-* ialt 3 ganger, M.2 (Her bruker du 3 m men øk 1 m i hver av de 3 rett m fra vrborden slik at 6 m i M.2 kommer rett under 3 m rett fra vrborden), 3 vr, M.1, 3 vr. God fornøjelse!
04.02.2015 - 14:59Josée Laberge wrote:
SVP oubliez ma question, j'avais une ancienne version du patron. Le nouveau est corrigé. Merci!
19.01.2012 - 00:54Josée Laberge wrote:
Bonjour, j'ai un problème avec le diagramme M1. Je comprends de mettre la maille auxiliaire devant (sur une broche à torsades, tricoter une maille, puis tricoter à l'endroit la maille auxiliaire. Je ne comprends pas quand on dit de reprendre la maille derrière et la tricoter à l'endroit. Est-ce qu'on parle de la 3ème maille et on fait seulement piquer par l'arrière? ça ne semble pas être ça... Merci! Josée
19.01.2012 - 00:47Hej Emelie! Jo, på det mönstret ska du ha två trådar hela vägen. Om du bara har en tråd och mindre stickor blir sockan för liten - bättre då att använda ett mönster som är avsett för enkelt garn. Mvh, Lotta
28.10.2008 - 12:06Ok, men då behöver man inte ha två trådar senare i arbetet? utan om man vill ha tunnare strumpor kan man sticka med en tråd och kanske lite smalare stickor?
28.10.2008 - 09:59