DROPS Karisma
DROPS Karisma
100% Wool
from 2.30 £ /50g
Get the yarn to make this pattern from 23.00£.

The yarn cost is calculated from the pattern’s smallest size and the yarn’s cheapest product type. Looking for an even better price? You might find it on the DROPS Deals!

DROPS SS24

Chantelle

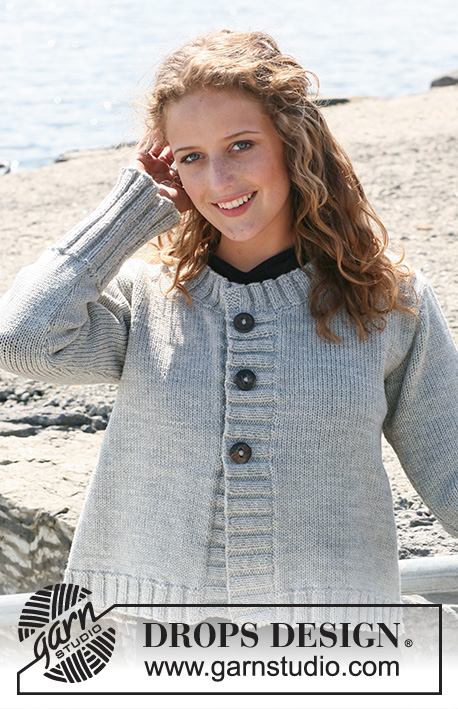
Knitted DROPS jacket in ”Karisma” with rib borders or "DROPS Loves You III". Size S - XXXL.

DROPS 108-22
Size: S - M - L - XL - XXL - XXXL

Materials: DROPS Karisma from Garnstudio
500-550-600-650-700-750 g colour no 44, light grey

Or use:
DROPS LOVES YOU III fro Garnstudio
350-400-400-450-500-500 g no 11, gray


DROPS circular needle size 4 mm (60 cm) – or size needed to get 21 sts x 28 rows in stocking st = 10 x 10 cm.
DROPS circular needle size 3 mm (60 cm) – for rib.
DROPS buffalo horn button, dark no 536: 3-3-3-4-4-4 pcs.

-------------------------------------------------------

Alternative Yarn – See how to change yarns here
Yarn Groups A to F – Use the same pattern and change the yarn here
Yarn usage using an alternative yarn – Use our yarn converter here

-------------------------------------------------------

DROPS Karisma
DROPS Karisma
100% Wool
from 2.30 £ /50g
Get the yarn to make this pattern from 23.00£.

The yarn cost is calculated from the pattern’s smallest size and the yarn’s cheapest product type. Looking for an even better price? You might find it on the DROPS Deals!

Pattern instructions

NOTE: This pattern is written in British English. All measurements in charts are in cm. For conversion from cm to inches - click here. There are different terms for crocheting in British and American English. If this pattern includes crochet, click for "crochet terms" here. For this pattern in American English, please click here.
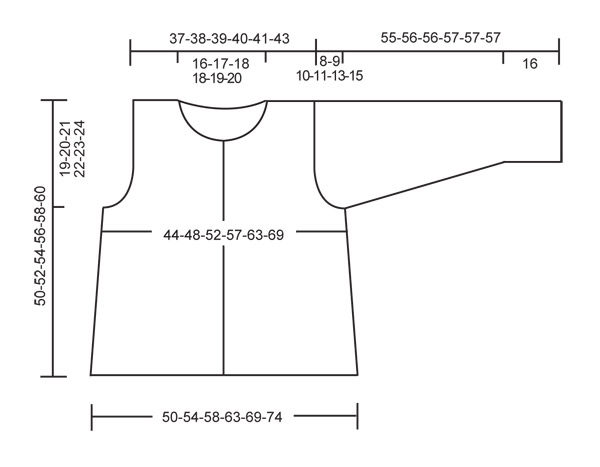
Back piece: Worked back and forth on needle. Cast on 143-155-167-179-197-215 sts on circular needle size 3 mm with Karisma. K 1 row from RS as follows: 1 edge st, * K3, P3 * repeat from *-*, finish with K3 and 1 edge st. Continue until rib measures 4 cm – adjust so that next row is from WS. Change to needle size 4 mm and K 1 row, at the same time dec 36-40-43-45-50-57 sts evenly = 107-115-124-134-147-158 sts. Now continue in stocking st, at the same time when piece measures 8 cm dec 1 st each side on every 3.5-3.5-3.5-4-4-4 cm a total of 6 times = 95-103-112-122-135-146 sts. When piece measures 31-32-33-34-35-36 cm cast off for armhole each side at the beg of every row: 3 sts 1 time, 2 sts 2-3-4-6-8-10 times and 1 st 2-3-4-4-5-5 times = 77-79-82-84-87-90 sts. Continue in stocking st. When piece measures 48-50-52-54-56-58 cm cast off the middle 31-33-36-36-37-40 sts for neck and dec 1 st on neckline on next row = 22-22-22-23-24-24 sts left on each shoulder. Cast off when piece measures 50-52-54-56-58-60 cm.

Left front piece: Worked back and forth on circular needle. Cast on 68-74-80-92-98-110 sts (includes 1 edge st at side and 1 edge st towards mid front) on needle size 3 mm with Karisma. K 1 row from the side (RS) as follows: 1 edge st, * P3/K3 *, repeat from *-*, and finish with 1 edge st towards mid front. Continue until rib measures 4 cm – adjust so that next row is from WS. Change to needle size 4 mm and K 1 row, at the same time dec 14-16-17-24-24-29 sts evenly = 54-58-63-68-74-81 sts. Continue in stocking st with 1 edge st at side and 1 edge st towards mid front. At the same time when piece measures 8 cm dec at side as described for back piece = 48-52-57-62-68-75 sts. When piece measures 31-32-33-34-35-36 cm cast off for armhole at side as described for back piece. At the same time when piece measures 38-40-42-44-46-48 cm cast off to shape the neckline towards mid front on every other row as follows: 3 sts 3-4-4-4-4-5 times and 2 sts 4-3-4-4-4-4 times = 22-22-22-23-24-24 sts left on shoulder. Cast off when piece measures 50-52-54-56-58-60 cm.
Right front piece: Like left front piece, but mirrored.

Sleeve: Worked back and forth on circular needle. Cast on 74-74-80-80-86-86 sts on circular needle size 3 mm with Karisma. Work 16 cm rib, K3/P3, with 1 edge st each side. Adjust so that next row is from the WS. Change to needle size 4 mm and K 1 row, at the same time dec 18-15-19-17-21-17 sts evenly = 56-59-61-63-65-69 sts. Continue in stocking st. When piece measures 17 cm inc 1 st each side on every 4-3.5-2.5-2-1.5-1.5 cm a total of 8-9-11-13-15-15 times = 72-77-83-89-95-99 sts. When piece measures 47-47-46-46-44-42 cm – less on the larger sizes because of longer sleeve cap and wider shoulders - cast off for armhole at the beg of every row as follows: 3 sts 1 time, 2 sts 3-3-3-3-4-4 times, 1 st 3-5-6-7-8-11 times, then 2 sts each side until piece measures 54-55-55-56-56-56 cm, now cast off 3 sts each side 1 time and cast off remaining sts. Sleeve measures approx 55-56-56-57-57-57 cm.

Assembly: Sew shoulder seams. Set in sleeves. Sew side and sleeve seams inside 1 edge st.
Front bands: Worked back and forth on circular needle. Pick up 89-113 sts (divisible by 6 + 5) along left front piece from the RS on needle size 3 mm with Karisma. K 1 row from WS and K 1 row from RS. Continue from WS as follows: 1 garter st, P3, * K3 / P3 *, repeat from *-* and finish with 1 garter st. Cast off in rib when front band measures 5 cm. Repeat along right front piece, at the same time after 3 cm make 3-3-3-4-4-4 buttonholes evenly distributed. 1 buttonhole = cast off 2 sts and cast on 2 new sts on return row. Place the lower buttonhole approx 22 to 24 cm from bottom edge and the top buttonhole in the first P-section. Cast off in rib when front band measures 5 cm.
Neckline: Worked back and forth on circular needle. Pick up 161-179 sts (divisible by 6 + 5) on needle size 3 mm round the neck and on front bands. K 1 row from WS, K 1 row from RS and continue from WS as follows: 1 garter st, P3, * K3 / P3 * repeat from *-* and finish with 1 garter st. Cast off in rib when neckline measures 5 cm.
Sew on buttons.

Diagram

diagram measurements
Do you have a question? See a list of frequently asked questions (FAQ)

Knitting tension is what determines the final measurements of your work, and is usually measured per 10 x 10 cm. It is provided like so: number of stitches in width x number of rows in height - eg: 19 stitches x 26 rows = 10 x 10 cm.

The knitting tension is very individual; some people knit/crochet loosely while others work tightly. You adjust the knitting tension with the needle size, which is why the suggested needle size is only meant as a guide! You need to adjust this (up or down) to ensure that YOUR knitting tension matches the knitting tension provided in the pattern. If you work with a different knitting tension than provided you will have a different yarn consumption, and your work will have different measurements than what the pattern suggests.

The knitting tension also determines which yarns can replace each other. As long as you achieve the same knitting tension you can replace one yarn with another.

See DROPS lesson: How to measure your tension/gauge

See DROPS video: How to make a gauge tension swatch

The required amount of yarn is provided in grams, eg: 450 g. To calculate how many balls you’ll need you first need to know how many grams are in 1 ball (25g, 50g or 100g). This information is available if you click on the individual yarn quality on our pages. Divide the amount required with the amount of each ball. For example, if each ball is 50g (the most common amount), the calculation will be as follows: 450 / 50 = 9 balls.

The important thing when changing from one yarn to another is that the knitting/crochet tension remains the same. This is so that the measurements of the finished piece will be the same as on the sketch provided. It is easier to achieve the same knitting tension using yarns from the same yarn group. It is also possible to work with multiple strands of a thinner yarn to achieve the knitting tension of a thicker one. Please try our yarn converter. We recommend you to always work a test swatch.

Please NOTE: when changing yarn the garment might have a different look and feel to the garment in the photo, due to individual properties and qualities of each yarn.

See DROPS lesson: Can I use a different yarn than the one mentioned in the pattern?

All our yarns are categorised into yarn groups (from A to F) according to thickness and knitting tension – group A contains the thinnest yarns and group F the thickest. This makes it easier for you to find alternative yarns to our patterns, should you wish to switch yarn. All yarns within the same group have a similar knitting tension and can easily replace each other. However, different yarn qualities have different structures and properties which will give the finished work a unique look and feel.

Click here for an overview of the yarns in each yarn group

At the top of all our patterns you’ll find a link to our yarn calculator, which is a helpful tool should you wish to use a different yarn than suggested. By filling in the yarn quality you wish to replace, the amount (in your size) and number of strands, the calculator will present good alternative yarns with the same knitting tension. Additionally it will tell you how much you’ll require in the new qualities and whether you’ll need to work with multiple strands. Most skeins are 50g (some are 25g or 100g).

If the pattern is worked with multiple colours, every colour will have to be calculated separately. Similarly, if the pattern is worked with several strands of different yarns (for example 1 strand Alpaca and 1 strand Kid-Silk) you will have to find alternatives for each, individually.

Click here to see our yarn calculator

Since different yarns have different qualities and textures we have chosen to keep the original yarn in our patterns. However, you can easily find options among our available qualities by using our yarn calculator, or simply pick a yarn from the same yarn group.

It is possible that some retailers still have discontinued yarns in stock, or that someone has a few skeins at home that they would like to find patterns for.

The yarn calculator will provide both alternative yarn as well as required amount in the new quality.

If you think it's hard to decide what size to make, it can be a good idea to measure a garment you own already and like the size of. Then you can pick the size by comparing those measures with the ones available in the pattern's size chart.

You'll find the size chart at the bottom of the pattern.

See DROPS lesson: How to read size chart

The needle size provided in the pattern serves only as a guide, the important thing is to follow the knitting tension. And since knitting tension is very individual, you will have to adjust the needle size to ensure that YOUR tension is the same as in the pattern – maybe you’ll have to adjust 1, or even 2 needle sizes, up or down to achieve the correct tension. For this, we recommend that you work test swatches.

Should you work with a different knitting tension than the one provided, the measurements of the finished garment might deviate from the measurement sketch.

See DROPS lesson: How to measure your tension/gauge

See DROPS video: How to make a tension/gauge swatch

Working a garment top-down provides more flexibility and room for personal adjustment. For example it is easier to try the garment on while working, as well as making adjustments to length of yoke and shoulder caps.

The instructions are carefully explaining every step, in the correct order. Diagrams are adjusted to the knitting direction and are worked as usual.

The diagram depicts all rows/rounds, and every stitch seen from the right side. It is read from bottom to top, from right to left. 1 square = 1 stitch.

When working back and forth, every other row is worked from the right side and every other row is worked from the wrong side. When working from the wrong side, the diagram will have to be worked reversed: from left to right, knit stitches are purled, purl stitches are knit etc.

When working in the round every round is worked from the right side and the diagram are worked from right to left on all rounds.

See DROPS lesson: How to read knitting diagrams

The diagram depicts all rows/rounds, and every stitch seen from the right side. It is worked from bottom to top, from right to left.

When working back and forth every other row is worked from the right side: from right to left and every other row is worked from the wrong side: from left to right.

When working in the round, every row in the diagram are worked from the right side, from right to left.

When working a circular diagram you start in the middle and work your way outwards, counter clockwise, row by row.

The rows usually start with a given number of chain stitches (equivalent to the height of the following stitch), this will either be depicted in the diagram or explained in the pattern.

See DROPS lesson: How to read crochet diagrams

Instructions for working several diagrams after each other on the same row/round, will often be written like so: “work A.1, A.2, A.3 a total of 0-0-2-3-4 times". This means you work A.1 once, then A.2 is worked once, and A.3 is repeated (in width) the number of times provided for your size – in this case like so: S = 0 times, M = 0 times, L=2 times, XL= 3 times and XXL = 4 times.

The diagrams are worked as usual: begin with the first row in A.1, then work the first row in A.2 etc.

See DROPS lesson: How to read knitting diagrams

See DROPS lesson: How to read crochet diagrams

The total width of the garment (from wrist-to-wrist) will be larger in the larger sizes, despite the actual sleeves being shorter. The larger sizes have longer sleeve caps and wider shoulders, so there will be a good fit in all sizes.

The measurement sketch/schematic drawing provides information regarding the full length of the garment. If it’s a jumper or a jacket the length is measured from the highest point on the shoulder closest to the neckline, and straight down to the bottom of the garment. It is NOT measured from the tip of shoulder. Similarly, the length of yoke is measured from the highest point on the shoulder and down to where yoke is split into body and sleeves.

On a jacket measures are never taken along bands, unless specifically stated. Always measure inside band stitches when measuring the length.

See DROPS lesson: How to read a schematic drawing

Diagrams are often repeated on the round or in height. 1 repeat is the diagram the way it appears in the pattern. If it says to work 5 repeats of A.1 in the round, then you work A.1 a total of 5 times after/next to each other in the round. If it says to work 2 repeats of A.1 vertically/in height you work the entire diagram once, then begin again at the start and work the entire diagram one more time.

Chain stitches are slightly narrower than other stitches and to avoid working the cast-on edge too tight, we simply chain more stitches to begin with. The stitch count will be adjusted on the following row to fit the pattern and measurement sketch.

The rib edge is more elastic and will contract slightly compared to, for example, stocking stitch. By increasing before the rib edge, you avoid a visible difference in width between the rib edge and the rest of the body.

It’s very easy to cast off too tightly, and by making yarn overs while casting off (and simultaneously casting these off) you avoid a too tight cast off edge.

See DROPS video: How to bind off with yarn overs (yo)

To achieve an even increase (or decrease) you can increase on, for example: every 3rd and 4th row alternately, like so: work 2 rows and increase on the 3rd row, work 3 rows and increase on the 4th. Repeat this until the increase is complete.

See DROPS lesson: Increase or decrease 1 st on every 3rd and 4th row alternately

Should you prefer to work in the round instead of back and forth, you may of course adjust the pattern. You’ll need to add steeks mid-front (usually 5 stitches), and follow the instructions. When you would normally turn and work from the wrong side, simply work across the steek and continue in the round. At the end you’ll cut the piece open, pick up stitches to work bands, and cover the cut edges.

See DROPS video: How to knit steeks and cut open

Should you prefer to work back and forth instead of in the round, you may of course adjust the pattern so you work the pieces separately and then assemble them at the end. Divide the stitches for the body in 2, add 1 edge stitch in each side (for sewing) and work the front and back pieces separately.

See DROPS lesson: Can I adapt a pattern for circular needles into straight needles?

Pattern repeats can vary slightly in the different sizes, in order to get the correct proportions. If you’re not working the exact same size as the garment in the photo, yours might deviate slightly. This has been carefully developed and adjusted so that the complete impression of the garment is the same in all sizes.

Make sure to follow instructions and diagrams for your size!

If you have found a pattern you like which is available in women’s size it’s not very difficult to convert it to men’s size. The biggest difference will be the length of sleeves and body. Start working on the women size that you think would fit across the chest. The additional length will be worked right before you cast off for the armhole/sleeve cap. If the pattern is worked top-down you can add the length right after the armhole or before the first decrease on sleeve.

Regarding additional yarn amount, this will depend on how much length you add, but it is better with a skein too many than too few.

All yarns will have excess fibres (from production) that might come off as lint or shedding. Brushed yarns (ie hairier yarns) have more of these loose, excess fibres, causing more shedding.

Shedding also depends on what is worn under or over the garment, and whether this pulls at the yarn fibres. It’s therefore not possible to guarantee that there will be no shedding

Below are some tips on how to get the best result when working with hairier yarns:

1. When the garment is finished (before you wash it) shake it vigorously so the looser hairs come off. NOTE: do NOT use a lint roller, brush or any method that pulls at the yarn.

2. Place the garment in a plastic bag and put it in your freezer - the temperature will cause the fibres to become less attached to each other, and excess fibres will come off easier.

3. Leave in the freezer for a few hours before taking it out and shaking it again.

4. Wash the garment according to the instructions on the yarn label.

Pilling is a natural process that happens to even the most exclusive of fibers. It's a natural sign of wear and tear that is hard to avoid, and that is most visible in high friction areas of your garment like a sweater's arms and cuffs.

You can make your garment look as new by removing the pilling, using a fabric comb or a pill/lint remover.

Still can't find the answer you need? Then scroll down and leave your question so one of our experts can try to help you. This will be done normally within 5 to 10 working days.
In the meantime, you can read the questions and answers that others have left to this pattern or join the DROPS Workshop on Facebook to get help from fellow knitters/crocheters!

You might also like...

Post a comment to pattern DROPS 108-22

We would love to hear what you have to say about this pattern!

If you want to leave a question, please make sure you select the correct category in the form below, to speed up the answering process. Required fields are marked *.

Comments / Questions (42)

country flag Eva wrote:

Hur mycket garn hår det åt i stl L om man stickar i Cotton Light?

04.03.2023 - 11:11

DROPS Design answered:

Hei Eva. Använd vår garn-konverterare, klikk på link til høyre eller under bildet. Fyll inn informassjon og konverterare regner ut hvor mye du trenger i den kvaliteten du ønsker å strikke i. mvh DROPS Design

06.03.2023 - 14:41

country flag Lola Gómez wrote:

Hola, esta chaqueta se quedará bien si la hago con Cotton Light??? Gracias.

15.07.2020 - 10:46

DROPS Design answered:

Hola Lola. En la foto la chaqueta está hecha con Karisma (lana 100 %). Se puede hacer con Cotton Light, porque es del mismo grupo de lanas, pero la textura de la chaqueta quedará diferente.

19.08.2020 - 17:55

country flag Belinda wrote:

I have a problem with the decreasing for armhole in 108-22 back I cannot get with the instructions from 135 st to 87 st using the decreases listed, what have I got wrong, I also don’t understand “ bind off each side at the beginning of every row 1 time’ this was only bind off on one side? Hoping you can help Belinda

22.06.2020 - 13:18

DROPS Design answered:

Dear Belinda, you have to cast off at the beg of each row on each side, ie both from RS and from WS, so that you bind off: 3 sts at the beg of next 2 rows, then 2 sts at the beg of next 16 rows (=8 times on each side), and 1 st at the beg of next 10 rows (= 5 times on each side) = 135 - 3x2 - 2x16 - 1x10= 87 sts remain. Happy knitting!

22.06.2020 - 14:33

country flag Lina wrote:

Hur ska man minska för ärmhål, t.ex. på bakstycket? Det står att avmaskningarna görs *i början* på varje varv, men då stämmer inte antalet maskor. Minskar jag lika mkt även i slutet av varje varv stämmer det. Jag gör stl small och ska minska från 95 till 77 m = 18 m. Minskning i början av varje varv ger 3-2-2-1-1=9 m. Så: ska jag minska lika mycket även i slutet av varje varv, eller bara i början men över dubbelt så många varv (3-3-2-2-2-2-1-1-1-1)?

17.05.2019 - 17:02

DROPS Design answered:

Hej. Du gör minskningarna i början av varje varv, det blir alltså på följande sätt: minska 3 m i början av varvet och sticka varvet ut. Vid början på nästa varv minskas även här 3 m (blir då på andra sidan av arbetet) sedan stickas varvet ut. I början på nästa varv minskas 2 m och så fortsätter du enligt beskrivningen. Hoppas du förstår hur vi menar.

22.05.2019 - 08:17

country flag MONICA wrote:

Buonasera, vorrei sapere se fosse possibile utilizzare due filati uno di tipo A insieme al Brushed Alpaca Silk e quanto filato occorrerebbe per la taglia M. Ringrazio anticipatamente.

14.11.2018 - 15:14

DROPS Design answered:

Buongiorno Monica. Karisma appartiene al gruppo filati B. Brushed Alpaca Silk è invece del gruppo C, quindi più spesso. Può sostituire Karisma con un altro filato sempre del gruppo B (p.es Puna, Sky, Lima). Per ogni ulteriore aiuto, può contattare il suo rivenditore Drops di fiducia. Buon lavoro!

15.11.2018 - 09:18

country flag Maria wrote:

Si può lavorare tutto con ferri diritti?Grazie

16.10.2018 - 13:56

DROPS Design answered:

Buongiorno Maria. Il capo è lavorato avanti e indietro. Può quindi usare ferri dritti. Buon lavoro!

16.10.2018 - 14:12

country flag Daniela Barro wrote:

I ferri circolari che vengono indicati sono per lavorare dietro e i due davanti in contemporanea?

27.08.2018 - 21:46

DROPS Design answered:

Buongiorno Daniela. Il cardigan viene lavorato in parti separate e poi cucite. Può lavorare anche con i ferri dritti. I ferri circolari vengono consigliati per il numero elevato di maglie e possono risultare più comodi per lavorare i bordi sui davanti e intorno allo scollo. Buon lavoro!

27.08.2018 - 22:00

country flag Monica Andersson wrote:

Nu har jag hittat det! =)

04.02.2018 - 21:12

country flag Monica Andersson wrote:

Jag kan inte hitta beskrivning på ärmarna. Var finns det? Monica

04.02.2018 - 21:10

DROPS Design answered:

Beskrivningen till ärmarna hittar du direkt under höger framstycke.

05.02.2018 - 17:52

country flag Lion wrote:

Bonjour , je ne comprends pas bien l'arrondi des manches: pour la taille M vous écrivez : rabatte 1x3m,3x2m,5x1m, puis 2m jusqu'à 55 cm . Faut-il continuer à rabattre 2m à chaque rang ? Ou bien une seule fois cette diminution de 2m ? En vous remerciant par avance, cordialement , V Lion .

19.10.2016 - 11:15

DROPS Design answered:

Bonjour Mme Lion, quand vous avez rabattu 1x3m, 3x2m et 5x1 m de chaque côté, continuez en rabattant 2 m de chaque côté (= en début de rang sur l'endroit et sur l'envers) jusqu'à ce que l manche mesure 55 cm de hauteur totale - ce nbe de fois dépendra de votre tension en hauteur. Rabattez ensuite 1x3 m de chaque côté et rabattez les mailles restantes au rang suivant sur l'endroit. Bon tricot!

19.10.2016 - 12:11