DROPS Merino Extra Fine
100% Wool
from 4.55 $ /50g
Get the yarn to make this pattern from 13.65$.

The yarn cost is calculated from the pattern’s smallest size and the yarn’s cheapest product type. Looking for an even better price? You might find it on the DROPS Deals!

DROPS SS24

Little Petal

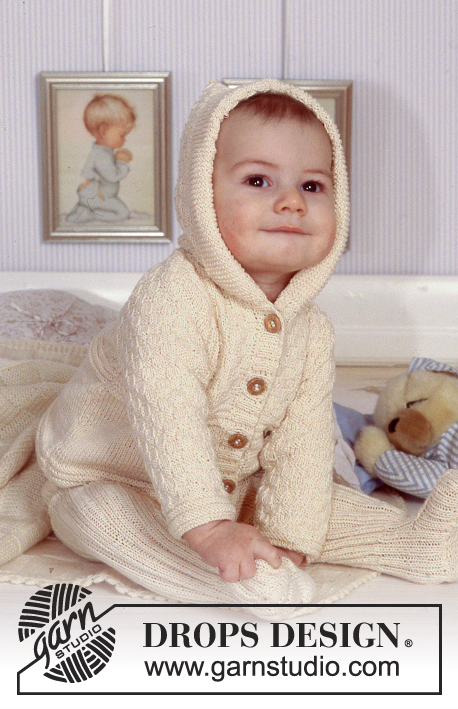
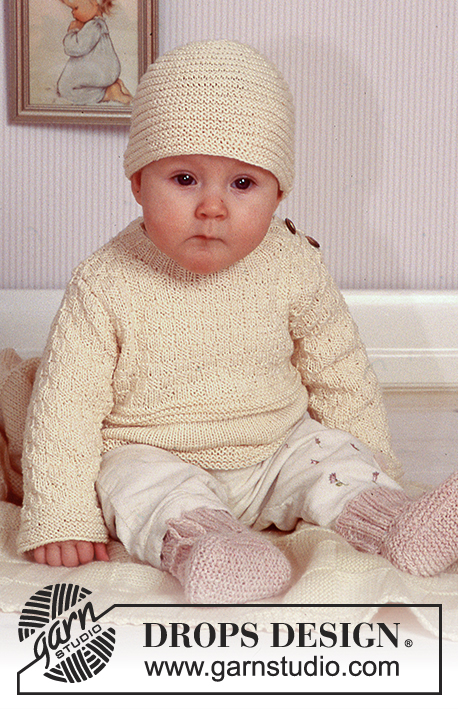
Jacket with raglan sleeves and crochet borders, hat and socks in Merino Extra Fine

DROPS Baby 11-5
Size: 1/3 – 6/9 – 12/18 – 24 months

Materials: DROPS Merino Extra Fine from Garnstudio
Jacket:
150-200-200-250 g color no 16, light pink
Hat:
50-50-50-50 g color no 16, light pink
Socks:
50-50-50-50 g color no 16, light pink
All three pieces:
200-250-300-350 g color no 16, light pink

DROPS circular needle and double pointed needle size 4mm/US 6 and 4.5mm/US 7
DROPS double pointed needles size 3 mm / US 2.5 (for socks)
DROPS crochet hook size 4 mm / G/6

DROPS button, no 620 (white), 4 to 5 pcs

-------------------------------------------------------

Alternative Yarn – See how to change yarns here
Yarn Groups A to F – Use the same pattern and change the yarn here
Yarn usage using an alternative yarn – Use our yarn converter here

-------------------------------------------------------

DROPS Merino Extra Fine
100% Wool
from 4.55 $ /50g
Get the yarn to make this pattern from 13.65$.

The yarn cost is calculated from the pattern’s smallest size and the yarn’s cheapest product type. Looking for an even better price? You might find it on the DROPS Deals!

Pattern instructions

NOTE: This pattern is written in American English. All measurements in charts are in cm. For conversion from inches to cm - click here. There are different terms for crocheting in American and British English. If this pattern includes crochet, click for "crochet terms" here. For this pattern in British English, please click here.
Knitting gauge: 20 sts x 26 rows on needles size 4.5 mm / US 7 in stockinette sts = 10 x 10 cm / 4" x 4".

Garter sts: Knit all rows
Garter sts (on circular needle): knit 1 round, purl 1 round

Dec tips (apply to raglan): Dec inside 2 sts from the RS and dec 2 and 3 sts per dec. (see explanation in pattern).
Dec as follows after raglan st: Put 2/3 sts on cable needle behind piece, K tog first st on left needle and first st on cable needle (= st to the far right on needle), repeat until all sts on cable needle has been dec .
Dec as follows before raglan st: Put 2/3 sts on cable needle in front of piece, slip first st on cable needle (= st to the far right on cable needle) as if to knit, K first st on left needle, psso, repeat until all sts on cable needle has been dec.

Crochet border: Crochet round the outermost garter sts with crochet hook size 4 mm / G/6 and Merino as follows: 1 sc, *ch 1, skip 2 sts (in the width) or 3 sts (in the height), crochet in the next stitch: 3 dc, 3 ch, 3 dc, skip 2 sts (in width) or 3 stitches (in height): ch 1, 1 sc in next st*, repeat from *-*.


JACKET:
Front and back piece: Knit the jacket back and forth on circular needle from mid front. Cast on 100-112-124-144 sts (incl 2 edge sts each side, knitted in garter sts throughout) with Merino on needle size 4 mm / US 6 and knit 2 rows garter sts.
Change to needle size 4.5 mm / US 7 and continue in stockinette sts.
When piece measures 16-18-20-22 cm / 6¼"-7"-8"-8¾", work next row as follows from the RS: knit 22-24-27-32 sts (= right front piece), bind off 6-8-8-8 sts for armhole, knit 44-48-54-64 sts (= back piece), bind off 6-8-8 8 sts for armhole, knit 22-24-27-32 sts (= left front piece).
Put the piece aside and knit the sleeves.

Sleeve:
Cast on 30-30-32-34 sts with Merino on double pointed needles size 4 mm / US 6 and work 2 rounds in garter sts.
Change to needle size 4.5 mm / US 7 and continue in stockinette sts.
When piece measures 3 cm / 1⅛" inc 2 sts mid under arm a total of 5-7-8-9 times as follows:
Size 1/3 months: on every 6th and 7th round alternately
Size 6/9 months: on every 4th and 5th round alternately
Size 12/18 months: on every 5th round
Size 24 months: on every 5th and 6th round alternately
= 40-44-48-52 sts.
When piece measures 15-16-19-23 cm / 6"-6¼"-7½"-9" bind off 6-8-8-8 sts mid under arm = 34-36-40-44 sts. Put piece aside and knit the other sleeve.

Yoke: Put sleeves in on the same needle as body piece where you bind off for armholes = 156-168-188-216 sts. Insert a marker in all transitions between sleeve and body pieces = 4 markers. Continue in stockinette sts back and forth on circular needle, at the same time dec for raglan.
Raglan decreases: Please read all of this section before knitting it!
There are 8 dec per round and 2 sts between each dec (i.e 1 st on each side of the marker). These 2 sts = raglan sts, knit these.
Dec on every 4th round – see Dec Tips.
Dec as follows on front and back pieces: 3 sts 0-2-3-4 times and then 2 sts 6-4-4-4 times
Dec as follows on sleeves: 3 sts 1-2-2-2 times and then 2 sts 5-4-5-6 times.
Neckline: At the same time when piece measures 22-25-27-30 cm / 8¾"-9¾"-10⅝"-11¾" bind off 6 sts each side towards mid front and dec to shape the neckline on every other row: 1 st 4-4-4-6 times. Note! Discontinue the dec for raglan on front pieces when they meet the dec for neckline.
The above numbers for raglan dec apply to the back piece (i.e. there will be fewer raglan dec on the front pieces).
After all dec for raglan and neckline have been completed = approx 36 to 44 sts left and piece measures approx 27-30-33-36 cm / 10⅝"-11¾"-13"-14¼".

Neck: Put sts on circular needle size 4 mm / US 6 and pick up approx 12 to16 sts on each front piece with Merino = 60 to 76 st.
Knit 2 rows in garter sts and bind off.

Assembly: Sew the openings under the arms.
Crochet borders (see above): Start at bottom edge on front piece and crochet up along front edge, round the neck, down along the other front edge and round the bottom edge of front and back pieces.
Crochet a similar border round the sleeves. Sew on buttons evenly distributed on left front piece. Use the crochet loops on right front edge as buttonholes.


HAT:
To fit head circumference: 41-44-46-48 cm / 16"-17¼"-18"-19"

Cast on 74-78-82-86 sts on double pointed needles size 4.5 mm / US 7 with Merino.
Knit 6 rounds stockinette sts (= rolling edge).
Purl 1 round and continue in stockinette sts until finished measurements.
When piece measures 9-10-11-12 cm / 3½"-4"-4½"-4¾" (from purled round) dec 14-15-16-17 sts evenly = 60-63-66-69 sts.
Repeat the dec on every 4th round a total of 4 times = 18 sts left.
Now K2 tog around.
Cut the yarn and pull through remaining sts.
Sew tight.
The hat measures approx 14-15-16-17 cm / 5½"-6"-6¼"-6¾".


SOCKS:
To fit foot length: 10-11-12 14 cm / 4"-4½"-4¾"-5½"

Knitting gauge: 23 sts x 49 rows on needle size 3 mm / US 2.5 in garter sts = 10 x 10 cm / 4" x 4".

Rib: *K2, P2*, repeat from *-*.

Cast on 44-48-48-52 sts on double pointed needles size 3 mm / US 2.5 and Merino.
Work 4-5-5-6 cm / 1½"-2"-2"-2½" Rib and continue in garter sts, at the same time dec 8 sts evenly on first round in garter sts = 36-40-40-44 sts.
After 2 rounds in garter sts knit next round as follows: *K2 tog, yo*, repeat from *-*. Work another 2 rounds in garter sts and continue as follows: Knit 4-5-6-7 cm / 1½"-2"-2½"-2¾" garter sts over the middle 8-10-10-12 sts (= upper foot) and put remaining sts on a holder.
Now pick up 9-11-13-16 sts on each side of the upper foot piece and put sts from holder back on needles = 54-62-66-74 sts.
Knit 1.5-2-2.5-3 cm / ½"-¾"-⅞"-1⅛" in garter sts.
Now bind off but leave the 8-10-10-12 front sts on upper foot piece on needle and knit 10-11-12-14 cm / 4"-4½"-4¾"-5½" garter sts over these for sole.
Bind off and sew the sole to the sock.
Crochet a chain measuring approx 35 cm / 13¾" on crochet hook size 4 mm / G/6 and pull through eyelet row.

Diagram

All measurements in charts are in cm.

diagram measurements

Each of our patterns has specific tutorial videos to help you.

Do you have a question? See a list of frequently asked questions (FAQ)

Knitting tension is what determines the final measurements of your work, and is usually measured per 10 x 10 cm. It is provided like so: number of stitches in width x number of rows in height - eg: 19 stitches x 26 rows = 10 x 10 cm.

The knitting tension is very individual; some people knit/crochet loosely while others work tightly. You adjust the knitting tension with the needle size, which is why the suggested needle size only serve as a guide! You need to adjust this (up or down) to ensure that YOUR knitting tension matches the knitting tension provided in the pattern. If you work with a different knitting tension than provided you will have a different yarn consumption, and your work will have different measurements than what the pattern suggests.

The knitting tension also determines which yarns can replace each other. As long as you achieve the same knitting tension you can replace one yarn with another.

See DROPS lesson: How to measure your tension/gauge

See DROPS video: How to make a gauge tension swatch

The required amount of yarn is provided in grams, eg: 450 g. To calculate how many balls you’ll need you first need to know how many grams are in 1 ball (25g, 50g or 100g). This information is available if you click on the individual yarn quality on our pages. Divide the amount required with the amount of each ball. For example, if each ball is 50g (the most common amount), the calculation will be as follows: 450 / 50 = 9 balls.

The important thing when changing from one yarn to another is that the knitting/crochet tension remains the same. This is so that the measurements of the finished piece will be the same as on the sketch provided. It is easier to achieve the same knitting tension using yarns from the same yarn group. It is also possible to work with multiple strands of a thinner yarn to achieve the knitting tension of a thicker one. Please try our yarn converter. We recommend you to always work a test swatch.

Please NOTE: when changing yarn the garment might have a different look and feel to the garment in the photo, due to individual properties and qualities of each yarn.

See DROPS lesson: Can I use a different yarn than the one mentioned in the pattern?

All our yarns are categorised into yarn groups (from A to F) according to thickness and knitting tension – group A contains the thinnest yarns and group F the thickest. This makes it easier for you to find alternative yarns to our patterns, should you wish to switch yarn. All yarns within the same group have a similar knitting tension and can easily replace each other. However, different yarn qualities have different structures and properties which will give the finished work a unique look and feel.

Click here for an overview of the yarns in each yarn group

At the top of all our patterns you’ll find a link to our yarn converter, which is a helpful tool should you wish to use a different yarn than suggested. By filling in the yarn quality you wish to replace, the amount (in your size) and number of strands, the converter will present good alternative yarns with the same knitting tension. Additionally it will tell you how much you’ll require in the new qualities and whether you’ll need to work with multiple strands. Most skeins are 50g (some are 25g or 100g).

If the pattern is worked with multiple colours, every colour will have to be converted separately. Similarly, if the pattern is worked with several strands of different yarns (for example 1 strand Alpaca and 1 strand Kid-Silk) you will have to find alternatives for each, individually.

Click here to see our yarn converter

Since different yarns have different qualities and textures we have chosen to keep the original yarn in our patterns. However, you can easily find options among our available qualities by using our yarn converter, or simply pick a yarn from the same yarn group.

It is possible that some retailers still have discontinued yarns in stock, or that someone has a few skeins at home that they would like to find patterns for.

The yarn converter will provide both alternative yarn as well as required amount in the new quality.

If you think it's hard to decide what size to make, it can be a good idea to measure a garment you own already and like the size of. Then you can pick the size by comparing those measures with the ones available in the pattern's size chart.

You'll find the size chart at the bottom of the pattern.

See DROPS lesson: How to read size chart

The needle size provided in the pattern serves only as a guide, the important thing is to follow the knitting tension. And since knitting tension is very individual, you will have to adjust the needle size to ensure that YOUR tension is the same as in the pattern – maybe you’ll have to adjust 1, or even 2 needle sizes, up or down to achieve the correct tension. For this, we recommend that you work test swatches.

Should you work with a different knitting tension than the one provided, the measurements of the finished garment might deviate from the measurement sketch.

See DROPS lesson: How to measure your tension/gauge

See DROPS video: How to make a gauge tension swatch

Working a garment top-down provides more flexibility and room for personal adjustment. For example it is easier to try the garment on while working, as well as making adjustments to length of yoke and shoulder caps.

The instructions are carefully explaining every step, in the correct order. Diagrams are adjusted to the knitting direction and are worked as usual.

The diagram depicts all rows/rounds, and every stitch seen from the right side. It is read from bottom to top, from right to left. 1 square = 1 stitch.

When working back and forth, every other row is worked from the right side and every other row is worked from the wrong side. When working from the wrong side, the diagram will have to be worked reversed: from left to right, knit stitches are purled, purl stitches are knit etc.

When working in the round every round is worked from the right side and the diagram are worked from right to left on all rounds.

See DROPS lesson: How to read knitting diagrams

The diagram depicts all rows/rounds, and every stitch seen from the right side. It is worked from bottom to top, from right to left.

When working back and forth every other row is worked from the right side: from right to left and every other row is worked from the wrong side: from left to right.

When working in the round, every row in the diagram are worked from the right side, from right to left.

When working a circular diagram you start in the middle and work your way outwards, counter clockwise, row by row.

The rows usually start with a given number of chain stitches (equivalent to the height of the following stitch), this will either be depicted in the diagram or explained in the pattern.

See DROPS lesson: How to read crochet diagrams

Instructions for working several diagrams after each other on the same row/round, will often be written like so: “work A.1, A.2, A.3 a total of 0-0-2-3-4 times". This means you work A.1 once, then A.2 is worked once, and A.3 is repeated (in width) the number of times provided for your size – in this case like so: S = 0 times, M = 0 times, L=2 times, XL= 3 times and XXL = 4 times.

The diagrams are worked as usual: begin with the first row in A.1, then work the first row in A.2 etc.

See DROPS lesson: How to read knitting diagrams

See DROPS lesson: How to read crochet diagrams

The total width of the garment (from wrist-to-wrist) will be larger in the larger sizes, despite the actual sleeves being shorter. The larger sizes have longer sleeve caps and wider shoulders, so there will be a good fit in all sizes.

The measurement sketch/schematic drawing provides information regarding the full length of the garment. If it’s a jumper or a jacket the length is measured from the highest point on the shoulder (usually closest to the neckline), and straight down to the bottom of the garment. It is NOT measured from the tip of shoulder. Similarly, the length of yoke is measured from the highest point on the shoulder and down to where yoke is split into body and sleeves.

See DROPS lesson: How to read a schematic drawing

Diagrams are often repeated on the round or in height. 1 repeat is the diagram the way it appears in the pattern. If it says to work 5 repeats of A.1 in the round, then you work A.1 a total of 5 times after/next to each other in the round. If it says to work 2 repeats of A.1 vertically/in height you work the entire diagram once, then begin again at the start and work the entire diagram one more time.

Chain stitches are slightly narrower than other stitches and to avoid working the cast-on edge too tight, we simply chain more stitches to begin with. The stitch count will be adjusted on the following row to fit the pattern and measurement sketch.

The rib edge is more elastic and will contract slightly compared to, for example, stocking stitch. By increasing before the rib edge, you avoid a visible difference in width between the rib edge and the rest of the body.

It’s very easy to cast off too tightly, and by making yarn overs while casting off (and simultaneously casting these off) you avoid a too tight cast off edge.

See DROPS video: How to bind off with yarn overs (yo)

To achieve an even increase (or decrease) you can increase on, for example: every 3rd and 4th row alternately, like so: work 2 rows and increase on the 3rd row, work 3 rows and increase on the 4th. Repeat this until the increase is complete.

See DROPS lesson: Increase or decrease 1 st on every 3rd and 4th row alternately

Should you prefer to work in the round instead of back and forth, you may of course adjust the pattern. You’ll need to add steeks mid-front (usually 5 stitches), and follow the instructions. When you would normally turn and work from the wrong side, simply work across the steek and continue in the round. At the end you’ll cut the piece open, pick up stitches to work bands, and cover the cut edges.

See DROPS video: How to knit steeks and cut open

Should you prefer to work back and forth instead of in the round, you may of course adjust the pattern so you work the pieces separately and then assemble them at the end. Divide the stitches for the body in 2, add 1 edge stitch in each side (for sewing) and work the front and back pieces separately.

See DROPS lesson: Can I adapt a pattern for circular needles into straight needles?

Pattern repeats can vary slightly in the different sizes, in order to get the correct proportions. If you’re not working the exact same size as the garment in the photo, yours might deviate slightly. This has been carefully developed and adjusted so that the complete impression of the garment is the same in all sizes.

Make sure to follow instructions and diagrams for your size!

If you have found a pattern you like which is available in women’s size it’s not very difficult to convert it to men’s size. The biggest difference will be the length of sleeves and body. Start working on the women size that you think would fit across the chest. The additional length will be worked right before you cast off for the armhole/sleeve cap. If the pattern is worked top-down you can add the length right after the armhole or before the first decrease on sleeve.

Regarding additional yarn amount, this will depend on how much length you add, but it is better with a skein too many than too few.

All yarns will have excess fibres (from production) that might come off as lint or shedding. Brushed yarns (ie hairier yarns) have more of these loose, excess fibres, causing more shedding.

Shedding also depends on what is worn under or over the garment, and whether this pulls at the yarn fibres. It’s therefore not possible to guarantee that there will be no shedding

Below are some tips on how to get the best result when working with hairier yarns:

1. When the garment is finished (before you wash it) shake it vigorously so the looser hairs come off. NOTE: do NOT use a lint roller, brush or any method that pulls at the yarn.

2. Place the garment in a plastic bag and put it in your freezer - the temperature will cause the fibres to become less attached to each other, and excess fibres will come off easier.

3. Leave in the freezer for a few hours before taking it out and shaking it again.

4. Wash the garment according to the instructions on the yarn label.

Pilling is a natural process that happens to even the most exclusive of fibers. It's a natural sign of wear and tear that is hard to avoid, and that is most visible in high friction areas of your garment like a sweater's arms and cuffs.

You can make your garment look as new by removing the pilling, using a fabric comb or a pill/lint remover.

Still can't find the answer you need? Then scroll down and leave your question so one of our experts can try to help you. This will be done normally within 5 to 10 working days.
In the meantime, you can read the questions and answers that others have left to this pattern or join the DROPS Workshop on Facebook to get help from fellow knitters/crocheters!

You might also like...

Post a comment to pattern DROPS Baby 11-5

We would love to hear what you have to say about this pattern!

If you want to leave a question, please make sure you select the correct category in the form below, to speed up the answering process. Required fields are marked *.

Comments / Questions (21)

country flag Dirk Spiegelhoff wrote:

Ich verstehe die Raglanabnahme absolut nicht , das Video hat auch nicht geholfen Man soll 2/3 Maschen auf eine Hilfsnadel legen, dann die rechte Masche der Hilfsnadel mit der 1. Masche der linken Nadel zusammen stricken, aber das ist doch dir Raglanmasche, dir glatt rechts gestrickt werden soll. Oder muss ich früher Maschen auf die Hilfsnadel legen (also z.B. die 5. und 4. Masche vor dem Markierer)

17.12.2022 - 19:18

DROPS Design answered:

Lieber Herr Spiegelhoff, es wird beidseitig von den 2 RaglanMaschen abgenommen, dh vor diesen 2 Raglanmaschen beginnen Sie wenn noch 4 bzw 6 Maschen übrig sind und legen Sie die 2 bzw 3 nächste Maschen vor der Arbeit (dann jede Masche mit der nächsten auf der Nadel stricken); und nach den 2 Raglanmaschen legen Sie die nächsten 2 bzw 3 Maschen auf der Hilfsnadel. Viel Spaß beim stricken!

19.12.2022 - 09:07

country flag Marianne Juhler wrote:

Hej. Der står under "Hele sættet" i starten, at det er gr f.nr. 14...det er vel nr. 16? Under hals: Der står, at man samler med Angora-Tweed...hvor kommer det garn fra?

12.08.2022 - 16:33

country flag Marianne Juhler wrote:

Hej. Under "lukketips" står der: Sæt 2/3 m på hj.p bag arbejdet. Hvad menes der? Er det 2 eller 3 masker? Vh Marianne

12.08.2022 - 16:30

country flag Marianne Juhler wrote:

Hej. I skriver, at garn til hele sættet er 150 gram for størrelse 6/9 måneder. Men jeg får det til 250 gram, hvis man skal følge jakke: 150 gram, hue: 50 gram og sokker 50 gram. Det giver jo ikke 150 gram men 250 gram.

12.08.2022 - 16:25

country flag Metive wrote:

Rectificatif : il fallait lire : Pour les points horizontaux : 1 maille serrée, *(sauter 2 mailles ) 3 brides, 1 maille en l\'air, 3 brides, sauter 2 mailles, 1 maille serrée dans la 3ème maille*. recommencer de *à*.\

08.03.2021 - 11:29

country flag Metive wrote:

Personnellement, j\'ai effectué : pour les points verticaux : 1 maille serrée, *(sauter 3 mailles ) 4 brides, 1 maille en l\'air, 4 brides, sauter 3 mailles, 1 maille serrée dans la 4ème maille*. recommencer de *à*.\r\n. Pour les points horizontaux : 1 maille serrée, *(sauter 2 mailles ) 3 brides, 1 maille en l\'air, 3 brides, sauter 3 mailles, 1 maille serrée dans la 4ème maille*. recommencer de *à*.\r\nC\'est plus joli et ressemble davantage à la photo.

08.03.2021 - 11:26

country flag Metive wrote:

Bonjour, Merci pour vos corrections. Je suggère de remplacer le tutoriel "comment faire une bordure" ci-dessus par le tutoriel "Comment crocheter une bordure éventails" disponible sur votre site. Ce serait plus explicite. M M

08.03.2021 - 11:16

country flag Metive wrote:

En complément de mon précédent message, je pense que le point bordure de ce modèle est plutôt le suivant : "Comment crocheter une bordure éventails" Par ailleurs, j'ai relevé quelques autres erreurs dans vos modèles. Sinon, site très enrichissant !!! Cordialement M M

06.03.2021 - 18:19

DROPS Design answered:

Bonjour Mme Metive, la bordure a été ajoutée - cf réponse précédente, il peut effectivement arriver que des erreurs se glissent dans nos modèles, n'hésitez pas à nous les signaler afin que nous puissions les corriger, merci d'avance. Bon tricot!

08.03.2021 - 09:56

country flag Metive wrote:

Bonjour, Concernant la bordure qui entoure l'ouvrage, la video ci-dessus ne semble pas correspondre à la bordure visible sur la photo. De mon point de vue, cela correspond au 1 er rang. Il y a un deuxième rang comportant : *1 ms sur la maille serrée du rang précédent, 3 double brides , 2 mailles en l'air, 3 double brides dans l'arceau * répéter de *à*. Merci de m'éclairer sur ce point. MM

06.03.2021 - 17:51

DROPS Design answered:

Bonjour Mme Metive, effectivement, il manquait quelques indications à la bordure, elles ont été ajoutées, merci pour votre retour. Bonne continuation!

08.03.2021 - 07:53

country flag Carole wrote:

Vous dites 8 diminutions par rang au niveau du raglan mais pour moi je diminue 2 x 24m par rang et 4 fois 16m par rang ? Pour le raglan à 2 m du bord cela veut dire 3 m avant le marqueur ? Le raglan n’est pas uniforme dans le dos et sur les 2 devants. Merci de m’éclairer

07.05.2020 - 16:40

DROPS Design answered:

Bonjour Carole, les diminutions du raglan se font à un rythme différent sur le devant et le dos, autrement dit, en fonction de la taille et des rangs de diminutions vous diminuerez soit 8 fois 3 m (devant, dos et manches), soit 4 x 3 m (dos+ devants) + 2 x 2 m (manches) soit 8 fois 2 m (devant, dos et manches). Vous diminuerez 8 fois (le texte va être corrigé), mais effectivement pas 8 mailles à chaque fois. Bon tricot!

08.05.2020 - 08:33