DROPS Alpaca
DROPS Alpaca
100% Alpaca
from 6.75 CAD /50g
DROPS Cotton Viscose
54% Cotton, 46% Viscose
Discontinued
find alternatives
DROPS SS24

Heartland Sunset

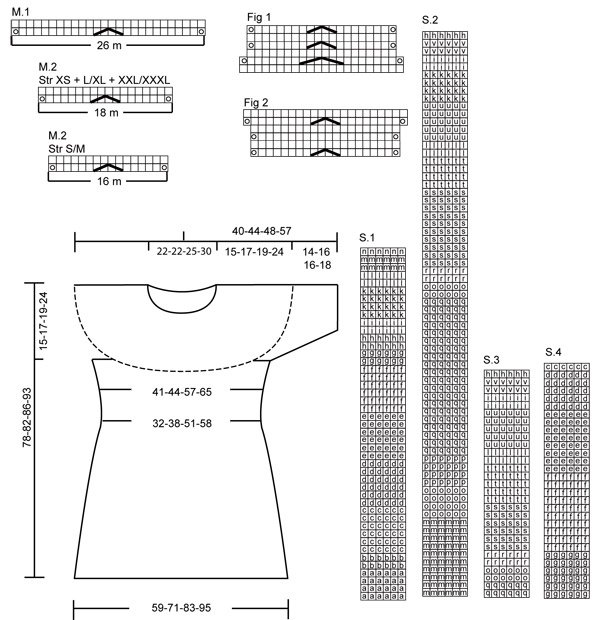
DROPS dress in zigzag pattern with short raglan sleeve in “Alpaca” and “Cotton Viscose”. Size XS - XXXL.

DROPS 105-10
Size: XS – S/M – L/XL – XXL/XXXL
Finished measurements:
Bust: 32.2"-34.6"-45"–51"
Hem: 46½"-55.7"-65.2"–74.7"
Full length: 30.7"-32.2"-33.9"-36.6"

Materials:DROPS Alpaca from Garnstudio
100-100-100-150 g no 6360, blue mixv
100-100-100-100 g no 6347, dark steel blue
100-100-100-100 g no 7120, light slate green
100-100-100-100 g no 3800, blue violet
50-100-100-100 g no 7139, slate grey
50-50-100-100 g no 3720, violet
50-50-100-100 g no 0100, off-white
50-50-50-100 g no 8105, light steel blue

and use: DROPS Cotton Viscose from Garnstudio
100-100-100-100 g no 22, denim
100-100-100-100 g no 29, light grey/green
50-100-100-100 g no 28, light pink
50-50-50-50 g no 27, light purple
50-50-50-50 g no 02, off-white

DROPS circular needle 80 and 40 cm [15¾"] size 5 mm [US 8] - or size needed to obtain 22 sts x 24 rows in pattern with 2 threads = 10 x 10 cm [4" x 4"].

DROPS double pointed needles size 5 mm [US 8] – for sleeves.

-------------------------------------------------------

Alternative Yarn – See how to change yarns here
Yarn Groups A to F – Use the same pattern and change the yarn here
Yarn usage using an alternative yarn – Use our yarn converter here

-------------------------------------------------------

DROPS Alpaca
DROPS Alpaca
100% Alpaca
from 6.75 CAD /50g
DROPS Cotton Viscose
54% Cotton, 46% Viscose
Discontinued
find alternatives

Pattern instructions

NOTE: This pattern is written in American English. All measurements in charts are in cm. For conversion from inches to cm - click here. There are different terms for crocheting in American and British English. If this pattern includes crochet, click for "crochet terms" here. For this pattern in British English, please click here.
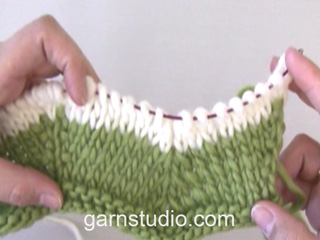
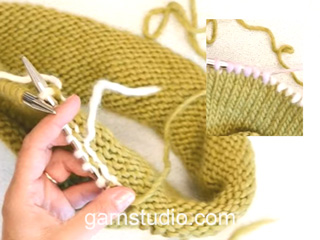
Stripes, body piece:
Work stripes as follows: Work S.1. After 1 vertical repeat of S.1, continue with 2 threads Alpaca color no 7139 until piece measures 25-26-27-28 cm [9.7"- 10.2"-10.6"-11"]. Work S.2. After 1 vertical repeat of S.2, continue with 2 threads Alpaca color no 3800 until piece measures 63-65-67-69 cm [24.7"-25½"-26.4"-27.1"].

Stripes, sleeves:
Work stripes as follows: Work S.3. After 1 vertical repeat of S.3, continue with 2 threads Alpaca color no 3800 until piece measures 14-16-16-18 cm [5½"- 6.2"-6.2"-7"].

Stripes, yoke:
Work stripes as follows: Work 0-2-4-6 cm [0"-0.7"-1½"-2.4"] with 1 thread Alpaca color no 3800 + 1 thread Alpaca color no 6360. Then continue in S.4. After 1 vertical repeat of S.4, continue with 2 threads Alpaca color no 6347 until piece measures 13-15-17-22 cm [5.1"-6"-6.7"-8.7"]. Now work 3 rounds with 1 thread Alpaca color no 6347 + 1 thread Alpaca color 8105, then 3 rounds with 2 threads Alpaca color no 8105. Bind off.

Garter st, in the round: K 1 round, P 1 round.

Pattern: See diagram M.1 and M.2.
The diagram shows the pattern from the RS side.

Decreasing tip-1: See fig.1 for an example.
Make all dec on rounds in pattern. Dec 2 sts in each pattern repeat as follows: Work 2 sts in 1 st, work row until 3 sts before the middle of pattern repeat, slip 1 st as if to K, K2 tog, psso, after the middle K3 tog. Complete pattern repeat and work 2 sts in 1 st. Work next row as before, but with 1 less st on each side of the middle.

Decreasing tip-2: When dec in each P section, dec by P tog the first 2 and the last 2 sts alternately.

Increasing tip: See fig 2 for an example. Make all inc on rounds in pattern. Inc 2 sts in each pattern repeat as follows: Work 2 sts in 1 st, K all sts in repeat, finish repeat by K 2 sts in 1 st. Work next row as before, but with 1 additional st on each side of the middle.
________________________________________________________________

DRESS
Knitted in the round on circular needle. Round beg at the side. Cast on 260-312-364-416 sts on 2 circular needle size 5 mm [US 8] (to make the edge elastic) with 2 threads Alpaca color 8105. Remove 1 needle and work 2 rounds garter st, at the same time beg Stripe pattern – see above. Insert 1 Marking Thread (MT) at beg of round and 1 after 130-156-182-208 sts (to mark the sides). Continue in M.1 (10-12-14-16 repeats across the round). When piece measures 8 cm [3"] from bottom point dec 2 sts in each pattern repeat – see Decreasing tip-1 – on every 6-6-8-8 cm [2.4"-2.4"-3.1"-3.1"] a total of 6-6-5-5 times = 140-168-224-256 sts (1 repeat = 14-14-16-16 sts). Remember the knitting gauge. When piece measures 44-44-46-46 cm [17.2"-17.2"-18"-18"] inc 2 sts in each repeat – see Increasing tip = 160-192-252-288 sts (1 repeat = 16-16-18-18 sts).
Size XS: Repeat the inc when piece measures 53 cm [21"] = 180 sts (1 repeat = 18 sts).
When piece measures 62-64-66-68 cm [24.4"-25.2"-26"-26.7"] work 9-8-9-9 sts on each side of both MT in garter st (work remaining sts as before).
When piece measures 63-65-67-69 cm [24.7"-25½"-26.4"-27.1"] bind off 9-8-9-9 sts on each side of both MT for armhole = 144-160-216-252 sts (8-10-12-14 repeats). Put piece aside and knit the sleeves.

Sleeve: Worked in the round on double pointed needles. Cast on 54-64-72-90 sts on needle size 5 mm [US 8] with 2 threads Alpaca color 8105. K 1 round, at the same time beg Stripe pattern – see above. Now continue in Rib as follows: * K1, P 5-3-5-5 *, repeat from *-*. When Rib measures 4 cm [1½"] work 2 rounds garter st and continue in M.2 – see diagram for appropriate size = 3-4-4-5 repeats. Note! Make sure to place first st in M.2 over K1 in Rib. When piece measures 13-15-15-17 cm [5.1"-6"-6"-6.7"] work the first and the last 9-8-9-9 sts on round in garter st (work remaining sts as before). When piece measures 14-16-16-18 cm [5½"- 6.2"-6.2"-7"] bind off 18-16-18-18 st mid under arm = 36-48-54-72 sts left on round. Put piece aside and knit the other sleeve.

Yoke: Slip sleeves in on the same circular needle as body piece where bind off for armholes = 216-256-324-396 sts (= 12-16-18-22 repeats). Insert a Marking Thread (MT) and now measure piece from here. Continue in zigzag pattern and stripes – see above. When piece measures 1 cm [½"] from MT dec 2 sts in each repeat = 192-224-288-352 sts. Repeat the dec when piece measures 4 cm [1½"] = 168-192-252-308 sts, and when it measures 7 cm [2.7"] = 144-160-216-264 sts (1 repeat = 12-10-12-12 sts). When piece measures 8-9-9-14 cm [3.1"-3½"-3½"-5½"] continue in Rib as follows: * K1, P 5-4-5-5 *, repeat from *-*. Note! Place K1 in Rib over first st in M.2. At the same time when piece measures 10-12-12-16 cm [4"-4.7"-4.7"- 6.2"] dec 1 st in each P section - see Decreasing tip-2 – on every 2.5-2.5-2.5-3 cm [0.9"-0.9"-0.9"-1.1"] a total of 2-2-3-3 times = 96-96-108-132 sts. Continue in Rib, K over K and P over P, until piece measures 15-17-19-24 cm [6"-6.7"-7½"-9½"] from MT. Bind off loosely in Rib.

Assembly: Sew openings under arms.

Diagram

symbols = K
symbols = K 2 sts in 1 st
symbols = slip 1 st as if to K, K1, psso
symbols = K2 tog
symbols = slip 1 st as if to K, K2 tog, psso
symbols = K3 tog
symbols = 2 x Alpaca 8105
symbols = Alpaca 8105 +Alpaca 6347
symbols = 2 x Alpaca 6347
symbols = Alpaca 6347 + Cotton Viscose 22
symbols = Alpaca 6360 + Cotton Viscose 22
symbols = 2 x Alpaca 6360
symbols = Alpaca 6360 + Alpaca 3800
symbols = 2 x Alpaca 3800
symbols = 2 x Cotton Viscose 27
symbols = 2 x Alpaca 3720
symbols = 2 x Cotton Viscose 28
symbols = Alpaca 7139 + Cotton Viscose 29
symbols = 2 x Alpaca 7139
symbols = 2 x Cotton Viscose 29
symbols = Alpaca 7120 + Cotton Viscose 29
symbols = 2 x Alpaca 7120
symbols = 2 x Cotton Viscose 02
symbols = 2 x Alpaca 0100
symbols = Alpaca 3720 + Cotton Viscose 28
symbols = Alpaca 0100 + Cotton Viscose 02
symbols = Alpaca 3800 + Cotton Viscose 27
diagram

Each of our patterns has specific tutorial videos to help you.

Do you have a question? See a list of frequently asked questions (FAQ)

Knitting tension is what determines the final measurements of your work, and is usually measured per 10 x 10 cm. It is provided like so: number of stitches in width x number of rows in height - eg: 19 stitches x 26 rows = 10 x 10 cm.

The knitting tension is very individual; some people knit/crochet loosely while others work tightly. You adjust the knitting tension with the needle size, which is why the suggested needle size only serve as a guide! You need to adjust this (up or down) to ensure that YOUR knitting tension matches the knitting tension provided in the pattern. If you work with a different knitting tension than provided you will have a different yarn consumption, and your work will have different measurements than what the pattern suggests.

The knitting tension also determines which yarns can replace each other. As long as you achieve the same knitting tension you can replace one yarn with another.

See DROPS lesson: How to measure your tension/gauge

See DROPS video: How to make a gauge tension swatch

The required amount of yarn is provided in grams, eg: 450 g. To calculate how many balls you’ll need you first need to know how many grams are in 1 ball (25g, 50g or 100g). This information is available if you click on the individual yarn quality on our pages. Divide the amount required with the amount of each ball. For example, if each ball is 50g (the most common amount), the calculation will be as follows: 450 / 50 = 9 balls.

The important thing when changing from one yarn to another is that the knitting/crochet tension remains the same. This is so that the measurements of the finished piece will be the same as on the sketch provided. It is easier to achieve the same knitting tension using yarns from the same yarn group. It is also possible to work with multiple strands of a thinner yarn to achieve the knitting tension of a thicker one. Please try our yarn converter. We recommend you to always work a test swatch.

Please NOTE: when changing yarn the garment might have a different look and feel to the garment in the photo, due to individual properties and qualities of each yarn.

See DROPS lesson: Can I use a different yarn than the one mentioned in the pattern?

All our yarns are categorised into yarn groups (from A to F) according to thickness and knitting tension – group A contains the thinnest yarns and group F the thickest. This makes it easier for you to find alternative yarns to our patterns, should you wish to switch yarn. All yarns within the same group have a similar knitting tension and can easily replace each other. However, different yarn qualities have different structures and properties which will give the finished work a unique look and feel.

Click here for an overview of the yarns in each yarn group

At the top of all our patterns you’ll find a link to our yarn converter, which is a helpful tool should you wish to use a different yarn than suggested. By filling in the yarn quality you wish to replace, the amount (in your size) and number of strands, the converter will present good alternative yarns with the same knitting tension. Additionally it will tell you how much you’ll require in the new qualities and whether you’ll need to work with multiple strands. Most skeins are 50g (some are 25g or 100g).

If the pattern is worked with multiple colours, every colour will have to be converted separately. Similarly, if the pattern is worked with several strands of different yarns (for example 1 strand Alpaca and 1 strand Kid-Silk) you will have to find alternatives for each, individually.

Click here to see our yarn converter

Since different yarns have different qualities and textures we have chosen to keep the original yarn in our patterns. However, you can easily find options among our available qualities by using our yarn converter, or simply pick a yarn from the same yarn group.

It is possible that some retailers still have discontinued yarns in stock, or that someone has a few skeins at home that they would like to find patterns for.

The yarn converter will provide both alternative yarn as well as required amount in the new quality.

If you think it's hard to decide what size to make, it can be a good idea to measure a garment you own already and like the size of. Then you can pick the size by comparing those measures with the ones available in the pattern's size chart.

You'll find the size chart at the bottom of the pattern.

See DROPS lesson: How to read size chart

The needle size provided in the pattern serves only as a guide, the important thing is to follow the knitting tension. And since knitting tension is very individual, you will have to adjust the needle size to ensure that YOUR tension is the same as in the pattern – maybe you’ll have to adjust 1, or even 2 needle sizes, up or down to achieve the correct tension. For this, we recommend that you work test swatches.

Should you work with a different knitting tension than the one provided, the measurements of the finished garment might deviate from the measurement sketch.

See DROPS lesson: How to measure your tension/gauge

See DROPS video: How to make a gauge tension swatch

Working a garment top-down provides more flexibility and room for personal adjustment. For example it is easier to try the garment on while working, as well as making adjustments to length of yoke and shoulder caps.

The instructions are carefully explaining every step, in the correct order. Diagrams are adjusted to the knitting direction and are worked as usual.

The diagram depicts all rows/rounds, and every stitch seen from the right side. It is read from bottom to top, from right to left. 1 square = 1 stitch.

When working back and forth, every other row is worked from the right side and every other row is worked from the wrong side. When working from the wrong side, the diagram will have to be worked reversed: from left to right, knit stitches are purled, purl stitches are knit etc.

When working in the round every round is worked from the right side and the diagram are worked from right to left on all rounds.

See DROPS lesson: How to read knitting diagrams

The diagram depicts all rows/rounds, and every stitch seen from the right side. It is worked from bottom to top, from right to left.

When working back and forth every other row is worked from the right side: from right to left and every other row is worked from the wrong side: from left to right.

When working in the round, every row in the diagram are worked from the right side, from right to left.

When working a circular diagram you start in the middle and work your way outwards, counter clockwise, row by row.

The rows usually start with a given number of chain stitches (equivalent to the height of the following stitch), this will either be depicted in the diagram or explained in the pattern.

See DROPS lesson: How to read crochet diagrams

Instructions for working several diagrams after each other on the same row/round, will often be written like so: “work A.1, A.2, A.3 a total of 0-0-2-3-4 times". This means you work A.1 once, then A.2 is worked once, and A.3 is repeated (in width) the number of times provided for your size – in this case like so: S = 0 times, M = 0 times, L=2 times, XL= 3 times and XXL = 4 times.

The diagrams are worked as usual: begin with the first row in A.1, then work the first row in A.2 etc.

See DROPS lesson: How to read knitting diagrams

See DROPS lesson: How to read crochet diagrams

The total width of the garment (from wrist-to-wrist) will be larger in the larger sizes, despite the actual sleeves being shorter. The larger sizes have longer sleeve caps and wider shoulders, so there will be a good fit in all sizes.

The measurement sketch/schematic drawing provides information regarding the full length of the garment. If it’s a jumper or a jacket the length is measured from the highest point on the shoulder (usually closest to the neckline), and straight down to the bottom of the garment. It is NOT measured from the tip of shoulder. Similarly, the length of yoke is measured from the highest point on the shoulder and down to where yoke is split into body and sleeves.

See DROPS lesson: How to read a schematic drawing

Diagrams are often repeated on the round or in height. 1 repeat is the diagram the way it appears in the pattern. If it says to work 5 repeats of A.1 in the round, then you work A.1 a total of 5 times after/next to each other in the round. If it says to work 2 repeats of A.1 vertically/in height you work the entire diagram once, then begin again at the start and work the entire diagram one more time.

Chain stitches are slightly narrower than other stitches and to avoid working the cast-on edge too tight, we simply chain more stitches to begin with. The stitch count will be adjusted on the following row to fit the pattern and measurement sketch.

The rib edge is more elastic and will contract slightly compared to, for example, stocking stitch. By increasing before the rib edge, you avoid a visible difference in width between the rib edge and the rest of the body.

It’s very easy to cast off too tightly, and by making yarn overs while casting off (and simultaneously casting these off) you avoid a too tight cast off edge.

See DROPS video: How to bind off with yarn overs (yo)

To achieve an even increase (or decrease) you can increase on, for example: every 3rd and 4th row alternately, like so: work 2 rows and increase on the 3rd row, work 3 rows and increase on the 4th. Repeat this until the increase is complete.

See DROPS lesson: Increase or decrease 1 st on every 3rd and 4th row alternately

Should you prefer to work in the round instead of back and forth, you may of course adjust the pattern. You’ll need to add steeks mid-front (usually 5 stitches), and follow the instructions. When you would normally turn and work from the wrong side, simply work across the steek and continue in the round. At the end you’ll cut the piece open, pick up stitches to work bands, and cover the cut edges.

See DROPS video: How to knit steeks and cut open

Should you prefer to work back and forth instead of in the round, you may of course adjust the pattern so you work the pieces separately and then assemble them at the end. Divide the stitches for the body in 2, add 1 edge stitch in each side (for sewing) and work the front and back pieces separately.

See DROPS lesson: Can I adapt a pattern for circular needles into straight needles?

Pattern repeats can vary slightly in the different sizes, in order to get the correct proportions. If you’re not working the exact same size as the garment in the photo, yours might deviate slightly. This has been carefully developed and adjusted so that the complete impression of the garment is the same in all sizes.

Make sure to follow instructions and diagrams for your size!

If you have found a pattern you like which is available in women’s size it’s not very difficult to convert it to men’s size. The biggest difference will be the length of sleeves and body. Start working on the women size that you think would fit across the chest. The additional length will be worked right before you cast off for the armhole/sleeve cap. If the pattern is worked top-down you can add the length right after the armhole or before the first decrease on sleeve.

Regarding additional yarn amount, this will depend on how much length you add, but it is better with a skein too many than too few.

All yarns will have excess fibres (from production) that might come off as lint or shedding. Brushed yarns (ie hairier yarns) have more of these loose, excess fibres, causing more shedding.

Shedding also depends on what is worn under or over the garment, and whether this pulls at the yarn fibres. It’s therefore not possible to guarantee that there will be no shedding

Below are some tips on how to get the best result when working with hairier yarns:

1. When the garment is finished (before you wash it) shake it vigorously so the looser hairs come off. NOTE: do NOT use a lint roller, brush or any method that pulls at the yarn.

2. Place the garment in a plastic bag and put it in your freezer - the temperature will cause the fibres to become less attached to each other, and excess fibres will come off easier.

3. Leave in the freezer for a few hours before taking it out and shaking it again.

4. Wash the garment according to the instructions on the yarn label.

Pilling is a natural process that happens to even the most exclusive of fibers. It's a natural sign of wear and tear that is hard to avoid, and that is most visible in high friction areas of your garment like a sweater's arms and cuffs.

You can make your garment look as new by removing the pilling, using a fabric comb or a pill/lint remover.

Still can't find the answer you need? Then scroll down and leave your question so one of our experts can try to help you. This will be done normally within 5 to 10 working days.
In the meantime, you can read the questions and answers that others have left to this pattern or join the DROPS Workshop on Facebook to get help from fellow knitters/crocheters!

You might also like...

Post a comment to pattern DROPS 105-10

We would love to hear what you have to say about this pattern!

If you want to leave a question, please make sure you select the correct category in the form below, to speed up the answering process. Required fields are marked *.

Comments / Questions (50)

country flag Dieuwke wrote:

Hoeveel garen heb je nodig als je deze jurk in één kleur wil maken?

27.06.2019 - 10:22

DROPS Design answered:

Dag Dieuwke,

Helaas is niet bekend hoeveel garen je dan precies nodig hebt. Het zal uiteraard iets minder zijn dan de totaal aangegeven bollen in de meerkleurige versie. Je kunt je verkooppunt vragen binnen welke termijn je overgebleven bollen in mag leveren als je garen over houdt.

27.06.2019 - 12:32

country flag Sabine wrote:

Kann ich das Kleid auch von oben stricken und demnach die Strickvorlagen in umgekehrter Reihenfolge verwenden? Oder gibt es ei ähnliches Modell mit Pässe von oben in diesem Muster?

02.06.2019 - 13:13

DROPS Design answered:

Liebe Sabine, wir haben noch keine ähnliche Anleitung für ein Kleid, die mit Zickzackmuster und von oben nach unten gestrickt wird, vielleicht kann Ihnen dieses Modell (wo die Maschenprobe ist aber verschieden) inspirieren. Viel Spaß beim stricken!

03.06.2019 - 10:08

country flag Sonia Baldoni Tiberi wrote:

Bellissimo lo sto realizzando !!! Grande bella sequenza di colori drops merinos e viscosa

14.02.2016 - 16:18

country flag Monique wrote:

Sorry Tine, ik weet nu dat je alleen met ijsblauw moet opzetten. Op de foto leek het een paar naalden...:-)

08.12.2013 - 11:29

country flag Monique wrote:

Op teltekening S3 staat de q voor de eerste paar naalden. Waarom moet ik dan opzetten met 8105, en hoe kan ik dan tegelijkertijd beginnen met S3? Dank.

07.12.2013 - 13:44

country flag Monique wrote:

Tine, dank je wel! Het is me nu duidelijk, het meerderen ontstaat dus door het "niet meer minderen" in t midden van t motief. :-) dank voor je hulp.

01.10.2013 - 16:54

country flag Monique wrote:

Beste tine, kun je de tip meerderen iets duidelijker beschrijven? Want vlgs. Die tip en fig. 2 moet ik dus in t midden gewoon blijven minderen? Fig. 2 is me niet duidelijk! Help!

30.09.2013 - 15:46

DROPS Design answered:

Hoi Monique. Ik kan het helaas niet duidelijker maken dan wat al is gedaan. Kijk op figuur 2. In nld 1 meerder/minder je, in nld 3 meerder je alleen (dus geen mindering/motief) en in nld 5 heb je weer meerder/minder, maar nu met 2 st meer per herhaling. Als je zo niet verder kan dan raad ik aan om je werk naar je winkel te nemen en vragen voor persoonlijke ondersteuning.

01.10.2013 - 13:53

country flag Monique wrote:

Hoe werkt dat meerderen? Dat moet je dus in een nld. Met motief doen, maar als je alle nld. R. breit, heb je toch dat motief niet meer? Help!!

04.09.2013 - 21:18

DROPS Design answered:

Hoi Monique. Kijk op figuur 2. In de derde nld meerder je zoals beschreven in Tip Meerderen. In deze nld komt er inderdaad geen motief, maar in nld 5 heb je weer een mindering/motief en 2 st meer per herhaling.

01.10.2013 - 13:51

country flag Monique wrote:

Helaas heb ik het toch niet begrepen....moet ik nou tot 8 cm hoogte steeds precies patroon M1 breien? Dus 1 nld. motief en 1 helemaal recht? En dan bij 8 cm pas naar FIGUUR 1 kijken? Bvd

27.07.2013 - 18:43

DROPS Design answered:

Dat is correct. U breit 8 cm in M.1 en dan mindert u zoals beschreven staat.

29.07.2013 - 07:42

country flag Monique wrote:

Hartelijk dank, ben gewoon opnieuw begonnen. Maar misschien handig voor meer breisters, om dat ietsje duidelijker te omschrijven, dat men direkt moet beginnen en niet pas na het woord minderen in de beschrijving bij "jurk" ? Ik begrijp het nu wel. Fijn weekend u allemaal,

26.07.2013 - 19:11