
Popular categories
Looking for a yarn?


|
|
Peter Pan |
|
|
|
|
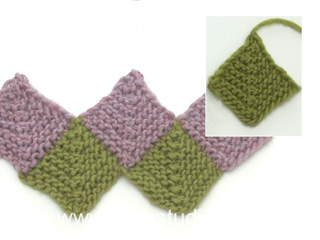
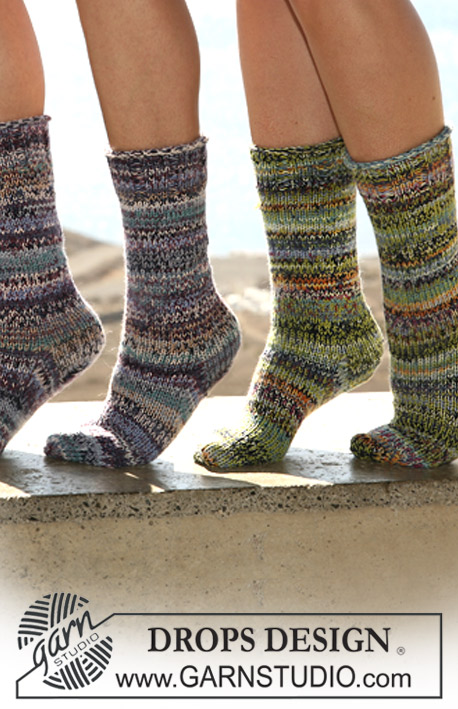
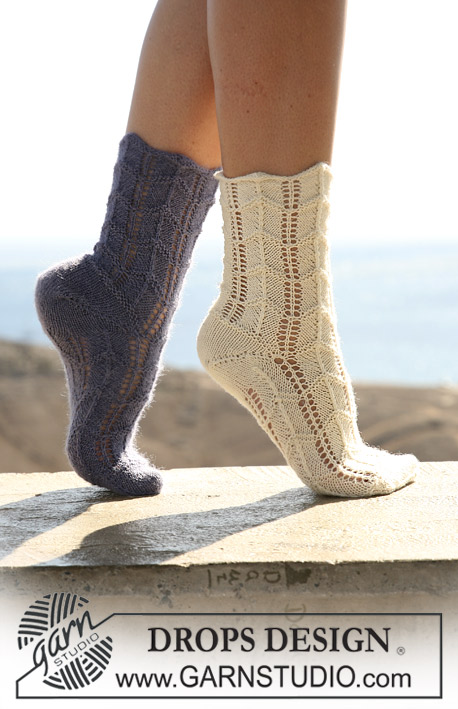
DROPS socks in domino diamonds in “Fabel”. Size 35 - 43
DROPS 105-43 |
|
|
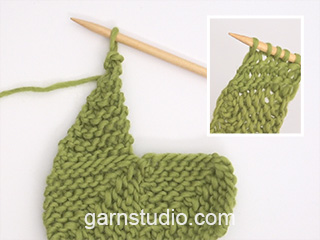
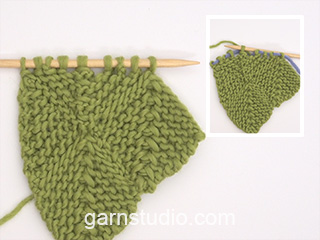
Knitting tip-1: To avoid thread ends you may work each diamond in the first line of diamonds with a separate ball and let this follow the piece for the following lines instead of cutting the thread. Knitting tip-2: Always pick up sts from RS. Whole domino diamond : Insert a marking thread (MT) in the middle st. Row 1 (= WS): K Row 2 (= RS): K row until 1 st before MT, slip 1 st as if to K, K2 tog, psso, K to the end of row. Repeat row 1 and 2, i.e. dec 2 sts in the middle of diamond on every other row until 1 st left on row. Cut the thread and pull through st. Half domino diamond (horizontal): Pick up 19-21-23 sts between 2 diamonds from previous line of diamonds. Work like whole diamond, but in addition to dec in the middle of diamond, slip the last st on a thread at the end of every row (first time = on first row from WS) until 3-4-3 sts left on row. Continue as follows: Size 35/37 + 41-43: 3 sts left on row (i.e. 4-5 sts on threads each side). K 1 row from WS on the 3 sts. Work next row (= RS) as follows: slip 1 st as if to K, K2 tog, psso. Cut the thread and pull through remaining st on needle. Size 38/40: 4 sts left on row. Work next row as follows from RS: slip 1 st as if to K, K2 tog, psso. Put the last st on thread at side (i.e. 5 sts on threads each side). Cut the thread and pull through remaining st on needle. Half domino diamond (vertical): Beg with 10-11-12 sts. Row 1 (= WS): K Row 2 (= RS): K row until 2 sts before MT, K 2 tog. Mirror this at the other end of the line of dominos, i.e. K2 tog after MT. Repeat row 1 and 2, i.e. dec 1 st in diamond (towards under the foot) on every other row until there is 1 st left on row. Cut the thread and pull through remaining st. Heel decreases: Row 1 (= RS): Work row until 6-7-7 sts left on needle, slip 1 st as if to K, K1, psso, turn piece. Row 2 (= WS): Work row until 6-7-7 sts left on needle, slip 1 st as if to P, P1, psso, turn piece. Row 3 (= RS): Work row until 5-6-6 sts left on needle, slip 1 st as if to K, K1, psso, turn piece. Row 4 (= WS): Work row until 5-6-6 sts left on needle, slip 1 st as if to P, P1, psso, turn piece. Continue to dec like this with 1 less st before dec until there are 14-14-16 sts left on needle. Socks: Beg at the top of leg. Cast on 115-125-135 sts on double pointed needles size 2.5 mm. P 1 round. Work next round as follows: *K 10-11-12, slip 1 st as if to K, K2 tog, psso, K 10-11-12*, repeat from *-* a total of 5 times = 105-115-125 sts. Turn the piece and continue back and forth on needle. Work 1 whole domino diamond – see above – on the first 21-23-25 sts. See Knitting tip-1. Leave remaining sts on needle.. When the whole domino diamond is complete work on the next 21-23-25 sts in the same way, and continue like this on the remaining sts on row = 5 domino diamonds in total. Now pick up 10-11-12 sts – see Knitting tip-2! - along the side of the last diamond from the previous Line of dominos, pick up 1 st between this Diamond and pick up 10-11-12 sts along the side of the diamond = 21-23-25 sts on row. Work 1 whole domino diamond as before and continue like this on remaining sts. Continue as described above until there are 3 Lines of domino diamonds in total. Work the 4th Line of diamonds in the same way, but dec 2 sts evenly on first row (= from WS) in each diamond = 19-21-23. Work 1 whole domino diamond on these sts. In Line 5 pick up 19-21-23 sts along the sides of diamonds and work diamonds across the row. Continue as described for Line 5 until there are 8 Lines of diamonds in total. Piece now measures approx 23-25-27 cm. Heel: On next row work 2 half horizontal diamonds - see above. After 2 half diamonds pick up 1 st (from RS) before the first half diamond. Now work the 4-5-5 sts from thread back on needle, pick up 2 sts between the 2 threads, work the 4-5-5 sts from the other thread back on needle and pick up 2 sts between the 2 half diamonds, work 4-5-5 sts from thread back on needle, pick up 2 sts between the 2 threads, work the 4-5-5 sts from the other thread back on needle and pick up 1 st after the last half diamond = 24-28-28 sts. P 1 row from WS, at the same time dec 0-2-0 sts evenly = 24-26-28 sts for heel. Now work 5-5.5-6 cm stocking st on heel sts. Insert a Marking Thread (MT) and dec for heel – see explanation above. After completing the heel pick up 13-14-16 sts on both sides of heel = 40-42-48 sts. Slip all sts on a thread. Upper foot 1: Pick up 19-21-23 sts for whole domino diamond as before and work a Line of 3 diamonds on upper foot. Under foot 1: Pick up 10-11-12 sts along the side of the outermost diamond on upper foot, work the 40-42-48 sts from thread back on needle and pick up 10-11-12 sts along the side of the diamond on the other side of upper foot = 60-64-72 sts. Insert 1 marking thread (MT) on both sides of sts from thread. Continue in stocking st back and forth on needle on sts under foot, at the same time work 1 half vertical domino diamond –see above – each side. At the same time dec under foot (from RS) each side as follows: K tog the first 2 sts after the first MT and K tog the last 2 sts before second MT into back of st. Dec like this on every other row a total of 13-14-15 times. Continue until the half dominos are complete and slip remaining sts on a thread. Upper foot 2: Pick up 19-21-23 sts for whole domino diamond as before and work 2 diamonds on upper foot. Now pick up sts for the next Line of diamonds and work 3 whole domino diamonds. Under foot 2: Slip sts from thread back on needle and pick up 10-11-12 sts in the outermost diamond from upper foot each side. Continue in stocking st on sts under foot, at the same time work 1 half vertical domino diamond each side. NB! Remember to continue the dec each side under foot. When the half diamond is complete slip the remaining sts on a thread. Upper foot 3: Pick up sts for whole domino diamond as before and work 2 diamonds on upper foot. Now pick up sts for the next Line of diamonds, but work 3 half horizontal domino diamonds. Toe: Slip the 14-14-18 sts from under foot back on needle and pick up 1 st before the first half diamond, *work the 4-5-5 sts from thread back on needle, pick up 2 sts between the threads, work the next 4-5-5 sts from thread back on needle*, pick up 2 sts between diamonds, repeat from *-*, pick up 2 sts between diamonds, repeat from *-* and finish with picking up 1 st after the last half diamond. = 50-56-60 sts. Now continue in the round. Work stocking st on all sts until piece measures approx 18-19-21 cm from MT on heel (approx 4-5-6 cm left to finished measurements). Insert 1 MT each side with 25-28-30 sts on upper foot and 25-28-30 sts under foot. Continue in stocking st, at the same time dec for toes on each side of both MT. Dec as follows before K1 and MT: K2 tog. Dec as follows after MT and K1: K2 tog into back of st. Dec like this each side on every other round a total of 4-5-8 times and then on every round 6-6-3 times = 10-12-16 sts left on needle. On next round work all sts tog 2 by 2. Cut the thread, pull it through remaining sts and fasten. |
|
|
Have you made this or any other of our designs? Tag your pictures in social media with #dropsdesign so we can see them! Do you need help with this pattern?You'll find tutorial videos, a Comments/Questions area and more by visiting the pattern on garnstudio.com. © 1982-2024 DROPS Design A/S. We reserve all rights. This document, including all its sub-sections, has copyrights. Read more about what you can do with our patterns at the bottom of each pattern on our site. |


With over 40 years in knitting and crochet design, DROPS Design offers one of the most extensive collections of free patterns on the internet - translated to 17 languages. As of today we count 304 catalogues and 11422 patterns - 11422 of which are translated into English (UK/cm).
We work hard to bring you the best knitting and crochet have to offer, inspiration and advice as well as great quality yarns at incredible prices! Would you like to use our patterns for other than personal use? You can read what you are allowed to do in the Copyright text at the bottom of all our patterns. Happy crafting!
Comments / Questions (85)
Hello, please, is it knitted in the round?
11.02.2024 - 10:03Hallo, Ich bin gerade dabei, diese tollen Socken zu stricken und hatte zu Beginn die Anleitung grob überflogen. Jetzt allerdings hänge ich an der Ferse. Im Text steht, glatt rechts stricken, Markierungsfaden einziehen und dann mit der Fersenabnahme anfangen -siehe oben. Auf welches oben bezieht sich das? Ich stricke sonst immer eine andere Fersenform und hab daher keine Idee, wie ich fortfahren muss. Liebe Grüße und schonmal danke im Voraus, Amboßmücke
07.03.2023 - 11:58DROPS Design answered:
Liebe Amboßmücke, es bezieht sich auf den Absatz Fersenabnahme: oben (zwischen Halbes Viereck (vertikal): und Socken:). Viel Spaß beim stricken!
07.03.2023 - 14:22Mijn vraag, die ik net gesteld heb, is intussen beantwoord. Met andere woorden: ik begrijp wat ik niet goed gelezen heb. Groetjes, Elma
27.02.2023 - 18:28Hallo, opzetten 125 steken, dan een naald averecht en dan 5 keer 23 steken voor het begin van 5 ruitjes is 115 steken. Dan houd ik 10 steken over? Groetjes, Elma.
27.02.2023 - 18:24DROPS Design answered:
Dag Elma,
Je breit na het opzetten eerst een naald averecht. Daarna brei je de volgende naald als volgt:* 11 r, haal 1 st r van de breinld af, 2 st r samen breien, en haal de afgeh st daarover, 11 r *, herhaal *-* totaal 5 keer. Na deze naald heb je 115 steken op de naald staan. Daarna begin je met de dominoruitjes.
01.03.2023 - 20:40Bonjour Réalisation de la 2è ligne il est écrit : "Relever ensuite 10-11-12 m -voir astuce 2- le long du côté du dernier domino de la 1ère ligne de motifs, relever 1 m entre celui-ci et le motif suivant = 21-23-25 m. " Je fais la taille 38/40, 11 +1=12, il manque 11 mailles il me semble ?!? Merci d'avance pour votre réponse.
26.03.2016 - 08:23DROPS Design answered:
Bonjour Satie, il manquait effectivement les mailles à relever le long de la moitié du domino suivant pour avoir 11 +1 + 11 en taille 38/40. Bon tricot!
29.03.2016 - 09:09Socken mit Vierecken! Wow! Das muss ich ausprobieren...........
19.05.2015 - 19:17Ohjeessa neuvotaan laittamaan kokonaista ruutua aloittaessa laittaan merkkilanka keskimmäiseen silmukkaan. Missä on keskimmäisen silmukan kohta? (koko = 41/43 Onko se 12 ja 12 oikean silmukan välissä vai silmukoiden kavennuskohdassa? En päässyt neulomisessa alkua pidemmälle.
07.01.2014 - 18:23Denne oppskriften er lest gjennom og har blitt strikket mange ganger. Hvis du har spørsmål til strikk henviser vi deg til din DROPS/GARNSTUDIO-forhandler for råd/veiledning.
12.08.2008 - 10:52Hej! Roligt och beroendeframkallande mönster. Men har stött på patrull. När jag kommer till tån har jag bara 8 m istället för 14. Har gått tillbaka i mönstret men kan inte se var jag i så fall skulle ha gjort fel. Har kommit ihåg att fortsätta minskn under foten i varje sida. Men då får färre maskor än era 14. Hjälp mig är ni snälla!
11.08.2008 - 13:22Wonderful work of art and looks like it will go with most anything
17.02.2008 - 14:49