
Popular categories
Looking for a yarn?


|
|||||||
Miss Bront |
|||||||
|
|
|||||||
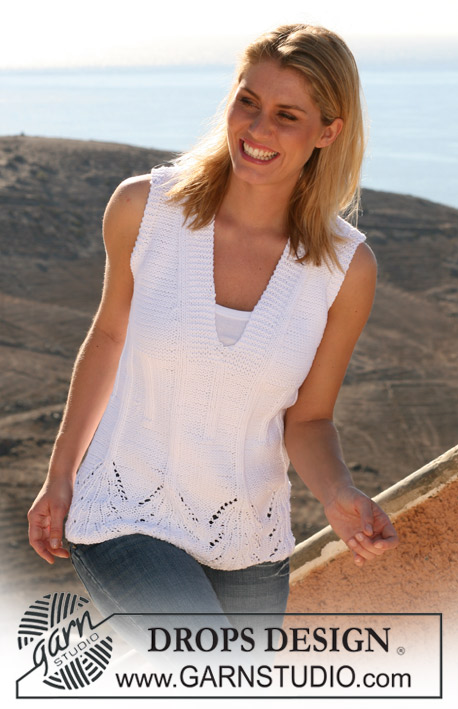
DROPS poncho with flounce edge in ”Symphony”. Sizes: S - XXXL
DROPS 105-35 |
|||||||
|
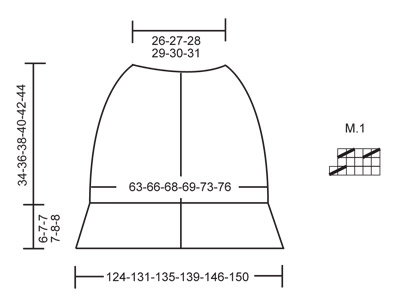
Garter st, back and forth on needle: K all rows. Flounce edge: See diagram M.1. Diagram is seen from RS. Buttonhole: Bind off for buttonholes on right front band. 1 buttonhole = bind off third and fourth st from mid front and cast on 2 new sts on return row. Bind off for buttonholes when piece measures: Size S: 24 and 32 cm. [9½ and 12½"] Size M: 25 and 34 cm. [9.7" and 13.4"] Size L: 26 and 36 cm. [10.2" and 14.2"] Size XL: 26, 32 and 38 cm. [10.2", 12½" and 15"] Size XXL: 27, 34 and 40 cm. [10.6", 13.4" and 15.7"] Size XXXL: 28, 35 and 42 cm. [11", 13.7" and 16"] Poncho: Worked back and forth on circular needle. Cast on 360-378-390-402-420-432 sts (includes 6 front band sts each side, worked in garter st throughout) on needle size 7 mm [US 10 ½] with Symphony. K 4 rows and continue in stocking sts. Remember knitting gauge! When piece measures 4-5-5-5-6-6 cm [1½"-2"-2"-2"-2.4"-2.4"] work M.1 with front band sts in garter st. After 1 vertical repeat of M.1 there are 186-195-201-207-216-222 sts on row. Insert 1 marking thread or stitch marker after 49-51-53-55-57-58 sts and 1 marking thread or stitch marker after 137-144-148-152-159-164 sts, these mark the sides. All measurements are done from this point. K 8 rows and continue in stocking sts. When piece measures 5 cm [2"] from marking threads or stitch markers, dec 1 st on each side of both marking threads on every 4-5-5-5-6-6 cm [1½"-2"-2"-2"-2.4"-2.4"] a total of 4 times = 170-179-185-191-200-206 sts. When piece measures 22-23-24-25-26-27 cm [8.7"-9"-9½"-9.7"-10.2"-10.6"] from marking threads or stitch markers, K1 row from RS at the same time dec 20-19-20-21-20-21 sts evenly (do not dec on front bands) = 150-160-165-170-180-185 sts. Change to circular needle size 6.5 mm [US 10 ½]. Now complete piece in garter st. Remember to bind off for buttonholes! See explanation above. Insert 5 marking threads or stitch markers in piece as follows: 1 marking thread or stitch marker after 15-16-16-17-18-18 sts, 1 marking thread or stitch marker after 45-48-49-51-54-55 sts, 1 marking thread or stitch marker after 75-80-83-85-90-93 sts, 1 marking thread or stitch marker after 105-112-116-119-126-130 sts and 1 marking thread or stitch marker after 135-144-149-153-162-167 sts. When piece measures 24-26-26-27-29-29 cm [9½"-10.2"-10.2"-10.6"-11.4"-11.4"] from marking threads or stitch markers at sides dec 1 st on each side of each marking thread or stitch marker (= 10 dec per row) on every 2-2-2.5-2.5-2-2.5 cm [0.7"-0.7"-0.9"-0.9"-0.7"-0.9"] a total of 4-4-4-4-5-5 times = 110-120-125-130-130-135 sts. When piece measures 33-35-37-39-41-43 cm [13"-13.7"-14½"-15.2"-16.1"-17"] from marking threads or stitch markers at sides (adjust so next row is from RS) dec 25-32-35-37-34-36 sts evenly (do not dec on front bands) = 85-88-90-93-96-99 sts. K 3 rows. Bind off loosely. Sew on buttons. |
|||||||
Diagram explanations |
|||||||
|
|||||||
|
|||||||
|
Have you made this or any other of our designs? Tag your pictures in social media with #dropsdesign so we can see them! Do you need help with this pattern?You'll find tutorial videos, a Comments/Questions area and more by visiting the pattern on garnstudio.com. © 1982-2024 DROPS Design A/S. We reserve all rights. This document, including all its sub-sections, has copyrights. Read more about what you can do with our patterns at the bottom of each pattern on our site. |
|||||||


With over 40 years in knitting and crochet design, DROPS Design offers one of the most extensive collections of free patterns on the internet - translated to 17 languages. As of today we count 304 catalogs and 11422 patterns - 11417 of which are translated into English (US/in).
We work hard to bring you the best knitting and crochet have to offer, inspiration and advice as well as great quality yarns at incredible prices! Would you like to use our patterns for other than personal use? You can read what you are allowed to do in the Copyright text at the bottom of all our patterns. Happy crafting!
Comments / Questions (25)
After completing M1 I have 186 stitches. When placing the markers at 49 st as called for there are 137 st left on the needle. How does that tally with putting the second marker at 137 and decreasing before and after? I have the correct amount of stitches according to the patter.
08.04.2022 - 18:48DROPS Design answered:
Dear Nancy, you need to put a marker in the 49th and 137th stitch, counting from the original 186 stitch amount. So you should have a marker within 49 stitches from both sides . Happy knitting!
09.04.2022 - 18:53Jeg kan ikke få opskriften og tegningen til at passe sammen, i opskriften står der 6 cm, så yderligere 27 cm, så 29 cm og endnu 43 cm, men på tegningen står der kun 8 cm + 44 cm (i største str.) = 52 cm?
17.06.2017 - 15:25DROPS Design answered:
Hei Anette. Når arbeidet måler 27, strikkes det 2 cm til (= 29 cm), start med fellingene på hver side av merketråden på hver 2½.cm totalt 5 ganger. Så strikkes det til arb måler 43 cm (inkl de 29 cm), så skal det felles 36 masker jevnt fordelt og 3 pinner rett. Arbeidet måler nå ca 44 cm + 6 cm i begynnelsen (før merketråden ble satt) = ca 52 cm. God Fornøyelse!
19.06.2017 - 08:18Hvis jeg strikker den i Drops Melody i stedet for som foreslået, hvor mange ngl skal jeg så bruge til en str. XXXL i stedet for 11 ngl Symphony? Håber på hurtigt svar, da jeg meget gerne vil i gang med denne skønne cape. Med venlig hilsen Anette
05.06.2017 - 11:15DROPS Design answered:
Hei Anette. Her er en link til beskrivelsen om hvordan du regner ut garnmengden ved bytte av garn: Bytte av garn God Fornøyelse!
06.06.2017 - 07:27I have completed the first M.1 (all 3 rows) and have ended up with 222 sts instead of the 201 for size L. I started with 390 Sts, Do you have a suggestion? Is there some way to make an adjustment that doesn't effect the look of the poncho - perhaps make 21 decreases on the next purl row? I was very accurate with the cast on-cvounting and recounting it several times. Thank you for any help.
30.03.2016 - 05:35DROPS Design answered:
Dear Mrs Gaboardi, you can always dec 21 sts evenly on next row from WS but make sure you will keep the ruffle effect that should have been created in M.1. Happy knitting!
30.03.2016 - 09:41Thank you-I see now. I had forgotten that you read a chart from right to left.
30.03.2016 - 01:22Thank you for you reply. My M.1 pattern chart does not show "K4 ,K2 tog". It only shows "K2 tog, K1, K2 tog" for first M.1 row. . Has there been a correction to the chart? Do I knit "K4, K2 tog" only on the first M.1 row?
29.03.2016 - 16:05DROPS Design answered:
Dear Mrs Gaboardi, you start reading diagram on the bottom corner on the right side towards the left (from RS), ie on 1st row in M.1, you will work (K4, K2 tog), and on row 3 in M.1 (K2 tog, K1, K2 tog) - read more about diagrams here. Happy knitting!
29.03.2016 - 17:20Thank you for you reply. My M.1 pattern chart does not show "K4 ,K2 tog". It only shows "K2 tog, K1, K2 tog" for first M.1 row. . Has there been a correction to the chart? Do I knit "K4, K2 tog" only on the first M.1 row?
29.03.2016 - 16:02In reference to drops poncho with flounce edge 105-35 . I have cast on 390 sts and followed pattern through the first vertical M.1 per chart. I now have 258 sts on needle instead of 205 for the L size. I knitted 6 sts for the band, then K2 tog, K1, K2 tog, then 6 sts . Is there an error in the pattern? Am I reading the M.1 chart correctly (see above). Thanks for any help.
29.03.2016 - 08:18DROPS Design answered:
Dear Mrs Gaboardi, on first row in M.1 repeat (K4, K2 tog) accross with the 6 sts in garter st on each side = 390 - 63 sts dec (you repeat M.1 a total of 63 times in width) = 327 sts. Work next row from WS. On next row from RS (= 3rd row in M.1) work: 6 sts in garter st, (K2 tog, K1, K2 tog) a total of 63 times (= 126 sts dec), 6 sts in garter st = 201 sts. Happy knitting!
29.03.2016 - 11:08I cast on 390 sts, knitted 4 rows. Pattern says after M1 there should be 201 sts. I am confused. Did I cast on too many sts?
28.03.2016 - 15:58DROPS Design answered:
Dear Mrs Gaboardi, you work M.1 as follows: 6 sts in garter st, then repeat M.1 a total of 63 times in width (6 sts on first row x 63 times), and 6 sts in garter st. On first row in M.1 you dec 1 st x 63 times then you dec 2 sts on 3rd row in M.1 (2 sts dec x 63 = 126 sts dec). There were 390 sts - 63 sts (dec on 1st row) - 126 sts (dec on 3rd row) = 201 sts. Happy knitting!
29.03.2016 - 10:29Bonjour, Vous parlez d'une aiguille circulaire 6,5 mais vous ne la vendez pas ? De plus peut-on payer par chèque ? Merci d'effacer ce même texte que j'ai mis par erreur dans les commentaires... Cordialement Y. Molé
10.10.2013 - 18:33DROPS Design answered:
Chère Mme Mole, nous avons bien des aiguilles circulaires 80 cm en taille 6,5 (collection Trend, un plastique très doux et léger). La liste des détaillants en France et leurs coordonnées sont à votre disposition sous le menu "Détaillants/ France". N'hésitez pas à les contacter par mail ou téléphone pour leur demander leurs disponibilités. Bon tricot!
11.10.2013 - 09:24