
Popular categories
Looking for a yarn?


|
|
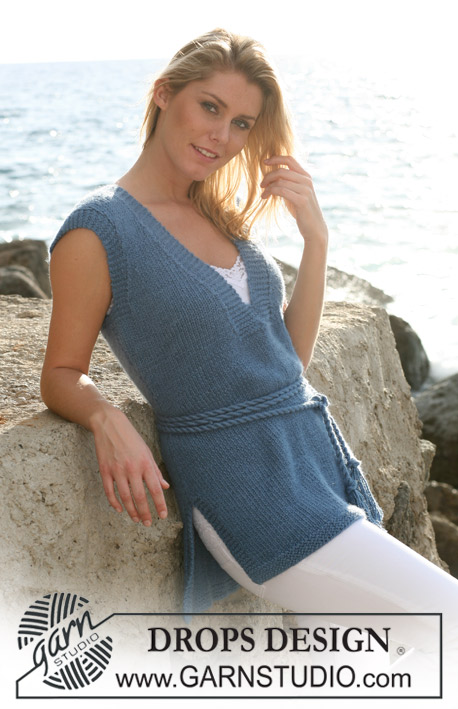
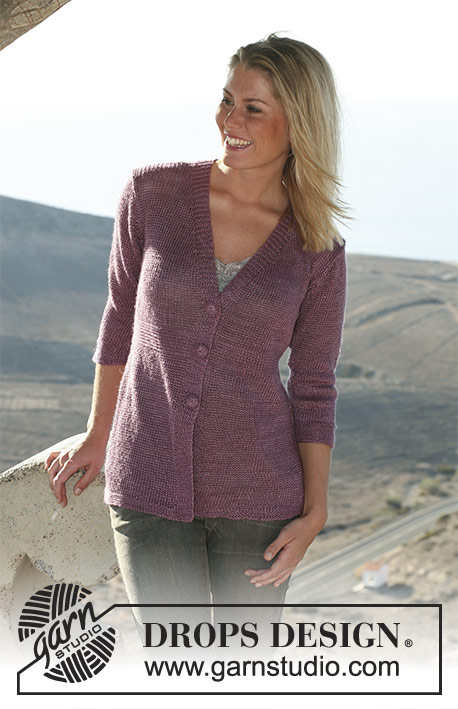
Tucson Tunic |
|
|
|
|
DROPS tunic in stockinette and garter st in “Lin”. Size S – XXXL
DROPS 106-24 |
|
|
Garter st, back and forth on needle: K all rows. Back piece: Loosely cast on 110-118-126-136-146-156 sts (includes 1 edge st each side) on needle size 4 mm [US 6]. Work 4 rows garter st and continue in stocking st. Remember the knitting gauge! Read all of the following section before continuing! When piece measures 2.75" dec 1 st each side on every 1.1" a total of 12 times = 86-94-102-112-122-132 sts. At the same time, when piece measures 3.1" work 4 rows in garter st and then continue in stocking st. When piece measures 6.25" work 4 rows garter st and continue in stockinette st. When piece measures 16½" (for all sizes) change to needle size 3.5 mm [US 4] and complete piece in garter st. When piece measures 21"-21.2"-21.6"-22"-22½"-22.75" bind off for armhole each side on every other row: 4 sts 1-1-1-1-2-2 times, 2 sts 0-1-2-4-4-6 times and 1 st 2-3-4-4-4-4 times = 74-76-78-80-82-84 sts. When piece measures 27½"-28.4"-29.1"-30"-30.7"-31½" bind off the middle 28-28-28-30-30-30 sts for neck and dec 1 st on neckline on next row = 22-23-24-24-25-26 sts left on each shoulder. Bind off loosely when piece measures 28.4"-29.1"-30"-30.7"-31½"-32.2". Front piece: Cast on and work like back piece until piece measures 20"-20½"-21"-21.2"-21.6"-22" (= 0.75" before armhole). Now P 4 rows on the middle 8 sts (work remaining sts in garter st as before). On next row divide the piece in two for split and complete each side separately. Left side: = 43-47-51-56-61-66 sts. Continue in garter st with 4 P sts towards mid front on every row. Armhole: At the same time when piece measures 21"-21.2"-21.6"-22"-22½"-22.75" bind off for armhole as described for back piece. Neckline: When piece measures 24.7"-25.2"-25½"-26"-26.4"-26.7" put 9-9-9-10-10-10 sts towards mid front on a thread and now dec to shape the neckline on every other row: 2 sts 2 times, 1 st 2 times. After all dec for armhole and neckline are complete = 22-23-24-24-25-26 sts left on shoulder. Continue until piece measures 28.4"-29.1"-30"-30.7"-31½"-32.2" and bind off loosely. Right side: = 43-47-51-56-61-66 sts. Work like left side, but mirrored. Sleeve: Loosely cast on 52-54-56-58-60-62 sts (includes 1 edge st each side) on needle size 4 mm [US 6]. Work 4 rows garter st and continue in stocking st. At the same time when piece measures 2" dec 1 st each side on every 1.1" a total of 4 times = 44-46-48-50-52-54 sts. When piece measures 6" change to needle size 3.5 mm [US 4] and complete piece in garter st. At the same time when piece measures 6.2"-6.2"-6.2"-7"-8"-8" cm inc 1 st each side on every 0.9"-0.75"-0.75"-0.6"-0.4"-0.4" a total of 13-14-15-17-19-19 times = 70-74-78-84-90-92 sts. When piece measures 19"-18½"-18"-17.7"-17"-16½" (less on the larger sizes because of larger sleeve cap) dec to shape the sleeve cap each side on every other row: 3 sts 1 time, 2 sts 1 time, then 1 st each side until piece measures 21.6", dec 3 sts each side 1 time and bind off remaining sts. Sleeve measures approx 22". Assembly: Sew shoulder seams. Set in sleeves and sew side and sleeve seams inside 1 edge st. Pick up approx 90 to 110 sts (includes sts on threads) round the neck on circular needle size 3.5 mm [US 4]. Work 4 rows garter st back and forth on needle from mid front, bind off. |
|

|
|
|
Have you made this or any other of our designs? Tag your pictures in social media with #dropsdesign so we can see them! Do you need help with this pattern?You'll find tutorial videos, a Comments/Questions area and more by visiting the pattern on garnstudio.com. © 1982-2024 DROPS Design A/S. We reserve all rights. This document, including all its sub-sections, has copyrights. Read more about what you can do with our patterns at the bottom of each pattern on our site. |


With over 40 years in knitting and crochet design, DROPS Design offers one of the most extensive collections of free patterns on the internet - translated to 17 languages. As of today we count 304 catalogs and 11422 patterns - 11417 of which are translated into English (US/in).
We work hard to bring you the best knitting and crochet have to offer, inspiration and advice as well as great quality yarns at incredible prices! Would you like to use our patterns for other than personal use? You can read what you are allowed to do in the Copyright text at the bottom of all our patterns. Happy crafting!
Comments / Questions (44)
Bonjour, J'aimerais avoir le métrage de drop lin, car j'ai cliqué sur le lien dans une question et ça ne me donne pas la page en question. Pouvez-vous m'aider?
12.01.2024 - 20:34DROPS Design answered:
Bonjour Lise, DROPS Lin faisait environ 120 m pour 50 g; retrouvez plus d'infos sur ce fil ici, avec toutes les autres fils épuisés ; pour connaître les alternatives et les quantités correspondantes, utilisez le convertisseur. Bon tricot!
15.01.2024 - 08:01Sto eseguendo questo modello. Purtroppo il bordo a legaccio si arrotola. Sto sbagliando qualcosa? Grazie
10.10.2023 - 22:01DROPS Design answered:
Buonasera Rossana, può bloccare il lavoro una volta finito o provare a lavorare più ferri a legaccio per il bordo. Buon lavoro!
14.10.2023 - 23:39Buongiorno, non ho ben capito come procedere per le maglie da lasciare sospese sul davanti. Dovrei dividere tra parte dx e sx dello scollo? Ma dato che sono in numero dispari non capisco bene come procedere in quale parte del collo prendere le maglie da lasciare sospese. Grazie Lucia
06.03.2023 - 17:25DROPS Design answered:
Buonasera Lucia, ad esempio per la taglia S ci sono 9 maglie in sospeso a ogni lato del collo: deve riprendere 90-110 maglie comprese le 18 maglie in sospeso e lavorare 4 ferri a maglia legaccio in piano su queste maglie. Buon lavoro!
06.03.2023 - 20:33Please help me understand your bust sizing. You have 32 -36 then you have number 2”- 39 and then the number 4” - 43 I do not understand the why the numbers 2 Then 4 are there I want to make this tunic just a little shorter in lenght and I can not wait to cast on Thank you in advance for any info you can give me about reading the bust measurements in your charts I just thought I could use the numbers in the schematic drawing across the Chest as a measurement?
30.07.2019 - 04:04DROPS Design answered:
Dear Marie, in size M the bust is 92 cm (see chart), ie 36.2 inches = 36.2". You can convert measurements from chart into inches here. Happy knitting!
06.08.2019 - 10:54Hi! Could anyone help me please to modify numbers of stiches for size XS? I’ve started making size S but I can already see it would be more then just nicely oversized for me. Thank you. :)
05.05.2019 - 11:57DROPS Design answered:
Dear Markéta, we are unfortunately not able to adjust every pattern to every single request, but you are welcome to contact your DROPS store, even per mail or telephone for any individual assistance. Happy knitting!
06.05.2019 - 11:00Hei er det noen grunn jeg ikke finner til ikke å strikke denne rundt på rundpinne (Til man skal dele arbeidet for ermer da, selvsagt)? I så fall, er det noe jeg må tilpasse? Jeg kan ikke fordra å strikke voksenstørrelser fram og tilbake, nemlig, men har lyst til å labbe i vei med denne. Lite ekstraspørsmål: Vil dere komme med et nytt lingarn?
02.01.2017 - 21:11DROPS Design answered:
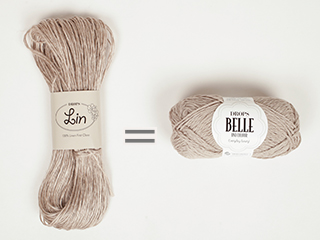
Hej Nirill. Nogle modeller strikkes frem og tilbage - andre rundt. Det kan have noget med design, mönster og form at göre - og vi har nogle brugere som foretraekker at strikke frem og tilbage (saa vi maa have design til dem ogsaa :)). Men jeg tror du sagtens kan strikke denne rundt. Jeg tror ikke der er planer ligenu for et 100% lingarn, men denne bliver ogsaa fint i feks Belle.
10.01.2017 - 14:08Fulvia wrote:
Buonasera , e' possibile avere la traduzione in italiano di questo progetto , per piacere? Molte grazie!! 😊
28.10.2016 - 21:02DROPS Design answered:
Buonasera Fulvia. Tradurremo il modello e lo caricheremo sul sito, nei prossimi giorni. La ringraziamo per la richiesta. Buon lavoro!
28.10.2016 - 21:21Bonjour Drop Lin semble discontinué, et vos n'indiquez pas la longueur de fil pour 50 gr dans la description. Quelle est-elle svp, puisque je devrais acheter une autre qualité de laine?
11.11.2015 - 18:16DROPS Design answered:
Bonjour Ludmilla, cliquez ici pour en savoir plus sur DROPS Lin et les alternatives proposées - vous trouverez ici des informations à propos des équivalences. Bon tricot!
12.11.2015 - 09:59Mistä mahtaa johtua että kappaleesta tulee paljon annettua mittaa leveämpi vaikka tiheys ja lanka ovat oikeat?
04.09.2014 - 14:40DROPS Design answered:
Jos tiheys on oikea, myös leveyden tulisi olla oikea. Huomasithan, että kappaleissa tehdään sivukavennukset, eli alaosa on yläosaa leveämpi. Sekä ala- että yläosan mitat on merkitty mittapiirrokseen.
09.09.2014 - 15:39Vaikka tiheys on oikea niin kappaleesta tulee paljon leveämpi kuin ohjeessa. Miten on mahdollista? Lanka on ohjeen mukainen.
04.09.2014 - 14:17