DROPS Muskat
DROPS Muskat
100% Cotton
from 2.80 $ /50g
Get the yarn to make this pattern from 30.80$.

The yarn cost is calculated from the pattern’s smallest size and the yarn’s cheapest product type. Looking for an even better price? You might find it on the DROPS Deals!

DROPS SS24
DROPS 105-33
Size: S – M – L – XL – XXL – XXXL
Finished measurements:
Bust: 33"-36.2"-39.4"–43.4"-47.2"-51"
Hem: 31½"-34.6"-37.7"–41.7"-45.7"-49½"
Full length: 22.7"-23.6"-24.4"-25.2"-26"-26.7"

Materials:DROPS Muskat from Garnstudio
color no 06, rose: 550-600-650-750-800-900 g

DROPS pointed needles size 4.5 mm
[US 7] - or size needed to obtain 20 sts x
26 rows in stockinette st = 10 x 10 cm [4" x 4"].

-------------------------------------------------------

Alternative Yarn – See how to change yarns here
Yarn Groups A to F – Use the same pattern and change the yarn here
Yarn usage using an alternative yarn – Use our yarn converter here

-------------------------------------------------------

DROPS Muskat
DROPS Muskat
100% Cotton
from 2.80 $ /50g
Get the yarn to make this pattern from 30.80$.

The yarn cost is calculated from the pattern’s smallest size and the yarn’s cheapest product type. Looking for an even better price? You might find it on the DROPS Deals!

Pattern instructions

NOTE: This pattern is written in American English. All measurements in charts are in cm. For conversion from inches to cm - click here. There are different terms for crocheting in American and British English. If this pattern includes crochet, click for "crochet terms" here. For this pattern in British English, please click here.
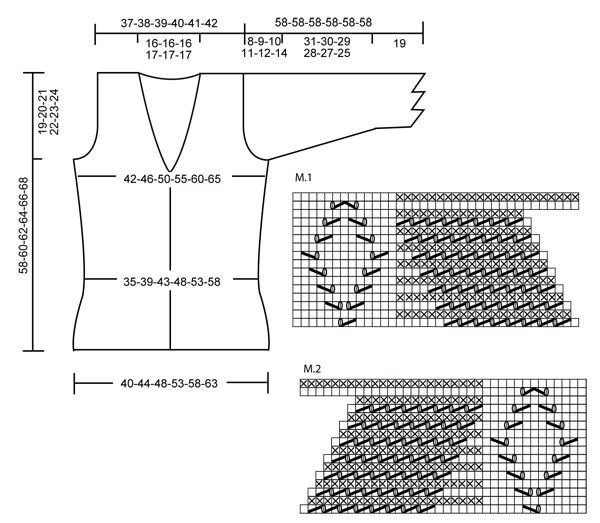
Garter st, back and forth on needle: K all rows

Pattern: See diagram M.1 and M.2.
The diagram shows the pattern from the RS side.
Note! On row 14 in M.1 and on row 15 in M.2 cast on 7 new sts at the end of row.

Decreasing tip (applies to neckline):
Dec on the inside of M.1/M.2. Make all dec from RS!
Dec as follows after M.1: slip 1 st as if to knit, K1, psso
Dec as follows before M.2: K2 tog.

Back piece: Cast on 82-90-98-108-118-128 sts (includes 1 edge st each side) on needle size 4.5 mm [US 7]. Work 4 rows garter st and continue in stockinette st. Remember the knitting gauge! When piece measures 6 cm [2.4"] dec 1 st each side on every 3 cm [1.1"] a total of 5 times = 72-80-88-98-108-118 sts. When piece measures 22-23-24-25-26-27 cm [8.7"-9"-9½"-9.7"-10.2"-10.6"] inc 1 st each side on every 2 cm [3/4"] a total of 7 times = 86-94-102-112-122-132 sts.
When piece measures 39-40-41-42-43-44 cm [15.2"-15.7"-16.1"-16½"-17"-17.2"] bind off for armhole each side on every other row: 3 sts 1-1-1-1-2-2 times, 2 sts 1-2-3-4-5-6 times and 1 st 1-2-3-5-4-6 times = 74-76-78-80-82-84 sts. Continue in stockinette st until piece measures 54-56-58-60-62-64 cm [21.2"-22"- 22.7"-23.6"-24.4"-25.2"] and now bind off the middle 24-24-24-26-26-26 sts for neck. Dec to shape the neckline on every other row: 1 st 4 times = 21-22-23-23-24-25 sts left on each shoulder. Bind off when piece measures 58-60-62-64-66-68 cm [22.7"-23.6"-24.4"-25.2"-26"-26.7"].

Right front piece: Cast on 52-56-60-65-70-75 sts (includes 1 edge st at side) on needle size 4.5 mm [US 7]. Work 4 rows garter st and work next row as follows from RS: M.1, stockinette st on remaining sts. Dec and inc at side as described for back piece. At the same time when piece measures 38 cm [15"] dec for neckline inside M.1 – see Decreasing tip: 1 st on every 6-5-5-5-5-6 cm [2.4"-2"-2"-2"-2"-2.4"] a total of 4-4-4-5-5-5 times. At the same time when piece measures 39-40-41-42-43-44 cm [15.2"-15.7"-16.1"-16½"-17"-17.2"] bind off for armhole as described for back piece. After all dec for neckline and armhole are complete there are 44-45-46-46-47-48 sts left on row (If you’re at the beg or end of M.1, if elsewhere in M.1 this number may be up to 7 sts less). When piece measures 58-60-62-64-66-68 cm [22.7"-23.6"-24.4"-25.2"-26"-26.7"] bind off the outermost 21-22-23-23-24-25 sts for shoulder = between 16 and 23 sts left on row. Continue in pattern as before on these sts for 8-8-8-9-9-9 cm [3.1"-3.1"-3.1"-3½"-3½"-3½"] (this part is to be stretched slightly when sewn on to neckline on back piece). Put remaining sts on a thread.

Left front piece: Cast on and work like right front piece, but mirrored, i.e. work M.2 on sts towards mid front.

Sleeve: The cuff is knitted separately and worked crosswise. Sts are then picked up on the upper side of the cuff and sleeve worked from cuff up.
Cuff: Cast on 37 sts on needle size 4.5 mm [US 7] and work M.1 with 1 garter st on the left side of piece. Work 5-5-5-6-6-6 vertical repeats of M.1 and bind off.

Sleeve: Pick up 60-60-60-70-70-70 sts along the garter st edge on the cuff inside 1 edge st. Work 1 row garter st from WS, at the same time dec evenly to 50-52-56-60-62-64 sts. Now measure piece from here! Continue in stockinette st, at the same time when piece measures 2 cm [3/4"] inc 1 st each side on every 3-2.5-2.5-2-2-1.5 cm [1.1"-0.9"-0.9"-2"-2"-1.5"] a total of 10-11-11-12-13-14 times = 70-74-78-84-88-92 sts. When piece measures 31-30-29-28-27-26 cm [12.2"-11.7"-11.4"-11"-10.6"-10.2"] (less on the larger sizes because of larger sleeve cap) dec to shape the sleeve cap each side on every other row: 3 sts 1 time, 2 sts 3 times, 1 st 2-4-5-6-8-10 times, then 2 sts each side until piece measures 38 cm [15"], dec 3 sts each side 1 time and bind off remaining sts. Sleeve measures approx 58 cm [22.75"], incl cuff.

Assembly: Sew shoulder seams. Sew tog collar mid back – sew in the outermost sts to avoid a chunky seam. Sew collar to neckline, stretch collar slightly. Set in sleeves and sew side and sleeve seams inside 1 edge st.

Diagram

All measurements in charts are in cm.

symbols = K from RS, P from WS
symbols = P from RS, K from WS
symbols = K2 tog
symbols = slip 1 st as if to knit, K1, psso
symbols = slip 1 st as if to knit, K2 tog, psso
symbols = 1 yo between 2 sts
diagram
Do you have a question? See a list of frequently asked questions (FAQ)

Knitting tension is what determines the final measurements of your work, and is usually measured per 10 x 10 cm. It is provided like so: number of stitches in width x number of rows in height - eg: 19 stitches x 26 rows = 10 x 10 cm.

The knitting tension is very individual; some people knit/crochet loosely while others work tightly. You adjust the knitting tension with the needle size, which is why the suggested needle size only serve as a guide! You need to adjust this (up or down) to ensure that YOUR knitting tension matches the knitting tension provided in the pattern. If you work with a different knitting tension than provided you will have a different yarn consumption, and your work will have different measurements than what the pattern suggests.

The knitting tension also determines which yarns can replace each other. As long as you achieve the same knitting tension you can replace one yarn with another.

See DROPS lesson: How to measure your tension/gauge

See DROPS video: How to make a gauge tension swatch

The required amount of yarn is provided in grams, eg: 450 g. To calculate how many balls you’ll need you first need to know how many grams are in 1 ball (25g, 50g or 100g). This information is available if you click on the individual yarn quality on our pages. Divide the amount required with the amount of each ball. For example, if each ball is 50g (the most common amount), the calculation will be as follows: 450 / 50 = 9 balls.

The important thing when changing from one yarn to another is that the knitting/crochet tension remains the same. This is so that the measurements of the finished piece will be the same as on the sketch provided. It is easier to achieve the same knitting tension using yarns from the same yarn group. It is also possible to work with multiple strands of a thinner yarn to achieve the knitting tension of a thicker one. Please try our yarn converter. We recommend you to always work a test swatch.

Please NOTE: when changing yarn the garment might have a different look and feel to the garment in the photo, due to individual properties and qualities of each yarn.

See DROPS lesson: Can I use a different yarn than the one mentioned in the pattern?

All our yarns are categorised into yarn groups (from A to F) according to thickness and knitting tension – group A contains the thinnest yarns and group F the thickest. This makes it easier for you to find alternative yarns to our patterns, should you wish to switch yarn. All yarns within the same group have a similar knitting tension and can easily replace each other. However, different yarn qualities have different structures and properties which will give the finished work a unique look and feel.

Click here for an overview of the yarns in each yarn group

At the top of all our patterns you’ll find a link to our yarn converter, which is a helpful tool should you wish to use a different yarn than suggested. By filling in the yarn quality you wish to replace, the amount (in your size) and number of strands, the converter will present good alternative yarns with the same knitting tension. Additionally it will tell you how much you’ll require in the new qualities and whether you’ll need to work with multiple strands. Most skeins are 50g (some are 25g or 100g).

If the pattern is worked with multiple colours, every colour will have to be converted separately. Similarly, if the pattern is worked with several strands of different yarns (for example 1 strand Alpaca and 1 strand Kid-Silk) you will have to find alternatives for each, individually.

Click here to see our yarn converter

Since different yarns have different qualities and textures we have chosen to keep the original yarn in our patterns. However, you can easily find options among our available qualities by using our yarn converter, or simply pick a yarn from the same yarn group.

It is possible that some retailers still have discontinued yarns in stock, or that someone has a few skeins at home that they would like to find patterns for.

The yarn converter will provide both alternative yarn as well as required amount in the new quality.

If you think it's hard to decide what size to make, it can be a good idea to measure a garment you own already and like the size of. Then you can pick the size by comparing those measures with the ones available in the pattern's size chart.

You'll find the size chart at the bottom of the pattern.

See DROPS lesson: How to read size chart

The needle size provided in the pattern serves only as a guide, the important thing is to follow the knitting tension. And since knitting tension is very individual, you will have to adjust the needle size to ensure that YOUR tension is the same as in the pattern – maybe you’ll have to adjust 1, or even 2 needle sizes, up or down to achieve the correct tension. For this, we recommend that you work test swatches.

Should you work with a different knitting tension than the one provided, the measurements of the finished garment might deviate from the measurement sketch.

See DROPS lesson: How to measure your tension/gauge

See DROPS video: How to make a gauge tension swatch

Working a garment top-down provides more flexibility and room for personal adjustment. For example it is easier to try the garment on while working, as well as making adjustments to length of yoke and shoulder caps.

The instructions are carefully explaining every step, in the correct order. Diagrams are adjusted to the knitting direction and are worked as usual.

The diagram depicts all rows/rounds, and every stitch seen from the right side. It is read from bottom to top, from right to left. 1 square = 1 stitch.

When working back and forth, every other row is worked from the right side and every other row is worked from the wrong side. When working from the wrong side, the diagram will have to be worked reversed: from left to right, knit stitches are purled, purl stitches are knit etc.

When working in the round every round is worked from the right side and the diagram are worked from right to left on all rounds.

See DROPS lesson: How to read knitting diagrams

The diagram depicts all rows/rounds, and every stitch seen from the right side. It is worked from bottom to top, from right to left.

When working back and forth every other row is worked from the right side: from right to left and every other row is worked from the wrong side: from left to right.

When working in the round, every row in the diagram are worked from the right side, from right to left.

When working a circular diagram you start in the middle and work your way outwards, counter clockwise, row by row.

The rows usually start with a given number of chain stitches (equivalent to the height of the following stitch), this will either be depicted in the diagram or explained in the pattern.

See DROPS lesson: How to read crochet diagrams

Instructions for working several diagrams after each other on the same row/round, will often be written like so: “work A.1, A.2, A.3 a total of 0-0-2-3-4 times". This means you work A.1 once, then A.2 is worked once, and A.3 is repeated (in width) the number of times provided for your size – in this case like so: S = 0 times, M = 0 times, L=2 times, XL= 3 times and XXL = 4 times.

The diagrams are worked as usual: begin with the first row in A.1, then work the first row in A.2 etc.

See DROPS lesson: How to read knitting diagrams

See DROPS lesson: How to read crochet diagrams

The total width of the garment (from wrist-to-wrist) will be larger in the larger sizes, despite the actual sleeves being shorter. The larger sizes have longer sleeve caps and wider shoulders, so there will be a good fit in all sizes.

The measurement sketch/schematic drawing provides information regarding the full length of the garment. If it’s a jumper or a jacket the length is measured from the highest point on the shoulder (usually closest to the neckline), and straight down to the bottom of the garment. It is NOT measured from the tip of shoulder. Similarly, the length of yoke is measured from the highest point on the shoulder and down to where yoke is split into body and sleeves.

See DROPS lesson: How to read a schematic drawing

Diagrams are often repeated on the round or in height. 1 repeat is the diagram the way it appears in the pattern. If it says to work 5 repeats of A.1 in the round, then you work A.1 a total of 5 times after/next to each other in the round. If it says to work 2 repeats of A.1 vertically/in height you work the entire diagram once, then begin again at the start and work the entire diagram one more time.

Chain stitches are slightly narrower than other stitches and to avoid working the cast-on edge too tight, we simply chain more stitches to begin with. The stitch count will be adjusted on the following row to fit the pattern and measurement sketch.

The rib edge is more elastic and will contract slightly compared to, for example, stocking stitch. By increasing before the rib edge, you avoid a visible difference in width between the rib edge and the rest of the body.

It’s very easy to cast off too tightly, and by making yarn overs while casting off (and simultaneously casting these off) you avoid a too tight cast off edge.

See DROPS video: How to bind off with yarn overs (yo)

To achieve an even increase (or decrease) you can increase on, for example: every 3rd and 4th row alternately, like so: work 2 rows and increase on the 3rd row, work 3 rows and increase on the 4th. Repeat this until the increase is complete.

See DROPS lesson: Increase or decrease 1 st on every 3rd and 4th row alternately

Should you prefer to work in the round instead of back and forth, you may of course adjust the pattern. You’ll need to add steeks mid-front (usually 5 stitches), and follow the instructions. When you would normally turn and work from the wrong side, simply work across the steek and continue in the round. At the end you’ll cut the piece open, pick up stitches to work bands, and cover the cut edges.

See DROPS video: How to knit steeks and cut open

Should you prefer to work back and forth instead of in the round, you may of course adjust the pattern so you work the pieces separately and then assemble them at the end. Divide the stitches for the body in 2, add 1 edge stitch in each side (for sewing) and work the front and back pieces separately.

See DROPS lesson: Can I adapt a pattern for circular needles into straight needles?

Pattern repeats can vary slightly in the different sizes, in order to get the correct proportions. If you’re not working the exact same size as the garment in the photo, yours might deviate slightly. This has been carefully developed and adjusted so that the complete impression of the garment is the same in all sizes.

Make sure to follow instructions and diagrams for your size!

If you have found a pattern you like which is available in women’s size it’s not very difficult to convert it to men’s size. The biggest difference will be the length of sleeves and body. Start working on the women size that you think would fit across the chest. The additional length will be worked right before you cast off for the armhole/sleeve cap. If the pattern is worked top-down you can add the length right after the armhole or before the first decrease on sleeve.

Regarding additional yarn amount, this will depend on how much length you add, but it is better with a skein too many than too few.

All yarns will have excess fibres (from production) that might come off as lint or shedding. Brushed yarns (ie hairier yarns) have more of these loose, excess fibres, causing more shedding.

Shedding also depends on what is worn under or over the garment, and whether this pulls at the yarn fibres. It’s therefore not possible to guarantee that there will be no shedding

Below are some tips on how to get the best result when working with hairier yarns:

1. When the garment is finished (before you wash it) shake it vigorously so the looser hairs come off. NOTE: do NOT use a lint roller, brush or any method that pulls at the yarn.

2. Place the garment in a plastic bag and put it in your freezer - the temperature will cause the fibres to become less attached to each other, and excess fibres will come off easier.

3. Leave in the freezer for a few hours before taking it out and shaking it again.

4. Wash the garment according to the instructions on the yarn label.

Pilling is a natural process that happens to even the most exclusive of fibers. It's a natural sign of wear and tear that is hard to avoid, and that is most visible in high friction areas of your garment like a sweater's arms and cuffs.

You can make your garment look as new by removing the pilling, using a fabric comb or a pill/lint remover.

Still can't find the answer you need? Then scroll down and leave your question so one of our experts can try to help you. This will be done normally within 5 to 10 working days.
In the meantime, you can read the questions and answers that others have left to this pattern or join the DROPS Workshop on Facebook to get help from fellow knitters/crocheters!

You might also like...

Post a comment to pattern DROPS 105-33

We would love to hear what you have to say about this pattern!

If you want to leave a question, please make sure you select the correct category in the form below, to speed up the answering process. Required fields are marked *.

Comments / Questions (54)

country flag Bayard wrote:

Bonjour, Après plusieurs essais, je pense qu’il manque un jeté après le M1 sinon l’ouvrage rétrécit. Cordialement. J. Bayard

02.09.2022 - 19:58

DROPS Design answered:

Bonjour Mme Bayard, sauf erreur de ma part, le diagramme M.1 est juste ainsi, vous diminuez le nombre de mailles à droite dans M.1aux rangs 1, 3, 5, 7,9,11, 13 et montez 7 mailles à la fin du rang 14. On va ainsi former les pointes du devant. Si vous pensiez à autre chose, n'hésitez pas à préciser votre pensée, nous vérifierons alors volontiers ensemble. Bon tricot!

05.09.2022 - 08:41

country flag Gilbert Veronique wrote:

Ji tricote un point fantaisie 1j 2mensenble mon travaille par de bais comment faire

15.11.2021 - 11:31

country flag Copla wrote:

Bonjour, pourriez-vous nous montrer une photo de dos pour qu'on puisse voir à quoi ressemble le haut du dos de ce modèle ? (pour l'encolure)

07.06.2021 - 23:20

DROPS Design answered:

Bonjour Mme Copla, nous n'avons pas de photo de dos de ce modèle, mais le col châle va se tricoter/présenter de la même façon que dans cette vidéo, sauf que, naturellement, ici, on va continuer le motif ajouré au lieu des mailles point mousse de la vidéo, mais la technique restera la même. Bon tricot!

08.06.2021 - 08:39

country flag Copla wrote:

Merci pour votre réponse.

29.05.2021 - 00:31

country flag Copla wrote:

Bonjour, pourquoi, à la fin des devants doit-on placer les mailles en attente ?

28.05.2021 - 15:05

DROPS Design answered:

Bonjour Mme Copla, les 16 à 24 mailles à la fin de chaque devant sont pour le col et sont ensuite assemblées entre elles en grafting pour une couture plus invisible. Bon tricot!

28.05.2021 - 15:16

country flag Mirland Marie wrote:

Bonjour, peut on avoir les diagrammes écrit s il vous plaît C est a dire ex: 1 Maille endroit, 1jete,1endroit, 2envers ex......

29.04.2021 - 06:21

DROPS Design answered:

Bonjour Mme Mirland, ce modèle comporte seulement des diagrammes, mais cette leçon vous aidera à comprendre comment lire les diagrammes qui accompagnent les explications. Bon tricot!

29.04.2021 - 08:13

country flag Joke wrote:

Ik ben er achter gekomen dar er in het diagram een fout zit, ik ben begonnen met het rechter voorpand en kwam er niet uit, dus ben ik gaan zoeken en vond de fout, je begint met 4 pennen recht dan ga je naar M1 hier moet je 8x 2 samen en 1 omslag breien , maar bij de 8ste staat alleen 2 samen breien ,daar zijn ze vergeten de omslag te vermelden, en dat is bij M2 ook. Dus ik heb probleem opgelost en nu klopt het wel, dus voor de mensen die de fout niet vinden, dit is de fout. gr Joke

02.01.2021 - 21:06

country flag Nicole Genay wrote:

J'ai compris la façon de procéder mais il y a un problème. La maille que l'on supprimé après M1 et avant M2 n'est pas remplacée ce qui fait qu'il manque des mailles et le côté diminue très vite

02.01.2016 - 21:27

DROPS Design answered:

Bonjour Mme Genay, ces diminutions après M1 et avant M2 concernent l'encolure et se font à partir de 38 cm, 4-5 fois tous les 6-5 cm (cf taille), on va diminuer 4-5 m seulement côté encolure. Bon tricot!

04.01.2016 - 09:21

country flag Nicole Genay wrote:

Merci pour votre réponse rapide. Si j'ai bien compris, la Dim. se fait à la fin du rang?

02.01.2016 - 20:02

DROPS Design answered:

Bonjour Mme Genay, cette diminution pour l'encolure se fait juste après M1 sur l'endroit du devant droit: tricotez M1 pour la bordure devant et diminuez 1 m, continuez les mailles suivantes comme avant avec les diminutions/augmentations sur le côté en fin de rang sur l'endroit (on rabat les mailles de l'emmanchure en début de rang sur l'envers pour le devant droit). Bon tricot!

04.01.2016 - 09:15

country flag Nicole Genay wrote:

Bjr je ne comprends pas comment faire les diminutions sur le point fantaisie du bord des devants. Je n'arrive pas à retomber juste après quelques rangs après plusieurs tentatives

30.12.2015 - 22:16

DROPS Design answered:

Bonjour Mme Genay, les diminutions des devants se font après (devant droit) ou avant (devant gauche) le point fantaisie - voir aussi "Diminutions (encolure)" au début des explications. Pour le devant droit par ex, tricotez toutes les mailles de M1, puis glissez 1 m à l'end, 1 m end, passez la m glissée par-dessus la m tricotée, et terminez le rang = 1 m a été diminuée après M1. Bon tricot!

02.01.2016 - 15:45