
Popular categories
Looking for a yarn?


|
||||||||||||||||
Here Kitty |
||||||||||||||||
 |
 |
|||||||||||||||
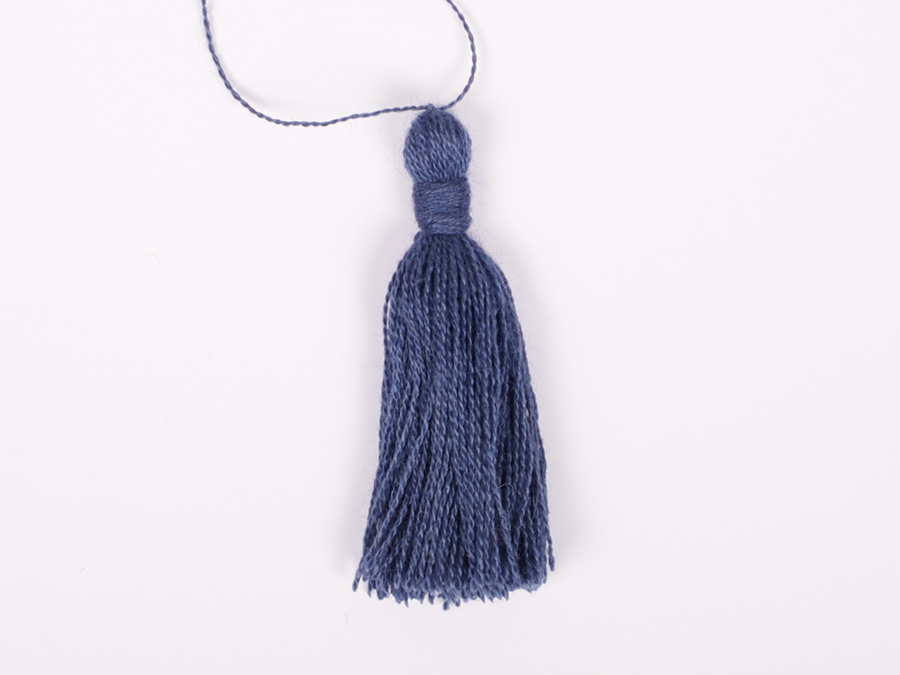
DROPS jacket with cat motif, hat and socks in “Karisma”.
DROPS Baby 3-7 |
||||||||||||||||
|
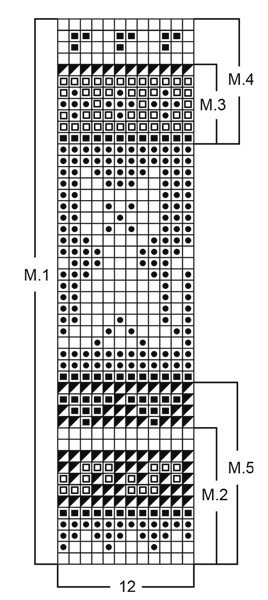
JACKET: Knitting tension: 21 sts x 28 rows on needles size 3.5 mm in stocking st = 10 x 10 cm. Rib: *K1, P1*. Front and back piece: Knitted back and forth on needle from mid front. Colour way 2 ( ). Cast on 106-116-124 (132-132) sts on circular needle size 2.5 mm with blue (off-white) and knit 3-3-3 (3-4) cm Rib. Change to needle size 3.5 mm, knit 1 round, at the same time inc 2-4-8 (12-24) sts evenly on round = 108-120-132 (144-156) sts. Continue as follows: Size 3- 6/9 months: 1-3 rounds blue, then M.1. Size 12/18 months-2 years-3 years: M.2, 2-3-4 cm blue, then M.1. When piece measures 15-16-18 (20-19) cm knit next row as follows from the RS: 27-30-33 (36-39) sts = front piece, 54-60-66 (72-78) sts = back piece, 27-30-33 (36-39) sts = front piece. Now complete front and back pieces separately. Front piece: = 27-30-33 (36-39) sts. Dec to shape the armhole on every other row: 3 sts 1 time, 1 st 1-2-2 (2-1) times = 23-25-28 (31-35) sts. After M.1 continue in blue until piece measures 23-25-28 (31-34) cm. Now knit M.2, at the same time dec to shape the neckline on every other row: 8-10-11 (12-15) sts 1 time, 2 sts 1 time,1 st 2 times. Cast off remaining 12-12-14 (16-17) sts after M.2, piece measures approx 27-29-32 (35-38) cm. Back piece: = 54-60-66 (72-78) sts. Dec to shape the armhole and continue in pattern as described for front piece = 46-50-56 (62-70) sts. When piece measures 25-27-30 (33-36) cm cast off the middle 18-22-24 (26-32) sts for neck and dec to shape the neckline on next row: 2 sts 1 time. Cast off remaining 12-12-14 (16-17) sts after M.2, piece measures approx 27-29-32 (35-38) cm. Sleeve: Cast on 32-38-42 (46-50) sts on double pointed needle size 2.5 mm with blue (off-white) and knit 3-3-3 (3-4) cm Rib. Change to needle size 3.5 mm and continue in M.4 – make sure to place a pattern repeat mid upper sleeve. At the same time inc 2 sts mid under arm a total of 9-9-9 (8-15) times as follows: Size 3 Months: on every 3rd round Size 6/9 months: on every 3rd and 4th round alternately Size 12/18 months: on every 4th and 5th round alternately Size 2 years: on every 6th round Size 3 years: on every 4th round = 50-56-60 (62-80) sts. After M.4 continue in blue (off-white) until 8 cm left to finished measurements. Now knit M.5, M.3 and then complete piece in blue (off-white). At the same time when piece measures 20-24-26 (28-31) cm cast off 6 sts for armhole and complete piece back and forth on needle. Dec to shape the sleeve cap on every other row: 4 sts 2-3-3 (3-3) times. Cast off, sleeve measures approx 22-27-29 (31-34) cm. Assembly: Sew shoulder seams. Pick up approx 66-74 sts along right front piece on needle size 2.5 mm with blue (off-white) and knit 3 cm Rib, cast off. Repeat along left front piece, but after 1 cm make 5-5-5 (6-6) buttonholes evenly distributed on row. 1 buttonhole = cast off 2 sts and cast on 2 new sts on return row. Pick up 70-76 sts round the neck on needle size 2.5 mm with blue (off-white) and knit 1.5 cm Rib, cast off. Set in sleeves and sew on buttons. HAT: Size: 3 – 6/9 – 12/18 months (2 -3 years) To fit head circumference: 42-46-48 (50-51) cm. DROPS circular needle size 3.5 mm DROPS crochet hook size 3 mm Knitting tension: 21 sts x 28 rows on needles size 3.5 mm in stocking st = 10 x 10 cm. Pattern: 3 rows blue (off-white), *3 rows blue (off-white), M.4, 1 row blue (off-white), M.5*, repeat from *-*. NB! When number of sts on row doesn’t fit pattern in M.5 knit extra sts in blue (off-white). Earflap: Colour way 2 in ( ). Cast on 4 sts on needle size 3.5 mm with blue (off-white) and knit pattern – see above. At the same time inc 1 st each side on every other row a total of 6-8-8 (8-10) times = 16-20-20 (20-24) sts. Now inc on the right side of piece (towards forehead) on every other row: 2 sts 2-2-4 (4-4) times = 20-24-28 (28-32) sts. Piece measures approx 6-7.5-8 (8-9) cm. Put piece aside and make another earflap with inc towards forehead on the opposite side. Hat: Cast on 20-20-20 (20-20) sts between earflaps at back and 28-28-24 (28-24) sts between earflaps at front = 88-96-100 (104-108) sts. Distribute sts on double pointed needles. Measure piece from here. Continue in pattern. When piece measures 8-9-10 (11-12) cm dec 32-40-40 (44-44) sts evenly on the first round in single colour (from now on only dec on rounds in single colour) = 56-56-60 (60-64) sts. After 2 cm dec 20-20-20 (20-20) sts evenly on round. After another 2 cm dec 16-16-16 (16-16) sts evenly on round, and after a further 2 cm dec 12-12-16 (8-12) sts evenly = 8-8-8 (16-16) sts. After another 2 cm cut the thread on the 3 smaller sizes, dec 8-8 sts evenly on the 2 larger sizes, knit 2 cm and cut thread, pull thread through remaining sts and fasten. Now crochet a row of dc round the edge with blue (off-white) and 1 row with pink (blue). Make 2 tassels measuring approx 5 cm in any colour and attach to bottom of earflap. SOCKS: Size: 3 – 6/9 – 12/18 months (2 -3 years) Foot length: 10-11-12 (13-14) cm DROPS pointed needles size 2.5 mm and 3.5 mm Knitting tension: width of 22 sts on needles size 3.5 mm in stocking st = 10 cm. Rib: *K1, P1*, repeat from *-*. Moss st: first round *K1, P1*, second round P over K, K over P. Repeat second round. Colour way 2 in ( ). Cast on 48-50-52 (54-56) sts on needle size 2.5 mm with blue (off-white) and knit Rib. When piece measures 4-5-5 (5-6) cm, K tog 3 sts mid back, knit 4 rounds and K tog 3 sts mid back = 44-46-48 (50-52) sts. When piece measures 10-11-12 (13-14) cm change to needle size 3.5 mm and continue in stocking st, at the same time dec evenly to 36-40-40 (44-44) sts. After 2 rounds knit next row as follows: *K2 tog, 1 yo*, repeat from *-*. Remember the knitting tension. Knit 1 row stocking st. Now knit 4-5-5.5 (7-7.5) cm stocking st on the first 8-10-10 (12-12) sts on round for middle piece, put the remaining 28-30-30 (32-32) sts on a thread. Pick up 8-10-12 (14-16) sts on each side of the middle piece = 52-60-64 (72-76) sts. P 1 round, 1-1-2 (3-4) rounds blue (off-white), M.3, 1 round blue (off-white). Now cast off all sts except for the front 8-10-10 (12-12) sts, knit 9-10-11 (13-14) cm moss st for sole on these and cast off. Sew sole to sock. Crochet a chain on crochet hook size 3 mm, approx 25 cm long, and thread through eyelet row. |
||||||||||||||||
Diagram explanations |
||||||||||||||||
|
||||||||||||||||
|
||||||||||||||||

|
||||||||||||||||
|
Have you made this or any other of our designs? Tag your pictures in social media with #dropsdesign so we can see them! Do you need help with this pattern?You'll find tutorial videos, a Comments/Questions area and more by visiting the pattern on garnstudio.com. © 1982-2024 DROPS Design A/S. We reserve all rights. This document, including all its sub-sections, has copyrights. Read more about what you can do with our patterns at the bottom of each pattern on our site. |
||||||||||||||||


With over 40 years in knitting and crochet design, DROPS Design offers one of the most extensive collections of free patterns on the internet - translated to 17 languages. As of today we count 304 catalogues and 11422 patterns - 11422 of which are translated into English (UK/cm).
We work hard to bring you the best knitting and crochet have to offer, inspiration and advice as well as great quality yarns at incredible prices! Would you like to use our patterns for other than personal use? You can read what you are allowed to do in the Copyright text at the bottom of all our patterns. Happy crafting!
Comments / Questions (11)
Dans la version française vous tricotez le col en côtes avec des aiguilles 3,5. Merci de me confirmer que c’est une erreur et qu il faut le tricoter avec des aig 2,5. (Comme dans la version anglaise)
13.02.2022 - 09:00DROPS Design answered:
Bonjour Mme Lepetit, le col se tricote effectivement avec les aiguilles 2,5, correction faite, merci pour votre retour. Bon tricot!
14.02.2022 - 10:20Bonjour, Pour le modèle layette Here Kitty : manches, augmenter pour la Taille 6/9 mois : alternativement tous les 3 et 4 tours. Dois-je comprendre tous les 3 ou 4 rangs ? Merci pour votre réponse.
15.10.2019 - 15:02DROPS Design answered:
Bonjour Bergeronettes, découvrez ici comment augmenter alternativement tous les 3 et 4 tours ou rangs. Bon tricot!
15.10.2019 - 15:23Werden beim Ärmel jeweils beidseitig 4 Maschen abgekanntet oder beziehen sich die 4 Maschen auf die Reihe, so das jeweils nur an beiden Seiten 2 Maschen abgekanntet werden?\\\\r\\\\nHerzlichen Dank im voraus für Ihre Antwort.
19.12.2018 - 16:02DROPS Design answered:
Liebe Conny, es werden 4 Maschen am Anfang jeder Hin- sowie Rückreihe abgekettet, also 4 M x 2-3 sind dann 8-12 M auf beiden Seiten (=16-32 M insgesamt). Viel Spaß beim stricken!
20.12.2018 - 08:07Hallo\r\nIch möchte Modell Baby 3-7 für 3-6 Monate stricken. Die Anleitung verstehe ich so dass ich nach dem Bünden M1 stricken soll.\r\nAuf dem Foto sieht es so aus als wären es 2 x Mh2.\r\nWas ist nun richtig ?\r\nVielen Dank für baldige Antwort.
22.07.2018 - 18:03DROPS Design answered:
Liebe Frau Riedel-Diefenbach, je nach der Größe wird das Muster unterschiedlich gestrickt werden, in den ersten 2 Grössen (= 3 Monate + 6/9 Monate) stricken Sie zuerst 1-3 R blau dann M.1 stricken, in den grösseren Größe (wie z.B. im Foto) wird zuerst M.2 gestrickt, dann 2-3-4 cm blau und dann M.1 gestrickt. Viel Spaß beim stricken!
23.07.2018 - 08:48Waar is het telpatroon van dit patroon?? Het staat niet meer op de website, waardoor het onmogelijk is dit leuke setje te gaan maken!
07.01.2018 - 19:56DROPS Design answered:
Hoi Anna, Het telpatroon is nu toegevoegd. Dankjewel voor het doorgeven en veel breiplezier!
08.01.2018 - 09:48Is this pattern written correctly? It seems from the picture that there is a pattern stripe at the bottom of the sweater followed by some rows of plain stockinette, then the main pattern sequence commences. Can the pattern be corrected? It is most annoying to have to pull out and reknit to try to match the picture.
03.07.2012 - 18:37DROPS Design answered:
Dear Mrs Tanzos, pattern should have said : Size 12/18 months-2 years-3 years: M.2, 2-3-4 cm blue, then M.1. Correction has been made thank you. Happy knitting!
04.12.2012 - 19:02I love the look of this pattern, but the directions are wrong. On the body of the sweater in the picture it looks like you work M2, then some plain blue and then start M1, so that the kittens are on the upper front near the shoulders. I have knitted for 45 years and have never had as much trouble with any other pattern than I have with this one. Please correct it, so others are not having the same problem. Am I correct in what I think the pattern ought to be? I would love your feedback.
03.07.2012 - 04:05Aj hvor dejligt at se det sæt jeg strikkede til min datter for 15 år siden. Desværre er bluse og opskrift væk, så jeg står og mangler de samme oplysninger som Anette skrev 18. sept.
10.02.2011 - 17:46Jeg mangler angivelse af størrelser, pind tykkelse og strikkefasthed. Mangler desuden antal masker, der slås op . Mangler desuden opskrift på huen.
18.09.2010 - 21:03De står lengst ned på oppskriften
19.05.2006 - 09:41