DROPS Angora-Tweed
DROPS Angora-Tweed
70% Wool, 30% Angora,
Discontinued
find alternatives
DROPS SS24

DROPS 103-15

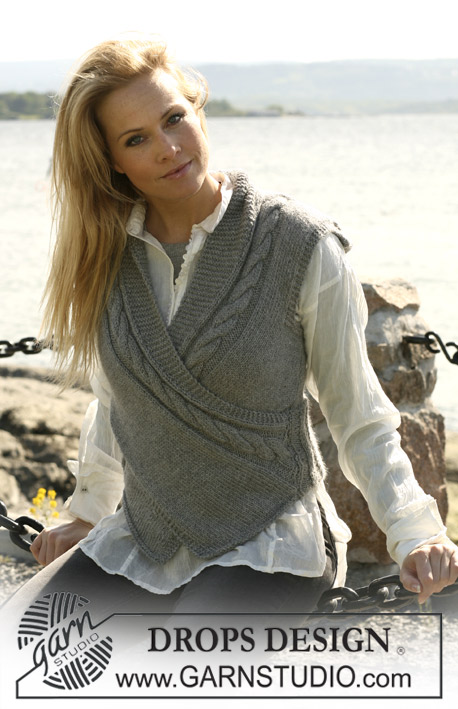
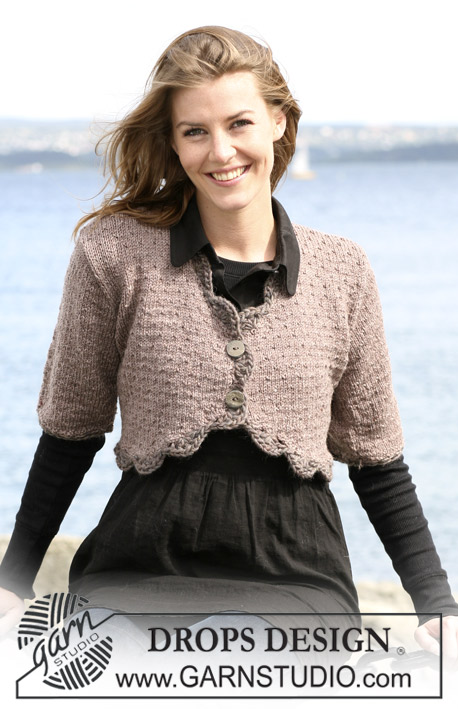
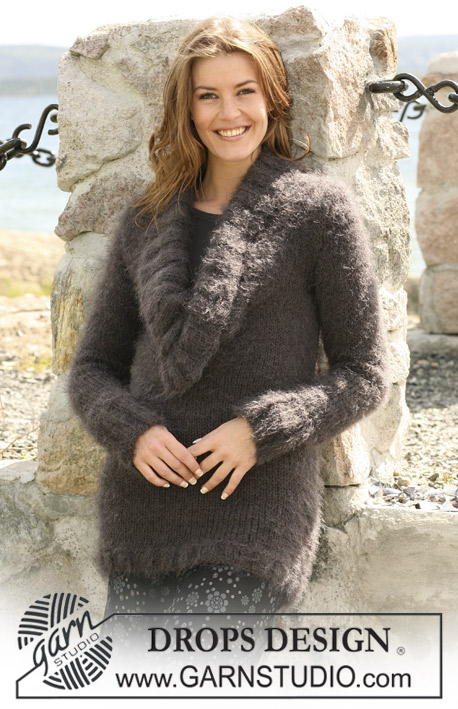
The set consist of: A knitted DROPS jacket with long or ¾-long sleeves and a beret in ”Angora-Tweed”. Size S to XXXL

DROPS 103-15
Jacket
Size: S - M - L - XL - XXL - XXXL
Materials: DROPS Angora-Tweed
¾-long sleeves:
400-400-450-500-550-600 g, clr. no. 06, brown.
Long sleeves:
500-500-550-600-600-700 g, clr. no. 06, brown.

DROPS Circular needle size 5 mm (80 cm) – or the size needed to obtain the correct knitting tension.
DROPS Circular needle size 4.5 mm (80 cm) – for the Rib
DROPS double pointed needles size 4,5 mm – for the sleeves
DROPS Buffalohorn button dark no. 535:
5-5-5-5-6-6 pcs.

-------------------------------------------------------

Alternative Yarn – See how to change yarns here
Yarn Groups A to F – Use the same pattern and change the yarn here
Yarn usage using an alternative yarn – Use our yarn converter here

-------------------------------------------------------

DROPS Angora-Tweed
DROPS Angora-Tweed
70% Wool, 30% Angora,
Discontinued
find alternatives

Pattern instructions

NOTE: This pattern is written in British English. All measurements in charts are in cm. For conversion from cm to inches - click here. There are different terms for crocheting in British and American English. If this pattern includes crochet, click for "crochet terms" here. For this pattern in American English, please click here.
Knitting tension: 17 sts x 22 rows in stocking sts = 10 x 10 cm.
Garter sts: Knit back and forth on all rows.
Button hole: Cast off for button hole at the right front edge. 1 button hole = Cast off the 2nd and the 3rd st from the edge, on returning row cast on 2 new sts at the same place.
Cast off for button holes when the piece measures:
Size S: 13, 21, 29, 37 and 45 cm.
Size M: 13, 21, 29, 37 and 46 cm.
Size L: 14, 22, 30, 38 and 46 cm.
Size XL: 14, 22, 30, 38 and 47 cm.
Size XXL: 14, 21, 28, 35, 42 and 48 cm.
Size XXXL: 14, 21, 28, 35, 42 and 49 cm.
Decreasing tips (applies for the neck shaping): All dec. are done from the RS.
Dec. as follows after 5 front band sts: Slip 1 st as if to K, K1, psso.
Dec. as follows before 5 front band sts: K 2 tog.


Back and front piece: Knit back and forth on circular needles. Remember the knitting tension! Cast on 160-174-188-202-223-244 sts (incl. 5 front band sts each side) on needle size 4.5 mm with Angora-Tweed. P 1 row from the WS. Continue to knit the next row as follows: 5 garter sts – see explanation above (= front band), * K3, P4 * repeat from *-* and finish with K3 and 5 garter sts (= front band). Knit until the Rib measures 3 cm Change to circular needle size 5 mm and knit in stocking sts with 5 front band sts each side knitted in garter sts through out. At the same time cast off for button holes on the right front band – se explanation above. When the piece measures 20-21-22-23-24-25 cm change to circular needles size 4.5 mm. Knit the next row as follows from the RS: 5 garter sts (=front band), * K3, P4 * repeat from *-* and finish with K3 and 5 garter sts (=front band). Continue this way until the piece measures 36-37-38-39-40-41 cm. Change to circular needles size 5 mm and continue in stocking sts and 5 front band sts each side. When the piece measures 45-46-47-48-49-50 cm knit the next row as follows: 39-43-46-50-55-60 sts (= right front piece), cast off 6 sts for the arm holes 70-76-84-90-101-112 sts (= back piece), cast off 6 sts for the arm holes, 39-43-46-50-55-60 sts (= left front piece). Continue each part separately.

Back piece = 70-76-84-90-101-112 sts. Then cast off for the armholes each side on every other row: 2 sts 1-2-3-4-6-8 times and 1 st 1-1-2-2-3-3 times = 64-66-68-70-71-74 sts. Knit in stocking sts until the piece measures 60-62-64-66-68-70 cm. Then knit 4 rows of garter sts over the mid. 26-26-28-28-29-30 m (stocking sts over the remaining sts). Cast off the mid 14-14-16-16-17-18 sts for the neck. Then cast off 1 st towards the neck = 24-25-25-26-26-27 sts left for each shoulder. To make the back piece match the front pieces when assembled knit 5 garter sts each side towards the neck. Cast off when the piece measures 64-66-68-70-72-74 cm.

Right front piece = 39-43-46-50-55-60 sts. Cast off for the arm holes as done for the back piece. At the same time when the piece measures 46-47-48-49-50-51 cm dec. 1 st towards the neck at the mid front on each cm a total of 10-11-11-12-12-12 times and on every 2 cm a total of 2 times – read decreasing tips. After all dec. = 24-25-25-26-26-27 sts left for the shoulder. Cast off when the piece measures 64-66-68-70-72-74 cm.

Left front piece: Knit as right front piece but reverse.

¾-long sleeves: See section long sleeves too. Knit round on needles. Cast on 49-49-56-56-63-63 sts on double pointed needles size 4.5 mm with Angora-Tweed. K 1 round. Continue with Rib * P4, K3 * repeat from *-*. At the same time when the piece measures 5 cm inc. 1 st each side of the 3K sts mid underneath the sleeve (incorporate new sts in the P parts as going along) on every 7-3-3-2-2-1 cm a total of 3-5-5-6-6-9 times = 55-59-66-68-75-81 sts. When the piece measures 21-21-20-19-18-17 cm cast off 6 sts mid underneath the sleeve. Then cast off each side for the sleeve cap on every other row as follows: 2 sts 3 times, 1 sts 2-2-3-4-6-7 times. Continue to cast off 2 sts each side until the piece measures 28-29-29-29-30-30 cm, then cast off 3 sts 1 times on every side. Cast off the remaining sts, the work measures approx. 29-30-30-30-31-31 cm.

Long sleeves: See section ¾-long sleeves too. Knit round on needle. Cast 42-42-42-49-49-49 sts on double pointed needles size 4.5 mm with Angora-Tweed. K 1 round. Continue with Rib *P4, K3 * repeat from *-*. At the same time when the piece measures 8 cm inc. 1 st each side of the 3K sts mid underneath the sleeves (incoporate new sts into the P part as goind along) on every 6-4½-3-4-2½-2 cm a total of 7-9-12-10-13-16 times = 56-60-66-69-75-81 sts. When the piece measures 47-47-46-46-44-43 cm cast off 6 sts mid underneath the sleeve. Continue to knit back and forth. Then cast off each side for the sleevecap on every other row as follows: 2 sts 3 times, 1 st 2-2-3-4-6-7 times. Continue to cast off 2 sts each side until the piece measures 54-55-55-56-56-56 cm, then cast off 3 sts each side 1 time. Cast off remaining sts when the piece measures approx. 55-56-56-57-57-57 cm.

Assembly: Sew the shoulder seams. Sew in the sleeves. Sew on the buttons at the left front band.


Beret:
Size: S/M - M/L
To fit head circumference: approx 54/56 - 56/58 cm
Materials: DROPS Angora-Tweed
100 g, for both size clr. no. 06, brown.
Yarn alternatives and yardage - see page 2

DROPS double pointed needles size 5mm – or the size needed to obtain the correct knitting tension.
DROPS double pointed needles size 4.5 mm – for Rib.


Beret: Knit round on double pointet needles.
Cast on 84-91 sts on double pointed needles size 4.5 mm with Angora-Tweed. K 1 round. Continue with Rib = K3 /P4 for 3 cm – at the same time on the last round adjust the number of sts to 84-90 sts.
Insert 6 MT (marking threads) in the work with 14-15 sts in between. Change to needle size 5 mm and and continue in stocking sts. Remember the knitting tension! At the same time when the work measures 4 cm inc. 1 st on left side of the all the MT on every other row a total of 5 times = 114-120 sts.
When the work measures 10 cm K2 tog on the left side of all the MT on every other row a total of 16 times = 18-24 sts. Then knit all sts tog. 2 by 2 = 9-12 sts. Pull 1 thread through remaining sts and pull tight.

This pattern has been corrected.

Updated online: 23.06.2021
Added "Change to needle size 5 mm" under Beret...14-15 sts in between. Change to needle size 5 mm and and continue in stocking sts.

Diagram

diagram measurements

Each of our patterns has specific tutorial videos to help you.

Do you have a question? See a list of frequently asked questions (FAQ)

Knitting tension is what determines the final measurements of your work, and is usually measured per 10 x 10 cm. It is provided like so: number of stitches in width x number of rows in height - eg: 19 stitches x 26 rows = 10 x 10 cm.

The knitting tension is very individual; some people knit/crochet loosely while others work tightly. You adjust the knitting tension with the needle size, which is why the suggested needle size is only meant as a guide! You need to adjust this (up or down) to ensure that YOUR knitting tension matches the knitting tension provided in the pattern. If you work with a different knitting tension than provided you will have a different yarn consumption, and your work will have different measurements than what the pattern suggests.

The knitting tension also determines which yarns can replace each other. As long as you achieve the same knitting tension you can replace one yarn with another.

See DROPS lesson: How to measure your tension/gauge

See DROPS video: How to make a gauge tension swatch

The required amount of yarn is provided in grams, eg: 450 g. To calculate how many balls you’ll need you first need to know how many grams are in 1 ball (25g, 50g or 100g). This information is available if you click on the individual yarn quality on our pages. Divide the amount required with the amount of each ball. For example, if each ball is 50g (the most common amount), the calculation will be as follows: 450 / 50 = 9 balls.

The important thing when changing from one yarn to another is that the knitting/crochet tension remains the same. This is so that the measurements of the finished piece will be the same as on the sketch provided. It is easier to achieve the same knitting tension using yarns from the same yarn group. It is also possible to work with multiple strands of a thinner yarn to achieve the knitting tension of a thicker one. Please try our yarn converter. We recommend you to always work a test swatch.

Please NOTE: when changing yarn the garment might have a different look and feel to the garment in the photo, due to individual properties and qualities of each yarn.

See DROPS lesson: Can I use a different yarn than the one mentioned in the pattern?

All our yarns are categorised into yarn groups (from A to F) according to thickness and knitting tension – group A contains the thinnest yarns and group F the thickest. This makes it easier for you to find alternative yarns to our patterns, should you wish to switch yarn. All yarns within the same group have a similar knitting tension and can easily replace each other. However, different yarn qualities have different structures and properties which will give the finished work a unique look and feel.

Click here for an overview of the yarns in each yarn group

At the top of all our patterns you’ll find a link to our yarn calculator, which is a helpful tool should you wish to use a different yarn than suggested. By filling in the yarn quality you wish to replace, the amount (in your size) and number of strands, the calculator will present good alternative yarns with the same knitting tension. Additionally it will tell you how much you’ll require in the new qualities and whether you’ll need to work with multiple strands. Most skeins are 50g (some are 25g or 100g).

If the pattern is worked with multiple colours, every colour will have to be calculated separately. Similarly, if the pattern is worked with several strands of different yarns (for example 1 strand Alpaca and 1 strand Kid-Silk) you will have to find alternatives for each, individually.

Click here to see our yarn calculator

Since different yarns have different qualities and textures we have chosen to keep the original yarn in our patterns. However, you can easily find options among our available qualities by using our yarn calculator, or simply pick a yarn from the same yarn group.

It is possible that some retailers still have discontinued yarns in stock, or that someone has a few skeins at home that they would like to find patterns for.

The yarn calculator will provide both alternative yarn as well as required amount in the new quality.

If you think it's hard to decide what size to make, it can be a good idea to measure a garment you own already and like the size of. Then you can pick the size by comparing those measures with the ones available in the pattern's size chart.

You'll find the size chart at the bottom of the pattern.

See DROPS lesson: How to read size chart

The needle size provided in the pattern serves only as a guide, the important thing is to follow the knitting tension. And since knitting tension is very individual, you will have to adjust the needle size to ensure that YOUR tension is the same as in the pattern – maybe you’ll have to adjust 1, or even 2 needle sizes, up or down to achieve the correct tension. For this, we recommend that you work test swatches.

Should you work with a different knitting tension than the one provided, the measurements of the finished garment might deviate from the measurement sketch.

See DROPS lesson: How to measure your tension/gauge

See DROPS video: How to make a tension/gauge swatch

Working a garment top-down provides more flexibility and room for personal adjustment. For example it is easier to try the garment on while working, as well as making adjustments to length of yoke and shoulder caps.

The instructions are carefully explaining every step, in the correct order. Diagrams are adjusted to the knitting direction and are worked as usual.

The diagram depicts all rows/rounds, and every stitch seen from the right side. It is read from bottom to top, from right to left. 1 square = 1 stitch.

When working back and forth, every other row is worked from the right side and every other row is worked from the wrong side. When working from the wrong side, the diagram will have to be worked reversed: from left to right, knit stitches are purled, purl stitches are knit etc.

When working in the round every round is worked from the right side and the diagram are worked from right to left on all rounds.

See DROPS lesson: How to read knitting diagrams

The diagram depicts all rows/rounds, and every stitch seen from the right side. It is worked from bottom to top, from right to left.

When working back and forth every other row is worked from the right side: from right to left and every other row is worked from the wrong side: from left to right.

When working in the round, every row in the diagram are worked from the right side, from right to left.

When working a circular diagram you start in the middle and work your way outwards, counter clockwise, row by row.

The rows usually start with a given number of chain stitches (equivalent to the height of the following stitch), this will either be depicted in the diagram or explained in the pattern.

See DROPS lesson: How to read crochet diagrams

Instructions for working several diagrams after each other on the same row/round, will often be written like so: “work A.1, A.2, A.3 a total of 0-0-2-3-4 times". This means you work A.1 once, then A.2 is worked once, and A.3 is repeated (in width) the number of times provided for your size – in this case like so: S = 0 times, M = 0 times, L=2 times, XL= 3 times and XXL = 4 times.

The diagrams are worked as usual: begin with the first row in A.1, then work the first row in A.2 etc.

See DROPS lesson: How to read knitting diagrams

See DROPS lesson: How to read crochet diagrams

The total width of the garment (from wrist-to-wrist) will be larger in the larger sizes, despite the actual sleeves being shorter. The larger sizes have longer sleeve caps and wider shoulders, so there will be a good fit in all sizes.

The measurement sketch/schematic drawing provides information regarding the full length of the garment. If it’s a jumper or a jacket the length is measured from the highest point on the shoulder closest to the neckline, and straight down to the bottom of the garment. It is NOT measured from the tip of shoulder. Similarly, the length of yoke is measured from the highest point on the shoulder and down to where yoke is split into body and sleeves.

On a jacket measures are never taken along bands, unless specifically stated. Always measure inside band stitches when measuring the length.

See DROPS lesson: How to read a schematic drawing

Diagrams are often repeated on the round or in height. 1 repeat is the diagram the way it appears in the pattern. If it says to work 5 repeats of A.1 in the round, then you work A.1 a total of 5 times after/next to each other in the round. If it says to work 2 repeats of A.1 vertically/in height you work the entire diagram once, then begin again at the start and work the entire diagram one more time.

Chain stitches are slightly narrower than other stitches and to avoid working the cast-on edge too tight, we simply chain more stitches to begin with. The stitch count will be adjusted on the following row to fit the pattern and measurement sketch.

The rib edge is more elastic and will contract slightly compared to, for example, stocking stitch. By increasing before the rib edge, you avoid a visible difference in width between the rib edge and the rest of the body.

It’s very easy to cast off too tightly, and by making yarn overs while casting off (and simultaneously casting these off) you avoid a too tight cast off edge.

See DROPS video: How to bind off with yarn overs (yo)

To achieve an even increase (or decrease) you can increase on, for example: every 3rd and 4th row alternately, like so: work 2 rows and increase on the 3rd row, work 3 rows and increase on the 4th. Repeat this until the increase is complete.

See DROPS lesson: Increase or decrease 1 st on every 3rd and 4th row alternately

Should you prefer to work in the round instead of back and forth, you may of course adjust the pattern. You’ll need to add steeks mid-front (usually 5 stitches), and follow the instructions. When you would normally turn and work from the wrong side, simply work across the steek and continue in the round. At the end you’ll cut the piece open, pick up stitches to work bands, and cover the cut edges.

See DROPS video: How to knit steeks and cut open

Should you prefer to work back and forth instead of in the round, you may of course adjust the pattern so you work the pieces separately and then assemble them at the end. Divide the stitches for the body in 2, add 1 edge stitch in each side (for sewing) and work the front and back pieces separately.

See DROPS lesson: Can I adapt a pattern for circular needles into straight needles?

Pattern repeats can vary slightly in the different sizes, in order to get the correct proportions. If you’re not working the exact same size as the garment in the photo, yours might deviate slightly. This has been carefully developed and adjusted so that the complete impression of the garment is the same in all sizes.

Make sure to follow instructions and diagrams for your size!

If you have found a pattern you like which is available in women’s size it’s not very difficult to convert it to men’s size. The biggest difference will be the length of sleeves and body. Start working on the women size that you think would fit across the chest. The additional length will be worked right before you cast off for the armhole/sleeve cap. If the pattern is worked top-down you can add the length right after the armhole or before the first decrease on sleeve.

Regarding additional yarn amount, this will depend on how much length you add, but it is better with a skein too many than too few.

All yarns will have excess fibres (from production) that might come off as lint or shedding. Brushed yarns (ie hairier yarns) have more of these loose, excess fibres, causing more shedding.

Shedding also depends on what is worn under or over the garment, and whether this pulls at the yarn fibres. It’s therefore not possible to guarantee that there will be no shedding

Below are some tips on how to get the best result when working with hairier yarns:

1. When the garment is finished (before you wash it) shake it vigorously so the looser hairs come off. NOTE: do NOT use a lint roller, brush or any method that pulls at the yarn.

2. Place the garment in a plastic bag and put it in your freezer - the temperature will cause the fibres to become less attached to each other, and excess fibres will come off easier.

3. Leave in the freezer for a few hours before taking it out and shaking it again.

4. Wash the garment according to the instructions on the yarn label.

Pilling is a natural process that happens to even the most exclusive of fibers. It's a natural sign of wear and tear that is hard to avoid, and that is most visible in high friction areas of your garment like a sweater's arms and cuffs.

You can make your garment look as new by removing the pilling, using a fabric comb or a pill/lint remover.

Still can't find the answer you need? Then scroll down and leave your question so one of our experts can try to help you. This will be done normally within 5 to 10 working days.
In the meantime, you can read the questions and answers that others have left to this pattern or join the DROPS Workshop on Facebook to get help from fellow knitters/crocheters!

You might also like...

Post a comment to pattern DROPS 103-15

We would love to hear what you have to say about this pattern!

If you want to leave a question, please make sure you select the correct category in the form below, to speed up the answering process. Required fields are marked *.

Comments / Questions (19)

country flag Geneviève G wrote:

Bonjour, Ce modèle se tricote-t-il avec 2 fils SVP, question se pose, ce fil se tricote normalement avec des aig 3,5 = 23 m et 32 rg, or ce modèle est tricoté en aig 5 pour l'échantillon = 17 m x 22 rangs = 10 x 10 cm en jersey? Merci d'avance pour votre réponse Joyeuses Fêtes à vous!

26.12.2021 - 15:37

DROPS Design answered:

Bonjour Geneviève, DROPS Angora-Tweed, qualite deja epuisee, normalement se tricote sur les aiguilles no 4 (echantillon 20 mailles x 26 rangs). Dans ce cas on utilise les aiguilles no 5 et l’echantillon est 17 mailles x 22 rangs (si les aiguilles sont plus grandes, il y a moins de mailles pour 10 cm). La veste est tricote avec 1 seul fil. Bon tricot!

28.12.2021 - 12:49

country flag Mary H wrote:

One more question! If the beret is not felted, is the yarn quantity correct? The pattern requires 100g for each size, but 100g=300m/318yd, which seems a bit much for an unfelted beret. It would make more sense if the beret were to be felted--which is another reason why I assumed it was felted. Could you please confirm the amount of yarn required for (both sizes of) the beret? Takk!

18.03.2020 - 02:16

DROPS Design answered:

Dear MaryH, you need 100 g DROPS Angora-Tweed, this meant 2 balls, you might not use the entire 318 y ds, but 159 yds (= 1 ball) won't be enough. Since Angora-Tweed is now discontinued, use our yarn converter to find any alternative. Happy knitting!

18.03.2020 - 08:47

country flag Mary H wrote:

I'd like to amend my previous question. I assumed that the beret was felted since that is how it appears in the photo, and because the original yarn was fellable. But perhaps I assumed wrong. IS the beret felted? If so, then please provide the circumference for both sizes, before & after felting. If it's not felted, please provide the finished circumference for both sizes! Thank you.

18.03.2020 - 02:02

DROPS Design answered:

Dear Mary H, as previously told, hat is not felted, with 17 sts = 10 cm the hat with 114-120 sts at the widest aprox. 67-70 cm and is matching an approx. 54/56 or 56/58 cm head circumference. Happy knitting!

18.03.2020 - 08:44

country flag MH wrote:

For the beret, you state that 4.5mm dpns are require for rib, & 5mm "or size needed for correct gauge", but not what 5mm are for. I assume for the rem. of the beret (in Stockinette st), but I see no mention of "change to 5mm dpns". Should this be before beg the St st, after placing 6 markers? And should Beret gauge be 17 st ... on 5mm in St st?
 Since the beret is felted, please provide circumf. before & after felting.

18.03.2020 - 01:23

DROPS Design answered:

Dear MH, you should change to larger needles after rib edge, pattern will be edited -yes, tension is worked with larger needles - this hat is not felted, you'll find sizes at the beg of the pattern. Happy knitting!

18.03.2020 - 08:42

country flag Dea wrote:

Buongiorno, mi servirebbe la traduzione di questo modello. Grazie.

05.12.2019 - 14:54

DROPS Design answered:

Buongiorno Dea. Tradurremo il modello nelle prossime settimane. Buon lavoro!

16.12.2019 - 15:18

country flag Winnie Hayden wrote:

I question this instruction for the beret: At the same time when the work measures 4 cm [1½’’] inc. 1 st each side of the all the MT on every other row a total of 5 times = 114-120 sts Shouldn't it be only one side of each MT, 5 times for a total increase of 30 stitches?

15.02.2014 - 18:26

DROPS Design answered:

Dear Mrs Hayden, you are correct, dec has to be done on left side of each marker - pattern has been corrected. Thank you. Happy knitting!

18.02.2014 - 17:50

country flag Els Molenaar wrote:

Hoe kom ik aandit breipatroon kan het niet downloaden

10.07.2007 - 09:11

Ragnhild wrote:

Kjempesøt!

09.07.2007 - 13:56

DROPS Design wrote:

Modellen kommer med, den är bara inte färdig ännu. Det är först i början på augusti som alla modeller är klara och ligger ute. Vi jobbar på - håll ut :-)

09.07.2007 - 12:24

Marie wrote:

Den här ville jag sticka men den kom ju inte med inte häller den i vårkollektionen som var lik denna utan ärmar båda stickades i Angora Tweed. Varför? Jag hoppas verkligen att de två kommer som extra mönster. KLAR MISS tycker jag.

07.07.2007 - 00:38