Blue Moon

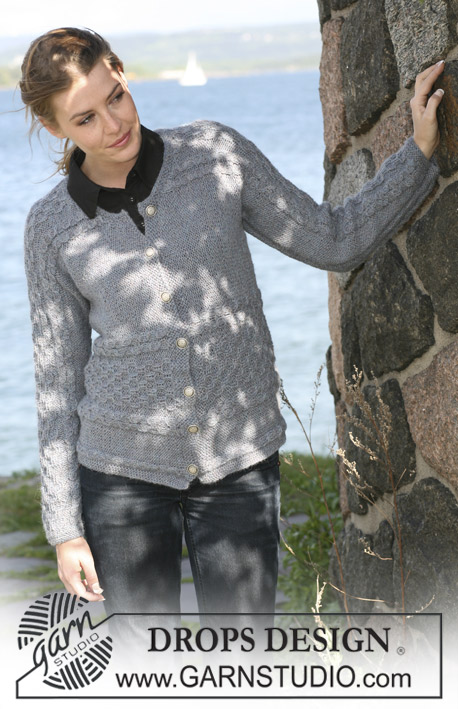
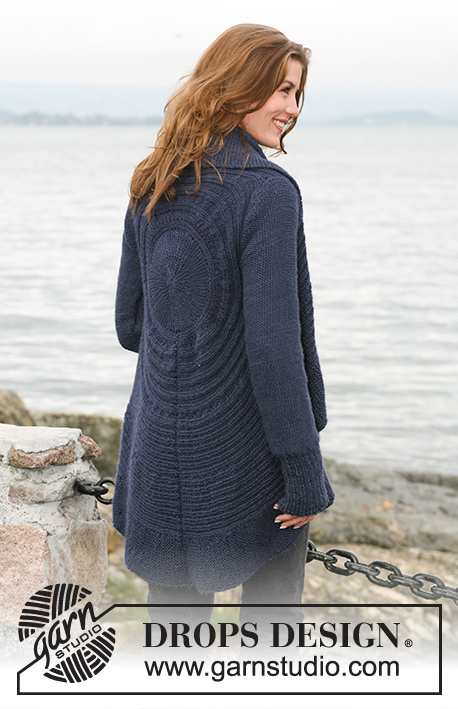
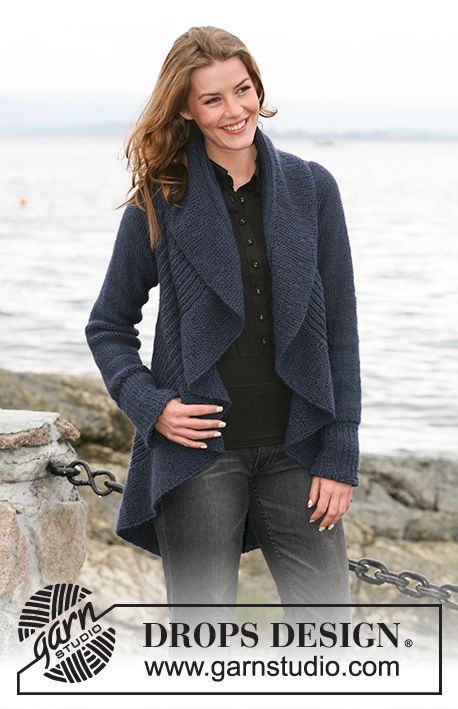
DROPS circular jacket in "SIlke-Alpaca" or ”Air” with texture pattern. Size: S to XXXL

DROPS 102-6
Size: S - M/L - XL /XXL - XXXL

Materials: DROPS Silke-Alpaca from Garnstudio
1200-1300-1450-1600 colour no 4305 grayblue

Or use:

DROPS Air from Garnstudio
600-650-700-750 g colour no 09, navy blue

DROPS circular needles size 4.5 mm [US 7] (80 cm [31½"]): 2 pcs – or the needle size needed to obtain correct knitting gauge
_____________________________________________________

-------------------------------------------------------

Alternative Yarn – See how to change yarns here
Yarn Groups A to F – Use the same pattern and change the yarn here
Yarn usage using an alternative yarn – Use our yarn converter here

-------------------------------------------------------

Pattern instructions

NOTE: This pattern is written in American English. All measurements in charts are in cm. For conversion from inches to cm - click here. There are different terms for crocheting in American and British English. If this pattern includes crochet, click for "crochet terms" here. For this pattern in British English, please click here.
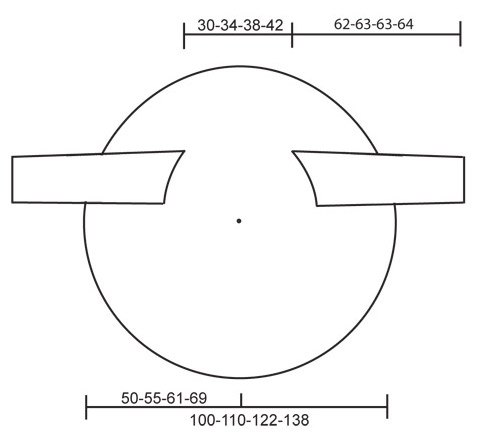
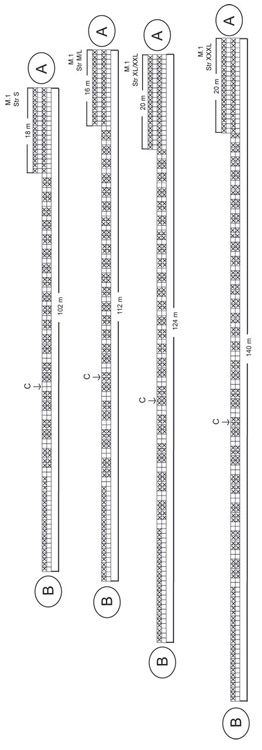
Knitting gauge: 17 sts x 22 rows stockinette sts = 10 x 10 cm [4" x 4"]

Pattern: See diagram M.1. Diagrams are seen from RS. NOTE: Each size has own diagram.

Short rows: Work short rows to ensure circular shape of piece, as follows:
1st / 2nd row: Knit 102-112-124-140 sts, turn piece and knit back.
3rd / 4th row: Knit back and forth over 18-16-20-20 first sts on row (these sts = outermost on circle) – read knitting tip 1 below.
Repeat 1st to 4th rows, but reduce stitch number by 2 sts on every 1st/2nd row before turning piece – repeat this 10-10-12-12 times in total, then reduce sts number knitted by 4 sts before piece is turned – repeat this 6-9-8-12 times in total and
from this point reduce sts number by 8 sts before piece is turned – repeat 5-5-6-6 times in total.
Remaining are 18-16-20-20 outermost sts of circle.
Start again from beginning over all sts.
– read Knitting tip 2 below.

Knitting tip 1: When turning piece slip the first st as if to knit and tighten yarn before continuing knitting. This is done to avoid holes when turning. This does not applies to innermost 20-20-24-24 sts of circle – when piece is turned knit all sts as normal.

Knitting tip 2: On row where all sts are knit, P 20-20-24-24 innermost sts in circle (seen from RS). Then continue as before with chart M.1.

Measuring tip: All measurements on circle are done with piece lying flat. Do not measure across! Measurements follow curve to 63rd - 69th -73rd - 81st sts.

CIRCLE
Knit piece back and forth on needle to make room for all sts. Cast on 102-112-124-140 sts on circular needle size 4.5 mm [US 7] with Air. Insert 1 marking thread or stitch marker after 63-69-73-81 sts, make all measurements from this point. Knit chart M.1 (see diagram for your size) from right to left (i.e. from outside towards inside on circle)1st row = RS. At the same time as chart M.1 knit Short rows – see explanation above – to make circular shape. When piece measures 37-40-49-57 cm [14½"-15¾"-19¼"-22½"] from marking thread or stitch marker – read measuring tip – knit armholes.

Armhole: Slip outermost 63-69-73-81 sts onto an extra needle size 4.5 mm [US 7] (circular needle to make room for all sts). Continuing, bind off next 2 sts (= armhole). Insert 1 marking thread or stitch marker between 2 bound off sts. Leave remaining sts on needle. Continuing, knit 2 parts (sts before and after armhole) separately, but knit them at the same time on separate needles with separate balls of yarn. This is done so the short rows are correct on both sides of armhole. Continue with pattern and short rows as earlier. When armhole measures 18-21-23-25 cm [7"-8¼"-9"-9¾"] cast on 2 new sts over armhole(i.e. between the 2 parts). Continuing, slip all sts onto one needle again = 102-112-124-140 sts. Insert 1 marking thread or stitch marker after 63-69-73-81 sts. Continuing, measure piece from this point.
Now knit chart M.1 and short rows on all sts. Continue like this until piece measures approx 15-17-19-21 cm [6"-6 ¾"-7½"-8 ¼"], this should be a ½ circle. Continue until piece measures approx 30-34-38-42 cm [11 ¾"-13⅜"-15"-16½"] from marking thread – read measuring tip. Now make armholes in same way. When all sts are back on one needle again insert 1 marking thread or stitch marker after 63-69-73-81 sts. Continue measuring from here. Continue with chart M.1 and short rows until piece measures approx 37-40-49-57 cm [14½"-15 ¾"-19 ¼"-22½"] from marking thread or stitch markers (adjust to 1 whole pattern repeat with short rows). Bind off loosely.

Sleeve: Knit piece back and forth on circular needles. Cast on 56-59-65-68 sts (incl 1 front edge sts on each side) on needles size 4.5 mm [US 7] with Air. P1 row from WS. Continue with Rib K2/P1 and 1 edge sts on each side. When Rib measures 13-13-14-14 cm [5⅛"-5⅛"-5½"-5½"] K 1 row from WS at the same time dec 10-11-13-14 sts evenly = 46-48-52-54 sts. Continue in stockinette sts with WS out until complete measurement. When piece measures 16 cm [6¼"] inc 1 sts on each side on every 9 -4.5 -3.5 -3 cm [3½"-1 ¾"-1 ¼"-1⅛"] 5-9-11-13 times in total = 56-66-74-80 sts. When piece measures 56 cm [22"] bind off top shape sleeve top on each side on every other row: 4 sts 1-2-2-2 times. Continuing, bind off 2 sts on each side until piece measures approx 61-62-62-63 cm [24"-24⅜"-24⅜"-24 ¾"]. Then bind off 4 sts 1 time on each side. Piece measures approx 62-63-63-64 cm [24⅜"-24 ¾"-24 ¾"-25 ¼"]. Bind off remaining sts.

Assembly: Sew circle tog in outermost edge of cast on sts and bind off edge. Sew in sleeves so seams under sleeve meet at middle of marking thread or stitch marker placed at bottom of armhole and middle of sleeve top meet marking thread or stitch marker placed on top of armhole. Sew sleeve seams.

Diagram

All measurements in charts are in cm.

symbols = K from RS, P from WS
symbols = P from RS, K from WS
symbols = outermost on circle
symbols = innermost of circle
symbols = marking thread is placed here
diagram
diagram
Do you have a question? See a list of frequently asked questions (FAQ)

Knitting tension is what determines the final measurements of your work, and is usually measured per 10 x 10 cm. It is provided like so: number of stitches in width x number of rows in height - eg: 19 stitches x 26 rows = 10 x 10 cm.

The knitting tension is very individual; some people knit/crochet loosely while others work tightly. You adjust the knitting tension with the needle size, which is why the suggested needle size only serve as a guide! You need to adjust this (up or down) to ensure that YOUR knitting tension matches the knitting tension provided in the pattern. If you work with a different knitting tension than provided you will have a different yarn consumption, and your work will have different measurements than what the pattern suggests.

The knitting tension also determines which yarns can replace each other. As long as you achieve the same knitting tension you can replace one yarn with another.

See DROPS lesson: How to measure your tension/gauge

See DROPS video: How to make a gauge tension swatch

The required amount of yarn is provided in grams, eg: 450 g. To calculate how many balls you’ll need you first need to know how many grams are in 1 ball (25g, 50g or 100g). This information is available if you click on the individual yarn quality on our pages. Divide the amount required with the amount of each ball. For example, if each ball is 50g (the most common amount), the calculation will be as follows: 450 / 50 = 9 balls.

The important thing when changing from one yarn to another is that the knitting/crochet tension remains the same. This is so that the measurements of the finished piece will be the same as on the sketch provided. It is easier to achieve the same knitting tension using yarns from the same yarn group. It is also possible to work with multiple strands of a thinner yarn to achieve the knitting tension of a thicker one. Please try our yarn converter. We recommend you to always work a test swatch.

Please NOTE: when changing yarn the garment might have a different look and feel to the garment in the photo, due to individual properties and qualities of each yarn.

See DROPS lesson: Can I use a different yarn than the one mentioned in the pattern?

All our yarns are categorised into yarn groups (from A to F) according to thickness and knitting tension – group A contains the thinnest yarns and group F the thickest. This makes it easier for you to find alternative yarns to our patterns, should you wish to switch yarn. All yarns within the same group have a similar knitting tension and can easily replace each other. However, different yarn qualities have different structures and properties which will give the finished work a unique look and feel.

Click here for an overview of the yarns in each yarn group

At the top of all our patterns you’ll find a link to our yarn converter, which is a helpful tool should you wish to use a different yarn than suggested. By filling in the yarn quality you wish to replace, the amount (in your size) and number of strands, the converter will present good alternative yarns with the same knitting tension. Additionally it will tell you how much you’ll require in the new qualities and whether you’ll need to work with multiple strands. Most skeins are 50g (some are 25g or 100g).

If the pattern is worked with multiple colours, every colour will have to be converted separately. Similarly, if the pattern is worked with several strands of different yarns (for example 1 strand Alpaca and 1 strand Kid-Silk) you will have to find alternatives for each, individually.

Click here to see our yarn converter

Since different yarns have different qualities and textures we have chosen to keep the original yarn in our patterns. However, you can easily find options among our available qualities by using our yarn converter, or simply pick a yarn from the same yarn group.

It is possible that some retailers still have discontinued yarns in stock, or that someone has a few skeins at home that they would like to find patterns for.

The yarn converter will provide both alternative yarn as well as required amount in the new quality.

If you think it's hard to decide what size to make, it can be a good idea to measure a garment you own already and like the size of. Then you can pick the size by comparing those measures with the ones available in the pattern's size chart.

You'll find the size chart at the bottom of the pattern.

See DROPS lesson: How to read size chart

The needle size provided in the pattern serves only as a guide, the important thing is to follow the knitting tension. And since knitting tension is very individual, you will have to adjust the needle size to ensure that YOUR tension is the same as in the pattern – maybe you’ll have to adjust 1, or even 2 needle sizes, up or down to achieve the correct tension. For this, we recommend that you work test swatches.

Should you work with a different knitting tension than the one provided, the measurements of the finished garment might deviate from the measurement sketch.

See DROPS lesson: How to measure your tension/gauge

See DROPS video: How to make a gauge tension swatch

Working a garment top-down provides more flexibility and room for personal adjustment. For example it is easier to try the garment on while working, as well as making adjustments to length of yoke and shoulder caps.

The instructions are carefully explaining every step, in the correct order. Diagrams are adjusted to the knitting direction and are worked as usual.

The diagram depicts all rows/rounds, and every stitch seen from the right side. It is read from bottom to top, from right to left. 1 square = 1 stitch.

When working back and forth, every other row is worked from the right side and every other row is worked from the wrong side. When working from the wrong side, the diagram will have to be worked reversed: from left to right, knit stitches are purled, purl stitches are knit etc.

When working in the round every round is worked from the right side and the diagram are worked from right to left on all rounds.

See DROPS lesson: How to read knitting diagrams

The diagram depicts all rows/rounds, and every stitch seen from the right side. It is worked from bottom to top, from right to left.

When working back and forth every other row is worked from the right side: from right to left and every other row is worked from the wrong side: from left to right.

When working in the round, every row in the diagram are worked from the right side, from right to left.

When working a circular diagram you start in the middle and work your way outwards, counter clockwise, row by row.

The rows usually start with a given number of chain stitches (equivalent to the height of the following stitch), this will either be depicted in the diagram or explained in the pattern.

See DROPS lesson: How to read crochet diagrams

Instructions for working several diagrams after each other on the same row/round, will often be written like so: “work A.1, A.2, A.3 a total of 0-0-2-3-4 times". This means you work A.1 once, then A.2 is worked once, and A.3 is repeated (in width) the number of times provided for your size – in this case like so: S = 0 times, M = 0 times, L=2 times, XL= 3 times and XXL = 4 times.

The diagrams are worked as usual: begin with the first row in A.1, then work the first row in A.2 etc.

See DROPS lesson: How to read knitting diagrams

See DROPS lesson: How to read crochet diagrams

The total width of the garment (from wrist-to-wrist) will be larger in the larger sizes, despite the actual sleeves being shorter. The larger sizes have longer sleeve caps and wider shoulders, so there will be a good fit in all sizes.

The measurement sketch/schematic drawing provides information regarding the full length of the garment. If it’s a jumper or a jacket the length is measured from the highest point on the shoulder (usually closest to the neckline), and straight down to the bottom of the garment. It is NOT measured from the tip of shoulder. Similarly, the length of yoke is measured from the highest point on the shoulder and down to where yoke is split into body and sleeves.

See DROPS lesson: How to read a schematic drawing

Diagrams are often repeated on the round or in height. 1 repeat is the diagram the way it appears in the pattern. If it says to work 5 repeats of A.1 in the round, then you work A.1 a total of 5 times after/next to each other in the round. If it says to work 2 repeats of A.1 vertically/in height you work the entire diagram once, then begin again at the start and work the entire diagram one more time.

Chain stitches are slightly narrower than other stitches and to avoid working the cast-on edge too tight, we simply chain more stitches to begin with. The stitch count will be adjusted on the following row to fit the pattern and measurement sketch.

The rib edge is more elastic and will contract slightly compared to, for example, stocking stitch. By increasing before the rib edge, you avoid a visible difference in width between the rib edge and the rest of the body.

It’s very easy to cast off too tightly, and by making yarn overs while casting off (and simultaneously casting these off) you avoid a too tight cast off edge.

See DROPS video: How to bind off with yarn overs (yo)

To achieve an even increase (or decrease) you can increase on, for example: every 3rd and 4th row alternately, like so: work 2 rows and increase on the 3rd row, work 3 rows and increase on the 4th. Repeat this until the increase is complete.

See DROPS lesson: Increase or decrease 1 st on every 3rd and 4th row alternately

Should you prefer to work in the round instead of back and forth, you may of course adjust the pattern. You’ll need to add steeks mid-front (usually 5 stitches), and follow the instructions. When you would normally turn and work from the wrong side, simply work across the steek and continue in the round. At the end you’ll cut the piece open, pick up stitches to work bands, and cover the cut edges.

See DROPS video: How to knit steeks and cut open

Should you prefer to work back and forth instead of in the round, you may of course adjust the pattern so you work the pieces separately and then assemble them at the end. Divide the stitches for the body in 2, add 1 edge stitch in each side (for sewing) and work the front and back pieces separately.

See DROPS lesson: Can I adapt a pattern for circular needles into straight needles?

Pattern repeats can vary slightly in the different sizes, in order to get the correct proportions. If you’re not working the exact same size as the garment in the photo, yours might deviate slightly. This has been carefully developed and adjusted so that the complete impression of the garment is the same in all sizes.

Make sure to follow instructions and diagrams for your size!

If you have found a pattern you like which is available in women’s size it’s not very difficult to convert it to men’s size. The biggest difference will be the length of sleeves and body. Start working on the women size that you think would fit across the chest. The additional length will be worked right before you cast off for the armhole/sleeve cap. If the pattern is worked top-down you can add the length right after the armhole or before the first decrease on sleeve.

Regarding additional yarn amount, this will depend on how much length you add, but it is better with a skein too many than too few.

All yarns will have excess fibres (from production) that might come off as lint or shedding. Brushed yarns (ie hairier yarns) have more of these loose, excess fibres, causing more shedding.

Shedding also depends on what is worn under or over the garment, and whether this pulls at the yarn fibres. It’s therefore not possible to guarantee that there will be no shedding

Below are some tips on how to get the best result when working with hairier yarns:

1. When the garment is finished (before you wash it) shake it vigorously so the looser hairs come off. NOTE: do NOT use a lint roller, brush or any method that pulls at the yarn.

2. Place the garment in a plastic bag and put it in your freezer - the temperature will cause the fibres to become less attached to each other, and excess fibres will come off easier.

3. Leave in the freezer for a few hours before taking it out and shaking it again.

4. Wash the garment according to the instructions on the yarn label.

Pilling is a natural process that happens to even the most exclusive of fibers. It's a natural sign of wear and tear that is hard to avoid, and that is most visible in high friction areas of your garment like a sweater's arms and cuffs.

You can make your garment look as new by removing the pilling, using a fabric comb or a pill/lint remover.

Still can't find the answer you need? Then scroll down and leave your question so one of our experts can try to help you. This will be done normally within 5 to 10 working days.
In the meantime, you can read the questions and answers that others have left to this pattern or join the DROPS Workshop on Facebook to get help from fellow knitters/crocheters!

You might also like...

Post a comment to pattern DROPS 102-6

We would love to hear what you have to say about this pattern!

If you want to leave a question, please make sure you select the correct category in the form below, to speed up the answering process. Required fields are marked *.

Comments / Questions (236)

Mel wrote:

Think I must be thick. I do not understand how the pattern works ie how can the chart be knitted on the same short rows, or are 248 stitches cast on? the pattern is not clear to me.

31.05.2017 - 09:06

DROPS Design answered:

Dear Mel, you are working back and forth on 102-112-124-140 sts (see size) with short rows so that the beg of rows from RS will be the outside of circle and the end of rows from RS (where you will work less rows) will be the inner side, ie the center of circle. When working armholes, you will work the outermost sts and the inner sts separately but at the same time, ie with 2 balls to make sure short rows will continue. Then you will sew the cast off sts to the cast on sts to get the whole circle. Happy knitting!

31.05.2017 - 10:13

country flag Angelika wrote:

Ich möchte dieses schöne Modell sehr gerne nachstricken, bin aber beim Garn etwas unentschlossen. Ich hatte mal an Brushed Alpaca Silk gedacht, befürchte aber, dass damit das Muster auf dem Rücken nicht richtig zur Geltung kommt. Welches Garn würden sie empfehlen?

03.05.2017 - 14:46

DROPS Design answered:

Liebe Angelika, vielleicht liber aus Air stricken, wie vorgeschlagen - siehe unter Tab "Material". Viel Spaß beim stricken!

03.05.2017 - 16:38

country flag Nora Daly wrote:

Bonjour, je suis en train de réaliser le modèle 102-6 en taille xl, j'arrive à la fin de la première emmanchure et je ne sais pas trop comment mesurer les 23 cm à partir du marqueur, dois-je mesurer la partie droite (extérieur) ou la partie gauche ?? En suivant la courbe ou tout droit. Merci d'avance pour vos réponses. Bonne fin de journée.

01.02.2017 - 16:04

DROPS Design answered:

Bonjour Mme Daly, vous devez mesurer depuis le début de l'emmanchure, en suivant la courbe. Vous devez avoir 23 cm sur chacune des 2 parties, avant l'emmanchure (extérieur de la veste) et après l'emmanchure (côté intérieur du cercle). Bon tricot!

02.02.2017 - 09:56

country flag Daly wrote:

Bonjour, je suis en train de réaliser le modèle 102-6 en taille xl, j'arrive à la fin de la première emmanchure et je ne sais pas trop comment mesurer les 23 cm à partir du marqueur, dois-je mesurer la partie droite (extérieur) ou la partie gauche ?? En suivant la courbe ou tout droit. Merci d'avance pour vos réponses. Bonne fin de journée.

01.02.2017 - 15:55

country flag Esther Bo wrote:

Op foto zijn geen naden te zien. Maar als ik afgekant heb terug tot de 16 steken, moet ik er toch weer bijopzetten en heb ik dan dus een naad of doe ik iets fout? Voor armsgat, via omtrek of via midden (zeg vanaf de markeerder) meten?

02.09.2016 - 11:52

DROPS Design answered:

Hoi Esther. Er is een naad in het werk - ook zichtbaar op de foto (zie onderkant van het achterpand). Maar je moet niet afkanten, je breit verkorte toeren, dus elke keer minder st - ze blijven op de nld staan. Zie ook onderstaande video. Je meet vanaf de markeerder zoals er ook staat in het patroon.

02.09.2016 - 14:19

country flag Louriou wrote:

J'ai pu avec votre aide terminer l'ouvrage (merci) Il me reste à l'assembler et je me demande comment cacher le centre du cercle du dos (4cm). Dois-je le coudre comme la couture du bas du dos ou passer un fil pour le serrer ? Cordialement

17.06.2016 - 13:38

DROPS Design answered:

Bonjour Mme Louriou, passez un fil dans les mailles côté intérieur du cercle (au centre) et resserrez - cf vidéo ci-dessous. Bonnes finitions!

17.06.2016 - 15:41

country flag Latêtue wrote:

J'ai tricoté avec plaisir, j'ai bien un cercle, mais la distance entre le haut des 2 manches est de 19 cm (XL/XXL) alors que d'après le croquis elle devrait être de 38 cm. Les explications du dernier paragraphe avant "MANCHES" disent 19 cm de hauteur du marqueur, faire la( 2°) emmanchure de la même façon. Me suis-je trompée quelque part, ou est-ce une erreur de croquis ou d'explications ? L'échantillon 17x22rgs aig. 4.5, est-ce en point fantaisie ou jersey ?Merci 1000 fois de votre aide

11.05.2016 - 14:39

DROPS Design answered:

Bonjour Latêtue, une phrase manquait dans les explications - à 19 cm, on doit avoir un demi-cercle, mais la 2ème emmanchure se fera à 38 cm (taille XL/XXL). La correction a été faite. Merci. Bon tricot!

11.05.2016 - 16:01

country flag Louriou wrote:

Merci encore. La mesure serait donc la courbe du fil de repère du marqueur ?

10.03.2016 - 15:20

DROPS Design answered:

Tout à fait, bon tricot!

10.03.2016 - 16:31

country flag Louriou wrote:

Désolée, encore moi ...Si j'ai bien compris, la mesure se fait sur la courbe depuis la 73°maille de l'aiguille (marqueur repéré depuis le montage des mailles) jusqu'à l'extérieur du cercle, au niveau des mailles de l'aiguille. Est-ce correct ? Merci de votre patience

10.03.2016 - 10:06

DROPS Design answered:

Bonjour Mme Louriou, pas tout à fait, vous devez mesurer à partir du rang de montage en suivant la courbe le long du marqueur placé dans la 73ème m. Comme vous faites des rangs raccourcis, si vous mesurez à la verticale du rang de montage au marqueur sur l'aiguille vous n'aurez pas la bonne mesure, mesurez à partir du début et suivez bien la courbe de votre marqueur (idéalement un fil - voir vidéo). Bon tricot!

10.03.2016 - 10:47

country flag Louriou wrote:

Bonjour et merci pour votre réponse. je crois comprendre que les mesures se prennent depuis le marqueur, à la verticale jusqu'à la courbe de l'aiguille où se trouvent les mailles, ceci à plat, avec rang de montage des mailles posé à l'horizontal. Est-ce correct ? 1000 excuses pour ces questions, je suis bloquée et voudrais éviter d'avoir à tout recommencer. 1000 merci pour votre aide

09.03.2016 - 10:27

DROPS Design answered:

Bonjour Mme Louriou, les mesures se prennent bien à plat, mais en suivant la courbe du marqueur, pas directement à la verticale mais bien en suivant l'arrondi. Bon tricot!

09.03.2016 - 10:47