
Popular categories
Looking for a yarn?


|
|
Silver Haze |
|
 |
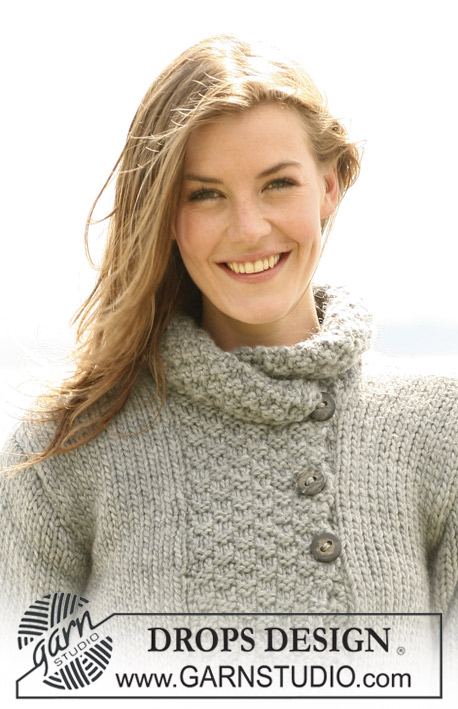 |
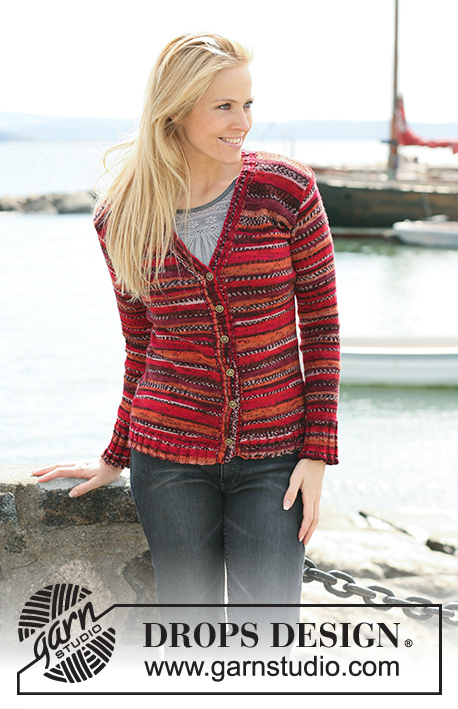
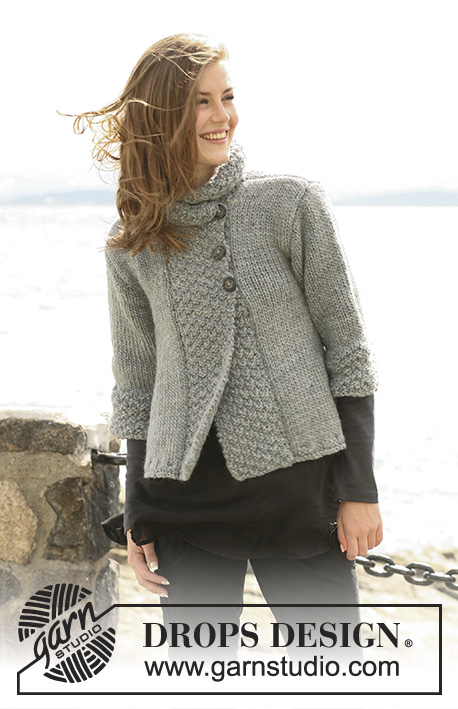
DROPS jacket in ”Snow”, "Andes" or ”Nepal” with A-shape and ¾-long or long sleeves. Size S to XXXL
DROPS 103-1 |
|
|
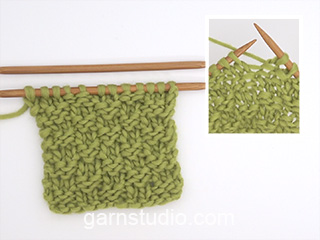
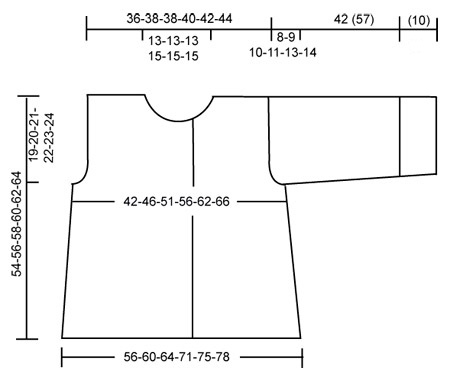
General comment: The double moss sts at the front will pull a little when knitting, but will stretch out when the garment is finish. Knitting tension: 11 sts x 15 rows in stocking sts = 10 x 10 cm. Double moss sts: 1st row: * P2, K2 *, repeat from *-*. 2nd row: P over P and K over K. 3rd row: * K2, P2 *, repeat from *-* 4th row: K over K and P over P. Repeat row 1-4. Rib: * K2, P2 *, repeat from *-*. Garter sts: Knit back and forth on all rows. Button hole: Cast off for button hole at the right front piece. 1 button hole = Cast of the 4th st from the edge, on the returning row cast on a new st at the same place. Cast off for button hole when the piece measures: Size S: 33, 40 and 47 cm. Size M: 35, 42 and 49 cm. Size L: 37, 44 and 51 cm. Size XL: 38, 45 and 52 cm. Size XXL: 38, 46 and 54 cm. Size XXXL: 38, 47 and 56 cm. Back piece: Knit back and forth! Cast on 64-68-72-80-84-88 sts (incl. 1 edge st each side) on needle size 8 mm with Snow. Knit 2 rows of garter sts, and then 2 rows of Rib with 1 edge st and 2 K sts each side (seen from the RS)– see explanation above. Continue in stocking sts. Remember the knitting tension! When the piece measures 5 cm cast off 1 st each side on every 3½-3½-4½-4-5-5 cm a total of 8-8-7-8-7-7 times = 48-52-58-64-70-74 sts. When the piece measures 35-36-37-38-39-40 cm cast off for armholes each side on every other row: 3 sts 1 time, 2 sts 0-0-1-2-3-3 times and 1 st 1-2-3-3-3-4 times = 40-42-42-44-46-48 sts left. When the piece measures 51-53-55-57-59-61 cm cast off the mid 12-12-12-14-14-14 sts for the neck. On the next row cast off 1 more st towards the neck = 13-14-14-14-15-16 sts left for each shoulder. Cast off when the piece measures 54-56-58-60-62-64 cm. Left front piece: Cast on 39-41-43-49-51-53 sts (incl. 1 edge st at the side) on needle size 8 mm with Snow. Knit 2 rows of garter sts and then 2 rows of Rib with 1 edge st and 2 P sts at the side (seen from the RS). Continue in stocking sts and 14-14-14-16-16-16 sts at the mid front in Double moss sts – see explanation above! When the piece measures 5 cm cast off at the side as done for the back piece = 31-33-36-41-44-46 sts. When the piece measures 35-36-37-38-39-40 cm cast off for the armhole at the side as done for the back piece = 27-28-28-31-32-33 sts. When the piece measures 49-51-53-54-56-58 cm cast off 10 sts at the mid front for the neck. Insert 1 MT (marking thread) after the cast off sts. Then cast off for the neck on every other row: 2 sts 2-2-2-3-3-3 times and 1 st 0-0-0-1-1-1 times = 13-14-14-14-15-16 sts left for the shoulder. Cast off remaining sts when the piece measures 54-56-58-60-62-64 cm. Right front piece: Cast on and knit as left front but reverse. In addition remember to cast off for the buttonholes at the front edge – see explanation above. Sleeve: The numbers before ( )apply for the ¾-long sleeves and the numbers in the ( ) applies for the long sleeves. Cast on 34-34-34-38-38-38 sts (incl. 1 edge st each side) on needle size 8 mm with Snow. Knit in double moss sts – see explanation above – with 1 edge st each side. When the piece measures 10 cm continue in stocking sts. At the same time when the piece measures 11 (25) cm inc. 1 st each side on every 9-6-4½-6-4-2½ cm a total off 3-4-5-4-5-7 times = 40-42-44-46-48-52 sts. When the piece measures 34-33-32-31-29-28 (49-48-47-46-44-43) cm cast off for the sleeve cap each side on every other row: 3 sts 1 time, 2 sts 1 time and 1 sts 2-3-4-4-6-7 times, continue to cast off 2 sts each side until the piece measures 40 (55) cm, then cast off 3 sts each side 1 time and cast off remaining sts. The piece measures approx. 42 (57) cm. Assembly: Sew the shoulder seams Collar: Pick up approx. 24 to 28 sts in between the MT at the neck line (i.e do not pick up sts in the outer most 10 sts each side at the mid front). Knit 2 rows of garter sts – on the last row inc. 10 sts evenly distributed = 34-38 sts. Continue in Double moss sts with 1 garter sts each side. At the same time inc. 2 sts each side as follows: To inc. knit 2 sts in the outer most st, then make a yo which should be twisted on the returning row –incorporate new sts into pattern as going along. Inc 2 sts at the beg. of row a total of 6 times each side = 24 extra sts = a total of 58-62 sts. Cast off when the collar measures 12 cm mid back. Sew the collar tight to the front pieces each side in the outer part of the edge, i.e. new sts are sewn to the 10 cast off sts each side. Sew the arm and the side seams inside 1 edge st. Sew on the buttons. _________________________________________________________________ NEPAL Size: S – M – L – XL – XXL - XXXL Materials: DROPS NEPAL from Garnstudio ¾-long sleeves: 600-650-750-800-900-1000 g, clr. 517, medium grey Long sleeves: 700-750-800-900-1000-1050 g, clr. 517, medium grey. DROPS pointed needles size 4.5 mm – or the size needed to obtain the correct knitting tension. DROPS Buffalohorn buttons no. 536: 3 pcs. Knitting tension: 17 sts x 22 rows in stocking sts = 10 x 10 cm Double moss sts: 1st row: * P2, K2 *, repeat from *-*. 2nd row: P over P and K over K. 3rd row: * K2, P2 *, repeat from *-* 4th row: K over K and P over P. Repeat row 1-4. Rib: * K2, P2 *, repeat from *-*. Garter sts: Knit back and forth on all rows. Button hole: Cast off for button hole at the right front piece. 1 button hole = Cast of the 5th and 6th stt from the edge on the returning row cast on 2 new sts at the same place. Cast off for button hole when the piece measures: Size S: 33, 40 and 47 cm. Size M: 35, 42 and 49 cm. Size L: 37, 44 and 51 cm. Size XL: 38, 45 and 52 cm. Size XXL: 38, 46 and 54 cm. Size XXXL: 38, 47 and 56 cm. Back piece: Knit back and forth! Cast on 96-104-112-124-132-136 sts (incl. 1 edge st each side) on needle size 4.5 mm with Nepal. Knit 2 rows of garter sts, and then 2 rows of Rib with 1 edge st and 2 K sts each side (seen from the RS)– see explanation above. Continue in stocking sts. Remember the knitting tension! When the piece measures 5 cm cast off 1 st each side on every 2½-2½-2½-2½-2½-3 cm a total of 11-12-12-13-12-11 times = 74-80-88-98-108-114 sts. When the piece measures 35-36-37-38-39-40 cm cast off for armholes each side on every other row: 3 sts 1-1-1-2-2-2 times, 2 sts 0-1-2-3-4-5 times and 1 st 3-3-4-3-4-4 times = 62-64-66-68-72-74 sts left. When the piece measures 51-53-55-57-59-61 cm cast off the mid 20-20-20-24-24-24 sts for the neck. On the next row cast off 1 more st towards the neck = 20-21-22-21-23-24 sts left for each shoulder. Cast off when the piece measures 54-56-58-60-62-64 cm. Left front piece: Cast on 59-63-67-75-79-81 sts (incl. 1 edge st at the side) on needle size 4.5 mm with Nepal. Knit 2 rows of garter sts and then 2 rows of Rib with 1 edge st and 2 P sts at the side (seen from the RS). Continue in stocking sts and 22-22-22-26-26-26 sts at the mid front in Double moss sts – see explanation above! When the piece measures 5 cm cast off at the side as done for the back piece = 48-51-55-62-67-70 sts. When the piece measures 35-36-37-38-39-40 cm cast off for the armhole at the side as done for the back piece = 42-43-44-47-49-50 sts. When the piece measures 49-51-53-54-56-58 cm cast off 16 sts at the mid front for the neck. Insert 1 MT (marking thread) after the cast off sts. Then cast off for the neck on every other row: 2 sts 2-2-2-4-4-4 times and 1 st 2 times = 20-21-22-21-23-24 sts left for the shoulder. Cast off remaining sts when the piece measures 54-56-58-60-62-64 cm. Right front piece: Cast on and knit as left front but reverse. In addition remember to cast off for the buttonholes at the front edge – see explanation above. Sleeve: The numbers before ( )apply for the ¾-long sleeves and the numbers in the ( ) applies for the long sleeves. Cast on 50-50-54-54-58-58 sts (incl. 1 edge st each side) on needle size 4.5 mm with Nepal. Knit in double moss sts– see explanation above – with 1 edge st each side. When the piece measures 10 cm continue in stocking sts. At the same time when the piece measures 11 (25) cm inc. 1 st each side on every 5-3-3-2-2-1½ cm a total of 5-7-7-9-9-11 times 60-64-68-72-76-80 sts. When the piece measures 34-33-32-31-29-28 (49-48-47-46-44-43) cm cast off for the sleeve cap each side on every other row: 3 sts 1 time, 2 sts 3 time and 1 sts 1-2-3-4-6-7 times, continue to cast off 2 sts each side until the piece measures 41 (56) cm, then cast off 3 sts each side 1 time and cast off remaining sts. The piece measures approx. 42 (57) cm. Assembly: Sew the shoulder seams. Collar: Pick up approx. 36 to 42 sts in between the MT at the neck line (i.e do not pick up sts in the outer most 16 sts each side at the mid front). Knit 2 rows of garter sts – on the last row inc. 12 sts evenly distributed = 48-54 sts. Continue in Double moss sts with 1 garter sts each side. At the same time inc. 2 sts each side as follows: To inc. knit 2 sts in the outer most st, then make a yo which should be twisted on the returning row –incorporate new sts into pattern as going along. Inc 2 sts at the beg. of row a total of 9 times each side = 36 extra sts = a total of 84-90 sts. Cast off when the collar measures 12 cm mid back. Sew the collar tight to the front pieces each side in the outer part of the edge, i.e. new sts are sewn to the 16 cast off sts each side. Sew the arm and the side seams inside 1 edge st. Sew on the buttons. |
|
|
|
|
Have you made this or any other of our designs? Tag your pictures in social media with #dropsdesign so we can see them! Do you need help with this pattern?You'll find tutorial videos, a Comments/Questions area and more by visiting the pattern on garnstudio.com. © 1982-2024 DROPS Design A/S. We reserve all rights. This document, including all its sub-sections, has copyrights. Read more about what you can do with our patterns at the bottom of each pattern on our site. |
|


With over 40 years in knitting and crochet design, DROPS Design offers one of the most extensive collections of free patterns on the internet - translated to 17 languages. As of today we count 304 catalogues and 11422 patterns - 11422 of which are translated into English (UK/cm).
We work hard to bring you the best knitting and crochet have to offer, inspiration and advice as well as great quality yarns at incredible prices! Would you like to use our patterns for other than personal use? You can read what you are allowed to do in the Copyright text at the bottom of all our patterns. Happy crafting!
Comments / Questions (275)
Buonasera, posso avere una spiegazione più chiara del collettò. Grazie
09.01.2021 - 20:39DROPS Design answered:
Buonasera Anna, quale parte del colletto non le è chiara? Deve iniziare riprendendo circa 24-28 m tra i segnapunti sulla scollatura e lavorando 2 ferri a legaccio e sull'ultimo ferro aumentare 10 maglie. Poi continuare a grana di riso doppia con 1 maglia a maglia legaccio a ogni lato. Deve seguire gli aumenti come indicato. Buon lavoro!
10.01.2021 - 19:24Buongiorno, come devo lavorare le maglie di vivagno? Grazie per l' aiuto.
23.12.2020 - 07:29DROPS Design answered:
In questo modello non è indicato come lavorare le maglie di vivagno. Può usare la tecnica che preferisce. Buon lavoro!
23.12.2020 - 09:10I’ve checked my gage twice. US #11s with Alafoss Lopi, a Group D bulky yarn, comes out 4”. But it’s way too loose for a coherent sweater. Casting on 84 sts for the back at 2.75 sts/in means the back is 30 inches wide for size XL (44 inch bust). WAY too big. What am I missing?
05.12.2020 - 00:10DROPS Design answered:
Dear Alice, when you use a yarn not indicated in the pattern you need to make a gauge swatch and either try to obtain the same gauge as in the pattern, to ensure you can use the calculations in the instructions, or, if the gauge is different, recalculate the number of stitches in each step, taking into account your gauge. Also, you need to take into account that the model is quite wide in itself, so take a look at the measurements in the chart to guide you. Happy knitting!
06.12.2020 - 16:54Hi thanks for getting back to me with the number of stitches for collar I did a few extra but it looks ok so now I am confused with the increase of 2 stitches at beginning of row it says work 1 garter then two moss and yarn over ? Do you put yarn over twice ?? To make two stitches and hoe do I stop the pattern from bring out in the moss stitch just not sure how and sent yo increase as it says increase two stitches could you please help so sorry to not understand jo x
02.07.2020 - 16:50DROPS Design answered:
Dear Mrs Kramer, you increase at the beg and end of row by working the first/last stitch (= edge stitch) in the front and back loop + make a yarn over inside the edge stitch, ie at the beg of row work the edge stitch twice, make a YO, work in pattern to the end of row, turn and repeat on the other side (so that you increase on each side at the beg of every row) and work the new stitches in pattern (double moss stitch). Hope this will help. Happy knitting!
02.07.2020 - 17:25Hi can you please help me i have finished the garment and i am about to start the collar and i am so confused as it state to pick up 42 stiches between the front markers and to not include the 16 stiches on each front section but the gap between the markers is way more than 42 stiches the back neck part is 24 stiches then you have the shoulder parts and the front section can you please tell me how to assemble the collar only thing i dont understand
01.07.2020 - 17:51DROPS Design answered:
Dear Mrs Kramer, you should pick up approx. 10 sts along each side of front piece (after/before the 16 sts on each side) and approx. 24 sts on back piece - if you pick up more/less stitches you can adjust the number of stitches on first row. Happy knitting!
02.07.2020 - 08:34Hola La abreviación REM es disminución de un punto? Gracias
29.04.2020 - 00:21DROPS Design answered:
Hola Alessandra. La abreviación REM = rematar, cerrar.
30.04.2020 - 23:34Thank you
08.04.2020 - 09:15Je souhaite avoir les explications pour le modèle "veste SPRINGDANCE de perle en perle" qui est paru vers 2013, avec un col "normal" et 3 boutons "bâtons" qui est sur les photos gris clair chinée. Quelqu'un peut il me communiquer les explications de ce modèle? je vous en remercie. Monique
26.01.2020 - 16:22DROPS Design answered:
Bonjour Mme Mary, pouvez-vous essayez de retrouver ce modèle? Je n'ai pas trouver de modèle de ce nom sur notre site. N'hésitez pas à vous adresser à votre magasin DROPS, il peut aussi vous aider. Bon tricot!
27.01.2020 - 09:26Die Erklärung zum Kragen irritiert: was heisst „auf beiden Seiten nicht über den 10 Maschen zur vorderen Mitte zu“? WO ist denn die vordereMitte?
11.12.2019 - 09:59DROPS Design answered:
Liebe Frau Brodbeck-Berger, es handelt sich um die ersten 10 Maschen beim rechten Vorderteil und die letzten 10 Maschen beim linken Vorderteil - von der Vorderseite gesehen. Dh die Maschen werden von der 11. Maschen am rechten Vorderteil bis 10 Maschen Perlmuster bleiben am linken Vorderteil. Viel Spaß beim stricken!
11.12.2019 - 12:59Hoe moet ik de kraag precies aan de voorpanden naaien? De 10 niet gebruikte steken aan de zijkant meten 10 cm. Als ik de kraag middenachter echter door brei tot 12 cm is de zijkant van de kraag veel langer dan de 10 cm waar deze op zou moeten aansluiten.
22.10.2019 - 21:27DROPS Design answered:
Dag Renee,
Het is inderdaad wel de bedoeling dat je de kanten van de kraag aan de biezen midden voor naait, dus dan zou ik de kraag iets minder hoog breien, zodat hij mooi aansluit.
30.10.2019 - 12:11