
Popular categories
Looking for a yarn?


|
|||||||||||||||||||
DROPS 102-22 |
|||||||||||||||||||
|
|
|||||||||||||||||||
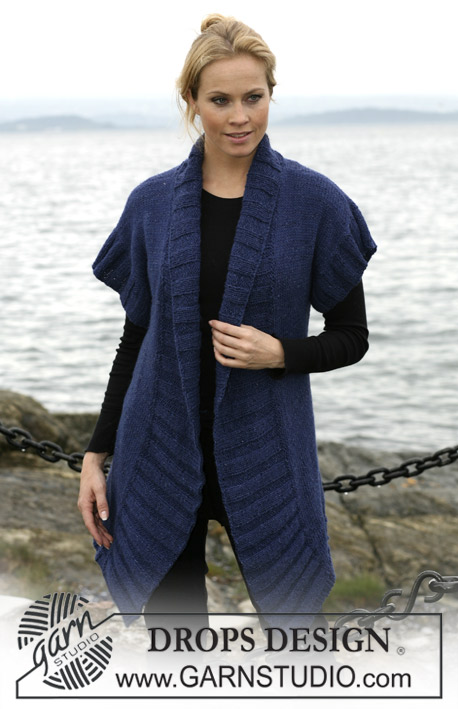
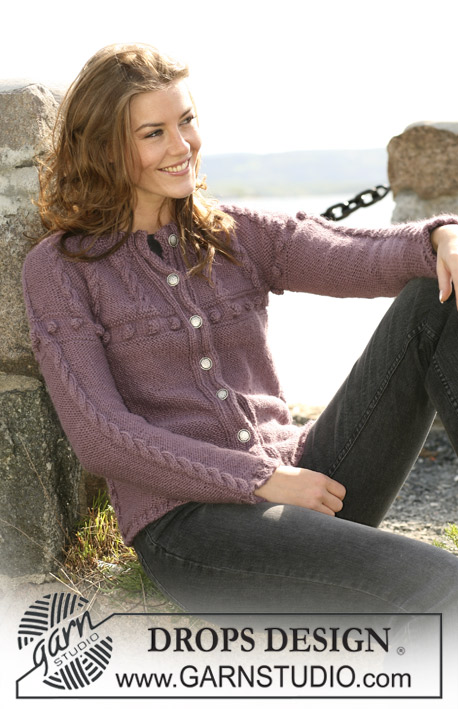
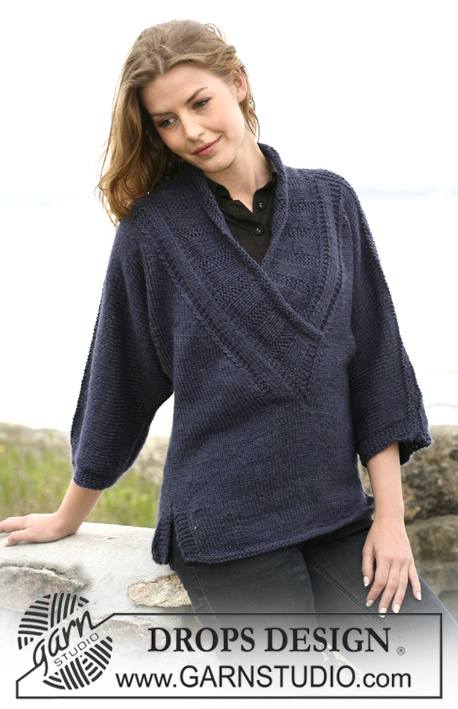
Long DROPS jacket with cables in ”Alpaca” and ”Vivaldi”, Sizes XS to XXXL.
DROPS 102-22 |
|||||||||||||||||||
|
Knitting tension: 1 pattern repeat of M.1 = 9 cm in width and 6 cm in height with 1 thread of each yarn. I.e. approx 14 sts x 20 rows stocking sts = 10 x 10 cm Garter st: Knit all rows back and forth on needle Decreasing tip (applies to neckline): Dec within 6 sts garter sts on each side. All decreases are done from RS! Dec as follows after 6 garter sts: Slip 1 sts as if to knit, K1, psso. Dec as follows after 6 garter sts: K2 tog Pattern: See diagram M.1, M.2 and M.3. Diagrams are seen from RS. Buttonhole: Cast off for buttonhole on right front band. 1 buttonhole = Cast off 4th sts from edge and cast on 1 new sts over the cast off sts on next row. Size XS/S: 16, 26, 36, 46 and 56 cm. Size M/L: 17, 27, 37, 47 and 57 cm. Size XL/XXL: 18, 28, 38, 48 and 58 cm. Size XXXL: 19, 29, 39, 49 and 59 cm. ________________________________________________________________ Back and front pieces: Knit piece back and forth on circular needles from mid front. Pick up approx 208-240-288-320 sts on circular needle size 6 mm with 1 thread of each yarn quality. Then knit as follows (1st row = RS): 6 sts garter sts, (= front edge), M.1 over 36-44-56-64 sts (start from edge in diagram – start arrow does not count here), P12 sts, 4 first sts of M.1 (= mid side), P 12 sts, M.1 over 68-84-108-124 sts (see start arrow for various sizes), P12 sts, 4 first sts of M.1 (= mid side), P 12 sts, M.1 over 36-44-56-64 sts (see start arrow for various sizes) and 6 sts garter sts (= front edge). Continue as follows: When piece measures 9-10-11-12 cm dec 1 sts on each side of the 4 cable sts on each side – dec by P2 tog. Remember buttonhole – see explanation above! Repeat de on every 6th cm 8 times in total = 176-208-256-288 sts. 12 P sts on each side of cable have now been dec to 4 P sts. After last dec, piece measures approx 51-52-53-54 cm. Continue with 1 row garter sts (from RS) at the same time as dec 2 sts over each of the small cables and 4 sts over the large cables by knitting sts tog 2 by 2 (inc 50-58-74-82 sts in total) = 126-150-182-206 sts. Then knit M.2 (1st row = WS) – see start arrow for various sizes when bubbles are knit on 6th row! After M.2 knit 1 row garter sts at the same time as inc 50-58-74-82 sts evenly (do not inc on front edges) = 176-208-256-288 sts. P1 row back. Knit next row as follows: 6 sts garter sts, (= front edge), M.3 over 36-44-56-64 sts (start from edge in diagram – start arrow does not count here), P4 sts, 4 first sts of M.3 (= mid side), P 4 sts, M.3 over 68-84-108-124 sts (see start arrow for various sizes), P4 sts, 4 first sts of M.3 (= mid side), P 4 sts, M.3 over 36-44-56-64 sts (see start arrow for various sizes) and 6 sts garter sts (= front edge). Read next entire section before knitting commences! Neckline: When piece measures 57-58-59-60 cm dec 1 sts to shape neckline on each side mid front – see Decreasing tips on every 2nd row 9-11-11-13 times in total and then on every 4th row 5 times in total. Armhole: At the same time when piece measures 60-61-62-63 cm cast off 4 sts over cable on each side of armhole. Complete each piece separately. Back piece: = 76-92-116-132 sts. Knit pattern as before at the same time as casting off for armhole on each side on every other row: 3 sts 0-0-2-3 times, 2 sts 0-2-4-5 times and 1 sts 1-3-5-4 times = 74-78-78-86 sts. Continue pattern – knit outermost sts on each side in garter sts until completed. When piece measures 77-79-81-83 cm dec middle 24-28-28-32 sts to 16-20-20-22 sts as follows: Dec cables of 4 sts to 2 sts and dec cables of 2 sts to 1 sts. On next row cast off middle 16-20-20-22 sts. Continue pattern over 25-25-25-27 sts on each shoulder. When piece measures 79-81-83-85 cm knit sts tog 2 by 2 over all cables = 18-18-18-19 sts left on shoulder. On next row cast off all sts loosely. Right front piece: Continue dec for neckline– at the same time cast off for armhole at side like back piece. There are 31-31-31-33 sts left on row when all dec has been completed. When piece measures 79-81-83-85 cm dec over cables like back piece = 24-24-24-25 sts. On next row cast off outermost 18-18-18-19 sts for shoulder = 6 garter sts left on needle. Knit garter sts over these sts for 6-7-7-8 cm, slip sts onto 1 stitch holder or safety pin (edge is to be sewn onto back piece afterwards). Left front piece: Knit like right piece but reversed. Sleeve: Knit piece back and forth on circular needles. Cast on 58-58-62-62 sts (incl 1 edge sts on each side) on needle size 6 mm with 1 thread of each yarn quality. Then knit as follows (1st row = RS): 1 edge sts, P1, M.3 over 54-54-58-58 sts, P1 and 1 edge sts. When piece measures 10 cm knit 1 row garter sts from RS at the same time as dec 14-14-18-18 sts evenly = 44-44-44-44 sts. Now knit M.2, 1st row = WS (start from edge, arrows only concern back and front pieces) with 1 edge sts on each side. After M.2 knit 1 row garter sts from RS at the same time inc 12-14-16-18 sts evenly = 56-58-60-62 sts. P1 row back. Continue as follows: 1 edge sts, P 5-6-7-8, M.1 over 44 sts, P5-6-7-8 and 1 edge sts. When piece measures 16 cm inc 1 sts on each side on every 6 -6 -4.5, 3.5 cm 6-6-7-8 time sin total = -68-70-74-78 sts – P new sts. When piece measures 51-49-46-44 cm (shorter measurement in larger sizes due to longer sleeve top) cast off to shape sleeve top on each side on every other row as follows: 4 sts 1 time, 2 sts 2-3-3-3 times and 1 sts 1-1-4-6 times, continuing cast off 2 sts on each side until piece measures 57 cm, then cast off 3 sts 1 time on each side. Piece measures approx 58 cm in all sizes, cast off remaining sts. Assembly: Sew shoulder seams. Sew 2 garter sts edge tog from each front piece with mattress sts and sew edge onto neckline neatly on back piece – stretch garter sts edge slightly when sewing it on so neck does not expand. Sew sleeve seams within 1 edge st and sew sleeves onto back and front pieces. Sew in buttons. |
|||||||||||||||||||
Diagram explanations |
|||||||||||||||||||
|
|||||||||||||||||||

|
|||||||||||||||||||
|
Have you made this or any other of our designs? Tag your pictures in social media with #dropsdesign so we can see them! Do you need help with this pattern?You'll find tutorial videos, a Comments/Questions area and more by visiting the pattern on garnstudio.com. © 1982-2024 DROPS Design A/S. We reserve all rights. This document, including all its sub-sections, has copyrights. Read more about what you can do with our patterns at the bottom of each pattern on our site. |
|||||||||||||||||||


With over 40 years in knitting and crochet design, DROPS Design offers one of the most extensive collections of free patterns on the internet - translated to 17 languages. As of today we count 304 catalogues and 11422 patterns - 11422 of which are translated into English (UK/cm).
We work hard to bring you the best knitting and crochet have to offer, inspiration and advice as well as great quality yarns at incredible prices! Would you like to use our patterns for other than personal use? You can read what you are allowed to do in the Copyright text at the bottom of all our patterns. Happy crafting!
Comments / Questions (6)
Hej, tänkte göra om detta mönster till en tröja med stickad resår nertill. Eftersom jag har hudallergi går de flesta garn bort och jag tänkte byta till ett bomullsgarn och undrar vilket ni rekommenderar till detta mönster.
21.02.2021 - 14:05DROPS Design answered:
Hej Maria, for at få 14 masker på 10 cm som det står i opskriften, så kan du feks bruge 1 tråd Safran og 1 tråd Paris. God fornøjelse!
23.02.2021 - 14:19Hvilke garn vil I anbefales til strikning af denne model?
02.02.2019 - 21:43DROPS Design answered:
Hej Inge, Du kan strikke med 2 tråde ifølge opskriften og erstatte DROPS Vivaldi med DROPS Brushed Alpaca Silk. Brug vores garnkalkulator til at regne garnforbruget om til Brushed. God fornøjelse!
06.02.2019 - 10:18Dolores Fusco wrote:
Gorgeous
18.07.2007 - 04:53Harrriet wrote:
This is elegant and lovely!
20.06.2007 - 05:11Snyggt mönster, lite empire-skärning under bysten i kombination med V-ringningen ger den ett lyft.
19.06.2007 - 11:16Jättesnygg modell med vackert mönster och färg
08.06.2007 - 19:00