DROPS Highlander
DROPS Highlander
90% Wool, 10% Nylon
Discontinued
find alternatives
DROPS Snow
DROPS Snow
100% Wool
from 2.00 £ /50g
DROPS SS24

Winter Elegance

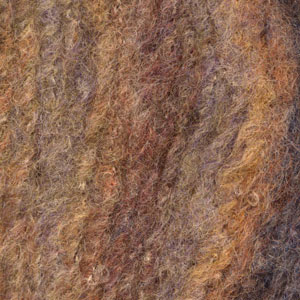
Crochet Drops jacket in ”Highlander” with decorative edges in ”Snow”

DROPS 102-28
Size: S - M - L - XL - XXL - XXXL

Materials:
DROPS Cloud from Garnstudio
Colour no 09, petrol:
550-600-650-700-800-850 g

and use DROPS Snow from Garnstudio
color no 40, brown mix: 100 g for all sizes

DROPS crochet hook size 8 mm – or the crochet hook size needed to obtain correct crochet tension.
DROPS dark buffalo horn button, no 536:
5-6-6-6-6-7 pcs

-------------------------------------------------------

Alternative Yarn – See how to change yarns here
Yarn Groups A to F – Use the same pattern and change the yarn here
Yarn usage using an alternative yarn – Use our yarn converter here

-------------------------------------------------------

DROPS Highlander
DROPS Highlander
90% Wool, 10% Nylon
Discontinued
find alternatives
DROPS Snow
DROPS Snow
100% Wool
from 2.00 £ /50g

Pattern instructions

NOTE: This pattern is written in British English. All measurements in charts are in cm. For conversion from cm to inches - click here. There are different terms for crocheting in British and American English. If this pattern includes crochet, click for "crochet terms" here. For this pattern in American English, please click here.
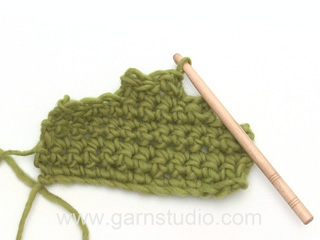
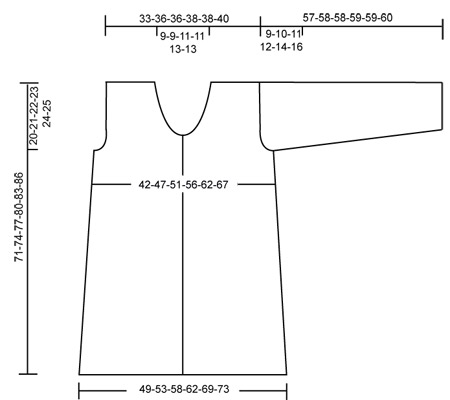
Crochet tension: 9 dc in width and 11 rows in height with Highlander = 10 x 10 cm

Crochet info: Turn each row with 1 ch.

Decreasing tip - 1 (slanted side): Dec 1 sts on each side crocheting 2 outermost dc tog, by slipping first dc and picking yarn, then into second dc picking yarn, yo and pull yarn through all 3 sts on crochet hook.

Cast off tip - 2 (armhole, neckline and sleeve top):
Cast off at end of row by crocheting to number of dc to be cast off and then turn piece.
Cast off at beg of row by crocheting sl st over number of dc to be cast off.

Increasing tips: Increase 1 sts on each side by crocheting 2 dc in first and last dc of row.
---------------------------------

Back piece:
Crochet 59-64-70-75-83-88 ch (incl 1 ch to turn with) on crochet hook size 8 mm with Highlander.
Crochet 1st row as follows: 1 dc in 2nd ch, 1 dc in each of next 2 ch, skip 1 ch, * 1 dc in each of next 3 ch, skip 1 ch * repeat from *-* and finish off with 1 dc in each of last 2-3-1-2-2-3 ch = 44-48-52-56-62-66 dc. Continuing crochet 1 dc in each dc – read Crochet info.
When piece measures 15 cm dec 1 dc – see Decreasing tip - 1 on each side of every 15th -16th -17th -18th -19th -20th cm 3 times in total = 38-42-46-50-56-60 dc.
Read next entire section before crocheting commences!
When piece measures 51-53-55-57-59-61 cm dec 3 dc on each side for armhole – see Closing off tip - 2. Continuing dec 1 dc on each side on every row 1-2-4-5-8-9 times in total = 30-32-32-34-34-36 sts.
When piece measures 69-72-75-78-81-83 cm do not continue crocheting over middle 8-8-10-10-12-12 dc = 11-12-11-12-11-12 dc left on each shoulder (complete each side separately). Crochet until piece measures 71-74-77-80-83-86 cm. Cut yarn.

Left front piece:
Crochet 38-40-43-46-51-54 ch (incl 1 ch to turn with) on crochet hook size 8 mm with Highlander. Crochet 1st row as follows: 1 dc in 2nd ch, 1 dc in each of next 2 ch, skip 1 ch, * 1 dc in each of next 3 ch, skip 1 ch * repeat from *-* and finish off with 1 dc in each of last 1-3-2-1-2-1 ch = 28-30-32-34-38-40 dc. Continuing crocheting 1 dc in each dc. When piece measures 15 cm dec on side as on back = 25-27-29-31-35-37 dc. When piece measures 51-53-55-57-59-61 cm dec for armhole like back piece. At the same time when piece measures 59-62-63-66-67-69 cm dec 5 dc towards mid front for neck. Continuing dec 1 dc towards neck on every other row 5-5-6-6-8-8 times in total. When all dec are completed 11-12-11-12-11-12 sts are left on shoulder. Cut thread when piece measures 71-74-77-80-83-86 cm.

Right front piece:
Crochet like left front piece. Additionally make 5-6-6-6-6-7 buttonholes as follows: Crochet 2 ch over 3rd and 4th dc from mid front, on next row crochet 1 dc in each ch. Cast off for buttonhole when piece measures:
Size S: 26, 34, 42, 50 and 58 cm.
Size M: 26, 33, 40, 47, 54 and 61 cm.
Size L: 27, 34, 41, 48, 55 and 62 cm.
Size XL: 25, 33, 41, 49, 57 and 65 cm.
Size XXL: 26, 34, 42, 50, 58 and 66 cm.
Size XXXL: 26, 33, 40, 47, 54, 61 and 68 cm.

Sleeve:
Crochet 27-30-30-31-31-34 ch (incl 1 ch to turn with) on crochet hook size 8 mm with Highlander. Crochet 1st row as follows: 1 dc in 2nd ch, 1 dc in each of next 2 ch, skip 1 ch, * 1 dc in each of next 3 ch, skip 1 ch * repeat from *-* and finish off with 1 dc in each of last 2-1-2-2-1 ch = 20-22-22-23-23-25 dc.
Continuing crochet 1 dc in each dc. At the same time when piece measures 8 cm inc 1 dc on each side – read Increasing tip – on every 7th -7th-6th-5th-4th-4th cm 6-6-7-8-9-9 times in total = 32-34-36-39-41-43 dc. When piece measures 48-48-47-47-45-44 cm cast off 3 dc on each side. Then cast off to shape sleeve top on every other row as follows: 2 dc 1-1-1-2-2-2 times and 1 dc 1-1-2-1-2-3 times. Continuing, cast off 2 dc on each side until piece measures 55-56-56-57-57-58 cm. Now cast off 3 dc 1 time on each side. Cut yarn. Crochet another sleeve.

Decorative pockets: Crochet 18-18-20-20-22-22 ch (incl 1 ch to turn with) on crochet hook size 8 mm with Highlander. Crochet 1st row as follows: 1 dc in 2nd ch, 1 dc in each of next 2 ch, skip 1 ch, * 1 dc in each of next 3 ch, skip 1 ch * repeat from *-* and finish off with 1 dc in each of last 1-1-3-3-1-1 ch = 13-13-15-15-16-16 dc. Continuing crochet 1 dc in each dc until approx 6-6-6-7-7-7 cm is crochet. Cut yarn.

Assembly: Sew shoulder seams in edge sts.

Collar: Crochet 30 to 45 dc around neckline with Highlander on crochet hook size 8 mm. Continue with 1 dc in each dc until collar measures approx 12-12-12-14-14-14 cm. Cut yarn.

Crochet edge (around armhole):
Crochet around armhole with Snow on crochet hook size 8 mm. Begin mid under sleeve. Crochet 1 dc, * 1 ch, skip approx 1 cm, 1 dc in next sts *, repeat from *-* and finish with 1 sl st in dc from beginning of round.

Assembly: Sew sleeved on under edge og Snow. Sew sleeve and side seams in outermost edge to avoid thick seams. Sew on decorative pockets mid front piece approx 7 to 9 cm from edge mid front. Only sew edge top pocket. Sew in buttons.

Crochet edges: Crochet around all edges of jacket with Snow on crochet hook size 8 mm. Start mid back of neck. Crochet 1 dc, * 1 ch, skip approx 1 cm, 1 dc in next sts *, repeat from *-* around collar, down along front piece, around bottom edge and up along front piece and back neck again. Finish round with 1 sl st in the first dc from beginning of round. Crochet in same way along bottom sleeve and around loose edge of pockets.

Slanted sts: Sew slanted sts with 2 threads Snow under breast (i.e. approx 32-34-36-38-40-42 cm down from shoulder) – sts should reach approx 2 x 2 cm.

Diagram

diagram measurements
Do you have a question? See a list of frequently asked questions (FAQ)

Knitting tension is what determines the final measurements of your work, and is usually measured per 10 x 10 cm. It is provided like so: number of stitches in width x number of rows in height - eg: 19 stitches x 26 rows = 10 x 10 cm.

The knitting tension is very individual; some people knit/crochet loosely while others work tightly. You adjust the knitting tension with the needle size, which is why the suggested needle size is only meant as a guide! You need to adjust this (up or down) to ensure that YOUR knitting tension matches the knitting tension provided in the pattern. If you work with a different knitting tension than provided you will have a different yarn consumption, and your work will have different measurements than what the pattern suggests.

The knitting tension also determines which yarns can replace each other. As long as you achieve the same knitting tension you can replace one yarn with another.

See DROPS lesson: How to measure your tension/gauge

See DROPS video: How to make a gauge tension swatch

The required amount of yarn is provided in grams, eg: 450 g. To calculate how many balls you’ll need you first need to know how many grams are in 1 ball (25g, 50g or 100g). This information is available if you click on the individual yarn quality on our pages. Divide the amount required with the amount of each ball. For example, if each ball is 50g (the most common amount), the calculation will be as follows: 450 / 50 = 9 balls.

The important thing when changing from one yarn to another is that the knitting/crochet tension remains the same. This is so that the measurements of the finished piece will be the same as on the sketch provided. It is easier to achieve the same knitting tension using yarns from the same yarn group. It is also possible to work with multiple strands of a thinner yarn to achieve the knitting tension of a thicker one. Please try our yarn converter. We recommend you to always work a test swatch.

Please NOTE: when changing yarn the garment might have a different look and feel to the garment in the photo, due to individual properties and qualities of each yarn.

See DROPS lesson: Can I use a different yarn than the one mentioned in the pattern?

All our yarns are categorised into yarn groups (from A to F) according to thickness and knitting tension – group A contains the thinnest yarns and group F the thickest. This makes it easier for you to find alternative yarns to our patterns, should you wish to switch yarn. All yarns within the same group have a similar knitting tension and can easily replace each other. However, different yarn qualities have different structures and properties which will give the finished work a unique look and feel.

Click here for an overview of the yarns in each yarn group

At the top of all our patterns you’ll find a link to our yarn calculator, which is a helpful tool should you wish to use a different yarn than suggested. By filling in the yarn quality you wish to replace, the amount (in your size) and number of strands, the calculator will present good alternative yarns with the same knitting tension. Additionally it will tell you how much you’ll require in the new qualities and whether you’ll need to work with multiple strands. Most skeins are 50g (some are 25g or 100g).

If the pattern is worked with multiple colours, every colour will have to be calculated separately. Similarly, if the pattern is worked with several strands of different yarns (for example 1 strand Alpaca and 1 strand Kid-Silk) you will have to find alternatives for each, individually.

Click here to see our yarn calculator

Since different yarns have different qualities and textures we have chosen to keep the original yarn in our patterns. However, you can easily find options among our available qualities by using our yarn calculator, or simply pick a yarn from the same yarn group.

It is possible that some retailers still have discontinued yarns in stock, or that someone has a few skeins at home that they would like to find patterns for.

The yarn calculator will provide both alternative yarn as well as required amount in the new quality.

If you think it's hard to decide what size to make, it can be a good idea to measure a garment you own already and like the size of. Then you can pick the size by comparing those measures with the ones available in the pattern's size chart.

You'll find the size chart at the bottom of the pattern.

See DROPS lesson: How to read size chart

The needle size provided in the pattern serves only as a guide, the important thing is to follow the knitting tension. And since knitting tension is very individual, you will have to adjust the needle size to ensure that YOUR tension is the same as in the pattern – maybe you’ll have to adjust 1, or even 2 needle sizes, up or down to achieve the correct tension. For this, we recommend that you work test swatches.

Should you work with a different knitting tension than the one provided, the measurements of the finished garment might deviate from the measurement sketch.

See DROPS lesson: How to measure your tension/gauge

See DROPS video: How to make a tension/gauge swatch

Working a garment top-down provides more flexibility and room for personal adjustment. For example it is easier to try the garment on while working, as well as making adjustments to length of yoke and shoulder caps.

The instructions are carefully explaining every step, in the correct order. Diagrams are adjusted to the knitting direction and are worked as usual.

The diagram depicts all rows/rounds, and every stitch seen from the right side. It is read from bottom to top, from right to left. 1 square = 1 stitch.

When working back and forth, every other row is worked from the right side and every other row is worked from the wrong side. When working from the wrong side, the diagram will have to be worked reversed: from left to right, knit stitches are purled, purl stitches are knit etc.

When working in the round every round is worked from the right side and the diagram are worked from right to left on all rounds.

See DROPS lesson: How to read knitting diagrams

The diagram depicts all rows/rounds, and every stitch seen from the right side. It is worked from bottom to top, from right to left.

When working back and forth every other row is worked from the right side: from right to left and every other row is worked from the wrong side: from left to right.

When working in the round, every row in the diagram are worked from the right side, from right to left.

When working a circular diagram you start in the middle and work your way outwards, counter clockwise, row by row.

The rows usually start with a given number of chain stitches (equivalent to the height of the following stitch), this will either be depicted in the diagram or explained in the pattern.

See DROPS lesson: How to read crochet diagrams

Instructions for working several diagrams after each other on the same row/round, will often be written like so: “work A.1, A.2, A.3 a total of 0-0-2-3-4 times". This means you work A.1 once, then A.2 is worked once, and A.3 is repeated (in width) the number of times provided for your size – in this case like so: S = 0 times, M = 0 times, L=2 times, XL= 3 times and XXL = 4 times.

The diagrams are worked as usual: begin with the first row in A.1, then work the first row in A.2 etc.

See DROPS lesson: How to read knitting diagrams

See DROPS lesson: How to read crochet diagrams

The total width of the garment (from wrist-to-wrist) will be larger in the larger sizes, despite the actual sleeves being shorter. The larger sizes have longer sleeve caps and wider shoulders, so there will be a good fit in all sizes.

The measurement sketch/schematic drawing provides information regarding the full length of the garment. If it’s a jumper or a jacket the length is measured from the highest point on the shoulder closest to the neckline, and straight down to the bottom of the garment. It is NOT measured from the tip of shoulder. Similarly, the length of yoke is measured from the highest point on the shoulder and down to where yoke is split into body and sleeves.

On a jacket measures are never taken along bands, unless specifically stated. Always measure inside band stitches when measuring the length.

See DROPS lesson: How to read a schematic drawing

Diagrams are often repeated on the round or in height. 1 repeat is the diagram the way it appears in the pattern. If it says to work 5 repeats of A.1 in the round, then you work A.1 a total of 5 times after/next to each other in the round. If it says to work 2 repeats of A.1 vertically/in height you work the entire diagram once, then begin again at the start and work the entire diagram one more time.

Chain stitches are slightly narrower than other stitches and to avoid working the cast-on edge too tight, we simply chain more stitches to begin with. The stitch count will be adjusted on the following row to fit the pattern and measurement sketch.

The rib edge is more elastic and will contract slightly compared to, for example, stocking stitch. By increasing before the rib edge, you avoid a visible difference in width between the rib edge and the rest of the body.

It’s very easy to cast off too tightly, and by making yarn overs while casting off (and simultaneously casting these off) you avoid a too tight cast off edge.

See DROPS video: How to bind off with yarn overs (yo)

To achieve an even increase (or decrease) you can increase on, for example: every 3rd and 4th row alternately, like so: work 2 rows and increase on the 3rd row, work 3 rows and increase on the 4th. Repeat this until the increase is complete.

See DROPS lesson: Increase or decrease 1 st on every 3rd and 4th row alternately

Should you prefer to work in the round instead of back and forth, you may of course adjust the pattern. You’ll need to add steeks mid-front (usually 5 stitches), and follow the instructions. When you would normally turn and work from the wrong side, simply work across the steek and continue in the round. At the end you’ll cut the piece open, pick up stitches to work bands, and cover the cut edges.

See DROPS video: How to knit steeks and cut open

Should you prefer to work back and forth instead of in the round, you may of course adjust the pattern so you work the pieces separately and then assemble them at the end. Divide the stitches for the body in 2, add 1 edge stitch in each side (for sewing) and work the front and back pieces separately.

See DROPS lesson: Can I adapt a pattern for circular needles into straight needles?

Pattern repeats can vary slightly in the different sizes, in order to get the correct proportions. If you’re not working the exact same size as the garment in the photo, yours might deviate slightly. This has been carefully developed and adjusted so that the complete impression of the garment is the same in all sizes.

Make sure to follow instructions and diagrams for your size!

If you have found a pattern you like which is available in women’s size it’s not very difficult to convert it to men’s size. The biggest difference will be the length of sleeves and body. Start working on the women size that you think would fit across the chest. The additional length will be worked right before you cast off for the armhole/sleeve cap. If the pattern is worked top-down you can add the length right after the armhole or before the first decrease on sleeve.

Regarding additional yarn amount, this will depend on how much length you add, but it is better with a skein too many than too few.

All yarns will have excess fibres (from production) that might come off as lint or shedding. Brushed yarns (ie hairier yarns) have more of these loose, excess fibres, causing more shedding.

Shedding also depends on what is worn under or over the garment, and whether this pulls at the yarn fibres. It’s therefore not possible to guarantee that there will be no shedding

Below are some tips on how to get the best result when working with hairier yarns:

1. When the garment is finished (before you wash it) shake it vigorously so the looser hairs come off. NOTE: do NOT use a lint roller, brush or any method that pulls at the yarn.

2. Place the garment in a plastic bag and put it in your freezer - the temperature will cause the fibres to become less attached to each other, and excess fibres will come off easier.

3. Leave in the freezer for a few hours before taking it out and shaking it again.

4. Wash the garment according to the instructions on the yarn label.

Pilling is a natural process that happens to even the most exclusive of fibers. It's a natural sign of wear and tear that is hard to avoid, and that is most visible in high friction areas of your garment like a sweater's arms and cuffs.

You can make your garment look as new by removing the pilling, using a fabric comb or a pill/lint remover.

Still can't find the answer you need? Then scroll down and leave your question so one of our experts can try to help you. This will be done normally within 5 to 10 working days.
In the meantime, you can read the questions and answers that others have left to this pattern or join the DROPS Workshop on Facebook to get help from fellow knitters/crocheters!

You might also like...

Post a comment to pattern DROPS 102-28

We would love to hear what you have to say about this pattern!

If you want to leave a question, please make sure you select the correct category in the form below, to speed up the answering process. Required fields are marked *.

Comments / Questions (84)

country flag Ann Mørk Rosborg wrote:

Har noget garn med samme vægt og løbelængde som highlander. Hækles den i enkelt eller dobbelt garn? Men enkelt garn kommer man slet ikke op i nærheden med 9fm=10 cm.

09.04.2020 - 11:32

DROPS Design answered:

Hei Ann. Denne jakken er heklet med 1 tråd Highlander. Prøv å bytte størrelsen på heklenålen for å få den oppgitte heklefastheten. mvh DROPS design

15.04.2020 - 14:42

country flag Sharon wrote:

Also on the photo of the jacket, there apparently isnt a 5dc decrease on the right side, as per the left.

07.03.2019 - 22:07

DROPS Design answered:

Dear Sharon, the sts dec towards mid front are for neck, you will then crochet collar over these sts (nekcline on front piece is starting lower than shoulders). Your previous comment has been forwarded to our design team. Thank you. Happy crocheting!

08.03.2019 - 08:22

country flag Sharon wrote:

Why on earth didnt you include a diagram and measurements for the front pieces!?

07.03.2019 - 13:27

country flag Beth Noll wrote:

When doing the right side, it says \"Additionally make 5-6-6-6-6-7 buttonholes as follows: ch 2 over 3rd and 4th sc from mid front, on next row crochet 1 sc in each ch.\" I can\'t figure out what mid front means. Do you mean for the button holes to go in the 3rd and 4th sc from the outside edge?

31.08.2018 - 19:00

DROPS Design answered:

Dear Mrs Noll, the buttonholes will be crocheted at the beg of a row from RS, ie skip the 3rd and 4th sc from the edge -towards mid front/jacket opening). Happy crocheting!

06.09.2018 - 09:45

Stefanie² wrote:

Hello, what size should I go for if I'm 96 cm bust? Thank you!

24.08.2018 - 18:30

DROPS Design answered:

Hi Stefanie, Measurements for the different sizes are shown in a diagram at the bottom of the pattern. Happy crocheting!

25.08.2018 - 08:02

country flag Loes wrote:

Mooi en makkelijk patroon! Heel veel complimenten gekregen, soms zomaar van een vreemde😀. De jas is erg warm....jas nr 2 bijna klaar, wel met een andere steek.

19.04.2018 - 12:08

country flag Jana T wrote:

Hi! I've just finished the back piece and started working on the left front piece. I'm confused about the width of the left/right front piece. The way it is shown on the drawing it seems to me that the front pieces should be half the width of the back piece, or 24,5cm for size small. However, mine is much wider, around 33cm. Is this what the width of each front piece should really be, or am I doing something wrong? Thank you very much in advance!

20.02.2018 - 22:37

DROPS Design answered:

Dear Jana, don´t worry - front pieces should not be half of width of the back piece, as you have to count with button bands. Front pieces have due to it lay over each other, so it must be slightly wider than half of back. Happy crocheting!

21.02.2018 - 07:00

country flag Hanne wrote:

Hei! For en fin passform og lengde på denne jakken. Denne jakken vil jeg veldig gjerne STRIKKE! Hvordan skal jeg tenke om jeg vil "gjøre om" denne til en strikkeoppskrift? Ikke vant med å hekle, men kan lese oppskrift. Tusen takk for svar!

30.09.2017 - 08:34

DROPS Design answered:

Hvis du går ind på DROPS forside, så kan du søge ved at skrive "jakker" i søgeruden og klikke på kategori "dame", du kan også vælge teknikk som feks "sjalskrave" hvis du vil det. Vi håber du finder en jakke du synes om :)

03.10.2017 - 11:50

country flag Alexandra wrote:

Hej. Jag är nu på slutet av ärmen men förstår inte, har minskat 3fm i båda sidorna och ska avmaska för ärmkullen nu. Hur gör jag då? Ska jag minska 2fm i båda sidorna el bara ena? Behöver hjälp ända ner till slutet.mvh Alexandra

11.02.2017 - 20:14

Hanaa Zahran wrote:

Hi I brought a yarn to make this pattern but unfortunately need more and cannot find it so I need to mix another color (I have powder pink and want to mix dark grey with it ) can u help how to do this pattern with two colors. Thanks

09.02.2017 - 19:35

DROPS Design answered:

Dear Mrs Zahran, please contact your DROPS store for any assistance choosing a colour, they will be able to help you even per mail or telephone. Happy crocheting!

10.02.2017 - 09:17