DROPS Fabel
DROPS Fabel
75% Wool, 25% Polyamide
from 3.00 $ /50g
DROPS Vivaldi
DROPS Vivaldi
56% Mohair, 30% Polyamide, 14% Wool
Discontinued
find alternatives
DROPS SS24

Eclipse

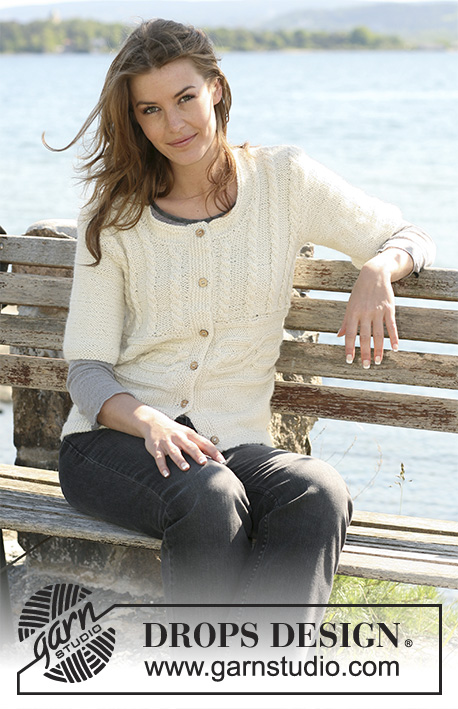
Long DROPS jacket in Fabel and Vivaldi or Fabel and Brushed Alpaca Silk with Rib. Size S til XXXL.

DROPS 102-18
Size: S - M - L - XL - XXL - XXXL
Finished measurements at chest: 35½"-37 ¾"-41 ¾"-44"-50⅜"-54 ¼"
Full length: 26"-26 ¾"-27½"-28⅜"-29⅛"-30"

Materials: DROPS Fabel from Garnstudio
300-350-400-400-450-500 g, clr. no. 521 blue/brown mix.
And use: DROPS Vivaldi from Garnstudio
200-250-250-250-300-300 g, clr. no. 01, black
Or use:
And use: DROPS Brushed Alpaca Silk from Garnstudio
200-250-250-250-300-300 g, clr. no. 16, black.


DROPS pointed needles size 5 mm [US 8] – or the size needed to obtain the correct knitting gauge.
DROPS pointed and circular needles (80cm) size 4 mm [US 6]– for Rib.
DROPS crochet hook size 4 mm [US G/6] – for button hole loops.

DROPS Buffalohorn buttons no. 535: 3 pcs.

Color combinations shown are:
A) DROPS Fabel 330 – DROPS Brushed Alpaca Silk 10
B) DROPS Fabel 918 – DROPS Brushed Alpaca Silk 11
C) DROPS Fabel 542 – DROPS Brushed Alpaca Silk 01

-------------------------------------------------------

Alternative Yarn – See how to change yarns here
Yarn Groups A to F – Use the same pattern and change the yarn here
Yarn usage using an alternative yarn – Use our yarn converter here

-------------------------------------------------------

DROPS Fabel
DROPS Fabel
75% Wool, 25% Polyamide
from 3.00 $ /50g
DROPS Vivaldi
DROPS Vivaldi
56% Mohair, 30% Polyamide, 14% Wool
Discontinued
find alternatives

Pattern instructions

NOTE: This pattern is written in American English. All measurements in charts are in cm. For conversion from inches to cm - click here. There are different terms for crocheting in American and British English. If this pattern includes crochet, click for "crochet terms" here. For this pattern in British English, please click here.
Knitting gauge: 17 sts x 22 rows in stockinette sts with 1 thread of each quality = 10 x 10 cm [4" x 4"].

Back piece: Cast on 89-95-107-113-125-137 sts (incl. 1 edge st each side) on needle size 4 mm [US 6] with 1 thread of each quality. K 1 row from the RS and P 1 row from the WS. Continue with Rib as follows (= RS): 1 edge st, * K3, P3 *, repeat from *-* and finish with K3 and 1 edge st. When the piece measures approx. 3 cm [1⅛"] change to needle size 5 mm [US 8] and continue in stockinette sts. At the same time on the 1st row of stockinette sts dec 11-11-15-15-15-17 sts evenly distributed = 78-84-92-98-110-120 sts. Remember the knitting gauge! When the piece measures 18-19-19-20-20-21 cm [7"-7½"-7½"-8"-8"-8¼"] inc. 11-11-15-15-15-17 sts evenly distributed = 89-95-107-113-125-137 sts. Change to needles size 4 mm [US 6] and continue with Rib as done earlier. Continue this way until the piece measures 32-34-34-36-36-38 cm [12½"-13⅜"-13⅜"-14 ¼"-14 ¼"-15"]. Change to needle size 5 mm [US 8] and continue in stockinette sts. At the same time on the 1st row of stockinette sts dec 11-11-15-15-15-17 sts evenly distributed = 78-84-92-98-110-120 sts. When the piece measures 46-47-48-49-50-51 cm [18"-18½"-19"-19 ¼"-19 ¾"-20"] bind off 4 sts each side for the armholes. Continue to bind off on every other row: 4 sts 0-0-0-0-1-1 time, 2 sts 1-2-4-5-6-8 times and 1 st 2-2-1-1-0-0 times = 62-64-66-68-70-72 sts. When the piece measures 63-65-67-69-71-73 cm [24 ¾"-25½"-26⅜"-27⅛"-28"-28 ¾"] bind off the middle 24-26-28-30-32-32 sts for neck. Continue to bind off 1 st towards the neck on every other row a total of 2 times = 17-17-17-17-17-18 sts left for each shoulder. Knit until the piece measures 66-68-70-72-74-76 cm [26"-26 ¾"-27½"-28⅜"-29⅛"-30"]. Bind off loosely.

Right front piece: Cast on 38-38-44-44-56-62 sts (incl. 1 edge st each side) on needles size 4 mm [US 6] with 1 thread of each quality. K 1 row from the RS and P 1 row from the WS. Continue with Rib K3/ P3 with 1 edge st each side (i.e 3 K sts towards the mid front.) When the piece measures approx. 3 cm [1⅛"] change to needle size 5 mm [US 8] and continue in stockinette sts. At the same time on the 1st row of stockinette sts dec. 8-6-8-6-12-12 sts evenly distributed = 30-32-36-38-44-50 sts. When the piece measures 18-19-19-20-20-21 cm [7"-7½"-7½"-8"-8"-8¼"] inc. 8-6-8-6-12-12 sts evenly distributed = 38-38-44-44-56-62 sts. Change to needle size 4 mm [US 6]. Continue with Rib as done earlier. Continue this way until the work measures 32-34-34-36-36-38 cm [12½"-13⅜"-13⅜"-14 ¼"-14 ¼"-15"]. Change to needle size 5 mm [US 8]. Continue in stockinette sts at the same time dec. 8-6-8-6-12-12 sts evenly distributed = 30-32-36-38-44-50 sts.
Please read all of the next section before knitting it!
When the piece measures 38-38-40-40-42-42 cm [15"-15"-15 ¾"-15 ¾"-16½"-16½"] dec. 1 st inside the edge st mid front on every 6-6½-5-5½-4½-4 cm [2⅜"-2½"-2"-2 ¼"-1 ¾"-1½"] a total of 5-5-6-6-7-8 times. At the same time when the piece measures 46-47-48-49-50-51 cm [18"-18½"-19"-19 ¼"-19 ¾"-20"] bind off for armholes as done for the back piece. When all dec are completed = 17-17-17-17-17-18 sts left for the shoulder. Knit until the piece 66-68-70-72-74-76 cm [26"-26 ¾"-27½"-28⅜"-29⅛"-30"]. Bind off loosely.

Left front piece: Knit as right front piece but reverse.

Sleeve: Cast on 50-50-56-56-56-56 sts (incl. 1 edge st each side) on needle size 4 mm [US 6] with 1 thread of each quality. K 1 row from the RS and P 1 row from the WS. Continue with Rib K3/ P3 with 1 edge st each side. When the piece measures approx. 14-14-14-16-16-16 cm [5½"-5½"-5½"-6¼"-6¼"-6¼"] change to needle size 5 mm [US 8] and continue in stockinette sts until finish. At the same time on the 1st row of stockinette sts dec. 6-6-8-8-8-6 sts evenly distributed = 44-44-48-48-48-50 sts. When the piece measures 16-16-16-18-18-18 cm [6¼"-6¼"-6¼"-7"-7"-7"] inc. 1 st each side on every 3,5-3-2,5-2-1,5-1,5 cm [1 ¼"-1⅛"-⅞"-¾"-½"-½"] a total of 9-11-12-14-16-17 times = 62-66-72-76-80-84 sts. When the piece measures 49-49-48-48-45-45 cm [19 ¼"-19 ¼"-19"-19"-17 ¾"-17 ¾"] bind off 3 sts each side for the sleeve cap. Then continue to bind off for the sleeve cap on every other row: 2 sts 3-4-4-5-4-4 times and 1 st 2-1-1-1-6-7 times. Continue to bind off 2 sts each side until the piece measures 57-57-57-58-58-59 cm [22½"-22½"-22½"-22 ¾"-22 ¾"-23 ¼"]. Now bind off 3 sts each side. The piece measures approx. 58-58-58-59-59-60 cm [22 ¾"-22 ¾"-22 ¾"-23 ¼"-23 ¼"-23⅝"]. Bind off remaining sts.

Assembly: Sew the shoulder seams.
Edge around the front and back pieces: Knit the edge back and forth on circular needle. Insert 1 MT (marking thread) at the mid back at the nape of neck. Pick up 351 to 411 sts (divisible with 6 + 3) from the RS in the edge st along both front pieces and at the nape of the neck on needle size 4 mm [US 6] and 1 thread of each quality. Pick up the same number of sts each side of the MT. (Note! If it is too many sts to pick up at one time, the remaining number can be inc. on the next row evenly distributed. K 1 row from the WS. Continue as follows: 3 garter sts, * K3, P3 *, repeat from *-* and finish with K3 and 3 garter sts. Continue until the Rib measures 14 cm [5½"]. Then inc. 1 st (from the RS) in the middle 15 to 17 K parts at the nape of the neck (i.e an inc. of 7 to 8 sts each side of the MT).
Continue with K over K and P over P. When the Rib measures 20 cm [8"] inc. 1 st in all of the P parts. Continue with 2 more rows of Rib with K over K and P over P before binding off.

Assembly: Sew the buttons on. Sew the buttons on the left front piece evenly distributed at the Rib part at the waist, as follows: 1 button 1 cm [3/8"] after the beg. of the Rib, and the last button 1 cm [3/8"] before the Rib finish. Make 3 button loops with hook size 4mm [US G/6] and 1 thread of each quality on the right front piece as follows: Crochet 1 sc in the binding off edge for the front and back piece. Crochet 5 ch, skip approx. 1 cm [3/8"] and crochet 1 sc in the edge . Sew in the sleeves. Sew the sleeve and the side seams inside the edge st.

Diagram

All measurements in charts are in cm.

diagram measurements
Do you have a question? See a list of frequently asked questions (FAQ)

Knitting tension is what determines the final measurements of your work, and is usually measured per 10 x 10 cm. It is provided like so: number of stitches in width x number of rows in height - eg: 19 stitches x 26 rows = 10 x 10 cm.

The knitting tension is very individual; some people knit/crochet loosely while others work tightly. You adjust the knitting tension with the needle size, which is why the suggested needle size only serve as a guide! You need to adjust this (up or down) to ensure that YOUR knitting tension matches the knitting tension provided in the pattern. If you work with a different knitting tension than provided you will have a different yarn consumption, and your work will have different measurements than what the pattern suggests.

The knitting tension also determines which yarns can replace each other. As long as you achieve the same knitting tension you can replace one yarn with another.

See DROPS lesson: How to measure your tension/gauge

See DROPS video: How to make a gauge tension swatch

The required amount of yarn is provided in grams, eg: 450 g. To calculate how many balls you’ll need you first need to know how many grams are in 1 ball (25g, 50g or 100g). This information is available if you click on the individual yarn quality on our pages. Divide the amount required with the amount of each ball. For example, if each ball is 50g (the most common amount), the calculation will be as follows: 450 / 50 = 9 balls.

The important thing when changing from one yarn to another is that the knitting/crochet tension remains the same. This is so that the measurements of the finished piece will be the same as on the sketch provided. It is easier to achieve the same knitting tension using yarns from the same yarn group. It is also possible to work with multiple strands of a thinner yarn to achieve the knitting tension of a thicker one. Please try our yarn converter. We recommend you to always work a test swatch.

Please NOTE: when changing yarn the garment might have a different look and feel to the garment in the photo, due to individual properties and qualities of each yarn.

See DROPS lesson: Can I use a different yarn than the one mentioned in the pattern?

All our yarns are categorised into yarn groups (from A to F) according to thickness and knitting tension – group A contains the thinnest yarns and group F the thickest. This makes it easier for you to find alternative yarns to our patterns, should you wish to switch yarn. All yarns within the same group have a similar knitting tension and can easily replace each other. However, different yarn qualities have different structures and properties which will give the finished work a unique look and feel.

Click here for an overview of the yarns in each yarn group

At the top of all our patterns you’ll find a link to our yarn converter, which is a helpful tool should you wish to use a different yarn than suggested. By filling in the yarn quality you wish to replace, the amount (in your size) and number of strands, the converter will present good alternative yarns with the same knitting tension. Additionally it will tell you how much you’ll require in the new qualities and whether you’ll need to work with multiple strands. Most skeins are 50g (some are 25g or 100g).

If the pattern is worked with multiple colours, every colour will have to be converted separately. Similarly, if the pattern is worked with several strands of different yarns (for example 1 strand Alpaca and 1 strand Kid-Silk) you will have to find alternatives for each, individually.

Click here to see our yarn converter

Since different yarns have different qualities and textures we have chosen to keep the original yarn in our patterns. However, you can easily find options among our available qualities by using our yarn converter, or simply pick a yarn from the same yarn group.

It is possible that some retailers still have discontinued yarns in stock, or that someone has a few skeins at home that they would like to find patterns for.

The yarn converter will provide both alternative yarn as well as required amount in the new quality.

If you think it's hard to decide what size to make, it can be a good idea to measure a garment you own already and like the size of. Then you can pick the size by comparing those measures with the ones available in the pattern's size chart.

You'll find the size chart at the bottom of the pattern.

See DROPS lesson: How to read size chart

The needle size provided in the pattern serves only as a guide, the important thing is to follow the knitting tension. And since knitting tension is very individual, you will have to adjust the needle size to ensure that YOUR tension is the same as in the pattern – maybe you’ll have to adjust 1, or even 2 needle sizes, up or down to achieve the correct tension. For this, we recommend that you work test swatches.

Should you work with a different knitting tension than the one provided, the measurements of the finished garment might deviate from the measurement sketch.

See DROPS lesson: How to measure your tension/gauge

See DROPS video: How to make a gauge tension swatch

Working a garment top-down provides more flexibility and room for personal adjustment. For example it is easier to try the garment on while working, as well as making adjustments to length of yoke and shoulder caps.

The instructions are carefully explaining every step, in the correct order. Diagrams are adjusted to the knitting direction and are worked as usual.

The diagram depicts all rows/rounds, and every stitch seen from the right side. It is read from bottom to top, from right to left. 1 square = 1 stitch.

When working back and forth, every other row is worked from the right side and every other row is worked from the wrong side. When working from the wrong side, the diagram will have to be worked reversed: from left to right, knit stitches are purled, purl stitches are knit etc.

When working in the round every round is worked from the right side and the diagram are worked from right to left on all rounds.

See DROPS lesson: How to read knitting diagrams

The diagram depicts all rows/rounds, and every stitch seen from the right side. It is worked from bottom to top, from right to left.

When working back and forth every other row is worked from the right side: from right to left and every other row is worked from the wrong side: from left to right.

When working in the round, every row in the diagram are worked from the right side, from right to left.

When working a circular diagram you start in the middle and work your way outwards, counter clockwise, row by row.

The rows usually start with a given number of chain stitches (equivalent to the height of the following stitch), this will either be depicted in the diagram or explained in the pattern.

See DROPS lesson: How to read crochet diagrams

Instructions for working several diagrams after each other on the same row/round, will often be written like so: “work A.1, A.2, A.3 a total of 0-0-2-3-4 times". This means you work A.1 once, then A.2 is worked once, and A.3 is repeated (in width) the number of times provided for your size – in this case like so: S = 0 times, M = 0 times, L=2 times, XL= 3 times and XXL = 4 times.

The diagrams are worked as usual: begin with the first row in A.1, then work the first row in A.2 etc.

See DROPS lesson: How to read knitting diagrams

See DROPS lesson: How to read crochet diagrams

The total width of the garment (from wrist-to-wrist) will be larger in the larger sizes, despite the actual sleeves being shorter. The larger sizes have longer sleeve caps and wider shoulders, so there will be a good fit in all sizes.

The measurement sketch/schematic drawing provides information regarding the full length of the garment. If it’s a jumper or a jacket the length is measured from the highest point on the shoulder (usually closest to the neckline), and straight down to the bottom of the garment. It is NOT measured from the tip of shoulder. Similarly, the length of yoke is measured from the highest point on the shoulder and down to where yoke is split into body and sleeves.

See DROPS lesson: How to read a schematic drawing

Diagrams are often repeated on the round or in height. 1 repeat is the diagram the way it appears in the pattern. If it says to work 5 repeats of A.1 in the round, then you work A.1 a total of 5 times after/next to each other in the round. If it says to work 2 repeats of A.1 vertically/in height you work the entire diagram once, then begin again at the start and work the entire diagram one more time.

Chain stitches are slightly narrower than other stitches and to avoid working the cast-on edge too tight, we simply chain more stitches to begin with. The stitch count will be adjusted on the following row to fit the pattern and measurement sketch.

The rib edge is more elastic and will contract slightly compared to, for example, stocking stitch. By increasing before the rib edge, you avoid a visible difference in width between the rib edge and the rest of the body.

It’s very easy to cast off too tightly, and by making yarn overs while casting off (and simultaneously casting these off) you avoid a too tight cast off edge.

See DROPS video: How to bind off with yarn overs (yo)

To achieve an even increase (or decrease) you can increase on, for example: every 3rd and 4th row alternately, like so: work 2 rows and increase on the 3rd row, work 3 rows and increase on the 4th. Repeat this until the increase is complete.

See DROPS lesson: Increase or decrease 1 st on every 3rd and 4th row alternately

Should you prefer to work in the round instead of back and forth, you may of course adjust the pattern. You’ll need to add steeks mid-front (usually 5 stitches), and follow the instructions. When you would normally turn and work from the wrong side, simply work across the steek and continue in the round. At the end you’ll cut the piece open, pick up stitches to work bands, and cover the cut edges.

See DROPS video: How to knit steeks and cut open

Should you prefer to work back and forth instead of in the round, you may of course adjust the pattern so you work the pieces separately and then assemble them at the end. Divide the stitches for the body in 2, add 1 edge stitch in each side (for sewing) and work the front and back pieces separately.

See DROPS lesson: Can I adapt a pattern for circular needles into straight needles?

Pattern repeats can vary slightly in the different sizes, in order to get the correct proportions. If you’re not working the exact same size as the garment in the photo, yours might deviate slightly. This has been carefully developed and adjusted so that the complete impression of the garment is the same in all sizes.

Make sure to follow instructions and diagrams for your size!

If you have found a pattern you like which is available in women’s size it’s not very difficult to convert it to men’s size. The biggest difference will be the length of sleeves and body. Start working on the women size that you think would fit across the chest. The additional length will be worked right before you cast off for the armhole/sleeve cap. If the pattern is worked top-down you can add the length right after the armhole or before the first decrease on sleeve.

Regarding additional yarn amount, this will depend on how much length you add, but it is better with a skein too many than too few.

All yarns will have excess fibres (from production) that might come off as lint or shedding. Brushed yarns (ie hairier yarns) have more of these loose, excess fibres, causing more shedding.

Shedding also depends on what is worn under or over the garment, and whether this pulls at the yarn fibres. It’s therefore not possible to guarantee that there will be no shedding

Below are some tips on how to get the best result when working with hairier yarns:

1. When the garment is finished (before you wash it) shake it vigorously so the looser hairs come off. NOTE: do NOT use a lint roller, brush or any method that pulls at the yarn.

2. Place the garment in a plastic bag and put it in your freezer - the temperature will cause the fibres to become less attached to each other, and excess fibres will come off easier.

3. Leave in the freezer for a few hours before taking it out and shaking it again.

4. Wash the garment according to the instructions on the yarn label.

Pilling is a natural process that happens to even the most exclusive of fibers. It's a natural sign of wear and tear that is hard to avoid, and that is most visible in high friction areas of your garment like a sweater's arms and cuffs.

You can make your garment look as new by removing the pilling, using a fabric comb or a pill/lint remover.

Still can't find the answer you need? Then scroll down and leave your question so one of our experts can try to help you. This will be done normally within 5 to 10 working days.
In the meantime, you can read the questions and answers that others have left to this pattern or join the DROPS Workshop on Facebook to get help from fellow knitters/crocheters!

You might also like...

Post a comment to pattern DROPS 102-18

We would love to hear what you have to say about this pattern!

If you want to leave a question, please make sure you select the correct category in the form below, to speed up the answering process. Required fields are marked *.

Comments / Questions (10)

country flag Elyxira wrote:

Bonjour, Pour l'encolure devant, faut-il bien augmenter (ou faut-il diminuer) comme indiqué : A 38-38-40-40-42-42 cm de hauteur totale, augmenter 1 m à 1 m du bord côté milieu devant 5-5-6-6-7-8 fois tous les 6-6,5-5-5,5-4,5-4 cm Merci. Elyxira

22.06.2019 - 17:21

DROPS Design answered:

Bonjour Elyxira, il faut effectivement diminuer, la correction a été faite, merci. Bon tricot!

24.06.2019 - 07:37

country flag DROPS Design wrote:

Det er den del av designet. Om du ikke liker det kan du bare strikke glstrikk men da trenger du ikke å felle/øke før/etter.

08.04.2008 - 10:51

country flag Sidsel wrote:

Startet på ryggstykket og merket en rar variant av en "ekstra" vrangbord.Denne ligger litt for lavt i høyde til å være en innsvingning liksom og kommer heller ikke tydelig fram på selve diagrammet.Vil prøve å følge anvisning og se om jeg heller må/bør overse akkurat det.Har aldri sett dette før jeg.Tenker da på Drops sine oppskrifter og jeg har strikket maaange :)Tips mottas med takk *nikke*

07.04.2008 - 18:34

country flag Marylou wrote:

Merci pour ce joli modèle que j'ai réalisé dans un chiné prune et mordoré.

10.11.2007 - 16:24

country flag Maria wrote:

For stor, mørk og uformelig, efter min mening.

05.07.2007 - 22:53

country flag Ulrika wrote:

Snygg modell och kul att se så många nya modeller i Fabel. De ständigt skiftande färgerna gör det spännande att sticka.

19.06.2007 - 11:07

country flag Yvonne Ström wrote:

Härlig snygg jacka

18.06.2007 - 10:55

country flag Trees wrote:

Zeer gechikt voor mijn leeftijd en toch lekker nonchalant

14.06.2007 - 10:11

Iréne wrote:

Den gillar jag skarpt!!

12.06.2007 - 11:15

Alvhild wrote:

Stilig sett. Deilig høstjakke.

04.06.2007 - 23:01