DROPS Snow
DROPS Snow
100% Wool
from 2.00 £ /50g
Get the yarn to make this pattern from 34.00£.

The yarn cost is calculated from the pattern’s smallest size and the yarn’s cheapest product type. Looking for an even better price? You might find it on the DROPS Deals!

DROPS SS24

Grapeful

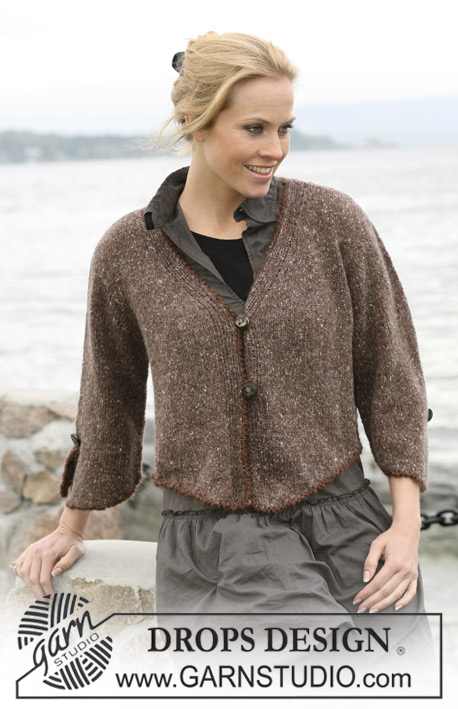
DROPS jacket with a big neck opening knitted in Rib with ”Snow”. Size S to XXXL

DROPS 103-22
Size: S - M - L - XL - XXL - XXXL
Materials: DROPS Snow from Garnstudio
850-950-1050-1150-1250-1350 g, col no. 33, red mix.

DROPS needles size 8 mm – or the size needed to obtain the correct knitting tension.

DROPS Buffalohorn button dark no. 536: 7-8-8-8-9-9 pcs.

-------------------------------------------------------

Alternative Yarn – See how to change yarns here
Yarn Groups A to F – Use the same pattern and change the yarn here
Yarn usage using an alternative yarn – Use our yarn converter here

-------------------------------------------------------

DROPS Snow
DROPS Snow
100% Wool
from 2.00 £ /50g
Get the yarn to make this pattern from 34.00£.

The yarn cost is calculated from the pattern’s smallest size and the yarn’s cheapest product type. Looking for an even better price? You might find it on the DROPS Deals!

Pattern instructions

NOTE: This pattern is written in British English. All measurements in charts are in cm. For conversion from cm to inches - click here. There are different terms for crocheting in British and American English. If this pattern includes crochet, click for "crochet terms" here. For this pattern in American English, please click here.
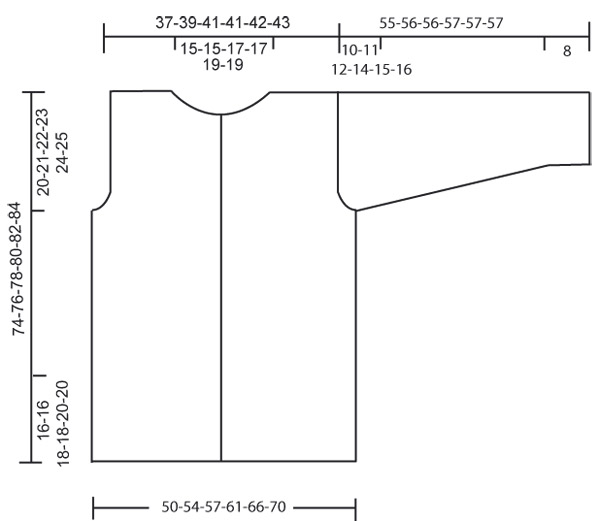
Knitting Tension: 11 sts x 15 rows in stocking sts = 10 x 10 cm.
Garter sts: Knit back and forth on all row.
Button hole: Cast off for button holes on the Right front band: 1 Button hole = cast off the 3rd st mid front; cast on a new st at the same place on the next row.
Cast off for button holes when the piece measures:
S: 15, 24, 33, 42, 51, 60 and 68 cm.
M: 15, 23, 31, 39, 47, 55, 63 and 70 cm.
L: 17, 25, 33, 41, 49, 57, 65 and 72 cm.
XL: 17, 25, 33, 41, 49, 57, 65 and 73 cm.
XXL:19, 26, 33, 40, 47, 54, 61, 68 and 75 cm.
XXXL:19, 26, 33, 40, 47, 54, 61, 69 and 77 cm.


Back piece: Remember the knitting tension! Knit back and forth on row. Cast on 57-61-65-69-75-79 sts (incl. 1 edge st each side) on needle size 8 mm with Snow. Knit as follows seen from the RS: 1 edge st, *K1, P1*, repeat from *-* and finish with K1 and 1 edge st. Continue the Rib until the piece measures 16-16-18-18-20-20 cm. Then knit 2 rows of garter sts – see explanation above. Finish the garmet in stocking sts at the same time when the piece measures 54-55-56-57-58-59 cm cast off 3 sts each side for the armholes.Then cast off each side on every other row as follows: 2 sts 2-2-2-3-4-4 times and 1 st 1-2-3-3-3-5 times =
= 41-43-45-45-47-47 sts. When the piece measures 72-74-76-78-80-82 cm cast off the mid 15-15-17-17-19-19 sts for the neck. On the next row cast off 1 st towards the neck = 12-13-13-13-13-13 sts left for each shoulder. Cast off remaining sts when the piece measures 74-76-78-80-82-84 cm.

Left front piece: Knit back and forth on row. Cast on 34-36-38-40-44-46 sts (incl 1 edge st at the side and 5 front band sts at the mid front) on needle size 8 mm with Snow. Knit as follows beg. at the side (1st row = RS): 1 edge st, *P1, K1*, repeat from *-*, and finish with 5 front band sts – knitted in garter sts through out. Continue the Rib until the piece measures16-16-18-18-20-20 cm. Then knit 2 rows of garter sts over all sts. Finish the garment in stocking sts, but continue to knit the front band in garter sts through out. Cast off for armholes at the side at the same measures as for the back piece = 26-27-28-28-30-30 sts. When the piece measures 69-71-73-74-76-78 cm put the outermost 11-11-12-12-14-14 sts on a thread or a stitch holder for the neck. Then continue to cast off 1 st for the neck on every other row a total of 3 times = 12-13-13-13-13-13 sts left for the shoulder. Cast off remaining sts when the piece measures 74-76-78-80-82-84 cm.

Right front piece: Knit as left front but reverse. Remeber the button holes – see explanation above

Sleeve: Knit the sleeve back and forth on row. Cast on 30-32-34-34-36-36 sts (incl. 1 edge st each side) with Snow on needle size 8 mm. Continue with Rib as follows: 1 edge st *K1, P1*, repeat from *-* and finish with 1 edge st. Continue with Rib until the piece measures 8 cm. Then knit 2 rows of garter sts. Finish the sleeve in stocking sts. At the same time when the piece measures 9-9-9-10-10-10 cm inc. 1 st each side on every 7-6.5-6.5-4-4-3.5 cm cm a total of 6-6-6-8-8-9 times = 42-44-46-50-52-54 sts. When the piece measures 45-45-44-43-42-41 cm cast off 3 sts each side for the sleeve cap. Continue to cast off for the sleeve cap each side on every other row as follows: 2 sts 1 time, 1 st 3-4-5-6-7-8 times and then 2 sts each side until the piece measures 53-54-54-55-55-55 cm. Cast off 3 sts each side 1 time and then cast off remaining sts.
The piece measures approx: 55-56-56-57-57-57 cm.

Assembly: Sew the shoulder seams and sew in the sleeves. Sew sleeve and side seams inside the edge st.
Collar: Pick up 47-49-51-53-55-57 sts (incl the sts on the thread or stitch holder) on needle size 8 mm with Snow ( the number of sts should be divisible with 2+1 sts).
Knit 2 rows of garter sts at the same time inc. 10 sts evenly distributed on row (for all sizes). Now knit the next row as follows from the RS: 5 garter sts, Rib *K1, P1*, repeat from *-* and finish with K1 and 5 garter sts. Knit Rib until the measures 35 cm, cast off with K over K and P over P.
Pockets: Cast on 20-20-24-24-26-26 sts on needle size 8 mm with Snow. Knit 2 rows of garter sts and continue in stocking sts with 4 sts of garter st each side. When the piece measures 17-17-17-19-19-19 cm knit 6 rows of garter sts at the top of the pocket. Cast off. Knit another pocket. Sew the pocket tight at the middle of each front piece just above the Rib at the bottom edge.


Diagram

diagram measurements
Do you have a question? See a list of frequently asked questions (FAQ)

Knitting tension is what determines the final measurements of your work, and is usually measured per 10 x 10 cm. It is provided like so: number of stitches in width x number of rows in height - eg: 19 stitches x 26 rows = 10 x 10 cm.

The knitting tension is very individual; some people knit/crochet loosely while others work tightly. You adjust the knitting tension with the needle size, which is why the suggested needle size is only meant as a guide! You need to adjust this (up or down) to ensure that YOUR knitting tension matches the knitting tension provided in the pattern. If you work with a different knitting tension than provided you will have a different yarn consumption, and your work will have different measurements than what the pattern suggests.

The knitting tension also determines which yarns can replace each other. As long as you achieve the same knitting tension you can replace one yarn with another.

See DROPS lesson: How to measure your tension/gauge

See DROPS video: How to make a gauge tension swatch

The required amount of yarn is provided in grams, eg: 450 g. To calculate how many balls you’ll need you first need to know how many grams are in 1 ball (25g, 50g or 100g). This information is available if you click on the individual yarn quality on our pages. Divide the amount required with the amount of each ball. For example, if each ball is 50g (the most common amount), the calculation will be as follows: 450 / 50 = 9 balls.

The important thing when changing from one yarn to another is that the knitting/crochet tension remains the same. This is so that the measurements of the finished piece will be the same as on the sketch provided. It is easier to achieve the same knitting tension using yarns from the same yarn group. It is also possible to work with multiple strands of a thinner yarn to achieve the knitting tension of a thicker one. Please try our yarn converter. We recommend you to always work a test swatch.

Please NOTE: when changing yarn the garment might have a different look and feel to the garment in the photo, due to individual properties and qualities of each yarn.

See DROPS lesson: Can I use a different yarn than the one mentioned in the pattern?

All our yarns are categorised into yarn groups (from A to F) according to thickness and knitting tension – group A contains the thinnest yarns and group F the thickest. This makes it easier for you to find alternative yarns to our patterns, should you wish to switch yarn. All yarns within the same group have a similar knitting tension and can easily replace each other. However, different yarn qualities have different structures and properties which will give the finished work a unique look and feel.

Click here for an overview of the yarns in each yarn group

At the top of all our patterns you’ll find a link to our yarn calculator, which is a helpful tool should you wish to use a different yarn than suggested. By filling in the yarn quality you wish to replace, the amount (in your size) and number of strands, the calculator will present good alternative yarns with the same knitting tension. Additionally it will tell you how much you’ll require in the new qualities and whether you’ll need to work with multiple strands. Most skeins are 50g (some are 25g or 100g).

If the pattern is worked with multiple colours, every colour will have to be calculated separately. Similarly, if the pattern is worked with several strands of different yarns (for example 1 strand Alpaca and 1 strand Kid-Silk) you will have to find alternatives for each, individually.

Click here to see our yarn calculator

Since different yarns have different qualities and textures we have chosen to keep the original yarn in our patterns. However, you can easily find options among our available qualities by using our yarn calculator, or simply pick a yarn from the same yarn group.

It is possible that some retailers still have discontinued yarns in stock, or that someone has a few skeins at home that they would like to find patterns for.

The yarn calculator will provide both alternative yarn as well as required amount in the new quality.

If you think it's hard to decide what size to make, it can be a good idea to measure a garment you own already and like the size of. Then you can pick the size by comparing those measures with the ones available in the pattern's size chart.

You'll find the size chart at the bottom of the pattern.

See DROPS lesson: How to read size chart

The needle size provided in the pattern serves only as a guide, the important thing is to follow the knitting tension. And since knitting tension is very individual, you will have to adjust the needle size to ensure that YOUR tension is the same as in the pattern – maybe you’ll have to adjust 1, or even 2 needle sizes, up or down to achieve the correct tension. For this, we recommend that you work test swatches.

Should you work with a different knitting tension than the one provided, the measurements of the finished garment might deviate from the measurement sketch.

See DROPS lesson: How to measure your tension/gauge

See DROPS video: How to make a tension/gauge swatch

Working a garment top-down provides more flexibility and room for personal adjustment. For example it is easier to try the garment on while working, as well as making adjustments to length of yoke and shoulder caps.

The instructions are carefully explaining every step, in the correct order. Diagrams are adjusted to the knitting direction and are worked as usual.

The diagram depicts all rows/rounds, and every stitch seen from the right side. It is read from bottom to top, from right to left. 1 square = 1 stitch.

When working back and forth, every other row is worked from the right side and every other row is worked from the wrong side. When working from the wrong side, the diagram will have to be worked reversed: from left to right, knit stitches are purled, purl stitches are knit etc.

When working in the round every round is worked from the right side and the diagram are worked from right to left on all rounds.

See DROPS lesson: How to read knitting diagrams

The diagram depicts all rows/rounds, and every stitch seen from the right side. It is worked from bottom to top, from right to left.

When working back and forth every other row is worked from the right side: from right to left and every other row is worked from the wrong side: from left to right.

When working in the round, every row in the diagram are worked from the right side, from right to left.

When working a circular diagram you start in the middle and work your way outwards, counter clockwise, row by row.

The rows usually start with a given number of chain stitches (equivalent to the height of the following stitch), this will either be depicted in the diagram or explained in the pattern.

See DROPS lesson: How to read crochet diagrams

Instructions for working several diagrams after each other on the same row/round, will often be written like so: “work A.1, A.2, A.3 a total of 0-0-2-3-4 times". This means you work A.1 once, then A.2 is worked once, and A.3 is repeated (in width) the number of times provided for your size – in this case like so: S = 0 times, M = 0 times, L=2 times, XL= 3 times and XXL = 4 times.

The diagrams are worked as usual: begin with the first row in A.1, then work the first row in A.2 etc.

See DROPS lesson: How to read knitting diagrams

See DROPS lesson: How to read crochet diagrams

The total width of the garment (from wrist-to-wrist) will be larger in the larger sizes, despite the actual sleeves being shorter. The larger sizes have longer sleeve caps and wider shoulders, so there will be a good fit in all sizes.

The measurement sketch/schematic drawing provides information regarding the full length of the garment. If it’s a jumper or a jacket the length is measured from the highest point on the shoulder closest to the neckline, and straight down to the bottom of the garment. It is NOT measured from the tip of shoulder. Similarly, the length of yoke is measured from the highest point on the shoulder and down to where yoke is split into body and sleeves.

On a jacket measures are never taken along bands, unless specifically stated. Always measure inside band stitches when measuring the length.

See DROPS lesson: How to read a schematic drawing

Diagrams are often repeated on the round or in height. 1 repeat is the diagram the way it appears in the pattern. If it says to work 5 repeats of A.1 in the round, then you work A.1 a total of 5 times after/next to each other in the round. If it says to work 2 repeats of A.1 vertically/in height you work the entire diagram once, then begin again at the start and work the entire diagram one more time.

Chain stitches are slightly narrower than other stitches and to avoid working the cast-on edge too tight, we simply chain more stitches to begin with. The stitch count will be adjusted on the following row to fit the pattern and measurement sketch.

The rib edge is more elastic and will contract slightly compared to, for example, stocking stitch. By increasing before the rib edge, you avoid a visible difference in width between the rib edge and the rest of the body.

It’s very easy to cast off too tightly, and by making yarn overs while casting off (and simultaneously casting these off) you avoid a too tight cast off edge.

See DROPS video: How to bind off with yarn overs (yo)

To achieve an even increase (or decrease) you can increase on, for example: every 3rd and 4th row alternately, like so: work 2 rows and increase on the 3rd row, work 3 rows and increase on the 4th. Repeat this until the increase is complete.

See DROPS lesson: Increase or decrease 1 st on every 3rd and 4th row alternately

Should you prefer to work in the round instead of back and forth, you may of course adjust the pattern. You’ll need to add steeks mid-front (usually 5 stitches), and follow the instructions. When you would normally turn and work from the wrong side, simply work across the steek and continue in the round. At the end you’ll cut the piece open, pick up stitches to work bands, and cover the cut edges.

See DROPS video: How to knit steeks and cut open

Should you prefer to work back and forth instead of in the round, you may of course adjust the pattern so you work the pieces separately and then assemble them at the end. Divide the stitches for the body in 2, add 1 edge stitch in each side (for sewing) and work the front and back pieces separately.

See DROPS lesson: Can I adapt a pattern for circular needles into straight needles?

Pattern repeats can vary slightly in the different sizes, in order to get the correct proportions. If you’re not working the exact same size as the garment in the photo, yours might deviate slightly. This has been carefully developed and adjusted so that the complete impression of the garment is the same in all sizes.

Make sure to follow instructions and diagrams for your size!

If you have found a pattern you like which is available in women’s size it’s not very difficult to convert it to men’s size. The biggest difference will be the length of sleeves and body. Start working on the women size that you think would fit across the chest. The additional length will be worked right before you cast off for the armhole/sleeve cap. If the pattern is worked top-down you can add the length right after the armhole or before the first decrease on sleeve.

Regarding additional yarn amount, this will depend on how much length you add, but it is better with a skein too many than too few.

All yarns will have excess fibres (from production) that might come off as lint or shedding. Brushed yarns (ie hairier yarns) have more of these loose, excess fibres, causing more shedding.

Shedding also depends on what is worn under or over the garment, and whether this pulls at the yarn fibres. It’s therefore not possible to guarantee that there will be no shedding

Below are some tips on how to get the best result when working with hairier yarns:

1. When the garment is finished (before you wash it) shake it vigorously so the looser hairs come off. NOTE: do NOT use a lint roller, brush or any method that pulls at the yarn.

2. Place the garment in a plastic bag and put it in your freezer - the temperature will cause the fibres to become less attached to each other, and excess fibres will come off easier.

3. Leave in the freezer for a few hours before taking it out and shaking it again.

4. Wash the garment according to the instructions on the yarn label.

Pilling is a natural process that happens to even the most exclusive of fibers. It's a natural sign of wear and tear that is hard to avoid, and that is most visible in high friction areas of your garment like a sweater's arms and cuffs.

You can make your garment look as new by removing the pilling, using a fabric comb or a pill/lint remover.

Still can't find the answer you need? Then scroll down and leave your question so one of our experts can try to help you. This will be done normally within 5 to 10 working days.
In the meantime, you can read the questions and answers that others have left to this pattern or join the DROPS Workshop on Facebook to get help from fellow knitters/crocheters!

You might also like...

Post a comment to pattern DROPS 103-22

We would love to hear what you have to say about this pattern!

If you want to leave a question, please make sure you select the correct category in the form below, to speed up the answering process. Required fields are marked *.

Comments / Questions (38)

country flag Claudia wrote:

10-11-12-14-15-16 cm = Die Höhe ab der 1. Abnahme?? Entschuldigung, wenn ich so viel Frage, aber die Anleitung verstehe ich nicht so leicht Danke

03.02.2023 - 17:20

DROPS Design answered:

Liebe Claudia, die 10-11-12-14-15-16 cm sind die gesamte Höhe der Armkugel, zwischen die ersten 6 abgekettenen Maschen under der Ärmel und die übrigen abgekettenen Maschen am Ende der Ärmel. Ketten Sie wie beschrieben ist, so bekommen Sie die genaue Maßnahmen wie in der Maßskizze. Viel Spaß beim stricken!

06.02.2023 - 09:00

country flag Claudia wrote:

10-11-12-14-15-16 cm ist halbe Armkugelbreite?

03.02.2023 - 15:36

DROPS Design answered:

Liebe Claudia, also nein, das ist die Länge der Armskugel = am Ende der Ärmel - Viel Spaß beim stricken!

03.02.2023 - 16:48

country flag Claudia wrote:

Das verstehe ich nicht. Das muss doch im Armloch passen. Meine Maschenprobe ist 13 Maschen auf 10 cm. Trotzdem habe ich die Abnahmen laut Anleitung gemacht

03.02.2023 - 09:38

DROPS Design answered:

Liebe Claudia, ja genau dann stimmt es auch, diese 2 Maschen beiseitig ketten Sie noch mehrmals ab, solange die Ärmel nicht die gewünschte Länge misst, dh53-54-55-55-55-55 cm, dann ketten Sie noch 3 Maschen am Anfang der 2 nächsten Reihe; die Armkugel muss je nach der Größe insgesamt 10-11-12-14-15-16 cm sein (siehe Maßskizze). Viel Spaß beim stricken!

03.02.2023 - 13:12

country flag Claudia wrote:

Guten Tag, Beim Ärmel steht: danach, auf beiden Seiten je 2 M. abk. bis Arbeit 53-54-54-55-55-55 misst Wird hier 1x 2 M. abk. oder mehrmals 2 M. bis man angegebene Höhe erreicht hat? Danke

02.02.2023 - 22:14

DROPS Design answered:

Liebe Claudia, also je nach Ihrer Maschenprobe werden Sie 1 Mal oder mehrmals 2 Maschen beidseitig abketten, Hauptsache ist daß die gleiche Maschenanzahl beidseitig abgekettet werden, und daß die Höhe bzw Länge stimmt. Viel Spaß beim stricken!

03.02.2023 - 08:30

country flag Claudia wrote:

Guten Tag, Bei den beiden Vorderteilen, die Maschen, die auf eine Hilfsnadel kommen, werden aber zunächst gestrickt? Sonst muss man neuen Faden ansetzen. Danke und liebe Grüße

29.01.2023 - 21:03

DROPS Design answered:

Liebe Claudia, ja genau, Sie können diese Maschen zuerst stricken, dann sie stilllegen, so brauchen Sie nicht den Faden abzuschneiden. Viel Spaß beim stricken!

30.01.2023 - 09:25

country flag Claudia wrote:

Guten Tag, Bei den Vorderteilen steht: Weiter, bei jeder 2. R., je 1 M. gegen den Hals abk. total 3 M Verstehe gegen den Hals nicht? Von wo nach wo kettet man ab? Von Blende Richtung Armloch? Danke

23.01.2023 - 00:38

DROPS Design answered:

Liebe Claudia, diese Maschen ketten Sie am Anfang einer Reihe von Hals bis Armloch, dh am Anfang einer Rückreihe beim linken Vorderteil und am Anfang einer Hinreihe beim rechten Vorderteil. Viel Spaß beim stricken!

23.01.2023 - 10:20

country flag Claudia wrote:

Guten Tag, Ich verstehe nicht beim Vorderteil: Nach xy cm, die äußersten xy Maschen gegen die Mitte auf einen Hilfsfaden legen. Welche Seite ist gemeint? Danke

29.12.2022 - 23:02

DROPS Design answered:

Liebe Claudia, es handelt sich um die letzten Maschen der Hinreihe beim linken Vorderteil und die ersten Maschen der Hinreihen beim rechten Vorderteil = die 5 BlendeMaschen + die nächsten 6-6-7-7-9-9 Maschen. Viel Spaß beim stricken!

02.01.2023 - 13:01

country flag Anja V Gent wrote:

Ik heb andere wol en breinaalden moeten gebruiken voor dit patroon Ik heb 86 steken opgezet met naalden nr 7 Hoe reken ik uit hoe ik moet minderen voor bijv de armsgaten en hals B v d Anja

29.12.2022 - 17:40

DROPS Design answered:

Dag Anja,

Op basis van de stekenverhouding kun je ook het aantal minderingen uitrekenen. Je moet je eigen stekenverhouding vergelijken met de stekenverhouding in het patroon en op basis daarvan weet je hoeveel steken je op de naald moet hebben om een bepaalde breedte te bereiken.

01.01.2023 - 11:29

country flag Bernard Gabrielle wrote:

Bonjour, Il est indiqué de faire des mailles lisières pour chaque morceau. Quelle méthode conseillez vous d'utiliser pour ce modèle-ci ? Une maille glissée ? un point mousse ? un jersey ? autre ? Merci d'avance pour votre aide

09.06.2020 - 12:21

DROPS Design answered:

Bonjour Mme Bernard, vous pouvez tricoter les mailles lisières comme vous le souhaitez, ce sont les mailles pour les coutures, donc, en fonction de votre façon d'assembler, optez pour des mailles lisières chaînettes, en jersey ou au point mousse. Bon tricot!

09.06.2020 - 13:33

country flag BELIN wrote:

Ai bien réparti mes 10 mailles à peu près uniformément en laissant 5 mailles de chaque côté pour le point mousse et ai bien tricoté ensuite mes 57 mailles sur 35 cm. Je pense donc ne pas le recommencer car ai bien fait à peu près mes répartitions mais vais juste le rapetisser un petit peu pour qu'il ne tombe pas trop à l'arrière. Merci pour votre aide.

22.02.2019 - 17:30