
Popular categories
Looking for a yarn?


|
|
DROPS 104-16 |
|
|
|
|
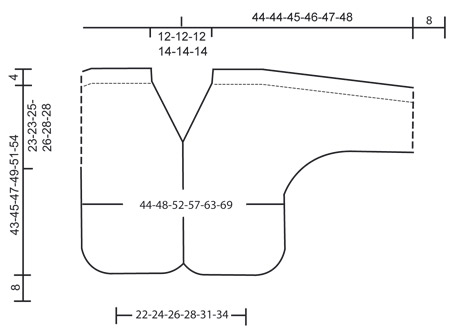
DROPS jacket knitted in 2 threads ”Alpaca” with crochet lace edge. Size: S to XXXL
DROPS 104-16 |
|
|
Knitting gauge: 18 sts x 23 rows stockinette sts = 10 x 10 cm [4" x 4"] Crochet gauge: 19 dc = 10 cm [4"] in width Crochet tips: At beginning of row substitute 1 tr with 4 ch. Garter st: Knit all rows. Back piece: Knit piece back and forth on circular needles. Cast on 42-46-50-54-60-64 sts (incl 1 edge sts on each side) on needle size 4.5 mm [US 7] with 1 thread of each color. Knit 2 rounds garter sts – see explanation above. Continue with stockinette sts until piece is completed. At the same time inc on each side on every other row as follows: 5 sts 2-3-1-2-2-3 times, 4 sts 2-1-3-3-3-3 times and 2 sts 1-1-3-2-3-2 times = 82-88-96-106-116-126 sts. Continue in stockinette sts with WS out until piece measures 20-22-22-23-23-26 cm [8"-8 ¾"-8 ¾"-9"-9"-10 ¼"]. Remember knitting gauge! Now inc on each side on every other row as follows: 1 sts 0-0-0-4-6-6 times, 2 sts 8-8-8-5-3-3 times. Continuing inc 22-20-18-18-16-14 sts 1 time = 158-160-164-170-172-178 sts. Continue in stockinette sts with WS out and 1 edge sts on each side until piece measures 39-41-42-44-45-48 cm [15 ¼"-16⅛"-16½"-17 ¼"-17 ¾"-19"] (bottom of sleeve measures 12-12-13-13-14-14 cm [4 ¾"-4 ¾"-5⅛"-5⅛"-5½"-5½"]). Now start bind off to shape shoulder (bind off on the outside of sleeve towards neck) on every other row as follows: 12-12-10-10-8-8 sts 3-3-4-4-5-5 times and 15-15-11-12-12-13 sts 1 time = 56-58-62-66-68-72 sts left on needle. On next row bind off middle 22-22-22-26-26-26 sts for neck = 17-18-20-20-21-23 sts left on each shoulder. Knit 1 row over shoulder. Bind off loosely. Piece now measures approx 43-45-47-49-51-54 cm [17"-17 ¾"-18½"-19 ¼"-20"-21 ¼"]. Left front piece: Cast on 18-20-22-24-27-29 sts on circular needle size 4.5 mm [US 7] with 1 thread of each color. Knit 2 rows garter sts. Continue with stockinette sts until piece is completed. At the same time inc for sleeve on side as on back piece. And at the same time inc 1 sts mid front on every other row 4 times in total. When all inc are completed there are 42-45-49-54-59-64 sts on row. Continue in stockinette sts from WS until piece measures 20-22-22-23-23-26 cm [8"-8 ¾"-8 ¾"-9"-9"-10 ¼"]. Now inc for sleeves on side as for back piece = 80-81-83-86-87-90 sts. Continue in stockinette sts with WS out and 1 edge sts on each side. When piece measures 27-29-30-31-32-35 cm [10⅝"-11⅜"-11 ¾"-12 ¼"-12½"-13 ¾"] bind off for v-neck mid front as follows: bind off 1 st on every other row 12-12-12-14-14-14 times in total. When piece measures 39-41-42-44-45-48 cm [15 ¼"-16⅛"-16½"-17 ¼"-17 ¾"-19"] start binding off for shoulder like back piece (ensure measurement on bottom of sleeve is the same as on back piece). When all bind offs are completed 17-18-20-20-21-23 sts are left on shoulder. Knit 1 row over shoulder. Bind off loosely. Piece now measures approx 43-45-47-49-51-54 cm [17"-17 ¾"-18½"-19 ¼"-20"-21 ¼"]. Right front piece: Knit like left piece but reversed. Crochet edges: Edge along top sleeve: Crochet an edge at top of both sleeves and on front and back pieces. Crochet 70 to 80 tr on sleeve cap with crochet hook size 4 mm [US G/6] with 2 threads light gray. Crochet from bottom of sleeve up to neck. Turn piece and crocket 1 row back with 1 tr in each tr. Cut yarn. Assembly: Sew tog shoulder seam (i.e. crochet edges) in outermost edge with small stitches. Sew bottom sleeve and side seams in one within 1 edge st. Edge around bottom sleeves: Crochet 60 to 69 tr (dividable with 3) – read Crochet tip – on bottom sleeve edge on crochet hook size 4 mm [US G/6] with 2 threads light gray. Complete round with 1 sl st in 4th ch from beg of round. 2nd round: Crochet tr in tr at the same time as inc by crocheting 2 tr in every 3rd tr (= 80 to 92 tr). 3rd round: Crochet 1 tr in each tr. 4th round: Crochet tr in tr at the same time as inc by crocheting 2 tr in every 4th tr (= 100 to 115 tr – dividable with 5). 5th round: Crochet * 1 sc in first tr, 2 dc in next tr, 2 tr in next tr, 2 dc in next tr, 1 sc in next tr *, repeat from *-*. Edge on back and front pieces: Crochet edge around back and front pieces on crochet hook size 4 mm [US G/6] with 2 threads light gray as follows: 1st round: Start mid neck back, crochet approx 19-19-19-21-21-21tr to shoulder seam. Now crochet approx 38-38-40-42-44-44 tr down along v-neck. Then crochet approx 57-60-61-62-63-67 tr down along front piece until cast on edge. Continue with 18-20-22-24-27-29 tr on bottom edge and 27-27-32-32-36-36 tr along curve up to side seam. Crochet 27-27-32-32-36-36 tr from side seam on curve down on back piece and 39-44-47-54-59-65 tr on bottom edge. On curve to side seam crochet 27-27-32-32-36-36 tr, crochet same number of sts from side seam and down to cast on edge on other front piece. Crochet on bottom edge and up along front piece to mid back on neck like other front piece and complete with 1 sl st in 4th ch from beg of round. There should now be approx 411-426-459-480-513-531 tr around back and front pieces. NOTE: Number of tr must be dividable with 3. 2nd round: Crochet tr in tr at the same time as inc by crocheting 2 tr in every 3rd tr. Complete round with 1 sl st in 4th ch from beg of round. Cut thread and sew. Neck edge: Start mid front at v-neck start. Crochet like 5th round on sleeve. Crochet along v-neck, back of neck and down along v-neck on other front piece. Ensure to complete after one pattern repeat. Cut thread and sew. Edge on bottom back and front pieces: Start crochet mid front where curve starts and crochet around entire bottom edge to curve end mid front and on the other front piece. 3rd round: Crochet tr in tr at the same time as inc by crocheting 2 tr in every 4th tr. 4th round: Crochet like 3rd round but adjust so total number of tr are dividable with 5. 5th round: Crochet like 5th round on sleeve. Assembly: Sew in buttons on left front piece. Sew in buttons on crochet edge between 1st and 2nd round. Sew 1 button approx 1-2 cm [3/8"-¾"] below v-neck and sew 1 button approx 1 to 2 cm [3/8"-¾"] above curve start mid front. Place remaining buttons in between and sew in. |
|
|
|
|
Have you made this or any other of our designs? Tag your pictures in social media with #dropsdesign so we can see them! Do you need help with this pattern?You'll find tutorial videos, a Comments/Questions area and more by visiting the pattern on garnstudio.com. © 1982-2024 DROPS Design A/S. We reserve all rights. This document, including all its sub-sections, has copyrights. Read more about what you can do with our patterns at the bottom of each pattern on our site. |


With over 40 years in knitting and crochet design, DROPS Design offers one of the most extensive collections of free patterns on the internet - translated to 17 languages. As of today we count 304 catalogs and 11422 patterns - 11417 of which are translated into English (US/in).
We work hard to bring you the best knitting and crochet have to offer, inspiration and advice as well as great quality yarns at incredible prices! Would you like to use our patterns for other than personal use? You can read what you are allowed to do in the Copyright text at the bottom of all our patterns. Happy crafting!
Comments / Questions (17)
Dear DROPSdesign, Thank you very much for the response and the video.
17.04.2020 - 19:58What does tr mean in the section about crocheting the edges? Thanks
16.04.2020 - 19:17DROPS Design answered:
Dear Jane, tr is for treble crochet. Happy crocheting!
17.04.2020 - 08:28Jeg har strikket denne og den blev helt fantastisk! Men - Iflg. opskriften, skal man tage ud i hæklekanten hele vejen rundt, men jeg undlod at tage ud i kanten foran, og kun halvt så mange masker i halskanten, hvilket stemmer overens med modellen. Hvis man tager ud efter opskriften, bliver kanten som en krøllet flæsekant hele vejen rundt og man kan ikke lukke den med knapper! Det må være en fejl i opskriften!
18.08.2009 - 13:40Love it, Please make us a crochet version, in usa
20.10.2007 - 04:58Supersüß!! Ich kann mich gar nicht mehr entscheiden, was ich als nächstes machen möchte!!
08.10.2007 - 13:55Colleen C. wrote:
Count me in on that!!!! Crochet version please!
06.09.2007 - 04:17Cheryl Burnette wrote:
I second that! A crochet version would be great! Love this look.
14.08.2007 - 12:59Pam Buzzard wrote:
I wished you had this pattern in crochet also...its so cute
17.07.2007 - 21:13Ragnhild wrote:
Veldig søt og romantisk, men stemmer for lengre armer (3/4)
09.07.2007 - 13:49Klasse, sieht super aus
18.06.2007 - 16:31