
Popular categories
Looking for a yarn?


|
|
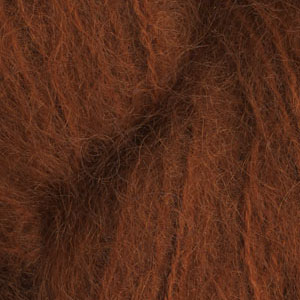
DROPS Extra 0-229 |
|
|
|
|
DROPS knitted short, loose-fitting jacket in Flores.
DROPS Extra 0-229 |
|
|
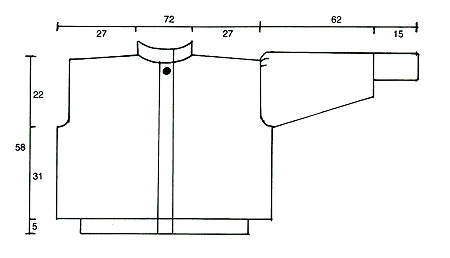
Front piece: Cast on 79 stitches with needle size 2.5 MM = US 1.5 and work rib: K2 twisted, P1 for 5 cm = 2". Place 22 stitches on a thread for band. Change to needle size 5.5 MM = US 9 and continue with stockinette stitch over the remaining stitches until piece measures 36 cm = 14¼". Now decrease for armhole every 2nd row as follows: 5 stitches 1 time, 2 stitches 1 time, 1 stitch 3 times. When piece measures 11 cm = 4⅜" from the first decrease, change back to needle size 2.5 MM = US 1.5 and work rib: K2 twisted, P1. Decrease for neck when rib measures 7.5 cm = 2⅞" as follows: 4 stitches 1 time, 3 stitches 1 time, 2 stitches 2 times, 1 stitch 4 times. Now bind off for shoulder as follows: 10 stitches, 11 stitches and finally the remaining 11 stitches. Work the other front piece in the same way, but reversed. Back piece: Cast on 106 stitches with needle size 2.5 MM = US 1.5 and work rib: K2 twisted, P1 for 5 cm = 2". Change to needle size 5.5 MM = US 9 and continue with stockinette stitch until the piece measures 36 cm = 14¼". Now decrease for armholes as follows: 4 stitches 1 time, 2 stitches 1 time, 1 stitch 2 times. When you have worked 11 cm = 4⅜" from the first decrease, change back to needle size 2.5 MM = US 1.5 and work rib: K2 twisted, P1. When the rib measures 9 cm = 3½" decrease for neck as follows: Place the middle 12 stitches on 1 thread. Then decrease on each side, 2 stitches 1 time, 1 stitch 5 times, at the same time as after the 6th row, you bind off for shoulder as on front piece. Sleeve: Cast on 40 stitches with needle size 2.5 MM = US 1.5 and work rib: K2 twisted, P1 for 4 cm = 1½". Continue with rib, but increase 1 stitch in each side every 4 cm = 1½", 3 times. When the rib measures 15 cm = 6", change to needle size 5.5 MM = US 9 and work stockinette stitch. Increase 1 stitch in each side every 4th round until there are 74 stitches on the needle. When the sleeve measures 46 cm = 18", bind off for armholes in each side every 2nd round: 5 stitches, 2 stitches and 1 stitch 2 times. Continue working until the piece measures 12 cm = 4¾" from the first decrease. Now decrease 1 stitch at the beginning of each row 5 times = 10 stitches and then at the beginning and end of each row 5 times = 10 stitches. Bind off the remaining stitches. Band: Place the 22 stitches on the first thread back on needle size 2.5 MM = US 1.5 and work rib: K2 twisted, P1 until the band is the right length. The right band has one buttonhole 2 cm = ¾" before the neckline. Buttonhole = Row 1: Work 4 stitches, bind off 4 stitches, work 6 stitches, bind off 4 stitches, work 4 stitches. Row 2: Work 4 stitches, cast on 4 stitches, work 6 stitches, cast on 4 stitches, work 4 stitches. Continue rib as far as neckline. Bind off. Collar: Knit up 96 stitches along the neckline and over bands with needle size 2.5 MM = US 1.5. Work rib: K2 twisted, P1 for 9 cm = 3½". Bind off. Fold collar double, right side to right side and sew together in front along edge. Turn inside out and fasten to neckline. Assembly: Sew shoulder seams. Sew in sleeves at the same time as the excess width is ruffled in towards the shoulder. Sew sleeve and side seams in one go. Sew 1 button to the left band. |
|
|
|
|
Have you made this or any other of our designs? Tag your pictures in social media with #dropsdesign so we can see them! Do you need help with this pattern?You'll find tutorial videos, a Comments/Questions area and more by visiting the pattern on garnstudio.com. © 1982-2024 DROPS Design A/S. We reserve all rights. This document, including all its sub-sections, has copyrights. Read more about what you can do with our patterns at the bottom of each pattern on our site. |


With over 40 years in knitting and crochet design, DROPS Design offers one of the most extensive collections of free patterns on the internet - translated to 17 languages. As of today we count 304 catalogs and 11422 patterns - 11417 of which are translated into English (US/in).
We work hard to bring you the best knitting and crochet have to offer, inspiration and advice as well as great quality yarns at incredible prices! Would you like to use our patterns for other than personal use? You can read what you are allowed to do in the Copyright text at the bottom of all our patterns. Happy crafting!
Comments / Questions (7)
Bonjour, j'aimerais réaliser ce modèle mais la qualité Florès n'existe plus. Pourriez-vous m'indiquer svp quel était le métrage d'une pelote ? J'ai acheté 10 pelotes brushed alpaca silk que je vais associer à 8 pelotes de baby mérinos soit 1400m pour chaque qualité. Aurais je assez pour réaliser ce joli modèle. Merci et belle journée à vous.
01.11.2023 - 21:43DROPS Design answered:
Bonjour Josie, utilisez le convertisseur pour voir les alternatives possibles et leur quantité correspondante; DROPS Royal (pas Florès) était du groupe C, vous pouvez également utiliser Brushed Alpaca Silk mais faites bien votre échantillon pour vérifier si la texture vous convient. Retrouvez ici comment calculer la nouvelle quantité requise. Bon tricot!
02.11.2023 - 17:38I would to have this pattern in size large - can you send?
26.08.2023 - 21:19DROPS Design answered:
Dear Neena, we don't make custom patterns but you can see in this lesson how to calculate a pattern according to your measurements:https://www.garnstudio.com/lesson.php?id=25&cid=19. Also, check the measurements in the schematic of this piece, since it's quite a wide jacket and it may fit your measurements even if marked as a Medium garment. Happy knitting!
28.08.2023 - 00:44Ærmet:strik videre til der er 12 cm fra aflukningen.Hvor mange cm er det efter lukningen til ærmegabet? Er det rigtigt at ærmet ialt skal måle 77 cm?
14.06.2021 - 21:50DROPS Design answered:
Hej Sanne, vi skrev opskrifterne lidt anderledes dengang. Ærmet skal måle 62 cm :)
16.06.2021 - 12:41Ærmer der står strik videre til der er 12cm fra aflukningen. Hvor mange cm skaljeg strikke efter aflukningen til ærmegabet? Er det rigtigt at ærmet ialt skal måle 77 cm?
14.06.2021 - 21:46Christine wrote:
Re: Drops Extra 0-229\\r\\nI would like to knit this sweater. - can I use Drops Big Merino yarn??
25.05.2018 - 23:50Hej Jeg forstår ikke: "Nu lukkes der 1 maske af i begyndelsen af hver pind 5 gange = 10 masker, og derefter i begyndelsen og slutningen af hver pinde 5 gange = 10 masker." Jeg forstår det skal der tages ind, den strikkes færdig. Der tages igen ind på den næste pind og den strikkes færdig osv. Men = 10m, jeg får det kun til 5 m. Dog får jeg det næste til at passe bedre ift med de = 10m Hvordan skal det forstås? MVH Celina
31.05.2017 - 08:39DROPS Design answered:
Hej Celina, når du tager 1 m ind i begyndelsen af hver pind 5 gange (ialt 10) så er det 5 gange i hver side. God fornøjelse!
05.06.2017 - 16:20Kan i hjælpe mig med at finde et rigtig god alternativ til Flores garn? Jeg kan ikke få fat i Vienna garn og heller ej flores.
24.10.2016 - 15:26DROPS Design answered:
Hej Susanne. Du kan bruge DROPS Brushed Alpaca Silk - den er i samme kategori som Flores var
24.10.2016 - 15:44