DROPS Alpaca
DROPS Alpaca
100% Alpaca
from 4.85 $ /50g
DROPS Cotton Viscose
54% Cotton, 46% Viscose
Discontinued
find alternatives
DROPS SS24

Breath of Summer

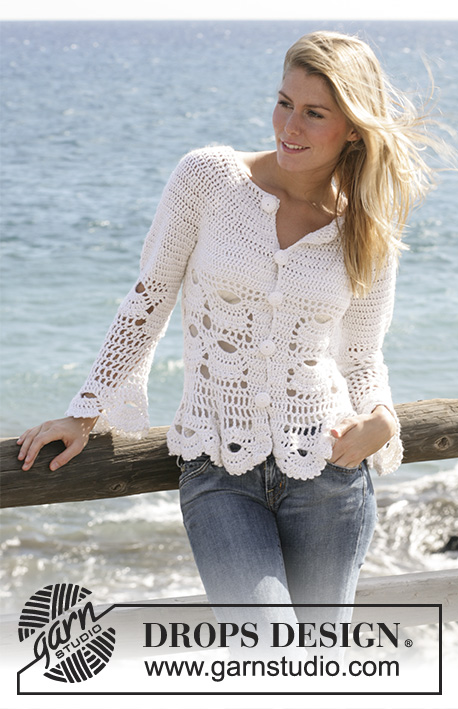
Crochet DROPS tunic with mussel pattern with 1 thread Alpaca and 1 thread Cotton Viscose or Bomull-Lin. Size S - XXL

DROPS 99-4
Size: S – M – L - XL – XXL
Finished measurements at chest: 33"-39⅜"-39⅜"-41 ¾"-45"
Full length: appr 26⅜"-27½"-29⅛"-29½"-31"

Materials: DROPS Alpaca from Garnstudio
200-200-250-250-300 g color no 1101, white
and use: DROPS Cotton Viscose from Garnstudio
300-350-350-400-450 g color no 01, white

Or use:
DROPS Bomull-Lin from Garnstudio
400-450-500-550-600 g color no 01, white

DROPS crochet hook size 5 mm [H/8], or size needed to obtain the correct gauge

-------------------------------------------------------

Alternative Yarn – See how to change yarns here
Yarn Groups A to F – Use the same pattern and change the yarn here
Yarn usage using an alternative yarn – Use our yarn converter here

-------------------------------------------------------

DROPS Alpaca
DROPS Alpaca
100% Alpaca
from 4.85 $ /50g
DROPS Cotton Viscose
54% Cotton, 46% Viscose
Discontinued
find alternatives

Pattern instructions

NOTE: This pattern is written in American English. All measurements in charts are in cm. For conversion from inches to cm - click here. There are different terms for crocheting in American and British English. If this pattern includes crochet, click for "crochet terms" here. For this pattern in British English, please click here.
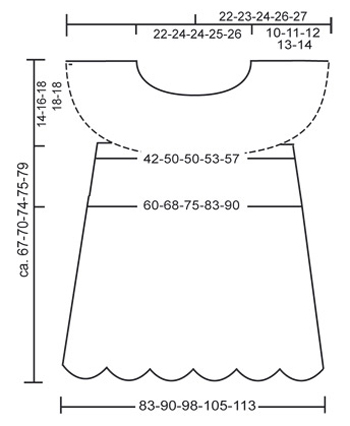
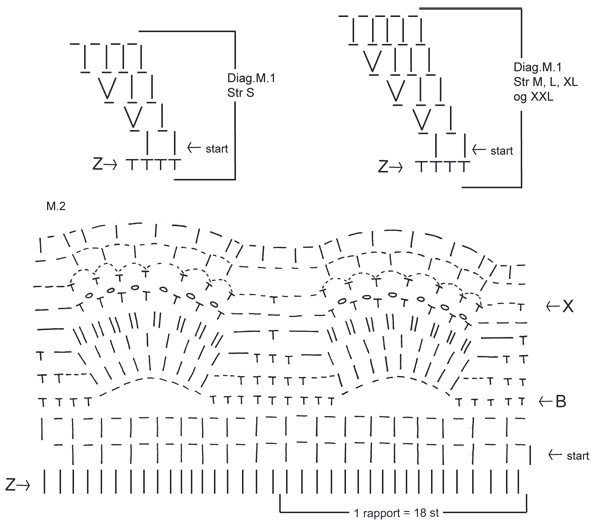
Crochet gauge: 12 dc x 7 rows with 1 thread Alpaca and 1 thread Cotton Vicose or 1 thread Bomull-Lin = 10 x 10 cm [4" x 4"]. 1 repeat of mussel pattern = width approx 12 cm [4¾"].

Increasing tip 1: To inc 1 sc: crochet 2 sc in 1 sc.

Increasing tip 2: To inc 1 dc: crochet 2 dc in 1 dc (no ch in between).

Increasing tip 3: To inc 1 ch-loop: crochet 2 ch-loops in the same st.

Crochet info: At the beg of each round replace the first dc with 3 ch. Replace first tr with 4 ch. Finish each round with 1 sl st in 3rd/4th ch from beg of round.

Pattern: See chart M.1 and M.2. The charts are seen from the RS.

Measuring tip: Because of the weight of the wool all measurements should be made whilst the garment is hanging.

TUNIC
Back and front piece: The tunic is crochet in the round from the top down. Loosely crochet 71-75-75-79-83 ch on crochet hook size 5 mm [H/8] with 1 thread Drops Alpaca and 1 thread Drops Cotton Viscose (double thread) or 1 thread Bomull-Lin. Form a ring with a sl st in the first ch. Crochet next round as follows: 1 sc in each of the first 3 ch, *skip 1 ch, 1 sc in each of the 3 next ch*, repeat from *-* = 54-57-57-60-63 sc. Now crochet a round of sc, at the same time inc 22-15-19-20-21 sc evenly – see Increasing tip 1 = 76-72-76-80-84 sc. Continue in chart M.1 – see Crochet info. After M.1 there are 76-90-95-100-105 ch-loops on round (1 ch-loop = 1 dc + 1 ch). Continue with dc in ch and ch over dc until piece measures 10-11-12-13-14 cm [4"-4⅜"-4 ¾"-5⅛"-5½"].
Crochet next round as follows:
Skip 17-19-21-22-22 ch-loops from previous round (= right sleeve), crochet 8 ch (= under arm), crochet 21-26-26-28-30 ch-loops (= front piece), skip 17-19-21-22-22 ch-loops from previous round (= left sleeve), crochet 8 ch (= under arm), crochet 21-26-27-28-31 ch-loops (= back piece). Place a marker each side, in between the 8 ch crochet mid under arm. Continue in ch-loops. Note! On the first round crochet the 8 ch under each arm as follows: 1 dc in the first ch, 1 ch, skip 1 ch, 1 dc in next ch, 1 ch, 1 dc in the same ch, 1 ch, skip 1 ch, 1 dc in next ch, 1 ch, 1 dc in the same ch, 1 ch, skip 1 ch, 1 dc in next ch, 1 ch and skip 1 ch (= 6 ch-loops under each arm) = 54-64-65-68-73 ch-loops on round in total. Continue in ch-loops in the round, at the same time inc 1 ch-loop – see Increasing tip 3 – on each side of both markers on every round a total of 4-4-6-6-7 times = 70-80-89-92-101 ch-loops.
After all inc piece measures approx 19-20-23-24-27 cm [7½"-8"-9"-9½"-10⅝"] measured from ch-chain at neckline (you have now reached mid chest; if you wish to adjust this crochet additional rounds in ch-loops after the inc). Now crochet 1 round in ch-loops, at the same time inc 4-2-2-14-14 dc evenly on round – see Increasing tip 2 = 144-162-180-198-216 dc/ch.
Now continue in mussel pattern chart M.2 (beg at start arrow in diagram) = 8-9-10-11-12 horizontal repeats on round. Crochet 3 vertical repeats of M.2, but beg the second and third repeat by the Arrow-B in diagram. After M.2 crochet 2-3-3-3-4 rounds in tr as follows:
Round 1: Remember crochet info! Crochet 1 tr in each ch-loop with 1 ch in between each and finish with 1 tr in the last dc = 72-81-90-99-108 tr.
Round 2: crochet 1 tr in each tr from previous round with 2 ch in between each tr (instead of 1) – finish size S here before the last mussel pattern = 72 tr.
Round 3: crochet 1 tr in each tr from previous round with 3 ch between each tr - finish size M, L and XL here before the last mussel pattern = 81-90-99 tr.
Round 4: crochet 1 tr in each tr from previous round with 3 ch between each tr - finish size XXL here before the last mussel pattern = 108 tr.
Now crochet a round in ch-loops as follows: 1 dc and 1 ch (= 1 ch-loop) in each tr from previous round, at the same time inc 1 ch-loop – see Increasing tip 3 – in every 3-3-4-4-4 tr. Note! For size L and XL finish with 1 dc and 1 ch in each of the last 2-3 tr = 96-108-112-123-135 ch-loops. Continue with 1 round of ch-loops, at the same time inc 6-0-10-6-0 dc – see Increasing tip 2 = 198-216-234-252-270 dc/ch. Now crochet M.2 again (beg at start arrow in diagram), but finish the pattern after row 7.

Diagram

All measurements in charts are in cm.

symbols = 1 ch
symbols = 1 sc
symbols = 1 dc
symbols = 2 dc in 1 ch
symbols = 1 picot (= 3 ch, 1 sc in the first ch)
symbols = this row is described in the pattern, beg by start arrow
symbols = 7th row
diagram
diagram
Do you have a question? See a list of frequently asked questions (FAQ)

Knitting tension is what determines the final measurements of your work, and is usually measured per 10 x 10 cm. It is provided like so: number of stitches in width x number of rows in height - eg: 19 stitches x 26 rows = 10 x 10 cm.

The knitting tension is very individual; some people knit/crochet loosely while others work tightly. You adjust the knitting tension with the needle size, which is why the suggested needle size only serve as a guide! You need to adjust this (up or down) to ensure that YOUR knitting tension matches the knitting tension provided in the pattern. If you work with a different knitting tension than provided you will have a different yarn consumption, and your work will have different measurements than what the pattern suggests.

The knitting tension also determines which yarns can replace each other. As long as you achieve the same knitting tension you can replace one yarn with another.

See DROPS lesson: How to measure your tension/gauge

See DROPS video: How to make a gauge tension swatch

The required amount of yarn is provided in grams, eg: 450 g. To calculate how many balls you’ll need you first need to know how many grams are in 1 ball (25g, 50g or 100g). This information is available if you click on the individual yarn quality on our pages. Divide the amount required with the amount of each ball. For example, if each ball is 50g (the most common amount), the calculation will be as follows: 450 / 50 = 9 balls.

The important thing when changing from one yarn to another is that the knitting/crochet tension remains the same. This is so that the measurements of the finished piece will be the same as on the sketch provided. It is easier to achieve the same knitting tension using yarns from the same yarn group. It is also possible to work with multiple strands of a thinner yarn to achieve the knitting tension of a thicker one. Please try our yarn converter. We recommend you to always work a test swatch.

Please NOTE: when changing yarn the garment might have a different look and feel to the garment in the photo, due to individual properties and qualities of each yarn.

See DROPS lesson: Can I use a different yarn than the one mentioned in the pattern?

All our yarns are categorised into yarn groups (from A to F) according to thickness and knitting tension – group A contains the thinnest yarns and group F the thickest. This makes it easier for you to find alternative yarns to our patterns, should you wish to switch yarn. All yarns within the same group have a similar knitting tension and can easily replace each other. However, different yarn qualities have different structures and properties which will give the finished work a unique look and feel.

Click here for an overview of the yarns in each yarn group

At the top of all our patterns you’ll find a link to our yarn converter, which is a helpful tool should you wish to use a different yarn than suggested. By filling in the yarn quality you wish to replace, the amount (in your size) and number of strands, the converter will present good alternative yarns with the same knitting tension. Additionally it will tell you how much you’ll require in the new qualities and whether you’ll need to work with multiple strands. Most skeins are 50g (some are 25g or 100g).

If the pattern is worked with multiple colours, every colour will have to be converted separately. Similarly, if the pattern is worked with several strands of different yarns (for example 1 strand Alpaca and 1 strand Kid-Silk) you will have to find alternatives for each, individually.

Click here to see our yarn converter

Since different yarns have different qualities and textures we have chosen to keep the original yarn in our patterns. However, you can easily find options among our available qualities by using our yarn converter, or simply pick a yarn from the same yarn group.

It is possible that some retailers still have discontinued yarns in stock, or that someone has a few skeins at home that they would like to find patterns for.

The yarn converter will provide both alternative yarn as well as required amount in the new quality.

If you think it's hard to decide what size to make, it can be a good idea to measure a garment you own already and like the size of. Then you can pick the size by comparing those measures with the ones available in the pattern's size chart.

You'll find the size chart at the bottom of the pattern.

See DROPS lesson: How to read size chart

The needle size provided in the pattern serves only as a guide, the important thing is to follow the knitting tension. And since knitting tension is very individual, you will have to adjust the needle size to ensure that YOUR tension is the same as in the pattern – maybe you’ll have to adjust 1, or even 2 needle sizes, up or down to achieve the correct tension. For this, we recommend that you work test swatches.

Should you work with a different knitting tension than the one provided, the measurements of the finished garment might deviate from the measurement sketch.

See DROPS lesson: How to measure your tension/gauge

See DROPS video: How to make a gauge tension swatch

Working a garment top-down provides more flexibility and room for personal adjustment. For example it is easier to try the garment on while working, as well as making adjustments to length of yoke and shoulder caps.

The instructions are carefully explaining every step, in the correct order. Diagrams are adjusted to the knitting direction and are worked as usual.

The diagram depicts all rows/rounds, and every stitch seen from the right side. It is read from bottom to top, from right to left. 1 square = 1 stitch.

When working back and forth, every other row is worked from the right side and every other row is worked from the wrong side. When working from the wrong side, the diagram will have to be worked reversed: from left to right, knit stitches are purled, purl stitches are knit etc.

When working in the round every round is worked from the right side and the diagram are worked from right to left on all rounds.

See DROPS lesson: How to read knitting diagrams

The diagram depicts all rows/rounds, and every stitch seen from the right side. It is worked from bottom to top, from right to left.

When working back and forth every other row is worked from the right side: from right to left and every other row is worked from the wrong side: from left to right.

When working in the round, every row in the diagram are worked from the right side, from right to left.

When working a circular diagram you start in the middle and work your way outwards, counter clockwise, row by row.

The rows usually start with a given number of chain stitches (equivalent to the height of the following stitch), this will either be depicted in the diagram or explained in the pattern.

See DROPS lesson: How to read crochet diagrams

Instructions for working several diagrams after each other on the same row/round, will often be written like so: “work A.1, A.2, A.3 a total of 0-0-2-3-4 times". This means you work A.1 once, then A.2 is worked once, and A.3 is repeated (in width) the number of times provided for your size – in this case like so: S = 0 times, M = 0 times, L=2 times, XL= 3 times and XXL = 4 times.

The diagrams are worked as usual: begin with the first row in A.1, then work the first row in A.2 etc.

See DROPS lesson: How to read knitting diagrams

See DROPS lesson: How to read crochet diagrams

The total width of the garment (from wrist-to-wrist) will be larger in the larger sizes, despite the actual sleeves being shorter. The larger sizes have longer sleeve caps and wider shoulders, so there will be a good fit in all sizes.

The measurement sketch/schematic drawing provides information regarding the full length of the garment. If it’s a jumper or a jacket the length is measured from the highest point on the shoulder (usually closest to the neckline), and straight down to the bottom of the garment. It is NOT measured from the tip of shoulder. Similarly, the length of yoke is measured from the highest point on the shoulder and down to where yoke is split into body and sleeves.

See DROPS lesson: How to read a schematic drawing

Diagrams are often repeated on the round or in height. 1 repeat is the diagram the way it appears in the pattern. If it says to work 5 repeats of A.1 in the round, then you work A.1 a total of 5 times after/next to each other in the round. If it says to work 2 repeats of A.1 vertically/in height you work the entire diagram once, then begin again at the start and work the entire diagram one more time.

Chain stitches are slightly narrower than other stitches and to avoid working the cast-on edge too tight, we simply chain more stitches to begin with. The stitch count will be adjusted on the following row to fit the pattern and measurement sketch.

The rib edge is more elastic and will contract slightly compared to, for example, stocking stitch. By increasing before the rib edge, you avoid a visible difference in width between the rib edge and the rest of the body.

It’s very easy to cast off too tightly, and by making yarn overs while casting off (and simultaneously casting these off) you avoid a too tight cast off edge.

See DROPS video: How to bind off with yarn overs (yo)

To achieve an even increase (or decrease) you can increase on, for example: every 3rd and 4th row alternately, like so: work 2 rows and increase on the 3rd row, work 3 rows and increase on the 4th. Repeat this until the increase is complete.

See DROPS lesson: Increase or decrease 1 st on every 3rd and 4th row alternately

Should you prefer to work in the round instead of back and forth, you may of course adjust the pattern. You’ll need to add steeks mid-front (usually 5 stitches), and follow the instructions. When you would normally turn and work from the wrong side, simply work across the steek and continue in the round. At the end you’ll cut the piece open, pick up stitches to work bands, and cover the cut edges.

See DROPS video: How to knit steeks and cut open

Should you prefer to work back and forth instead of in the round, you may of course adjust the pattern so you work the pieces separately and then assemble them at the end. Divide the stitches for the body in 2, add 1 edge stitch in each side (for sewing) and work the front and back pieces separately.

See DROPS lesson: Can I adapt a pattern for circular needles into straight needles?

Pattern repeats can vary slightly in the different sizes, in order to get the correct proportions. If you’re not working the exact same size as the garment in the photo, yours might deviate slightly. This has been carefully developed and adjusted so that the complete impression of the garment is the same in all sizes.

Make sure to follow instructions and diagrams for your size!

If you have found a pattern you like which is available in women’s size it’s not very difficult to convert it to men’s size. The biggest difference will be the length of sleeves and body. Start working on the women size that you think would fit across the chest. The additional length will be worked right before you cast off for the armhole/sleeve cap. If the pattern is worked top-down you can add the length right after the armhole or before the first decrease on sleeve.

Regarding additional yarn amount, this will depend on how much length you add, but it is better with a skein too many than too few.

All yarns will have excess fibres (from production) that might come off as lint or shedding. Brushed yarns (ie hairier yarns) have more of these loose, excess fibres, causing more shedding.

Shedding also depends on what is worn under or over the garment, and whether this pulls at the yarn fibres. It’s therefore not possible to guarantee that there will be no shedding

Below are some tips on how to get the best result when working with hairier yarns:

1. When the garment is finished (before you wash it) shake it vigorously so the looser hairs come off. NOTE: do NOT use a lint roller, brush or any method that pulls at the yarn.

2. Place the garment in a plastic bag and put it in your freezer - the temperature will cause the fibres to become less attached to each other, and excess fibres will come off easier.

3. Leave in the freezer for a few hours before taking it out and shaking it again.

4. Wash the garment according to the instructions on the yarn label.

Pilling is a natural process that happens to even the most exclusive of fibers. It's a natural sign of wear and tear that is hard to avoid, and that is most visible in high friction areas of your garment like a sweater's arms and cuffs.

You can make your garment look as new by removing the pilling, using a fabric comb or a pill/lint remover.

Still can't find the answer you need? Then scroll down and leave your question so one of our experts can try to help you. This will be done normally within 5 to 10 working days.
In the meantime, you can read the questions and answers that others have left to this pattern or join the DROPS Workshop on Facebook to get help from fellow knitters/crocheters!

You might also like...

Post a comment to pattern DROPS 99-4

We would love to hear what you have to say about this pattern!

If you want to leave a question, please make sure you select the correct category in the form below, to speed up the answering process. Required fields are marked *.

Comments / Questions (178)

country flag Ulla Sørensen wrote:

På min i phone blev diagrammet væk efter en opdatering ! Har fået det på et andet devise ! Beklager

20.04.2022 - 20:53

country flag Ulla Sørensen wrote:

Diagrammet i 99-4 er pludselig væk??? Kommer det igen???

20.04.2022 - 12:17

DROPS Design answered:

Hej Ulla, diagrammerne ligger nederst i opskriften :)

20.04.2022 - 15:31

country flag Carol wrote:

Hello, I too love this pattern. I’ve seen the symbols of the chart. It says “V” is 2 dc in 1 ch. but I was looking through the questions and it says “V” is 1 dc-ch 1-1 dc. Is this correct. Im new to charts. I ask this because at the end of the M1 diagram I should have 95 chain loops and I don’t have that many.

27.03.2022 - 08:18

DROPS Design answered:

Dear Carol, V means what is stated in the diagram explanation: 2 dc in 1 ch. Take into account that in the diagram, there is another symbol, the horizontal bar which means that you are also working 1 chain stitch between the 2 dc groups. Happy crochetting!

27.03.2022 - 23:12

country flag Tina wrote:

Ich versteh Ihre Anleitung nicht. Ihre Beschriftung auf der Textseite passt nicht zu Ihrer Zeichnung des Musters,e.g. Sie malen Stb und im Text sprechen Sie von DStb. Meine Freundin warnte mich vor Ihren chaotisch/unverständlichen Häkelanleitungen,aber ich dachte,weil ich Ihre Strickanleitungen gut verstand geb ich Ihnen eine Chance.Schade.Hätte Ihnen auch Foto gemailt, hier leider nicht möglich.

08.03.2022 - 11:49

DROPS Design answered:

Liebe Tina, dieses Modell wird mit Stb aber auch mit Doppelstäbchen gearbeitet; häkeln Sie wie im Text erklärt, und folgen Sie die Diagramme M.1 (Stäbchen) und M.2 (Lochmuster mit Stäbchen) wie gezeichnet und häkeln Sie auch Doppelstäbchen nach 3 x M.2 in der Höhe gearbeitet wird, vor dem letzten M.2. Kann das Ihnen helfen? Viel Spaß beim häkeln!

08.03.2022 - 21:49

country flag Karin wrote:

After the chain stitches...must the increases be under the arms ?

08.12.2021 - 18:13

DROPS Design answered:

Dear Karin, after you have skipped the stitches for arm and crocheted the 8 chains under each arm, you should crochet 6 chain-spaces as eplained in these both 8-ch-spaces and 54-64-65-68-73 ch-spaces at the end of this round. Happy crocheting!

09.12.2021 - 07:21

country flag Karin wrote:

Does pattern M1 mean first row1 dc, ch 1,1 dc repeat 2nd row 1dc,ch 1. Then 1dc,ch1 and one dc ...repeat And are they made in previous dc or in the chain gab ?

08.12.2021 - 13:14

DROPS Design answered:

Dear Karin, you should also skip 1 dc from previous round, ie 1 dc the the first dc, *1 ch, skip 1 stitch, 1 dc in next dc*, repeat from *-*. Happy crocheting!

08.12.2021 - 13:51

country flag GUY POLLIE wrote:

Geachte , hoe kan ik het model "breath of summer" in maat XXXL maken ??? Dank bij voorbaat .

24.03.2021 - 12:44

DROPS Design answered:

Dag Guy Pollie,

Helaas is dit patroon niet in de maat XXXL beschikbaar.

26.03.2021 - 15:58

country flag Cheryl Young wrote:

I just started on this and the beginning, which should be the neckline, is very small. My hook is correct and gauge is actually a little larger than one stated. This is not anywhere near the neckline that is shown in the picture. Even in the finished measurements it is not correct even thought I did exactly the chains it stated for the largest size. It seems like it should be twice this size. Any advise would be great.

13.10.2020 - 06:06

DROPS Design answered:

Dear Mrs Young, with the given tension you will get the finished measurements shown in the measurement chart (ex: 22 cm in width in the first size between both shoulders for neck) -feel free to adjust the circumference if required. Happy crocheting!

13.10.2020 - 12:06

country flag Linda wrote:

I've crocheted 47 years and never came across a pattern so hard to read and figure out how it's to be done. To much of back and forth of what you'll be doing then do this..out of order. Makes it to confusing. More up close pictures would help. I feel for the people that haven't been crocheting long. I love how this looks but I'll probably not try another drops pattern ( 99-4). Needs to be written so it can be understood better, made more clear.

10.04.2020 - 23:50

DROPS Design answered:

Dear Linda, The DROPS patterns are knitted and crocheted by thousands and thousands of people  around the world. We understand however that in certain countries, with different knitting/crochet traditions than Scandinavia, our patterns might be written in a way that differs from what some are used to. But of course we want everyone to understand our patterns, so that’s why we have created an extensive library of tutorial videos as well as step by step lessons that explain how to follow the techniques we use and how to read the diagrams in our patterns. Give them a try!

14.04.2020 - 14:51

country flag Maija wrote:

Hej Enligt mönstret ska man virka med drops alpacka och Continental viscose . Kan jag använda dubbla garn av alpackan istället ....Hur blir det tror ni . Mvh Maija

14.03.2020 - 20:09

DROPS Design answered:

Hei Maija. Ved bare å bruke 2 tråder DROPS Alpaca vil tunikaen bli ca 100-150 gram lettere, du vil ikke få den tyngden den opprinnelig har. Bare husk å sjekke at heklefastheten stemmer med oppskriften. God Fornøyelse!

16.03.2020 - 14:18