DROPS Alpaca
DROPS Alpaca
100% Alpaca
from 4.85 $ /50g
DROPS Cotton Viscose
54% Cotton, 46% Viscose
Discontinued
find alternatives
DROPS SS24

Brooke

DROPS crochet jacket with mussel pattern in “Alpaca” and “Cotton Viscose”. Size S - XXL

DROPS 99-1
Size: S – M – L - XL – XXL

Finished measurements at chest: 33"-35½"-40"-44"-49½"
Full length: 23 ¼"-24⅜"-24 ¾"-25 ¼"-26⅜"

Materials: DROPS Alpaca from Garnstudio
250-300-300-350-400 g color no 1101, white
and use:
DROPS Cotton Viscose from Garnstudio
400-450-500-550-600 g color no 01, white

DROPS crochet hook size 4.5 mm [US 7], or size needed to obtain the correct gauge
DROPS crochet hook size 3 mm [US C]for buttons.

DROPS wooden buttons no 502, 5-6-6-6-6 pcs

-------------------------------------------------------

Alternative Yarn – See how to change yarns here
Yarn Groups A to F – Use the same pattern and change the yarn here
Yarn usage using an alternative yarn – Use our yarn converter here

-------------------------------------------------------

DROPS Alpaca
DROPS Alpaca
100% Alpaca
from 4.85 $ /50g
DROPS Cotton Viscose
54% Cotton, 46% Viscose
Discontinued
find alternatives

Pattern instructions

NOTE: This pattern is written in American English. All measurements in charts are in cm. For conversion from inches to cm - click here. There are different terms for crocheting in American and British English. If this pattern includes crochet, click for "crochet terms" here. For this pattern in British English, please click here.
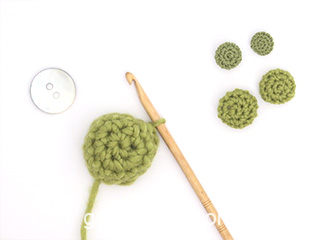
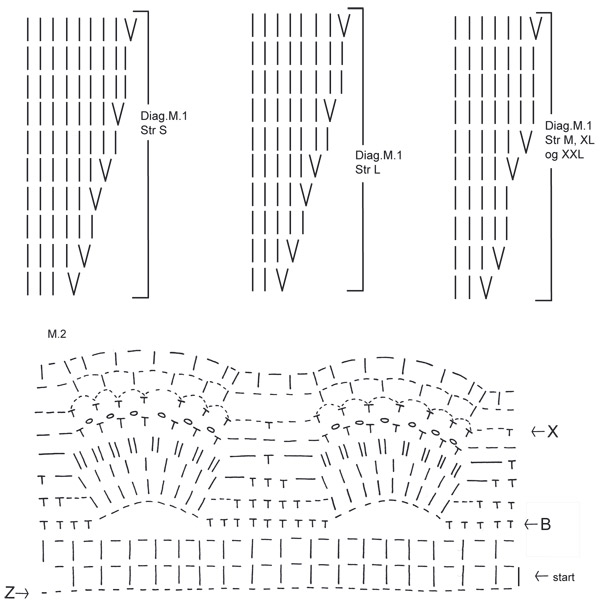
GAUGE:
14 dc x 7 rows with 1 strand of each quality = 10 x 10 cm [4" x 4"].
1 repeat of mussel pattern = width approx 11 cm [4⅜"].

CROCHET INFO:
At the beg of each round replace the first dc with ch 3. Replace first tr with ch 4.
Finish each round with 1 sl st in 3rd/4th ch from beg of round.

PATTERN: See diagrams M.1 and M.2. The diagram is seen from the RS.

MEASURING TIPS: Because of the weight of the yarn all measurements should be made whilst the garment is hanging.
_______________________________________________________________

BODY:
The jacket is crochet from the top down and back and forth with opening mid front.

Loosely ch 92-97-97-105-113 (includes 3 ch to turn with) on crochet hook size 4.5 mm [US 7] with 1 strand Alpaca and 1 strand Cotton Viscose (double strands held together).
Crochet next row as follows:
1 dc in 4th ch, *skip 1 ch, 1 dc in each of the next 3 ch*, repeat from *-* (in size M, L, XL and XXL finish with 1 dc in the last ch) = 68-72-72-78-84 dc – see Crochet info.
On next row work 1 dc in each dc and at the same time inc 14-13-10-19-19 dc (inc by working 2 dc in 1 dc) evenly on row (do not inc on 5 dc each side = front bands) = 82-85-82-97-103 dc.
Now crochet 10 rows following chart M.1 (5 dc each side = front bands and are not to be part of diagram, on these sts work 1 dc in each dc).
After chart M.1 there are 190-210-226-242-258 dc on row.
Continue with 1 dc in each dc until piece measures 20-21-23-23-24 cm [8"-8 ¼"-9"-9"-9½"].

Crochet next row as follows:
5 dc on front band, 26-28-31-35-39 dc (= front piece), ch 7-8-8-8-9 (under arm), skip 38-45-45-45-45 dc from previous row (= armhole, sts to be used later for sleeve), 52-54-64-72-80 dc (= back piece), ch 7-8-8-8-9 (under arm), skip 38-45-45-45-45 dc from previous row (= armhole, sts to be used later for sleeve), 26-28-31-35-39 dc ( = front piece), 5 dc on front band.

Next row: crochet 1 dc in each dc and each ch = 128-136-152-168-186 dc.
On next row work 1 dc in each dc and at the same time inc 9-19-21-23-23 dc evenly = 137-155-173-191-209 dc.
Then crochet 1 row with 1 sc in each dc (also on sts on front bands) and then continue following chart M.2 (beg at arrow in diagram).
Work 1 vertical repeat of chart M.2, and begin the second repeat by Arrow B in diagram.
After second repeat om M.2 the piece measures approx 44-45-46-47-48 cm [17 ¼"-17 ¾"-18"-18½"-19"].

Now crochet 3-3-4-4-4 rows of tr as follows (also on front band sts):

Row 1: Remember crochet info!
Work 1 tr in each ch-space, and ch 1 between each tr, finish row with 1 tr in the last st = 64-73-82-91-100 tr + 5 tr on each front band.

Row 2: 1 tr in each tr from previous row, but now ch 2 between each tr (instead of 1).

Row 3: 1 tr in each tr from previous row, but now ch 3 between each tr.
Note – finish size S and M here and skip row 4 below = 64-73 tr + + 5 tr on each front band.

Row 4 (Size L - XL – XXL): 1 tr in each tr from previous row with ch 3 between each tr.
Note - finish size L, XL and XXL here = 82-91-100 tr + 5 tr on each front band.

All sizes:
Now crochet diagram M.2 again (beg at start arrow in diagram).
Note! Crochet row 1 in M.2 as follows to make pattern fit (work 5 front band sts each side as before): 5 band sts, ch 1, 1 dc in the first tr, ch 1, *1 dc in the next tr, ch 1, 1 dc in ch-space, ch 1*, repeat from *-* = 126-144-162-180-198 ch-spaces (i.e. 14-16-18-20-22 repeats of mussel pattern at bottom of jacket). End working the pattern after row 7. Fasten off.


Sleeve:
Crochet from armhole towards bottom edge. Beg mid under arm as follows: crochet 1 sc in the 4th -5th -5th -5th -5th ch of the 7-8-8-8-9 ch worked under the arms on front and back piece.
Ch 3 (= 1 dc) and continue with 1 dc in each ch.
Note! Before continuing working around armhole crochet 1 dc in the transition to avoid a hole. Continue with 1 dc in each dc along armhole and crochet 1 dc in the transition before crocheting 1 dc in the remaining ch under the arm = 47-55-55-55-56 dc.
Crochet in the round like this until sleeve piece measures 9-10-9-9-10 cm [3½"-4"-3½"-3½"-4"].

Now crochet next round as follows:

Size S: Crochet 5 dc mid under arm, continue in M.2 (from start arrow in diagram) = 2 repeats of mussel pattern and finish with 6 dc. Crochet 1 vertical repeat of M.2.
Now crochet 1 row of tr as follows: crochet in the first 5 dc like this: ch 4 (= 1 tr), *1 ch, skip 1 dc, 1 tr in the next dc*, repeat from *-*.
Continue on mussel pattern like this: *ch 1, 1 tr in next dc*, repeat from *-*. Crochet in the last 6 dc like this: *ch 1, skip 1 dc, 1 tr in the next dc*, repeat from *-* = 23 ch-spaces.

Size M + L + XL: Ch 3 and continue in M.2 (from start arrow in diagram) = 3 repeats of mussel pattern + 1 dc mid under arm.
Crochet 1 vertical repeat of M.2. Now crochet 1 row of tr as follows: ch 4 (= 1 tr), ch 1, *1 tr in next dc, ch 1*, repeat from *-* and finish with 1 sl st in 4th ch from beg of round = 27 ch-spaces.

Size XXL: Ch 3 and continue in M.2 (from start arrow in diagram) and finish with 1 dc mid under arm = 3 repeats of mussel pattern + 2 dc mid under arm. Crochet 1 vertical repeat of M.2.
Now crochet 1 row of tr as follows: ch 4 (= 1 tr), ch 1, skip 1 dc, *1 tr in next dc, ch 1*, repeat from *-* and finish with 1 sl st in 4th ch from beg of round = 28 ch-spaces.

All sizes: Now crochet 7-6-6-6-5 rounds as follows:
ch 4 (= 1 tr), ch 1, 1 tr in the first tr, *ch 1, 1 tr in next tr*, repeat from *-* and finish with 1 sl st in the 4th ch from beg of round.
After the last round crochet M.2 again (from start arrow in diagram), but crochet the first round as follows to make the pattern fit:

Size S: ch 3 (= 1 dc), *ch 1, 1 dc in next ch-space, ch 1, 1 dc in the same ch-space, ch 1, 1 dc in the next ch-space*, repeat from *-* and finish with 1 sl st in the 3rd ch from beg of round. There are now 36 ch-spaces (= 4 repeats of mussel pattern at the bottom sleeve edge). Finish M.2 after row 7.

Size M + L + XL: ch 3 (= 1 dc), *ch 1, 1 dc in next ch-space, ch 1, 1 dc in the next ch-space, ch 1, 1 dc in the next ch-space, ch 1, 1 dc in the same ch-space*, repeat from *-* and finish with 1 sl st in the 3rd ch from beg of round.
There are now 36 ch-loops (= 4 repeats of mussel pattern at the bottom sleeve edge). Finish M.2 after row 7.

Size XXL: ch 3 (= 1 dc), *ch 1, 1 dc in next ch-space, ch 1, 1 dc in the next ch-space, ch 1, 1 dc in the next ch-space, ch 1, 1 dc in the next ch-space, ch 1, 1 dc in the same ch-space*, repeat from *-* and finish with 1 sl st in the 3rd ch from beg of round. There are now 36 ch-spaces (= 4 repeats of mussel pattern at the bottom sleeve edge). Finish M.2 after row 7.


Button covers:
Crochet covers for 5-6-6-6-6 buttons on crochet hook size 3 mm [US C] with Cotton Viscose as follows:
1st round: ch 2, 16 dc in the first ch and finish with 1 sl st in first dc.
2nd round: 1 sc in each dc and finish with 1 sl st in first sc from beg of round.
3rd round: ch 3, 1 dc in every other sc and finish with 1 sl st in 3rd ch from beg of round = 8 dc
Put button inside cover, sew round the opening and pull tight.

Assembly: Sew on buttons to left front piece as follows:
Size S: 1, 12, 23, 34 and 44 cm [3/8"-4 ¾"-9"-13⅜"-17 ¼"].
Size M: 1, 10, 19, 28, 37 and 45 cm [3/8"-4"-7½"-11"-14½"-17 ¾"].
Size L: 1, 10, 19, 28, 37 and 46 cm [3/8"-4"-7½"-11"-14½"-18"].
Size XL: 1, 10, 20, 29, 38 and 47 cm [3/8"-4"-8"-11⅜"-15"-18½"].
Size XXL: 1, 10, 20, 29, 39 and 48 cm [3/8"-4"-8"-11⅜"-15 ¼"-19"].

Crochet border:
Beg at the bottom of right front band. Crochet 2 sc in each dc up along front band, crochet 1 sc in each dc round neckline and crochet down left front band as described for right front band. At the same time crochet buttonhole loops on right front band as follows: 5 ch, skip approx 2 cm [3/4"], 1 sc in next st (make sure to position the buttonhole loops in line with buttons on left front band).

This pattern has been corrected.

Updated online: 30.04.2009
Note! Crochet row 1 in M.2 as follows to make pattern fit (crochet 5 front band sts each side as before): 1 ch, 1 dc in the first tr, 1 ch, *1 dc in the next tr, 1 ch, 1 dc in ch-loop, 1 ch*, repeat from *-* = 126-144-162-180-198 ch-loops (i.e. 14-16-18-20-22 repeats of mussel pattern at bottom of jacket).

Diagram

All measurements in charts are in cm.

symbols = 1 ch
symbols = 1 sc
symbols = 1 dc
symbols = 2 dc in 1 dc
symbols = 1 picot (= 3 ch, 1 sc in the first ch)
symbols = this row is described in the pattern, beg by start arrow
symbols = 7th row
diagram
diagram
Do you have a question? See a list of frequently asked questions (FAQ)

Knitting tension is what determines the final measurements of your work, and is usually measured per 10 x 10 cm. It is provided like so: number of stitches in width x number of rows in height - eg: 19 stitches x 26 rows = 10 x 10 cm.

The knitting tension is very individual; some people knit/crochet loosely while others work tightly. You adjust the knitting tension with the needle size, which is why the suggested needle size only serve as a guide! You need to adjust this (up or down) to ensure that YOUR knitting tension matches the knitting tension provided in the pattern. If you work with a different knitting tension than provided you will have a different yarn consumption, and your work will have different measurements than what the pattern suggests.

The knitting tension also determines which yarns can replace each other. As long as you achieve the same knitting tension you can replace one yarn with another.

See DROPS lesson: How to measure your tension/gauge

See DROPS video: How to make a gauge tension swatch

The required amount of yarn is provided in grams, eg: 450 g. To calculate how many balls you’ll need you first need to know how many grams are in 1 ball (25g, 50g or 100g). This information is available if you click on the individual yarn quality on our pages. Divide the amount required with the amount of each ball. For example, if each ball is 50g (the most common amount), the calculation will be as follows: 450 / 50 = 9 balls.

The important thing when changing from one yarn to another is that the knitting/crochet tension remains the same. This is so that the measurements of the finished piece will be the same as on the sketch provided. It is easier to achieve the same knitting tension using yarns from the same yarn group. It is also possible to work with multiple strands of a thinner yarn to achieve the knitting tension of a thicker one. Please try our yarn converter. We recommend you to always work a test swatch.

Please NOTE: when changing yarn the garment might have a different look and feel to the garment in the photo, due to individual properties and qualities of each yarn.

See DROPS lesson: Can I use a different yarn than the one mentioned in the pattern?

All our yarns are categorised into yarn groups (from A to F) according to thickness and knitting tension – group A contains the thinnest yarns and group F the thickest. This makes it easier for you to find alternative yarns to our patterns, should you wish to switch yarn. All yarns within the same group have a similar knitting tension and can easily replace each other. However, different yarn qualities have different structures and properties which will give the finished work a unique look and feel.

Click here for an overview of the yarns in each yarn group

At the top of all our patterns you’ll find a link to our yarn converter, which is a helpful tool should you wish to use a different yarn than suggested. By filling in the yarn quality you wish to replace, the amount (in your size) and number of strands, the converter will present good alternative yarns with the same knitting tension. Additionally it will tell you how much you’ll require in the new qualities and whether you’ll need to work with multiple strands. Most skeins are 50g (some are 25g or 100g).

If the pattern is worked with multiple colours, every colour will have to be converted separately. Similarly, if the pattern is worked with several strands of different yarns (for example 1 strand Alpaca and 1 strand Kid-Silk) you will have to find alternatives for each, individually.

Click here to see our yarn converter

Since different yarns have different qualities and textures we have chosen to keep the original yarn in our patterns. However, you can easily find options among our available qualities by using our yarn converter, or simply pick a yarn from the same yarn group.

It is possible that some retailers still have discontinued yarns in stock, or that someone has a few skeins at home that they would like to find patterns for.

The yarn converter will provide both alternative yarn as well as required amount in the new quality.

If you think it's hard to decide what size to make, it can be a good idea to measure a garment you own already and like the size of. Then you can pick the size by comparing those measures with the ones available in the pattern's size chart.

You'll find the size chart at the bottom of the pattern.

See DROPS lesson: How to read size chart

The needle size provided in the pattern serves only as a guide, the important thing is to follow the knitting tension. And since knitting tension is very individual, you will have to adjust the needle size to ensure that YOUR tension is the same as in the pattern – maybe you’ll have to adjust 1, or even 2 needle sizes, up or down to achieve the correct tension. For this, we recommend that you work test swatches.

Should you work with a different knitting tension than the one provided, the measurements of the finished garment might deviate from the measurement sketch.

See DROPS lesson: How to measure your tension/gauge

See DROPS video: How to make a gauge tension swatch

Working a garment top-down provides more flexibility and room for personal adjustment. For example it is easier to try the garment on while working, as well as making adjustments to length of yoke and shoulder caps.

The instructions are carefully explaining every step, in the correct order. Diagrams are adjusted to the knitting direction and are worked as usual.

The diagram depicts all rows/rounds, and every stitch seen from the right side. It is read from bottom to top, from right to left. 1 square = 1 stitch.

When working back and forth, every other row is worked from the right side and every other row is worked from the wrong side. When working from the wrong side, the diagram will have to be worked reversed: from left to right, knit stitches are purled, purl stitches are knit etc.

When working in the round every round is worked from the right side and the diagram are worked from right to left on all rounds.

See DROPS lesson: How to read knitting diagrams

The diagram depicts all rows/rounds, and every stitch seen from the right side. It is worked from bottom to top, from right to left.

When working back and forth every other row is worked from the right side: from right to left and every other row is worked from the wrong side: from left to right.

When working in the round, every row in the diagram are worked from the right side, from right to left.

When working a circular diagram you start in the middle and work your way outwards, counter clockwise, row by row.

The rows usually start with a given number of chain stitches (equivalent to the height of the following stitch), this will either be depicted in the diagram or explained in the pattern.

See DROPS lesson: How to read crochet diagrams

Instructions for working several diagrams after each other on the same row/round, will often be written like so: “work A.1, A.2, A.3 a total of 0-0-2-3-4 times". This means you work A.1 once, then A.2 is worked once, and A.3 is repeated (in width) the number of times provided for your size – in this case like so: S = 0 times, M = 0 times, L=2 times, XL= 3 times and XXL = 4 times.

The diagrams are worked as usual: begin with the first row in A.1, then work the first row in A.2 etc.

See DROPS lesson: How to read knitting diagrams

See DROPS lesson: How to read crochet diagrams

The total width of the garment (from wrist-to-wrist) will be larger in the larger sizes, despite the actual sleeves being shorter. The larger sizes have longer sleeve caps and wider shoulders, so there will be a good fit in all sizes.

The measurement sketch/schematic drawing provides information regarding the full length of the garment. If it’s a jumper or a jacket the length is measured from the highest point on the shoulder (usually closest to the neckline), and straight down to the bottom of the garment. It is NOT measured from the tip of shoulder. Similarly, the length of yoke is measured from the highest point on the shoulder and down to where yoke is split into body and sleeves.

See DROPS lesson: How to read a schematic drawing

Diagrams are often repeated on the round or in height. 1 repeat is the diagram the way it appears in the pattern. If it says to work 5 repeats of A.1 in the round, then you work A.1 a total of 5 times after/next to each other in the round. If it says to work 2 repeats of A.1 vertically/in height you work the entire diagram once, then begin again at the start and work the entire diagram one more time.

Chain stitches are slightly narrower than other stitches and to avoid working the cast-on edge too tight, we simply chain more stitches to begin with. The stitch count will be adjusted on the following row to fit the pattern and measurement sketch.

The rib edge is more elastic and will contract slightly compared to, for example, stocking stitch. By increasing before the rib edge, you avoid a visible difference in width between the rib edge and the rest of the body.

It’s very easy to cast off too tightly, and by making yarn overs while casting off (and simultaneously casting these off) you avoid a too tight cast off edge.

See DROPS video: How to bind off with yarn overs (yo)

To achieve an even increase (or decrease) you can increase on, for example: every 3rd and 4th row alternately, like so: work 2 rows and increase on the 3rd row, work 3 rows and increase on the 4th. Repeat this until the increase is complete.

See DROPS lesson: Increase or decrease 1 st on every 3rd and 4th row alternately

Should you prefer to work in the round instead of back and forth, you may of course adjust the pattern. You’ll need to add steeks mid-front (usually 5 stitches), and follow the instructions. When you would normally turn and work from the wrong side, simply work across the steek and continue in the round. At the end you’ll cut the piece open, pick up stitches to work bands, and cover the cut edges.

See DROPS video: How to knit steeks and cut open

Should you prefer to work back and forth instead of in the round, you may of course adjust the pattern so you work the pieces separately and then assemble them at the end. Divide the stitches for the body in 2, add 1 edge stitch in each side (for sewing) and work the front and back pieces separately.

See DROPS lesson: Can I adapt a pattern for circular needles into straight needles?

Pattern repeats can vary slightly in the different sizes, in order to get the correct proportions. If you’re not working the exact same size as the garment in the photo, yours might deviate slightly. This has been carefully developed and adjusted so that the complete impression of the garment is the same in all sizes.

Make sure to follow instructions and diagrams for your size!

If you have found a pattern you like which is available in women’s size it’s not very difficult to convert it to men’s size. The biggest difference will be the length of sleeves and body. Start working on the women size that you think would fit across the chest. The additional length will be worked right before you cast off for the armhole/sleeve cap. If the pattern is worked top-down you can add the length right after the armhole or before the first decrease on sleeve.

Regarding additional yarn amount, this will depend on how much length you add, but it is better with a skein too many than too few.

All yarns will have excess fibres (from production) that might come off as lint or shedding. Brushed yarns (ie hairier yarns) have more of these loose, excess fibres, causing more shedding.

Shedding also depends on what is worn under or over the garment, and whether this pulls at the yarn fibres. It’s therefore not possible to guarantee that there will be no shedding

Below are some tips on how to get the best result when working with hairier yarns:

1. When the garment is finished (before you wash it) shake it vigorously so the looser hairs come off. NOTE: do NOT use a lint roller, brush or any method that pulls at the yarn.

2. Place the garment in a plastic bag and put it in your freezer - the temperature will cause the fibres to become less attached to each other, and excess fibres will come off easier.

3. Leave in the freezer for a few hours before taking it out and shaking it again.

4. Wash the garment according to the instructions on the yarn label.

Pilling is a natural process that happens to even the most exclusive of fibers. It's a natural sign of wear and tear that is hard to avoid, and that is most visible in high friction areas of your garment like a sweater's arms and cuffs.

You can make your garment look as new by removing the pilling, using a fabric comb or a pill/lint remover.

Still can't find the answer you need? Then scroll down and leave your question so one of our experts can try to help you. This will be done normally within 5 to 10 working days.
In the meantime, you can read the questions and answers that others have left to this pattern or join the DROPS Workshop on Facebook to get help from fellow knitters/crocheters!

You might also like...

Post a comment to pattern DROPS 99-1

We would love to hear what you have to say about this pattern!

If you want to leave a question, please make sure you select the correct category in the form below, to speed up the answering process. Required fields are marked *.

Comments / Questions (215)

country flag Henriette wrote:

Hva menes med en 5 st stolpe?

11.05.2023 - 19:47

DROPS Design answered:

Hei Henriette, Hver stolpe består av 5 staver (som er tegnet inn i diagrammet) og er heklet med staver hele veien. God fornøyelse!

12.05.2023 - 06:40

country flag Nancy wrote:

Ik ben bij de knoophoesjes. In het patroon staat:haak 2 lossen en dan 16 stokjes in de eerste losse. Eindig met een halve vaste in de eerste vaste. Maar dan heb ik geen vaste. In de video worden alleen vasten gehaakt. Wat kan ik nu aanhouden?

02.03.2023 - 13:26

DROPS Design answered:

Dag Nancy,

Klopt, je hebt dan inderdaad geen vaste. Wat er bedoeld wordt is dat je de toer sluit met een halve vaste in het eerste stokje. Omdat het eerste stokje vervangen wordt door 3 lossen (zie info haken bovenaan het patroon), haak je dus een vaste in de derde van die 3 lossen.

02.03.2023 - 20:11

country flag Susan Richardson wrote:

Hello, some time ago I bought 8 balls of Bomull Lin yarn, as beginner crochet in lock down! I was planning to make a bag using one of your patterns, but it was too difficult for me at the time. I would now like so use the yarn for your Brooke pattern. Is this possible? I realise that the Alpaca yarn given is group A and Bomull lin is group C, and I am not clever enough to use your charts to convert! Could you help please?

12.02.2023 - 14:37

DROPS Design answered:

Dear Susan, since you use 2 threads of group A yarns (Alpaca + Cotton viscose), you can substitute them and work with 1 thread of Bomull Lin (A+A = C). First try to work a gauge as indicated in the pattern, using a single thread of Bomull-Lin; if it matches, you can work this garment with it, without changing the number counts. However, take into account that you are working with a thicker thread, so you will require more than 400gr of Bomull Lin to make this garment. Also, the garment's texture will be different from the original. Happy crocheting!

12.02.2023 - 20:30

country flag Nancy Mulder wrote:

Kunnen jullie me vertellen waar de correctie precies begint?

20.01.2023 - 23:51

DROPS Design answered:

Dag Nancy,

De correctie staat in de kleine alinea boven de alinea van de mouw. In het online patroon is de correctie al doorgevoerd.

22.01.2023 - 17:33

country flag Dagmar wrote:

Nach welcher Reihe wird die Arbeit als Vorder und Rückenteil und Ärmel extra weiter gehäkelt ?

24.10.2022 - 22:45

DROPS Design answered:

Liebe Dagmar, wenn die Arbeit 20-21-23-23-24 cm misst, häkeln Sie die Verteilung-Reihe. Viel Spaß beim häkeln!

25.10.2022 - 09:05

country flag Laurence wrote:

Bonjour, pour les manches (taille S) : "continuer en suivant M2, à partir de la flèche sur le diagramme" : s'agit-il de la flèche "start" ou de la flèche B ? "2 motifs d'éventail" : 2 éventails complets c'est à dire les 9 rangs de M2 ?

20.03.2022 - 14:37

DROPS Design answered:

Bonjour Laurence, il s'agit de la flèche "start" dans M.2 - et tout à fait, crochetez entièrement le diagramme pour avoir les 2 éventails en largeur et crochetez les 10 rangs de M.2 (en commençant par la flèche "start"). Bon crochet!

21.03.2022 - 08:38

country flag LAURENCE wrote:

Merci pour vos explications, j'ai fini par m'en sortir! ;)

05.03.2022 - 15:32

country flag LAURENCE wrote:

Bonjour, c'est quoi des "mailles de bordure devant"? des ms ?

24.02.2022 - 18:13

DROPS Design answered:

Bonjour Laurence, ce sont les 5 mailles que vous avez crocheté depuis le début en brides, dans M.2 vous les crochetez en brides sur les rangs 1 et 2, puis en mailles serrées sur les rangs 3 à 8 et en brides sur les rangs 9 et 10 (toujours les 5 premières et les 5 dernières mailles). Bon crochet!

25.02.2022 - 08:48

country flag LAURENCE wrote:

Bonjour, je crochète en taille S ; je n'ai pas fait ce que vous indiquez car je ne comprends pas ces instructions (j'imagine qu'il s'agit des corrections à faire pour ce modèle?) Dois-je commencer en B en remplaçant les 5 ms du diagramme M2 par 4 brides/ml +1bride avant de faire l'arceau de 9ml , puis continuer en 9 ms puis arceau de 9 ml puis 4 brides/ml +1bride ?

24.02.2022 - 14:17

DROPS Design answered:

Bonjour Laurence, en S vous avez donc 137 mailles, vous crochetez: 5 mailles de bordure devant, répétez 3 fois M.2 et terminez par les 19 premières mailles (= reprenez au début du motif et arrêtez après 5 mailles serrées) et terminez par les 5 mailles de bordure devant. Continuez M.2 ainsi, mais attention, la 1ère fois que vous crochetez M.2 vous devez commencer à la flèche start = (1 b, 1 ml, sautez 1 m) tout le rang, avec les 5 m de bordure devant de chaque côté; les arceaux se font au 3ème rang, après les 2 rangs de brides/mailles en l'air. Bon crochet!

24.02.2022 - 16:56

country flag LAURENCE wrote:

Bonjour, j'ai commencé M2 comme indiqué sur le diagramme en commençant en B, j'ai donc alterné 5 ms, 9 ml, 9 ms, 9ml, puis recommencé avec 5 ms, etc. Une fois le rang terminé, je me retrouve avec 5 ms pour commencer le rang, , 17 arceaux puis 9ms à la fin du rang ; le devant gauche et le devant droit ne sont pas symétriques, me suis-je trompée quelque part ?

23.02.2022 - 17:18

DROPS Design answered:

Bonjour Laurence, avez-vous bien sauté(1 bride, 1 maille en l'air) x 4 + 1 bride pour chaque arceau de 9 mailles en l'air (avec les mailles de bordure des devants comme avant) ? Quelle taille crochetez-vous?

24.02.2022 - 10:08