
Popular categories
Looking for a yarn?


|
|
Moonlight Mist |
|
 |
 |
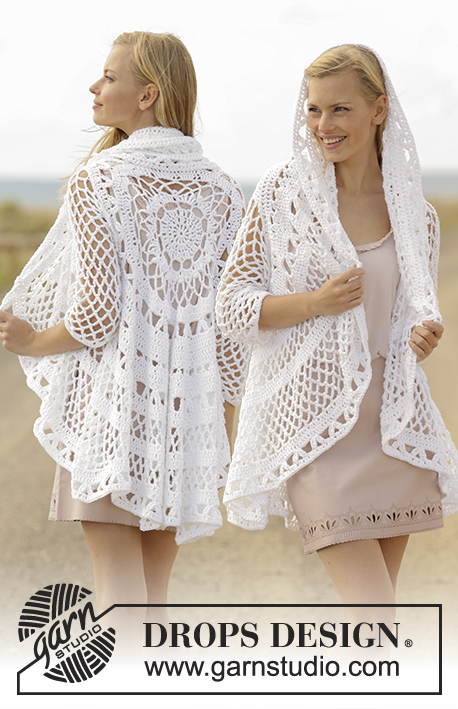
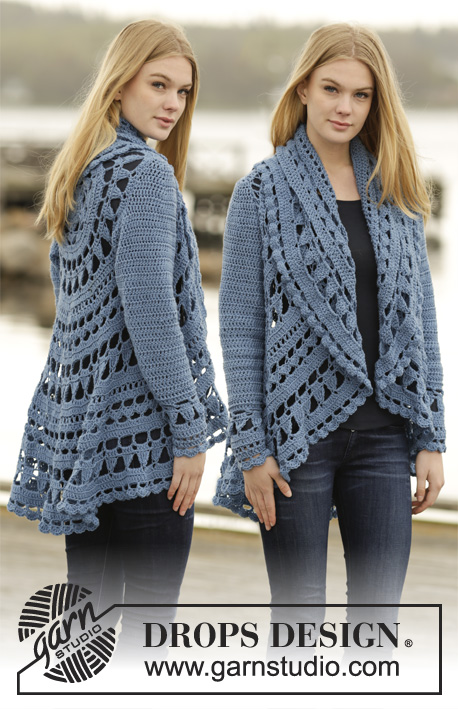
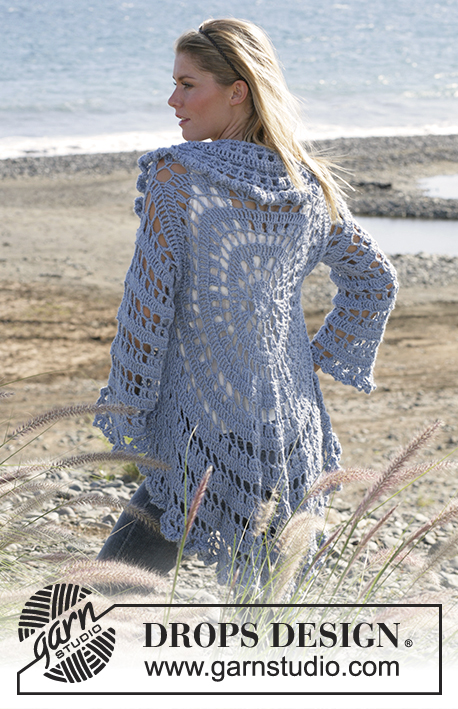
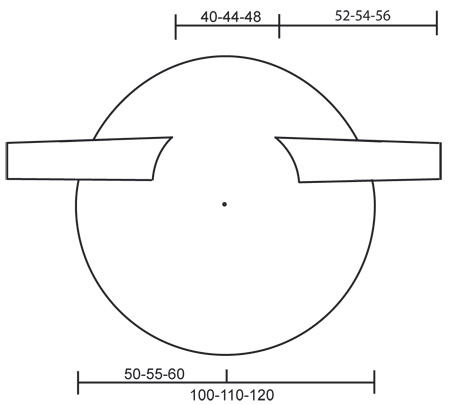
DROPS circle jacket crochet with 2 strands “Alpaca”. Sizes S-XL
DROPS 99-3 |
|
|
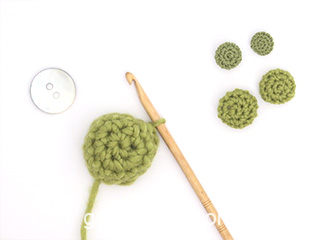
Crochet the jacket according to the explanations for the circle. Start to cast off for the armholes on the 12-13-14 round. Crochet 2 rounds according to the explanation for cast off for armholes, then continue to crochet according to explanation for the circle. Crochet tension: 3 rows in the circle using hook size 6 mm and 2 strands Alpaca measures 6.5 cm. After 5th round the circle measures 20 cm in diameter. Crochet info: Substitute the first dtr each round with 4 ch. Finish each round with a sl st at beg of round. Measurement tips: Because of the weight of the yarn, all measurements should be made whilst the garment is hanging, otherwise the sleeves will be too long when wearing the jacket. ------------------------------------------------------- CIRCLE: Crochet 4 ch with 2 strands Alpaca and make a ring with a sl st in the first ch. 1st round: Crochet 8 dc around the ring 2nd round: Read crochet info! Crochet 3 dtr in each dc. Finish with a sl st at beg. of round = 24 dtr 3rd round: Crochet 1 dtr, *3 ch, skip 1 dtr, 1 dtr in the next dtr*, repeat from *-* and finish with 3 ch and 1 sl st at the beg. of round = 12 dtr. 4th round: Crochet 3 dtr in the first dtr *3 ch, skip 3 ch, 3 dtr in the next dtr*, repeat from *-* and finish with 3 ch, skip 1 dtr and 1 sl st at beg. of round = 36 dtr. 5th round: Crochet 1 dtr in each dtr and 3 dtr in each ch-loop = 72 dtr. The circle now measures approx. 20 cm in diameter. 6th. round: Crochet 1 dtr in the first dtr, *3 ch, skip 1 dtr, 1 dtr in the next dtr*, repeat from *-* and finish with 3 ch, skip 1 dtr and a sl st at beg. of round = 36 dtr 7th. round: Crochet 3 dtr in the first dtr,* 2 ch, skip 3 ch, 3 dtr in the next dtr*, repeat from *-* and finish with 2 ch, skip 3 ch and a sl st at beg. of round = 108 dtr. 8th round: Crochet 1 dtr in each dtr and 1 dtr in each ch-loop = 144 dtr. 9th round: Crochet 1 dtr in the first dtr, *3 ch, skip 2 dtr, 1 dtr in the next dtr*, repeat from *-* and finish with 3 ch, skip 2 dtr and a sl st at beg. of round = 48 dtr 10th round: Crochet 3 dtr in the first dtr *1 ch, 3 dtr in the next dtr*, repeat from *-* and finish with 1 ch and a sl st at beg. of round = 144 dtr. 11th round: Crochet 1 dtr in each dtr and 1 dtr in each ch-loop = 192 dtr. Remember to cast off for armholes for size S/M – read cast off explanation for round 12 and 13 below! 12th round: *1 dtr, 3 ch, skip 2 dtr*, repeat from *-* until finish round = 64 dtr. Remember to cast off for armholes for size M/L – read cast off explanation for round 13 and 14 below! 13th round: 3 dtr in the first dtr, *2 ch, 3 dtr in the next dtr*, repeat from *-* = 192 dtr. Remember to cast off for armholes for size XL – read cast off explanation for round 14 and 15 below! 14th round: 1 dtr in each dtr, 1 dtr in each ch-loop = 256 dtr. 15th round: 1 dtr in the first dtr, *3 ch, skip 2 dtr, 1 dtr in the next dtr*, repeat from *-* until finish round = 86 dtr. 16th round: 3 dtr in the first dtr, *2 ch, 2 dtr in the next dtr, 2 ch, 3 dtr in the next dtr*, repeat from *-* until finish round = 215 dtr. Repeat round 14, 15 and 16 with inc. until the circle measures 100-110-120 cm in diameter. CAST OFF for armholes as follows: Size S/M: Crochet armholes according to round 12 below. 12th round: Crochet 1 dtr, 26 ch, skip over 26 dtr, *1 dtr, 3 ch, skip over 2 dtr*, repeat from *-* a total of 14 times, 1 dtr, 26 ch, skip 26 dtr, *1 dtr, 3 ch, skip 2 dtr*, repeat from *-* until finish round = 48 dtr. 13th round: Crochet as follows over the 26 ch’s: *3 dtr, 2 ch*, a total of 8 times. Over the dtr crochet as follows: *3 dtr in each dtr, 2 ch*, repeat from *-* = 192 dtr. Continue on round 14 as explained above. Size M/L: Crochet arm holes according to round 13 below. 13th round: 3 dtr in the first dtr, 30 ch, skip over (1 dtr and 3 ch) a total of 7 times, 3 dtr in the following dtr, *2 ch, 3 dtr in the next dtr*, repeat from *-* a total of 15 times, 30 ch, skip over (1 dtr and 3 ch) a total of 7 times, *2 ch, 3 dtr in the next dtr*, repeat from *-* until finish round = 150 dtr. 14th. round: Crochet as follows over the 30 ch’s: 28 dtr. Over the dtr and the ch-loops crochet as follows: 1 dtr in each dtr, 1 dtr in each ch-loop = 256 dtr. Continue on round 15 as explained above. Size XL: Crochet the armholes according to round 14 below: 14th round: 34 ch, skip over (3 dtr and 2 ch) a total of 8 times, *1 dtr in each of the next 3 dtr, 1 dtr in the next ch-loop*, repeat from *-* a total of 16 times, 34 ch, skip over (3 dtr and 2 ch) a total of 8 times *1 dtr in each of the next dtr, 1 dtr in the next ch-loop*, repeat from *-* until finish round = 192 dtr. 15th round: Crochet as follows over the 34 ch: *1 dtr, 3 ch*, repeat from *-* a total of 11 times. Over dtr crochet as follows: 1 dtr, *3 ch, skip over 2 dtr, 1 dtr in the next dtr*, finish with a dtr in the last dtr = 86 dtr. Continue on round 16 as explained above. SLEEVES: Crochet the sleeves from the armholes and down with 2 strands Alpaca. Crochet around. Remember the crochet info! 1st round: Crochet 52-60-68 dtr around the armhole from the circle and finish with a sl st in the first dtr from beg. of round. 2nd round: Crochet 1 dtr in the first dtr, *3 ch, skip over 3 dtr, 1 dtr in the next dtr*, repeat from *-* and finish with: Skip over 3 ch and 1 sl st in the first dtr = 13-15-17 dtr. 3rd round: Crochet 2 dtr in the first dtr, *1 ch, skip over 3 ch, 2 dtr in the next dtr*, repeat from *-* and finish with: 1 ch and 1 sl st in beg. of round = 26-30-34 dtr. 4th round: Crochet 1 dtr in each dtr and 2 dtr around each ch = 52-60-68 dtr. Repeat 2nd, 3rd and 4th round until the sleeve measures 52-54-56 cm from the armhole – read measurement tips. Cut and sew the thread. Crochet edge: Crochet an edge around the circle and at the bottom of the sleeves with 2 strands Alpaca as follows: 1st. round: 1 dtr in the first dtr, *2 ch, skip 1.5 - 2 cm, 1 dtr in the next stitch*, repeat from *-* and finish with 2 ch and a sl st in the first dtr. 2nd. round: 2 dtr in the first dtr, *4 ch, 2 dtr in the same dtr, 1 ch, 2 dtr in the next dtr* and finish with 4 ch, 2 dtr in the same dtr, 1 ch and 1 sl st in the first dtr. Cut and sew the thread. Button cover: Crochet 2 ch with 2 strands Alpaca and then crochet 6 dc in the first of the 2 ch and finish round with a sl st in the first dc (= 1st round). 2nd round: 1 ch, crochet 2 dc in each dc and finish with a sl st at beg. of round (= 12 dc) 3rd + 4th round: 1 ch, 1 dc in each dc and finish with a sl st at beg. of round (= 12 dc). 5th. round: 1 ch, crochet 1 dc in every other dc and finish with a sl st at beg. of round (= 6 dc). Put the button inside the cover, sew around and pull tight. Try on the jacket and place the buttons in the waist on the left side of the jacket in the penultimate round. |
|
|
|
|
Have you made this or any other of our designs? Tag your pictures in social media with #dropsdesign so we can see them! Do you need help with this pattern?You'll find tutorial videos, a Comments/Questions area and more by visiting the pattern on garnstudio.com. © 1982-2024 DROPS Design A/S. We reserve all rights. This document, including all its sub-sections, has copyrights. Read more about what you can do with our patterns at the bottom of each pattern on our site. |
|


With over 40 years in knitting and crochet design, DROPS Design offers one of the most extensive collections of free patterns on the internet - translated to 17 languages. As of today we count 304 catalogues and 11422 patterns - 11422 of which are translated into English (UK/cm).
We work hard to bring you the best knitting and crochet have to offer, inspiration and advice as well as great quality yarns at incredible prices! Would you like to use our patterns for other than personal use? You can read what you are allowed to do in the Copyright text at the bottom of all our patterns. Happy crafting!
Comments / Questions (501)
This is my first time ever trying something like this, usually only make doilies, not clothing, when your piece measure correct size,,,,, do you end off, (cut thread) and then join for armholes?,,,,,,,, sorry,,,,,,,,,,, just learning.
31.10.2018 - 01:34DROPS Design answered:
Hi Betty, Yes you cut the strand when you have finished the body and start the sleeves with a new strand. Happy crocheting!
31.10.2018 - 08:04For the M/L size it says to ch 30 for the 2nd arm opening then to ch ANOTHER 2. Why? What do you do with them in the next round? I obtain the correct stitch count for that round, but cannot get the 256 for rnd 14. Help would be appreciated . Thank you.
16.09.2018 - 21:00DROPS Design answered:
Dear Stephanie, the 30 chains are for the armhole, you then continue pattern with (2 ch, 3 tr in the next tr) so that the pattern match around on this round and on next round. Happy crocheting!
17.09.2018 - 09:39Ik ben bij rij 12. Nu wil armsgaten maken voor maat L. HIer gaat het naar rij 13. Houd het in dat ik eerst rij 12 van maat S moet haken en daarna rij 13 van maat L? Ik kom er even niet uit
24.07.2018 - 17:03DROPS Design answered:
Dag Anja, Ja, dat klopt Voor maat M/L beginnen de armsgaten op toer 13. Dus als er staat 'Begin nu voor maat XL met het maken van de armsgaten – lees de uitleg voor toer 14 en 15 hieronder!' dan ga je pas naar de paragraaf verderop waar omschreven staat hoe je de armsgaten maat voor maat M/L.
06.08.2018 - 11:30I have totally screwed up the armholes for this beautiful sweater!! M/L 13th round says 3tr in 1st tr, 30 chain, skip over (1yr and 3 ch) a total of 7 times. So I have a series of 7 loops of 30 ch on each side of my circle!!! Where did I go wrong???!!!!
19.07.2018 - 04:27DROPS Design answered:
Dear Mrs Vann, on 13th round you will create armholes skipping sts and chaining 30 chains a total of 2 times, ie skip (1 tr, 3 chains) a total of 7 times = 7 trebles will be skipped, chain 30 and continue with 3 tr in next tr, then work *2 ch, 3 tr in next tr* a total of 15 times then repeat armhole: chain 30 and skip the next (1 tr, 3 ch x 7 = 7 tr) and continue with 3 tr in next tr, then (2 ch, 3 tr in next tr) to the end of round. Happy crocheting!
19.07.2018 - 09:33Is this pattern available in toddler and child sizes...if not can you direct me to a similar pattern for kids?
11.07.2018 - 21:16DROPS Design answered:
Dear Mrs Woll, you will find here crocheted circle jackets for kids. Happy crocheting!
12.07.2018 - 09:01Selena wrote:
Hi, my question is with the armhole for XL and ending row 14. I have gone all the way around for row 14 XL but am unsure how to join to the first set of 34 chain. Without joining this row to the beginning somehow row 15 doesn't finish right (or at least to me). Do you have a photo of these rows to help.
02.07.2018 - 07:23DROPS Design answered:
Dear Selena, at the beg of row 14, crochet first 4 chains (= 1st st at the beg of row), then crochet the 34 chains for the first armhole, continue as explained to the end of round and finish with 1 sl st in the 4th ch from beg of round. Happy crocheting!
02.07.2018 - 10:09Sally T wrote:
Is there a tutorial for this pattern? I seen to be having difficulty with the terminology Thanks Sally
28.06.2018 - 04:21DROPS Design answered:
Dear Sally, there is only written pattern to this jacket - you will find video showing how to crochet the different stitches - make sure you are reading the right English-language, US- and UK-crochet terminology are different - edit language under picture if necessary. Happy crocheting!
28.06.2018 - 08:47Hej Kan jag virka koftan med 2 trådar Drops Kid Silk istället för 2 trådar Alpaca?
23.06.2018 - 03:17DROPS Design answered:
Hei Pernilla. DROPS Alpaca og DROPS Kid Silk tilhører begge garngruppe A, og har samme strikkefasthet. Du kan derfor helt fint bytte ut disse med hverandre. Vær obs på at teksturen på plagget blir annerledes om du bruker Kid Silk, da dette garnet har en mer «hårete» tekstur enn Alpaca. Var også obs på at du overholder strikkefastheten: kjernetråden i Kid Silk er mindre enn Alpaca så det er fort gjort å hekle strammere. God fornøyelse.
25.06.2018 - 10:14Non mi è chiaro il giro 13 nella sezione scalfi per la taglia S.Dice"Lavorare come segue sulle 26 cat: * 3 m.a.d, 2 cat *, per un totale di 8 volte." ma 3 m.a.d in una catenella due catenelle salto qualcosa....oppure come? non lo riesco a visualizzare
15.06.2018 - 20:27DROPS Design answered:
Buonasera Micòl. Abbiamo modicato leggermente il testo: deve lavorare intorno alle catenelle e non in una catenella. Quindi intorno alla fila di 26 cat, ripete *3 m.a.d, 3 cat * per 8 volte. Buon lavoro!
15.06.2018 - 21:15Ik loop vast na toer 13. Er staat dan dat je voor XL door moet voor de armsgaten maar er staat 2 keer toer 14, 15 en 16. En daar onder ook weer toer 14, 15 en 16. Wanneer moet ik wat doen? Als ik met de armsgaten bezig ga na toer 13 kom ik niet uit.
11.05.2018 - 22:55DROPS Design answered:
Hallo Simone, Voor maat XL haak je vanaf toer 14 de armsgaten en daarvoor lees je het stuk onder 'Maat XL: Haak de armsgaten volgens toer 14 hieronder'. Tot en met toer 13 en vanaf toer 16 haak je volgens de beschrijving in de alinea die boven 'Maak de armsgaten als volgt' staat. (In die paragraaf staan inderdaad ook toer 14 en 15 beschreven, maar die zijn voor de kleinere maten om mee verder te gaan nadat de armsgaten zijn gemaakt.)
12.05.2018 - 15:15