
Popular categories
Looking for a yarn?


|
|
Moonlight Mist |
|
 |
 |
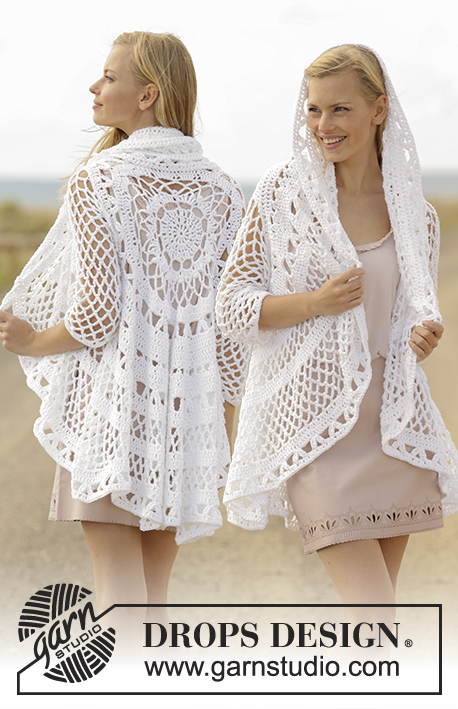
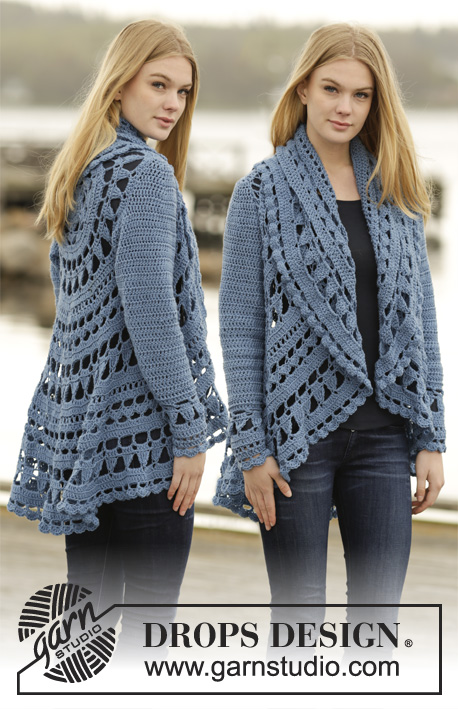
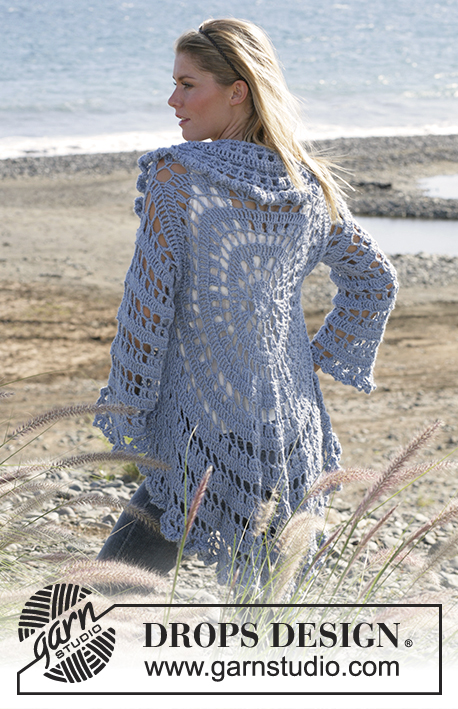
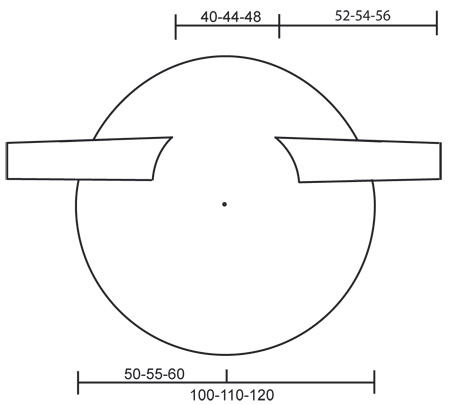
DROPS circle jacket crochet with 2 strands “Alpaca”. Sizes S-XL
DROPS 99-3 |
|
|
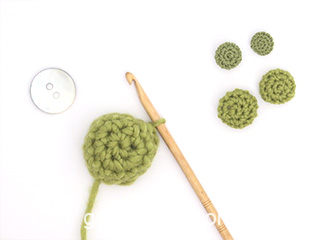
Crochet the jacket according to the explanations for the circle. Start to bind off for the armholes on the 12-13-14th round. Crochet 2 rounds according to the explanation for bind off for armholes, then continue to crochet according to explanation for the circle. Crochet gauge: 3 rows in the circle using hook size 6 mm [J/10] and 2 strands Alpaca should measure 6.5 cm [2⅝"]. After 5th round the circle should measure 20 cm [8"] in diameter. Crochet info: Substitute the first tr each round with 4 ch. Finish each round with a sl st at beg of round. Measurement tip: Because of the weight of the yarn, all measurements should be made whilst the garment is hanging, otherwise the sleeves will be too long when wearing the jacket. ------------------------------------------------------- CIRCLE Ch 4 with 2 strands Alpaca and make a ring with a sl st in the first ch. 1st round: Crochet 8 sc around the ring 2nd round: Read crochet info! Crochet 3 tr in each sc. Finish with a sl st at beg. of round = 24 tr 3rd round: Crochet 1 tr, *3 ch, skip 1 tr, 1 tr in the next tr*, repeat from *-* and finish with 3 ch and 1 sl st at the beg. of round = 12 tr. 4th round: Crochet 3 tr in the first tr *3 ch, skip 3 ch, 3 tr in the next tr*, repeat from *-* and finish with 3 ch, skip 1 tr and 1 sl st at beg. of round = 36 tr. 5th round: Crochet 1 tr in each tr and 3 tr in each ch-loop = 72 tr. The circle now measures approx. 20 cm [8"] in diameter. 6th round: Crochet 1 tr in the first tr, *3 ch, skip 1 tr, 1 tr in the next tr*, repeat from *-* and finish with 3 ch, skip 1 tr and a sl st at beg of round = 36 tr 7th round: Crochet 3 tr in the first tr,* 2 ch, skip 3 ch, 3 tr in the next tr*, repeat from *-* and finish with 2 ch, skip 3 ch and a sl st at beg of round = 108 tr. 8th round: Crochet 1 tr in each tr and 1 tr in each ch-loop = 144 tr. 9th round: Crochet 1 tr in the first tr, *3 ch, skip 2 tr, 1 tr in the next tr*, repeat from *-* and finish with 3 ch, skip 2 tr and a sl st at beg of round = 48 tr 10th round: Crochet 3 tr in the first tr *1 ch, 3 tr in the next tr*, repeat from *-* and finish with 1 ch and a sl st at beg of round = 144 tr. 11th round: Crochet 1 tr in each tr and 1 tr in each ch-loop = 192 tr. Remember to bind off for armholes for size S/M – read bind off explanation for round 12 and 13 below! 12th round: *1 tr, 3 ch, skip 2 tr*, repeat from *-* until finish round = 64 tr. Remember to bind off for armholes for size M/L – read bind off explanation for round 13 and 14 below! 13th round: 3 tr in the first tr, *2 ch, 3 tr in the next tr*, repeat from *-* = 192 tr. Remember to bind off for armholes for size XL – read bind off explanation for round 14 and 15 below! 14th round: 1 tr in each tr, 1 tr in each ch-loop = 256 tr. 15th round: 1 tr in the first tr, *3 ch, skip 2 tr, 1 tr in the next tr*, repeat from *-* until finish round = 86 tr. 16th round: 3 tr in the first tr, *2 ch, 2 tr in the next tr, 2 ch, 3 tr in the next tr*, repeat from *-* until finish round = 215 tr. Repeat round 14, 15 and 16 with inc. until the circle measures 100-110-120 cm [39⅜"-43⅜"-47 ¼"] in diameter. BIND OFF for armholes as follows: Size S/M: Crochet armholes according to round 12 below. 12th round: Crochet 1 tr, 26 ch, skip over 26 tr, *1 tr, 3 ch, skip over 2 tr*, repeat from *-* a total of 14 times, 1 tr, 26 ch, skip 26 tr, *1 tr, 3 ch, skip 2 tr*, repeat from *-* until finish round = 48 tr. 13th round: Crochet as follows over the 26 ch’s: *3 tr, 2 ch*, a total of 8 times. Over the tr crochet as follows: *3 tr in each tr, 2 ch*, repeat from *-* = 192 tr. Continue on round 14 as explained above. Size M/L: Crochet arm holes according to round 13 below. 13th round: 3 tr in the first tr, 30 ch, skip over (1 tr and 3 ch) a total of 7 times, 3 tr in the following tr, *2 ch, 3 tr in the next tr*, repeat from *-* a total of 15 times, 30 ch, skip over (1 tr and 3 ch) a total of 7 times, *2 ch, 3 tr in the next tr*, repeat from *-* until finish round = 150 tr. 14th. round: Crochet as follows over the 30 ch’s: 28 tr. Over the tr and the ch-loops crochet as follows: 1 tr in each tr, 1 tr in each ch-loop = 256 tr. Continue on round 15 as explained above. Size XL: Crochet the armholes according to round 14 below: 14th round: 34 ch, skip over (3 tr and 2 ch) a total of 8 times, *1 tr in each of the next 3 tr, 1 tr in the next ch-loop*, repeat from *-* a total of 16 times, 34 ch, skip over (3 tr and 2 ch) a total of 8 times *1 tr in each of the next tr, 1 tr in the next ch-loop*, repeat from *-* until finish round = 192 tr. 15th round: Crochet as follows over the 34 ch: *1 tr, 3 ch*, repeat from *-* a total of 11 times. Over tr crochet as follows: 1 tr, *3 ch, skip over 2 tr, 1 tr in the next tr*, finish with a tr in the last tr = 86 tr. Continue on round 16 as explained above. SLEEVES: Crochet the sleeves from the armholes and down with 2 strands Alpaca. Crochet around. Remember the crochet info! 1st round: Crochet 52-60-68 tr around the armhole from the circle and finish with a sl st in the first tr from beg. of round. 2nd round: Crochet 1 tr in the first tr, *3 ch, skip over 3 tr, 1 tr in the next tr*, repeat from *-* and finish with: Skip over 3 ch and 1 sl st in the first tr = 13-15-17 tr. 3rd round: Crochet 2 tr in the first tr, *1 ch, skip over 3 ch, 2 tr in the next tr*, repeat from *-* and finish with: 1 ch and 1 sl st in beg. of round = 26-30-34 tr. 4th round: Crochet 1 tr in each tr and 2 tr around each ch = 52-60-68 tr. Repeat 2nd, 3rd and 4th round until the sleeve measures 52-54-56 cm [20½"-21 ¼"-22"] from the armhole – read measurement tips. Cut and sew the thread. Crochet edge: Crochet an edge around the circle and at the bottom of the sleeves with 2 strands Alpaca as follows: 1st round: 1 tr in the first tr, *2 ch, skip 1.5 - 2 cm [½"-¾"], 1 tr in the next stitch*, repeat from *-* and finish with 2 ch and a sl st in the first tr. 2nd round: 2 tr in the first tr, *4 ch, 2 tr in the same tr, 1 ch, 2 tr in the next tr* and finish with 4 ch, 2 tr in the same tr, 1 ch and 1 sl st in the first tr. Cut and sew the thread. Button cover: Ch 2 with 2 strands Alpaca and then crochet 6 sc in the first of the 2 ch and finish round with a sl st in the first sc (= 1st round). 2nd round: 1 ch, crochet 2 sc in each sc and finish with a sl st at beg. of round (= 12 sc) 3rd + 4th round: 1 ch, 1 sc in each sc and finish with a sl st at beg. of round (= 12 sc). 5th round: 1 ch, crochet 1 sc in every other sc and finish with a sl st at beg. of round (= 6 sc). Put the button inside the cover, sew around and pull tight. Try on the jacket and place the buttons in the waist on the left side of the jacket in the penultimate round. |
|
|
|
|
Have you made this or any other of our designs? Tag your pictures in social media with #dropsdesign so we can see them! Do you need help with this pattern?You'll find tutorial videos, a Comments/Questions area and more by visiting the pattern on garnstudio.com. © 1982-2024 DROPS Design A/S. We reserve all rights. This document, including all its sub-sections, has copyrights. Read more about what you can do with our patterns at the bottom of each pattern on our site. |
|


With over 40 years in knitting and crochet design, DROPS Design offers one of the most extensive collections of free patterns on the internet - translated to 17 languages. As of today we count 304 catalogs and 11422 patterns - 11417 of which are translated into English (US/in).
We work hard to bring you the best knitting and crochet have to offer, inspiration and advice as well as great quality yarns at incredible prices! Would you like to use our patterns for other than personal use? You can read what you are allowed to do in the Copyright text at the bottom of all our patterns. Happy crafting!
Comments / Questions (501)
The picture above of the moonlight mist is lovely but I have seen another picture of one in blue which looks different not so flared and tighter Why are they different Thank u
08.06.2019 - 17:47DROPS Design answered:
Dear Clare, I am affraid we are not able to specify the difference as we do not know the second picture which you have seen. There might be another crocheting gauge or type of sitches used, which could make the final difference. Feel free to try and see what will look better for you. Happy crocheting!
08.06.2019 - 19:53On s/m on case off round 13 Do I change 4 then 2 dtr in same stitch then ch2 then do 8 x 3dtr ch 2 or is it 7 x over the arm hole or do I go in the chains Or do Thank u
07.06.2019 - 12:03DROPS Design answered:
Dear Clare, start round 13 with 4 chains (= 1st dtr), then crochet 2 dtr, 2 chains, *3 dtr, 2 ch* a total of 7 times (= 8 times in total around the 26 chains, and work *3 dtr in each dtr, 2 ch* between armholes - work 2nd armhole with *3 dtr, 2 ch* x 8. Happy crocheting!
07.06.2019 - 13:00I not sure which size to make s/m or m/l as in between sizes how do I decided what size to make I have right tension and wool Thank U
06.06.2019 - 20:51DROPS Design answered:
Hi Clare, There is a diagram at the bottom of the pattern with the measurements for each size. Happy crocheting!
07.06.2019 - 07:23Bonjour, J'aimerais savoir ce que signifie "sauter 1,5 - 2 cm" dans la bordure. Est-ce laisser 1.5 cm de fil avant de faire la DB ? ou est-ce laisser 1.5 cm de travail avant de faire la DB ? Merci d'avance pour votre réponse
07.05.2019 - 13:50DROPS Design answered:
Bonjour Élisabeth, après chaque DB, on crochète 2 mailles en l'air et on va sauter 1,5 à 2 cm environ (soit approximativement la largeur équivalente aux 2 mailles en l'air) puis crocheter 1 double-bride dans la double-bride suivante (on doit donc avoir de 1,5 à 2 cm entre chaque double-bride = largeur de l'arceau de 2 ml). Bon crochet!
07.05.2019 - 16:15Bonjour, pouvons nous adapter ce modèle en taille enfant si oui comment puis je faire merci infiniment pour votre réponse
01.05.2019 - 22:28DROPS Design answered:
Bonjour Mme Fournier, nous ne sommes pas en mesure de pouvoir adapter chaque modèle à chaque demande, toutefois, ces modèles pourront vous inspirer. Pour toute assistance complémentaire, merci de bien vouloir contacter votre magasin DROPS, même par mail ou téléphone. Bon crochet!
02.05.2019 - 09:51Je comprends pas comment faire R 15 : au dessus des 34 ml faire : *1DB, 3ml* répéter de *à* 11 fois ; au dessus des 34 ml veut dire dans ces ml ou bien vraiment dans celles en haut d'elles? J'espère que vous comprenez ma question? Merci beaucoup
24.03.2019 - 00:25DROPS Design answered:
Bonjour Mme Parent, vous allez crocheter autour de l'arceau de 34 ml de chacune des emmanchures (pas en piquant dans les mailles en l'air, mais bien autour des mailles en l'air). Quand vous ferez les manches par la suite, vous crochèterez entre ces mailles. Bon crochet!
25.03.2019 - 11:14Buongiorno Sono arrivata all’undicesimo giro per una taglia S/M e sono andata al dodicesimo giro dove ci sono le istruzioni per lo scalfo. Ho le 192 maglie alte di cui parli ma poi parto con la maglia alta doppia e le 26 catenelle eccc.. ma arrivo dopo le seconde 26 catenelle che non ho le 48 m.alte doppie di cui parli. Dove sbaglio?
13.03.2019 - 07:31DROPS Design answered:
Buongiorno Elena. Al giro 12, per la taglia S, lavora così: lavora 1 m.a.d, 26 cat, salta 26 m.a.d, ripete(1 m.a.d, 3 cat, salta 2 m.a.d) per 14 volte. Fino a qui ha lavorato su 69 m.a.d del giro precedente e ci sono 15 m.a.d sul nuovo giro. Lavora 1 m.a.d, 26 cat, salta 26 m.a.d. Ha quindi lavorato su 96 m.a.d del giro precedente. Ne rimangono 192-96=96. Su queste ripete (1 m.a.d, 3 cat, salta 2 m.a.d) per 32 volte. Ha lavorato su tutte le m.a.d del giro precedente e, alla fine del giro 12, ha 48 m.a.d. Buon lavoro!
13.03.2019 - 12:44Beste, Misschien een rare vraag ... Ik begin nu aan toer 9. Is het de bedoeling dat de ronde mooi plat kan liggen? Bij mijn werk rimpelt het wat, alsof het niet strak genoeg is, maar ik weet niet of dit normaal is of als ik te los werk? Alvast bedankt 😊 Annick
08.03.2019 - 16:42DROPS Design answered:
Dag Annick,
De cirkel hoeft niet plat te zijn (op de foto zie je ook dat het achterpand een beetje golft aan de onderkant). Als de stekenverhouding in de breedte en de hoogte klopt, dan komt het goed.
15.03.2019 - 18:47Ik wil heel graag het patroon van het vel gekleurde mandela vest in het Nederlands. Vanzelfsprekend betaal ik daarvoor. Met vriendelijke groeten Nel Pol
18.02.2019 - 11:43DROPS Design answered:
Dag Nel,
Al onze patronen zijn gratis en als er een patroon nog niet vertaald is in het Nederlands kun je dat inderdaad aangeven, zodat deze nog vertaald kan worden. Kun je aangeven om welk patroon het precies gaat, door het patroonnummer door te geven? Als je bedoelt dat je een afdruk van het patroon wilt, dan kun je dat met de knop 'Patroon' doen. Deze vindje bovenaan de Instructies voor het patroon.
22.02.2019 - 14:59Please tell me if your patterns have classifications like beginner or intermediate somewhere in the pattern or on your site??
12.01.2019 - 03:26DROPS Design answered:
Dear Faye, sory to say, but we do not classify our patterns according to the necessary skill level. I hope that you still find patterns you might want to try. If you have questions about particular patterns, we will be happy to answer. Happy crafting!
12.01.2019 - 15:19